
Weider Pro 9635 Support Question
Weider Pro 9635 Support Question
Find answers below for this question about Weider Pro 9635.Need a Weider Pro 9635 manual? We have 2 online manuals for this item!
Current Answers
Related Weider Pro 9635 Manual Pages
English Manual - Page 2
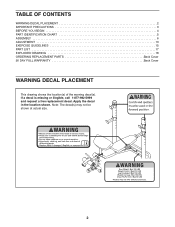
... not be shown at actual size.
2 Apply the decal in the location shown. If a decal is missing or illegible, call 1-877-992-5999 and request a free replacement decal. TABLE OF CONTENTS
WARNING DECAL PLACEMENT 2 IMPORTANT PRECAUTIONS 3 BEFORE YOU BEGIN 4 PART IDENTIFICATION CHART 5 ASSEMBLY 6 ADJUSTMENT 13 EXERCISE GUIDELINES 15 PART LIST 17 EXPLODED...
English Manual - Page 4
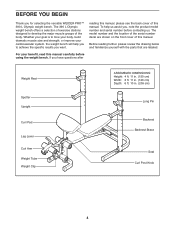
...you for selecting the versatile WEIDER PRO™ 390 L Olympic weight ...Backrest Brace
Seat Curl Post Knob
4 The 390 L Olympic weight bench offers a selection of exercise stations designed to develop the major muscle groups of this manual, please see the back cover... you to tone your body, build dramatic muscle size and strength, or improve your benefit, read this manual. For your cardiovascular system,...
English Manual - Page 6

... sure that the square holes are facing the floor. Do not tighten the Locknuts yet. ASSEMBLY
• Assembly requires two persons.
• Because of its size and weight, assemble the weight bench in a cleared area and remove the packing materials.
To make assembly easier, read the tips at
1
the top of...
English Manual - Page 2

.... TABLE OF CONTENTS
IMPORTANT PRECAUTIONS 3 BEFORE YOU BEGIN 4 ASSEMBLY 5 HOW TO USE THE HOME GYM SYSTEM 22 WEIGHT RESISTANCE CHART 24 TROUBLESHOOTING AND MAINTENANCE 25 CABLE DIAGRAMS 26 ORDERING REPLACEMENT PARTS Back Cover LIMITED WARRANTY Back Cover Note: A PART IDENTIFICATION CHART and a PART LIST/EXPLODED DRAWING are attached to the center...
English Manual - Page 3

...health problems. Read all of the owner to ensure that the cables remain on a foot plate when performing an exercise that the cables are exercising, stop immediately and begin cooling down. Make sure that all... your physician. Cover the floor beneath the home gym system to tip.
12. If the cables bind while you are on a level surface. tions before using . Your hand could cause ...
English Manual - Page 4
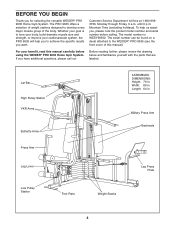
...number is to tone your body, build dramatic muscle size and strength, or improve your cardiovascular system, the PRO 9635 will help us assist you have additional questions, please... Plate
4 To help you to achieve the specific results you for selecting the versatile WEIDER® PRO 9635 Home Gym System.
Customer Service Department toll-free at 1-800-9993756, Monday through Friday, 6 ...
English Manual - Page 5
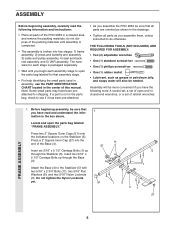
... two 5/16" Nylon Locknuts (3). Before beginning assembly, be needed. Press a 2" Square Inner Cap (27) into five stages: 1) frame assembly, 2) press and butterfly arm assembly, 3) cable and pulley assembly, 4) seat and backrest assembly, and 5) VKR assembly. If a part is broken into the end of the PRO 9635 in the drawings.
• Tighten all parts as...
English Manual - Page 11
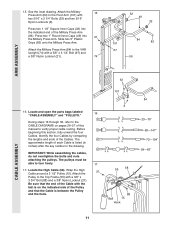
...36, refer to the VKR
Upright (74) with the
ball is on pages 26-27 of each Cable is between the Pulley
and the hook.
3
55
58
88
Ball
15
Hook
84
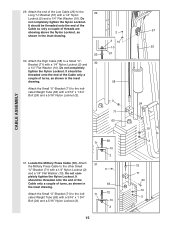
23-79" .... The approximate length of this section, fully unwind the four Cables. Wrap the High
21
Cable around a 3 1/2" Pulley (15). IMPORTANT: While assembling the cables,
do not overtighten the bolts and nuts
attaching the pulleys....
English Manual - Page 12
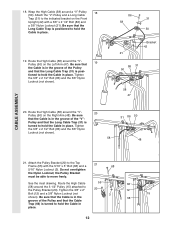
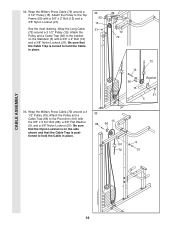
...) and
a 3/8" Nylon Locknut (21). tioned to
the Pulley Bracket (20). Tighten
the 3/8" x 2 1/2" Bolt (86) and the 3/8" Nylon
Locknut (not shown).
58
31 86 50 48
CABLE ASSEMBLY
21. Tighten the 3/8" x 2"
20
12
Bolt (12) and a 3/8" Nylon Locknut (not shown). Do not overtighten
the Nylon Locknut; Tighten
the 3/8" x 2 1/2" Bolt (86) and the...
English Manual - Page 13
...
22
66 21 57
23 55
58 15
12 57
Bracket 58
15 58
12 15
CABLE ASSEMBLY
21
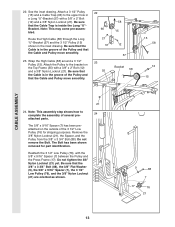
24. Remove the 3/8" Nylon Locknut (21), the Spacer, and the Pulley ...Nylon Locknut (21). 22. See the inset drawing. Be sure that the Cable is in the groove of the 3 1/2" Low Pulley (76) for part identification. Be sure that the Cable is in the groove of several pre-
24
attached parts.
The 5/8" x...
English Manual - Page 14
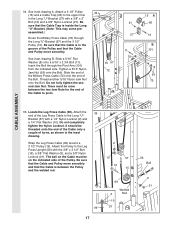
...3 3/4" Bolt (88).
23 15
88 66
42 Inset shows view from other side
14 Be sure that the
15 42
Cable is routed around the 3 1/2" Pulley (15) attached to the upper hole in the
27
Press Frame (17). Tighten the... view from other side 23
27. Be sure that the Cable Trap (66) is turned to hold the Cable in
place and that the Cable is routed around the 3 1/2" Pulley (15) attached to...
English Manual - Page 15
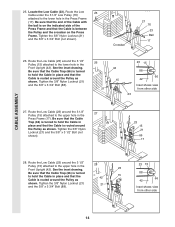
... turns, as shown in the inset drawing.
23
30. It should be
threaded onto the end of the Cable only a
couple of the Low Cable (23) to the indicated Weight Tube (63) with a 5/16" x 1 3/4" Bolt (24) and... 63
58 71
10 2
31. Do not com- It
should be threaded onto the end of the
Cable only a couple of threads are
showing above the Nylon Locknut, as shown in the inset
drawing. Attach ...
English Manual - Page 16
... (5) with a 3/8" x 2" Bolt (12) and a 3/8" Nylon Locknut (21). See the inset drawing. Attach the Pulley to hold the Cable in place.
33 15
88 66
9 101
72
21
CABLE ASSEMBLY
16
Be sure that the Cable Trap is turned to the Pivot Arm (101) with a 3/8" x 2" Bolt (12) and a 3/8" Nylon Locknut (21). Wrap the Military...
English Manual - Page 17
... Nut. Attach the
35
end of turns, as shown in the Long "U"-Bracket (57) with a 1/4" Nylon Locknut (2) and
a 1/4" Flat Washer (10). Be sure that the Cable and Pulley move smoothly. Locate the Leg Press Cable (99). Do not completely
tighten the Nylon Locknut. It should be
threaded onto the end of the...
English Manual - Page 21
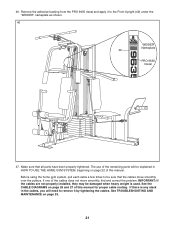
... parts will need to remove it to be sure that all parts have been properly tightened. IMPORTANT: If the cables are not properly installed, they may be explained in the cables, you will...the PRO 9635 decal and apply it by tightening the cables. The use of the cables does not move smoothly over the pulleys. See the CABLE DIAGRAMS on page 25.
21 Make sure that the cables move ...
English Manual - Page 22
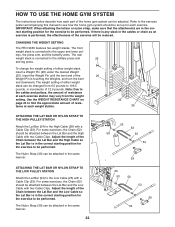
... accompanying this manual to be performed. CHANGING THE WEIGHT SETTING
The PRO 9635 features two weight stacks.
For some exercises, the Chain (52) should be attached between the Lat Bar and the Low Cable with two Cable Clips. For some exercises, the Chain (52) should be adjusted.
IMPORTANT: When attaching the lat bar or nylon strap...
English Manual - Page 23
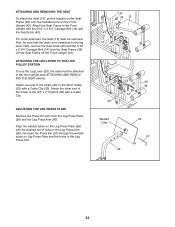
...23
Re-insert the Press Pin (97) through the welded tubes on the Front Upright (42). For some exercises, the Seat (13) must be attached to the front upright (see ATTACHING AND REMOVING THE SEAT above).... Leg Lever (29), the seat must be sure that the chain is not attached to the Short Cable (23) with a Cable Clip (53). Align the welded tubes on the Leg Press Plate (95) with the desired set ...
English Manual - Page 24
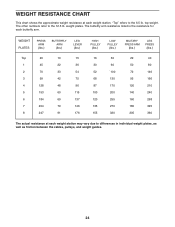
... arm resistance listed is the resistance for each weight station may vary due to differences in individual weight plates, as well as friction between the cables, pulleys, and weight guides.
24 WEIGHT RESISTANCE CHART
This chart shows the approximate weight resistance at each butterfly arm.
English Manual - Page 31
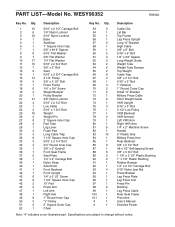
... Bushing Rubber Bumper 1/4" x 2 1/2" Carriage Bolt 5/16" Nylon Jam Nut Press Bracket Leg Press Plate Leg Press Arm Press Pin Bushing Leg Press Cable Rear Seat Frame Pivot Arm User's Manual Exercise Poster
Note: "#" indicates a non-illustrated part. Specifications are subject to change without notice. Qty.
1
10
2
6
3
33
4
1
5
1
6
1
7
1
8
8
9
7
10
17
11
10
12...
English Manual - Page 33
...-free at the center of this manual). The MODEL NUMBER of the product (WEIDER® PRO 9635 Home Gym System).
3. The SERIAL NUMBER of the product (see the PART LIST and EXPLODED...or consequential damages arising out of or in connection with the use , costs of merchantability or fitness for commercial or rental purposes; Accordingly, the above is not responsible or liable for a period ...
Similar Questions

Hello, Where Can I Find A Cable For My Welder Pro 9635 ? Thanks For Your Answer.
hello, where can I find a cable for my weider pro 9635 ? I have had it for few years and the cable f...
hello, where can I find a cable for my weider pro 9635 ? I have had it for few years and the cable f...
(Posted by Nathaliebrachet 4 years ago)


How To Install Cable And Pulley On Weider Pro 4850
can you help me install new weider pro 4850 cable and pulley?
can you help me install new weider pro 4850 cable and pulley?
(Posted by verrolburnett 8 years ago)


Cam You Help Me Install The Weirder Pro 9648 Cable?
I dont have the Weider Pro 9648 manual. I install the whole equipment, but having major problems wit...
I dont have the Weider Pro 9648 manual. I install the whole equipment, but having major problems wit...
(Posted by poncho1956 10 years ago)