
Weider Pro 9635 Support Question
Weider Pro 9635 Support Question
Find answers below for this question about Weider Pro 9635.Need a Weider Pro 9635 manual? We have 2 online manuals for this item!
Question posted by Nathaliebrachet on September 16th, 2019
Hello, Where Can I Find A Cable For My Welder Pro 9635 ? Thanks For Your Answer.
hello, where can I find a cable for my weider pro 9635 ? I have had it for few years and the cable for pulling the weights broke Thanks for your answer.Nathalie
Current Answers
Answer #1: Posted by Odin on September 16th, 2019 6:41 AM
Odin

Member since:
April 10th, 2010 Points: 41,236,710

Member since:
April 10th, 2010 Points: 41,236,710
If you can't get what you seek from the manufacturer [use the contact information at https://www.contacthelp.com/weider/customer-service], request a part number. Then (with a part number if possible) try http://www.cablestogo.com/. If no resolution, try https://encompass.com/; use a search engine like Google's or Yahoo's; or try http://www.searchtempest.com/*, which displays global listings from eBay, Craigslist, and other sources.
*For SearchTempest, you may want to use a free tracking program like https://www.followthatpage.com/ to save you from having to repeat your search over time.
*For SearchTempest, you may want to use a free tracking program like https://www.followthatpage.com/ to save you from having to repeat your search over time.
Hope this is useful. Please don't forget to click the Accept This Answer button if you do accept it. My aim is to provide reliable helpful answers, not just a lot of them. See https://www.helpowl.com/profile/Odin.
Related Weider Pro 9635 Manual Pages
English Manual - Page 4
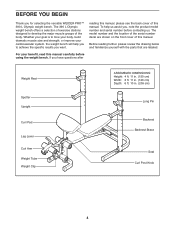
...carefully before contacting us assist you for selecting the versatile WEIDER PRO™ 390 L Olympic weight bench. For your cardiovascular system, the weight bench will help us . Before reading further, please ... YOU BEGIN
Thank you , note the product model number and serial number before using the weight bench. reading this manual, please see the back cover of exercise stations designed to...
English Manual - Page 13
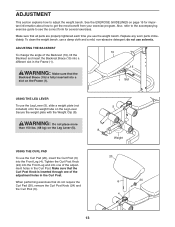
... (8). ADJUSTING THE BACKREST
To change the angle of the adjustment holes in the Frame (1). Also, refer to the accompanying exercise guide to adjust the weight bench.
WARNING: Make sure that the Curl Post Knob is fully inserted into a different slot in the Curl Post. Make sure that the
Backrest Brace (...
English Manual - Page 2
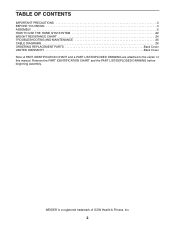
... CHART and the PART LIST/EXPLODED DRAWING before beginning assembly. WEIDER is a registered trademark of this manual. TABLE OF CONTENTS
IMPORTANT PRECAUTIONS 3 BEFORE YOU BEGIN 4 ASSEMBLY 5 HOW TO USE THE HOME GYM SYSTEM 22 WEIGHT RESISTANCE CHART 24 TROUBLESHOOTING AND MAINTENANCE 25 CABLE DIAGRAMS 26 ORDERING REPLACEMENT PARTS Back Cover LIMITED WARRANTY Back...
English Manual - Page 3
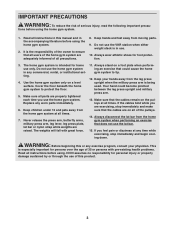
...the home gym system are on a foot plate when performing an exercise that the cables remain on a level surface. Cover the floor beneath the home ...cables are adequately informed of this or any exercise program, consult your hands away from the home gym system at any time while exercising, stop immediately and make sure that does not use only. Do not use the VKR station when either weight...
English Manual - Page 4
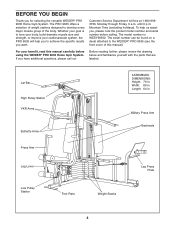
...Weight Stacks
Leg Press Plate
4
The model number is to the WEIDER® PRO 9635 (see the front cover of the body. until 6 p.m. Mountain Time (excluding holidays). The PRO 9635 offers a selection of weight... Width: 89 in . BEFORE YOU BEGIN
Thank you , please note the product model number and serial number before using the WEIDER® PRO 9635 Home Gym System. To help you to ...
English Manual - Page 5
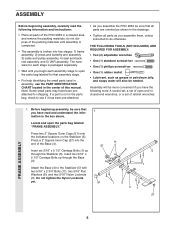
...if you have the following information and instructions:
• Place all parts of the PRO 9635 in the center of ratchet wrenches. Press two 2" Square Outer Caps (51) onto...
• The assembly is broken into five stages: 1) frame assembly, 2) press and butterfly arm assembly, 3) cable and pulley assembly, 4) seat and backrest assembly, and 5) VKR assembly.
Insert six 5/16" x 2 1/2" Carriage...
English Manual - Page 10
...the Nylon Locknut yet.
13
86
31
50 Welded Brackets
31 50
47 21
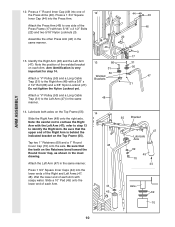
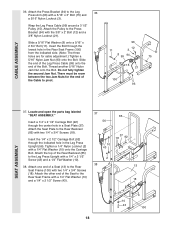
Attach a "V"-Pulley (50) and a Long Cable
Trap (31) to confuse the Right Arm with a 3/8" x 2 1/2" Bolt (86) and a 3/8" Nylon Locknut ...(47) in the same
48
manner.
14. ARM ASSEMBLY
12. Attach a "V"-Pulley (50) and a Long Cable Trap (31) to identify the Right Arm. Identify the Right Arm (48) and the Left Arm (47). Press...
English Manual - Page 12
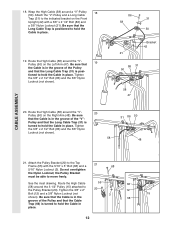
... turned to the indicated bracket on the Left Arm (47). Do not overtighten
the Nylon Locknut; Pulley and that the Long Cable Trap (31) is posi- 18. Wrap the High Cable (58) around the "V"Pulley (50) on the Front
Upright (42) with the 5/16" x 5" Bolt (68) and a
68
5/16" Nylon Locknut (3). Be...
English Manual - Page 13
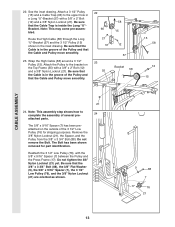
... 3/8" x 2" Bolt (12) and a 3/8" Nylon Locknut (21).
Attach a 3 1/2" Pulley (15) and a Cable Trap (66) to the bracket on the outside of several pre-
24
attached parts.
The Bolt has been shown removed for... shipping purposes. Route the High Cable (58) through the Long "U"-Bracket (57) and the 3 1/2" Pulley (15) shown in...
English Manual - Page 14
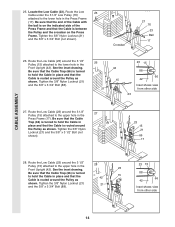
... Tighten the 3/8" Nylon
Locknut (21) and the 3/8" x 3 1/2" Bolt (not
shown).
23 15 21
66 17
28. Route the Low Cable (23) around
the Pulley as
shown. Route the Low Cable (23) around the Pulley as shown. CABLE ASSEMBLY
25. Tighten the 3/8" Nylon Locknut (21)
and the 3/8" x 3 3/4" Bolt (not shown). Route the Low
25...
English Manual - Page 15
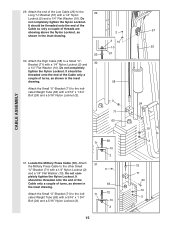
... end of turns, as shown in
63
the inset drawing. It should be
threaded onto the end of the Cable only a
couple of the Low Cable (23) to the indi-
71
72
cated Weight Tube (63) with a 5/16" x 1 3/4"
Bolt (24) and a 5/16" Nylon Locknut (3).
10
2
15
57 23
24
10 2
72 71
24...
English Manual - Page 17
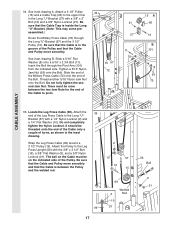
...
17
99
Welded
2
Rod
10
57
56 Ball
9 21
Be sure that the Cable and Pulley move smoothly and that the Cable Trap is between the two Jam Nuts for the end of the Bolt. Tighten ... Jam Nut (93) onto the Bolt. Attach the
35
end of the Pulley and that the Cable is in the groove of the Leg Press Cable to the upper hole
in the inset
drawing. Bracket (57) with a 3/8" x 2"
Bolt ...
English Manual - Page 18
..." Nylon Jam Nut onto the Bolt. Locate and open the parts bag labeled "SEAT ASSEMBLY." There must be room between the two Jam Nuts for cable adjustment.) Tighten a 5/16" Nylon Jam Nut (93) onto the Bolt. Tighten a 1/4" Nylon Locknut (2) with a 1/4" Flat Washer (10) onto the Carriage Bolt.
Slide a 5/16" Flat Washer...
English Manual - Page 21
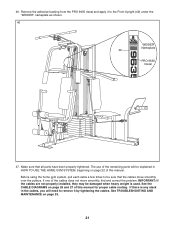
.... If one of this manual for proper cable routing. IMPORTANT: If the cables are not properly installed, they may be sure that all parts have been properly tightened. Before using the home gym system, pull each cable a few times to the Front Upright (42) under the "WEIDER" nameplate as shown.
46
WEIDER Nameplate 42 PRO 9635
Decal
47.
English Manual - Page 22
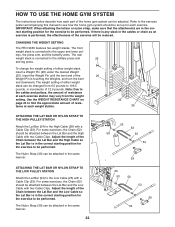
... THE WEIGHT SETTING
The PRO 9635 features two weight stacks.
tance at each weight station.
25 26
ATTACHING THE LAT BAR OR NYLON STRAP TO THE HIGH PULLEY STATION
Attach the Lat Bar (54) to
the cables and pulleys, the amount of resistance
at each exercise station may vary from 6.5 pounds to 106.5
pounds, in increments of...
English Manual - Page 23
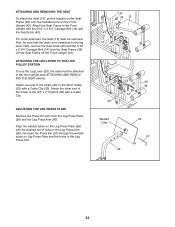
For some exercises, the Seat (13) must be removed. First, be sure that the chain is not attached to the front upright (see ATTACHING ... (40). ADJUSTING THE LEG PRESS PLATE
Remove the Press Pin (97) from the Seat Frame (36).
Attach the Seat Frame to the Short Cable (23) with the desired set the bracket on the Seat Frame (36) onto the indicated pins on the Front Upright (42). Next, remove...
English Manual - Page 24
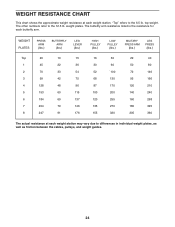
... in individual weight plates, as well as friction between the cables, pulleys, and weight guides.
24 "Top" refers to the 12.5 lb. The other numbers refer to the 6.5 lb. weight plates. The butterfly arm resistance listed is the resistance for each weight station. WEIGHT PLATES
PRESS ...
8
247
91
176
155
320
205
360
The actual resistance at each butterfly arm.
top weight.
English Manual - Page 25
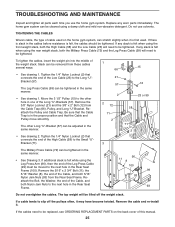
... can be tightened in the proper position and that connects the end of the weight stack. Remove the cable and re-install it may have become twisted. Slack can be tightened. If additional slack...slack in the same manner.
• See Drawing 3. Be sure that the Cable Trap is felt when using the rear weight stack, both Nylon Jam Nuts to be removed from the Rear Seat Frame. The...
English Manual - Page 31
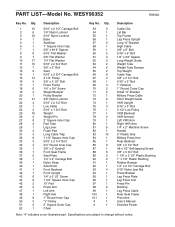
...Cable 3/8" x 8" Bolt 5/16" x 6" Bolt 1/2" x 3/4" Spacer Long Weight Guide Weight Tube Weight Tube Bumper Top Weight Cable Trap 3/8" x 3 1/4" Bolt 5/16" x 5" Bolt 1" Retainer 1" Round Cover Cap Small "U"-Bracket Military Press Cable Short Weight... Plate Leg Press Arm Press Pin Bushing Leg Press Cable Rear Seat Frame Pivot Arm User's Manual Exercise Poster
Note: "#" indicates a non-illustrated part....
English Manual - Page 33
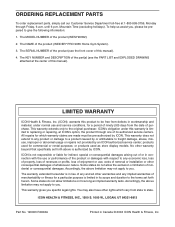
... or repairs not provided by an ICON authorized service center; LIMITED WARRANTY
ICON Health & Fitness, Inc. (ICON), warrants this manual).
4. All repairs for commercial or rental purposes;... The MODEL NUMBER of the product (WEIDER® PRO 9635 Home Gym System).
3. No other warranties and any implied warranties of merchantability or fitness for indirect, special or consequential damages ...
Similar Questions


I Need A Replacement Cable For My Welder Pro 8900 Do You Guys Carry One?
(Posted by mjdunkin21 3 years ago)


How Do You Keep Maintenance On The Welder Pro 9835?
(Posted by francismarcell4 10 years ago)