
Weider Pro 8900 Support Question
Weider Pro 8900 Support Question
Find answers below for this question about Weider Pro 8900.Need a Weider Pro 8900 manual? We have 1 online manual for this item!
Question posted by mjdunkin21 on February 16th, 2021
I Need A Replacement Cable For My Welder Pro 8900 Do You Guys Carry One?
The person who posted this question about this Weider product did not include a detailed explanation. Please use the "Request More Information" button to the right if more details would help you to answer this question.
Current Answers
Answer #1: Posted by waelsaidani1 on February 17th, 2021 12:20 AM
waelsaidani1

Member since:
May 12th, 2013 Points: 19,501,797

Member since:
May 12th, 2013 Points: 19,501,797
Hello the cable assembly is available here: https://www.fitnessrepairparts.com/equipment/Select/16194/Weider/Pro-8900-831.149230
Related Weider Pro 8900 Manual Pages
English Manual - Page 2
...
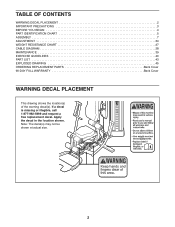
WARNING DECAL PLACEMENT 2 IMPORTANT PRECAUTIONS 3 BEFORE YOU BEGIN 4 PART IDENTIFICATION CHART 5 ASSEMBLY 7 ADJUSTMENT 34 WEIGHT RESISTANCE CHART 37 CABLE DIAGRAM 38 MAINTENANCE 39 EXERCISE GUIDELINES 40 PART LIST 43 EXPLODED DRAWING 45 ORDERING REPLACEMENT PARTS Back Cover 90-DAY FULL WARRANTY Back Cover
WARNING DECAL PLACEMENT
This drawing shows the location(s) of the...
English Manual - Page 3

... away from moisture and dust. Do not put the weight system in serious injury or death. Replace any exercise program, consult your weight sys- Never release the arms, leg lever, lat bar, handle,.... It is especially important for foot protection.
11. do not wear loose clothes that the cables remain on the pulleys at all times. Use the weight system only as described in a commercial...
English Manual - Page 4
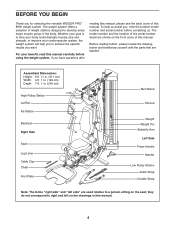
... your benefit, read this manual carefully before contacting us assist you want. If you for selecting the versatile WEIDER PRO™ 8900 weight system. Assembled Dimensions: Height: 6 ft. 11 in. (211 cm) Width: 4 ft. 1 in... cm)
High Pulley Station Lat Bar Ab Station
Backrest Right Side
Seat
Leg Lever Cable Clip Chain Foot Plate
Burn Band
Shroud
Weight Weight Pin Butterfly Arm
Left Side Press...
English Manual - Page 10
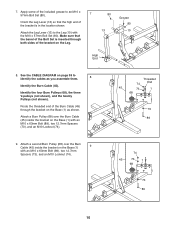
... the location shown. Make sure that the high end of the bracket is inserted through both sides of the Burn Cable (45) through the bracket on the Base (1) with an M10 x 63mm Bolt (89), two 12.7mm Spacers...Grease 80 10
High End
8. Route the threaded end of the bracket on page 38 to identify the cables as shown. Apply some of the included grease to the Leg (10) with an M10 x 63mm Bolt...
English Manual - Page 12
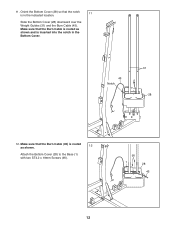
... into the notch in the indicated location.
11
Slide the Bottom Cover (28) downward over the Weight Guides (31) and the Burn Cable (45). Make sure that the Burn Cable (45) is routed as shown and is routed as shown.
12
Attach the Bottom Cover (28) to the Base (1) with two ST4...
English Manual - Page 13
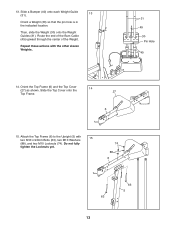
.... Attach the Top Frame (6) to the Upright (5) with the other eleven Weights.
31 45
30 Pin Hole
40
14. Route the end of the Burn Cable (45) upward through the center of the Weight. Slide the Top Cover onto the
14
27
Top Frame.
6
15. Then, slide the Weight (30) onto...
English Manual - Page 14
Note: For clarity, the Top Cover (27) is not shown.
17
Route the Burn Cable (45) over two Burn Pulleys (68).
Attach each Burn Pulley (68) to the Weight
16
Guides (31) with an M10 x 40mm Bolt (97) and an ...
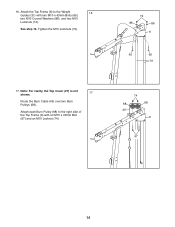
English Manual - Page 17
...69) to the bracket on the Leg Lever
22
(13). Route the Low Cable (43) over a Pulley (69) and through the bracket on the Base (1) over the Low Cable (43) with an M10 x 45mm Bolt (98) and an M10 Jam ...17
69 43 99
1 98 See drawing 24a. Route the Low Cable through the Leg (10).
23
Attach the Pulley (69) inside the Leg Lever (13) over the Low Cable (43) with an M10 x 63mm Bolt (89), two 12...
English Manual - Page 18
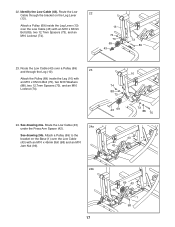
... of the Pulley.
69
83 71
43
88
18
17
26. Route the Low Cable (43) over a Pulley (69).
25
Attach the Pulley (69) and a Cable Trap (71) inside the Left and Right Press Arms (17, 18) with an... Arms (17, 18) with an M10 x 125mm Bolt (83) and an M10 Washer (88). Make sure that the Cable Trap is oriented to the bracket on the Base (1) with the M10 x 125mm Bolt (83) used in the
26
Base...
English Manual - Page 19
... Top Frame (6)
28
and over a Pulley (69).
29
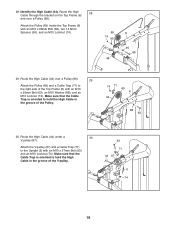
Attach the Pulley (69) and a Cable Trap (71) to hold the High Cable in the groove of the Top Frame (6) with an M10 x 93mm Bolt (63), an M10 ...Washer (88), and an M10 Locknut (74).
Attach the V-pulley (67) and a Cable Trap (71) to hold the High Cable in the groove of the Pulley.
74 71 69 6
44
88 63
30. Attach the Pulley (69...
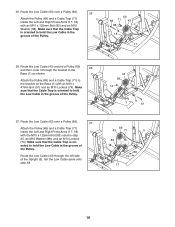
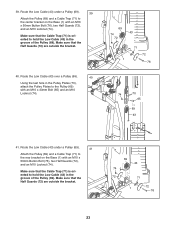
English Manual - Page 20
...Pulley Bracket (21) with an M10 x 47mm Bolt (91) and an M10 Locknut (74). Route the High Cable (44) around a Pulley (69).
32
Attach the Pulley (69) to the Left Butterfly Pulley Bracket (20) ... and an M10 Locknut (74).
33. Route the High Cable (44) around a Pulley (69).
31
Attach the Pulley (69) and a Cable Trap (71) to hold the High Cable in the groove of the Pulley.
74 71 69 21
44...
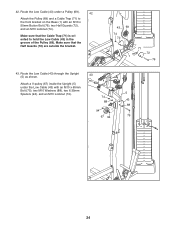
English Manual - Page 21
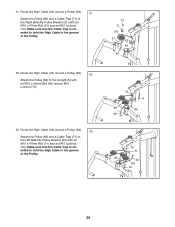
... side of the V-pulley. Note: For clarity, the Top Cover (27) is oriented to hold the High Cable in the groove of the Top Cover (27) as shown.
27 Slot
74 71
67 93 44 5
35...93) and an M10 Locknut (74).
Route the High Cable (44) under a V-pulley (67).
34
Attach the V-pulley (67) and a Cable Trap (71) to leave slack in the High Cable in this step.
35
Slide the Top Cover (not ...
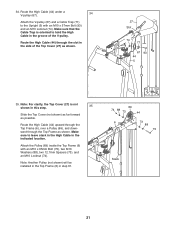
English Manual - Page 22
... the loop of the Pulley.
38 74 88
5
72 69
43 71
72
100
22 Make sure that the Cable Trap is oriented to the left side of the Upright (5) with an M10 x 43mm Bolt (65) and an... a Pulley (69). Make sure that the Cable Trap is oriented to the left side of the Pulley. Attach the Pulley (69) and a Cable Trap (71) to hold the Low Cable in the indicated location.
37. Using the second...
English Manual - Page 23
...the Half Guards (72) are outside the bracket.
69 43
74
72
71
1
72
76
23 Make sure that the Cable Trap (71) is oriented to the rear bracket on the Base (1) with an M10 x 43mm Bolt (65) and ... M10 Locknut (74).
69
74
43
72
71
72 1
76
74
70
65
69 43
41. Make sure that the Cable Trap (71) is oriented to the Pulley (69) with an M10 x 50mm Button Bolt (76), two Half Guards (72...
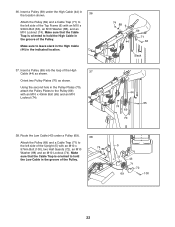
English Manual - Page 24
... under a Pulley (69).
42
Attach the Pulley (69) and a Cable Trap (71) to hold the Low Cable (43) in the groove of the Pulley (69). Make sure that the Cable Trap (71) is oriented to the front bracket on the Base (1) with... bracket.
43 69
74 72
71 72
1 76
43. 42. Route the Low Cable (43) under the Low Cable (43) with an M10 x 50mm Button Bolt (76), two Half Guards (72), and an M10 ...
English Manual - Page 25

... location.
44 A 45 32
45 B
30 32
37 30
25 Then, tighten the Nut (B) against the Burn Cable (45). Insert the Weight Selector (32) into the stack of Weights (30).
45
Lift the top Weight (30...) as shown.
44
Tighten the lower end of the Burn Cable (45).
Insert the threaded end of the High Cable (44) through the upper end of the Burn Cable (45) completely into the Weight Selector (32).
English Manual - Page 33
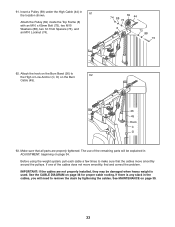
... High or Low Anchor (C, D) on page 34. If one of the remaining parts will be damaged when heavy weight is any slack in the cables, you will need to make sure that all parts are not properly installed, they may be explained in the location shown.
61
Attach the Pulley (69) inside...
English Manual - Page 34
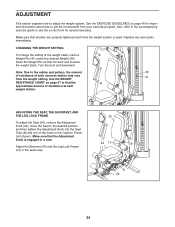
... Adjustment Knob (29), move the Seat to see the correct form for important information about how to the cables and pulleys, the amount
30
of resistance at each exercise station may vary from your exercise program. Replace any worn parts immediately.
Adjust the Backrest (25) and the Leg Lock Frame (12) in a hole. Also...
English Manual - Page 39
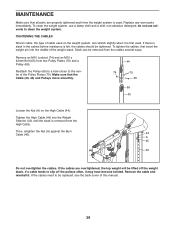
... off the weight stack. If there is slack in the cables before resistance is first used .
If the cables need to the center of this manual.
39
Replace any worn parts immediately. Reattach the Pulley (69) to a hole closer to be tightened. If the cables are properly tightened each time the weight system is removed...
English Manual - Page 48

..., day or night (U.S.A. and Canada)
www.sears.com
www.sears.ca
Our Home
For repair of carry-in material or workmanship within 90 days of the date of purchase, call or go on a product... apply when the WEIGHT SYSTEM EXERCISER is used commercially or for free repair (or replacement if repair proves impossible). This warranty gives you specific legal rights, and you need to do-it-yourself.
For...
Similar Questions

Need Replacement Seat Both Pieces For A 1500e Cross Bow Weider
need replacement seat. both pieces for a 1500e cross bow weider. I only have the longer seat but bro...
need replacement seat. both pieces for a 1500e cross bow weider. I only have the longer seat but bro...
(Posted by thepaulfrederich 3 years ago)

Weirder Pro 575 Replacement Cables
where can I order the replacement cables for this machine.
where can I order the replacement cables for this machine.
(Posted by Lilhoss 3 years ago)

Weider Pro 8900
Hello,Do universal weights fit Weider pro 8900?Thank you
Hello,Do universal weights fit Weider pro 8900?Thank you
(Posted by patoro969 4 years ago)

How Do U Assemble The Pulleys On The Weider Pro 8900 Instructions Not Clear
the diagram in the manual looks nothing like the actual machine is there a better way to see this di...
the diagram in the manual looks nothing like the actual machine is there a better way to see this di...
(Posted by carmen011374 10 years ago)

Weider Pro 8900 Pulley Position/tension.
Pulley's 3-6 do not seem to be set up correctly. I have them exactly as they are in the book, howeve...
Pulley's 3-6 do not seem to be set up correctly. I have them exactly as they are in the book, howeve...
(Posted by djbillbraun 11 years ago)