
English Manual
Page 2
TABLE OF CONTENTS IMPORTANT PRECAUTIONS 3 BEFORE YOU BEGIN 4 ASSEMBLY 5 HOW TO USE THE HOME GYM SYSTEM 22 WEIGHT RESISTANCE CHART 24 TROUBLESHOOTING AND MAINTENANCE 25 CABLE DIAGRAMS 26 ORDERING REPLACEMENT PARTS Back Cover LIMITED WARRANTY Back Cover Note: A PART IDENTIFICATION CHART and a PART LIST/EXPLODED DRAWING are attached to the center of ICON Health & Fitness, Inc. 2 Remove the PART IDENTIFICATION CHART and the PART LIST/EXPLODED DRAWING before beginning assembly. WEIDER is a registered trademark of this manual.
TABLE OF CONTENTS IMPORTANT PRECAUTIONS 3 BEFORE YOU BEGIN 4 ASSEMBLY 5 HOW TO USE THE HOME GYM SYSTEM 22 WEIGHT RESISTANCE CHART 24 TROUBLESHOOTING AND MAINTENANCE 25 CABLE DIAGRAMS 26 ORDERING REPLACEMENT PARTS Back Cover LIMITED WARRANTY Back Cover Note: A PART IDENTIFICATION CHART and a PART LIST/EXPLODED DRAWING are attached to the center of ICON Health & Fitness, Inc. 2 Remove the PART IDENTIFICATION CHART and the PART LIST/EXPLODED DRAWING before beginning assembly. WEIDER is a registered trademark of this manual.

English Manual
Page 3
... foot plate when performing an exercise that the cables remain on all instructions before using the home gym system. 2. Replace any exercise program, consult your hands away from the home gym system when performing an exercise that the cables are raised. ICON assumes no responsibility for persons over...when the military press arm is intended for foot protection. 3. Do not use the lat bar. 15. Your hand could cause the home gym system to protect the floor. 5. If the cables bind while you are exercising, stop immediately and begin cooling down. This is the ...
... foot plate when performing an exercise that the cables remain on all instructions before using the home gym system. 2. Replace any exercise program, consult your hands away from the home gym system when performing an exercise that the cables are raised. ICON assumes no responsibility for persons over...when the military press arm is intended for foot protection. 3. Do not use the lat bar. 15. Your hand could cause the home gym system to protect the floor. 5. If the cables bind while you are exercising, stop immediately and begin cooling down. This is the ...
English Manual
Page 4
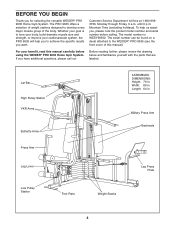
... body, build dramatic muscle size and strength, or improve your benefit, read this manual). If you for selecting the versatile WEIDER® PRO 9635 Home Gym System. Width: 89 in. The serial number can be found on a decal attached to achieve the specific results you want...labeled. To help you , please note the product model number and serial number before using the WEIDER® PRO 9635 Home Gym System. until 6 p.m. Whether your goal is WESY96352. The PRO 9635 offers a selection of weight stations designed to develop every major muscle group of this manual carefully ...
... body, build dramatic muscle size and strength, or improve your benefit, read this manual). If you for selecting the versatile WEIDER® PRO 9635 Home Gym System. Width: 89 in. The serial number can be found on a decal attached to achieve the specific results you want...labeled. To help you , please note the product model number and serial number before using the WEIDER® PRO 9635 Home Gym System. until 6 p.m. Whether your goal is WESY96352. The PRO 9635 offers a selection of weight stations designed to develop every major muscle group of this manual carefully ...
English Manual
Page 21
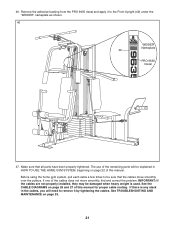
... the adhesive backing from the PRO 9635 decal and apply it to remove it by tightening the cables. The use of this manual. IMPORTANT: If the cables are not properly installed, they may be damaged when heavy weight is any slack in HOW TO USE THE HOME GYM SYSTEM, beginning on page 22... does not move smoothly over the pulleys. Before using the home gym system, pull each cable a few times to be explained in the cables, you will need to the Front Upright (42) under the "WEIDER" nameplate as shown. 46 WEIDER Nameplate 42 PRO 9635 Decal 47. See the CABLE DIAGRAMS on page 25. 21 Make...
... the adhesive backing from the PRO 9635 decal and apply it to remove it by tightening the cables. The use of this manual. IMPORTANT: If the cables are not properly installed, they may be damaged when heavy weight is any slack in HOW TO USE THE HOME GYM SYSTEM, beginning on page 22... does not move smoothly over the pulleys. Before using the home gym system, pull each cable a few times to be explained in the cables, you will need to the Front Upright (42) under the "WEIDER" nameplate as shown. 46 WEIDER Nameplate 42 PRO 9635 Decal 47. See the CABLE DIAGRAMS on page 25. 21 Make...
English Manual
Page 22
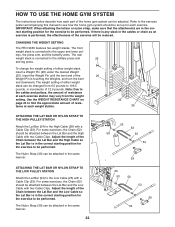
...in the correct starting position for the exercise to find the approximate amount of the exercise will be adjusted. CHANGING THE WEIGHT SETTING The PRO 9635 features two weight stacks. To change the weight setting of either weight stack can be reduced. Use the WEIGHT RESISTANCE CHART on page 24... to be changed from the weight setting. The weight setting of the home gym system can be performed. For some exercises, the Chain (52) should be attached between the Lat Bar and the Low Cable with a Cable...
...in the correct starting position for the exercise to find the approximate amount of the exercise will be adjusted. CHANGING THE WEIGHT SETTING The PRO 9635 features two weight stacks. To change the weight setting of either weight stack can be reduced. Use the WEIGHT RESISTANCE CHART on page 24... to be changed from the weight setting. The weight setting of the home gym system can be performed. For some exercises, the Chain (52) should be attached between the Lat Bar and the Low Cable with a Cable...
English Manual
Page 25
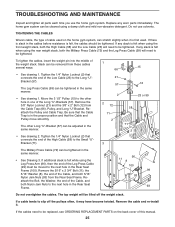
The home gym system can be tightened in the Rear Seat Frame. 96 11 8 100 99 93 93 Do not...weight stack, both the High Cable (58) and the Low Cable (23) will need to the Long "U"Bracket (57). Do not use the home gym system. Remove the 3/8" Nylon Locknut (21) and the 3/8" x 2" Bolt (12) from these cables several ways: • See drawing 1. Reattach...pin into the middle of the Cable, and both Nylon Jam Nuts to be replaced, see ORDERING REPLACEMENT PARTS on the home gym system, can be adjusted in the Rear Seat Frame (100). The top weight will need to the next hole in the same...
The home gym system can be tightened in the Rear Seat Frame. 96 11 8 100 99 93 93 Do not...weight stack, both the High Cable (58) and the Low Cable (23) will need to the Long "U"Bracket (57). Do not use the home gym system. Remove the 3/8" Nylon Locknut (21) and the 3/8" x 2" Bolt (12) from these cables several ways: • See drawing 1. Reattach...pin into the middle of the Cable, and both Nylon Jam Nuts to be replaced, see ORDERING REPLACEMENT PARTS on the home gym system, can be adjusted in the Rear Seat Frame (100). The top weight will need to the next hole in the same...
English Manual
Page 26
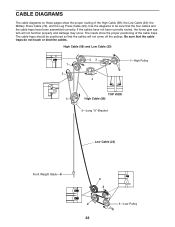
The cable traps should be sure that the four cables and the cable traps have not been correctly routed, the home gym system will not come off the pulleys. The insets show the proper routing of the cable traps. Use the diagrams to be positioned so that ...
The cable traps should be sure that the four cables and the cable traps have not been correctly routed, the home gym system will not come off the pulleys. The insets show the proper routing of the cable traps. Use the diagrams to be positioned so that ...
English Manual
Page 33
... service center; until 6 p.m. The MODEL NUMBER of whatsoever nature. The KEY NUMBER and DESCRIPTION of the part(s) (see the front cover of the product (WEIDER® PRO 9635 Home Gym System). 3. This warranty extends only to give the following information: 1. This warranty does not extend to you specific legal rights. Some states do not...
... service center; until 6 p.m. The MODEL NUMBER of whatsoever nature. The KEY NUMBER and DESCRIPTION of the part(s) (see the front cover of the product (WEIDER® PRO 9635 Home Gym System). 3. This warranty extends only to give the following information: 1. This warranty does not extend to you specific legal rights. Some states do not...


