
English Manual
Page 2
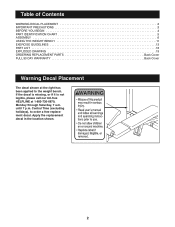
...call our toll-free HELPLINE at the right has been applied to order a free replacement decal. Central Time (excluding holidays), to the weight bench. Apply the replacement decal in the location shown. 2 Table of Contents WARNING DECAL PLACEMENT 2 IMPORTANT PRECAUTIONS 3 BEFORE YOU BEGIN 4 ...PART IDENTIFICATION CHART 5 ASSEMBLY 6 USING THE WEIGHT BENCH 11 EXERCISE GUIDELINES 13 PART LIST 18 EXPLODED DRAWING 19 ORDERING REPLACEMENT PARTS Back Cover FULL 90 DAY WARRANTY Back Cover Warning ...
...call our toll-free HELPLINE at the right has been applied to order a free replacement decal. Central Time (excluding holidays), to the weight bench. Apply the replacement decal in the location shown. 2 Table of Contents WARNING DECAL PLACEMENT 2 IMPORTANT PRECAUTIONS 3 BEFORE YOU BEGIN 4 ...PART IDENTIFICATION CHART 5 ASSEMBLY 6 USING THE WEIGHT BENCH 11 EXERCISE GUIDELINES 13 PART LIST 18 EXPLODED DRAWING 19 ORDERING REPLACEMENT PARTS Back Cover FULL 90 DAY WARRANTY Back Cover Warning ...
English Manual
Page 3
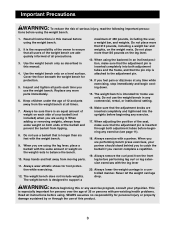
...using . Important Precautions WARNING: To reduce the risk of this product. 3 Use the weight bench only on the weight rests. The weight bench is longer than six feet with a partner. Always exercise with the weight bench. 9. Replace any commercial, rental, or institutional setting. 16. Do not place more than130...important for personal injury or property damage sustained by or through both ends of the barbell and prevent the barbell from the weight bench at any exercise program, consult your partner should stand behind you to ensure that all users of the owner to catch ...
...using . Important Precautions WARNING: To reduce the risk of this product. 3 Use the weight bench only on the weight rests. The weight bench is longer than six feet with a partner. Always exercise with the weight bench. 9. Replace any commercial, rental, or institutional setting. 16. Do not place more than130...important for personal injury or property damage sustained by or through both ends of the barbell and prevent the barbell from the weight bench at any exercise program, consult your partner should stand behind you to ensure that all users of the owner to catch ...
English Manual
Page 4
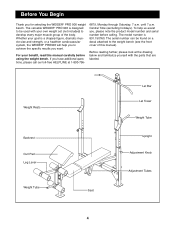
... toll-free HELPLINE at the drawing below and familiarize yourself with your own weight set (not included) to achieve the specific results you for selecting the WEIDER¨ PRO 900 weight bench. Weight Rests Backrest Curl Pad Leg Lever Weight Tube Seat Lat Bar Lat Tower Weight Tube Upright Adjustment Knob Adjustment Tubes 4 until 7 p.m. Before reading further, please look...
... toll-free HELPLINE at the drawing below and familiarize yourself with your own weight set (not included) to achieve the specific results you for selecting the WEIDER¨ PRO 900 weight bench. Weight Rests Backrest Curl Pad Leg Lever Weight Tube Seat Lat Bar Lat Tower Weight Tube Upright Adjustment Knob Adjustment Tubes 4 until 7 p.m. Before reading further, please look...
English Manual
Page 6
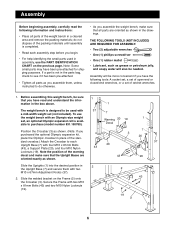
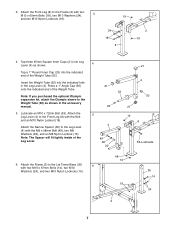
...Upright Bases are oriented as shown. Slide the welded bracket on the previous page. Before assembling this weight bench, be used in assembly, use the weight bench with an Olympic-size weight set, an optional Olympic expansion kit is completed. ¥ Read each assembly step before you ...-attached for shipping purposes. Slide the Uprights (1) into the desired position in the drawings. do otherwise. ¥ As you assemble the weight bench, make sure that all parts of ratchet wrenches. 1. Note: Some small parts may have the following information and instructions: ¥ Place...
...Upright Bases are oriented as shown. Slide the welded bracket on the previous page. Before assembling this weight bench, be used in assembly, use the weight bench with an Olympic-size weight set, an optional Olympic expansion kit is completed. ¥ Read each assembly step before you ...-attached for shipping purposes. Slide the Uprights (1) into the desired position in the drawings. do otherwise. ¥ As you assemble the weight bench, make sure that all parts of ratchet wrenches. 1. Note: Some small parts may have the following information and instructions: ¥ Place...
English Manual
Page 7
... the Front Leg (8) with the M8 x 58mm Bolt (49), two M8 Washers (48), and an M8 Nylon Locknut (13). Attach the Leg Lever (4) to the Weight Tube (52) as shown. Press a 1Ó Angle Cap (50) onto the indicated end of the Leg Lever. 4 21 23 5 4 49 48 30 21 4 52 50... 21 19 8 53ÐLubricate 6. Note: The Spacer will fit tightly inside of the Weight Tube. Insert the Weight Tube (52) into the indicated hole in the accessory manual. 5. Lubricate an M10 x 72mm Bolt (53). Attach the Frame (2) to the Frame (2) with two...
... the Front Leg (8) with the M8 x 58mm Bolt (49), two M8 Washers (48), and an M8 Nylon Locknut (13). Attach the Leg Lever (4) to the Weight Tube (52) as shown. Press a 1Ó Angle Cap (50) onto the indicated end of the Leg Lever. 4 21 23 5 4 49 48 30 21 4 52 50... 21 19 8 53ÐLubricate 6. Note: The Spacer will fit tightly inside of the Weight Tube. Insert the Weight Tube (52) into the indicated hole in the accessory manual. 5. Lubricate an M10 x 72mm Bolt (53). Attach the Frame (2) to the Frame (2) with two...
English Manual
Page 9
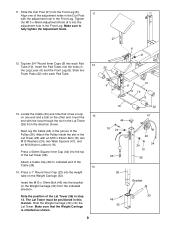
... hole in the Lat Tower (26) from the indicated direction. Locate the Cable (34) and note that the Weight Carriage is oriented as shown. 9 10 4 8 9 10 9 10 22 44 18 24 33 47 29 24... The Lat Tower must be positioned in 12 22 the Leg Lever (4) and the Front Leg (8). Slide the Weight Carriage (32) onto the Lat Tower. Make sure to indicated end of the Lat Tower (26). Press a 1&#...211; Round Inner Cap (23) into the weight tube on the other end. Insert the 13 end with an M10 x 65mm Bolt (18), two M10 Washers (...
... hole in the Lat Tower (26) from the indicated direction. Locate the Cable (34) and note that the Weight Carriage is oriented as shown. 9 10 4 8 9 10 9 10 22 44 18 24 33 47 29 24... The Lat Tower must be positioned in 12 22 the Leg Lever (4) and the Front Leg (8). Slide the Weight Carriage (32) onto the Lat Tower. Make sure to indicated end of the Lat Tower (26). Press a 1&#...211; Round Inner Cap (23) into the weight tube on the other end. Insert the 13 end with an M10 x 65mm Bolt (18), two M10 Washers (...
English Manual
Page 10
... Lat Tower with an M8 x 70mm Bolt (54) and an M8 Nylon Locknut (13). Note: The Carriage Stop must be explained in USING THE WEIGHT BENCH on the Weight Carriage (32) with the lip on the Lat 17 Tower (26). 18. Attach the Lat Bar (36) to the 15 M19 x 19mm Bolt (46... on top as shown. 15. Secure the looped end of all remaining parts will be positioned with an M10 Nylon Locknut (19). The use the weight bench. Make sure that the Lat Tower is turned as shown. 16. Next, slide the Carriage Stop (39) onto the Lat Tower (26).
... Lat Tower with an M8 x 70mm Bolt (54) and an M8 Nylon Locknut (13). Note: The Carriage Stop must be explained in USING THE WEIGHT BENCH on the Weight Carriage (32) with the lip on the Lat 17 Tower (26). 18. Attach the Lat Bar (36) to the 15 M19 x 19mm Bolt (46... on top as shown. 15. Secure the looped end of all remaining parts will be positioned with an M10 Nylon Locknut (19). The use the weight bench. Make sure that the Lat Tower is turned as shown. 16. Next, slide the Carriage Stop (39) onto the Lat Tower (26).
English Manual
Page 11
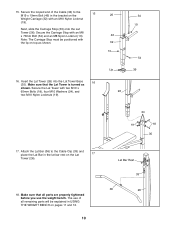
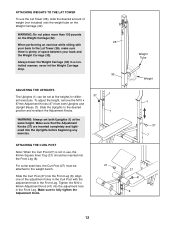
...THE BACKREST The Backrest (6) can be removed. Refer also to the Adjustment Pin. ATTACHING WEIGHTS TO THE LEG LEVER To use the Backrest (6) in the adjustment tubes. The weight bench can be cleaned with your weight set of holes in a level position, insert the Adjustment Pin (40) through one of...and then pull the Pad Tube out of two inclined positions. Using the Weight Bench The weight bench is attached. Do not use the weight bench. WARNING: Do not place more than 130 pounds on the Leg Lever (4). 52 Weight REMOVING THE PAD TUBE AND PADS To do this, slide off one ...
...THE BACKREST The Backrest (6) can be removed. Refer also to the Adjustment Pin. ATTACHING WEIGHTS TO THE LEG LEVER To use the Backrest (6) in the adjustment tubes. The weight bench can be cleaned with your weight set of holes in a level position, insert the Adjustment Pin (40) through one of...and then pull the Pad Tube out of two inclined positions. Using the Weight Bench The weight bench is attached. Do not use the weight bench. WARNING: Do not place more than 130 pounds on the Leg Lever (4). 52 Weight REMOVING THE PAD TUBE AND PADS To do this, slide off one ...
English Manual
Page 12
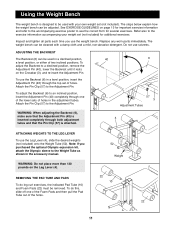
...Bases (7). To adjust the height, remove the M10 x 67mm Adjustment Knobs (37) from both Uprights (1) at five heights for differ- 37 1 ent exercises. Weight Tube Weight 1 37 7 27 41 8 12 Tighten the M10 x 48mm Adjustment Knob (41) into the adjustment hole in use the Lat Tower (26), slide the... hole in a controlled manner; ATTACHING THE CURL POST Note: When the Curl Post (27) is plenty of space between your back to the weight bench. ATTACHING WEIGHTS TO THE LAT TOWER To use , the 45mm Square Inner Cap (21) should be inserted into the Front Leg (8). Make sure that the...
...Bases (7). To adjust the height, remove the M10 x 67mm Adjustment Knobs (37) from both Uprights (1) at five heights for differ- 37 1 ent exercises. Weight Tube Weight 1 37 7 27 41 8 12 Tighten the M10 x 48mm Adjustment Knob (41) into the adjustment hole in use the Lat Tower (26), slide the... hole in a controlled manner; ATTACHING THE CURL POST Note: When the Curl Post (27) is plenty of space between your back to the weight bench. ATTACHING WEIGHTS TO THE LAT TOWER To use , the 45mm Square Inner Cap (21) should be inserted into the Front Leg (8). Make sure that the...
English Manual
Page 13
...time to regenerate. Schedule your workouts for each exercise. Once you find the schedule that you must also progressively increase the intensity of weight for the time of day when your energy level is wrong before continuing. Exercise for 20 to 30 minutes, resting for you perform... or sets performed. (A ÒrepetitionÓ is important. When you can complete 3 sets of 12 repetitions without difficulty, increase the amount of weight. ¥ Toning To tone your muscles, you , stick with a list of the muscles affected. WARMING UP Begin each exercise, and moving through...
...time to regenerate. Schedule your workouts for each exercise. Once you find the schedule that you must also progressively increase the intensity of weight for the time of day when your energy level is wrong before continuing. Exercise for 20 to 30 minutes, resting for you perform... or sets performed. (A ÒrepetitionÓ is important. When you can complete 3 sets of 12 repetitions without difficulty, increase the amount of weight. ¥ Toning To tone your muscles, you , stick with a list of the muscles affected. WARMING UP Begin each exercise, and moving through...
English Manual
Page 14
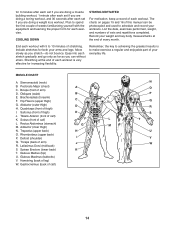
... muscle building workout, 1 minute after each set if you are doing a toning workout, and 30 seconds after each set if you are doing a weight loss workout. Stretching at the end of stretching. Hip Flexors (upper thigh) G. Tibialis Anterior (front of thigh) I. Ease into each stretch gradually... and go only as far as you can be photocopied and used to make exercise a regular and enjoyable part of your weight and key body measurements at the end of this manual can without strain. Quadriceps (front of calf) K. Gluteus Maximus (buttocks) V. for...
... muscle building workout, 1 minute after each set if you are doing a toning workout, and 30 seconds after each set if you are doing a weight loss workout. Stretching at the end of stretching. Hip Flexors (upper thigh) G. Tibialis Anterior (front of thigh) I. Ease into each stretch gradually... and go only as far as you can be photocopied and used to make exercise a regular and enjoyable part of your weight and key body measurements at the end of this manual can without strain. Quadriceps (front of calf) K. Gluteus Maximus (buttocks) V. for...
English Manual
Page 15
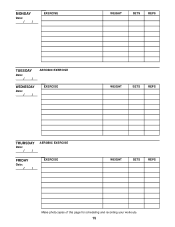
MONDAY Date: / / EXERCISE WEIGHT SETS REPS TUESDAY Date: / / AEROBIC EXERCISE WEDNESDAY Date: / / EXERCISE WEIGHT SETS REPS THURSDAY Date: / / AEROBIC EXERCISE FRIDAY Date: / / EXERCISE WEIGHT SETS REPS Make photocopies of this page for scheduling and recording your workouts. 15
MONDAY Date: / / EXERCISE WEIGHT SETS REPS TUESDAY Date: / / AEROBIC EXERCISE WEDNESDAY Date: / / EXERCISE WEIGHT SETS REPS THURSDAY Date: / / AEROBIC EXERCISE FRIDAY Date: / / EXERCISE WEIGHT SETS REPS Make photocopies of this page for scheduling and recording your workouts. 15

English Manual
Page 16
MONDAY Date: / / EXERCISE WEIGHT SETS REPS TUESDAY Date: / / AEROBIC EXERCISE WEDNESDAY Date: / / EXERCISE WEIGHT SETS REPS THURSDAY Date: / / AEROBIC EXERCISE FRIDAY Date: / / EXERCISE WEIGHT SETS REPS Make photocopies of this page for scheduling and recording your workouts. 16
MONDAY Date: / / EXERCISE WEIGHT SETS REPS TUESDAY Date: / / AEROBIC EXERCISE WEDNESDAY Date: / / EXERCISE WEIGHT SETS REPS THURSDAY Date: / / AEROBIC EXERCISE FRIDAY Date: / / EXERCISE WEIGHT SETS REPS Make photocopies of this page for scheduling and recording your workouts. 16
English Manual
Page 18
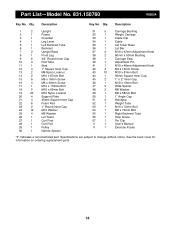
...Washer 25 4 M6 Washer 26 1 Lat Tower 27 1 Curl Post 28 1 Curl Pad 29 1 Pulley 30 1 Narrow Spacer 31 5 Carriage Bushing 32 1 Weight Carriage 33 1 Cable Clip 34 1 Cable 35 1 Lat Tower Base 36 1 Lat Bar 37 2 M10 x 67mm Adjustment Knob 38 2 60mm x 50mm ...211; Inner Cap 46 1 M10 x 19mm Bolt 47 2 Wide Spacer 48 2 M8 Washer 49 1 M8 x 58mm Bolt 50 1 1Ó Angle Cap 51 2 Handgrip 52 1 Weight Tube 53 1 M10 x 72mm Bolt 54 1 M8 x 70mm Bolt 55 1 Right Backrest Tube 56 1 Stop Screw 57 1 Pin Clip # 1 UserÕs Manual # 1 ...
...Washer 25 4 M6 Washer 26 1 Lat Tower 27 1 Curl Post 28 1 Curl Pad 29 1 Pulley 30 1 Narrow Spacer 31 5 Carriage Bushing 32 1 Weight Carriage 33 1 Cable Clip 34 1 Cable 35 1 Lat Tower Base 36 1 Lat Bar 37 2 M10 x 67mm Adjustment Knob 38 2 60mm x 50mm ...211; Inner Cap 46 1 M10 x 19mm Bolt 47 2 Wide Spacer 48 2 M8 Washer 49 1 M8 x 58mm Bolt 50 1 1Ó Angle Cap 51 2 Handgrip 52 1 Weight Tube 53 1 M10 x 72mm Bolt 54 1 M8 x 70mm Bolt 55 1 Right Backrest Tube 56 1 Stop Screw 57 1 Pin Clip # 1 UserÕs Manual # 1 ...
English Manual
Page 20
...days from state to provide the following information: ¥ The MODEL NUMBER of the product (831.150760) ¥ The NAME of the product (WEIDER¨ PRO 900 weight bench) ¥ The PART NUMBER of the PART (see the PART LIST and the EXPLODED DRAWING on a decal attached to order parts by telephone,... vary from the date of purchase, if failure occurs due to find that: ¥ you visit your WEIDER¨ PRO 900 are listed on pages 18 and 19 of this SEARS WEIGHT BENCH EXERCISER, contact the nearest SEARS Service Center throughout the United States and SEARS will repair or replace the...
...days from state to provide the following information: ¥ The MODEL NUMBER of the product (831.150760) ¥ The NAME of the product (WEIDER¨ PRO 900 weight bench) ¥ The PART NUMBER of the PART (see the PART LIST and the EXPLODED DRAWING on a decal attached to order parts by telephone,... vary from the date of purchase, if failure occurs due to find that: ¥ you visit your WEIDER¨ PRO 900 are listed on pages 18 and 19 of this SEARS WEIGHT BENCH EXERCISER, contact the nearest SEARS Service Center throughout the United States and SEARS will repair or replace the...


