
English Manual
Page 1
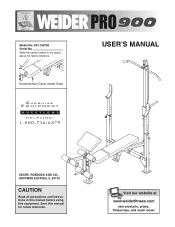
Visit our website at www.weiderfitness.com new products, prizes, fitness tips, and much more! Model No. 831.150760 Serial No. Write the serial number in this manual before using this manual for future reference. ¨ USERÕS MANUAL Serial Number Decal (Under Seat) SEARS, ROEBUCK AND CO., HOFFMAN ESTATES, IL 60179 CAUTION Read all precautions and instructions in the space above for future reference. Save this equipment.
Visit our website at www.weiderfitness.com new products, prizes, fitness tips, and much more! Model No. 831.150760 Serial No. Write the serial number in this manual before using this manual for future reference. ¨ USERÕS MANUAL Serial Number Decal (Under Seat) SEARS, ROEBUCK AND CO., HOFFMAN ESTATES, IL 60179 CAUTION Read all precautions and instructions in the space above for future reference. Save this equipment.
English Manual
Page 2
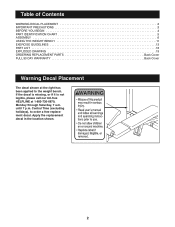
... PLACEMENT 2 IMPORTANT PRECAUTIONS 3 BEFORE YOU BEGIN 4 PART IDENTIFICATION CHART 5 ASSEMBLY 6 USING THE WEIGHT BENCH 11 EXERCISE GUIDELINES 13 PART LIST 18 EXPLODED DRAWING 19 ORDERING REPLACEMENT PARTS Back Cover FULL 90 DAY WARRANTY Back Cover Warning Decal Placement The decal shown at 1-800-736-6879, Monday through Saturday, 7 a.m. Central Time (excluding holidays), to the weight bench. Apply the replacement decal in the location shown. 2 until 7 p.m. If the decal...
... PLACEMENT 2 IMPORTANT PRECAUTIONS 3 BEFORE YOU BEGIN 4 PART IDENTIFICATION CHART 5 ASSEMBLY 6 USING THE WEIGHT BENCH 11 EXERCISE GUIDELINES 13 PART LIST 18 EXPLODED DRAWING 19 ORDERING REPLACEMENT PARTS Back Cover FULL 90 DAY WARRANTY Back Cover Warning Decal Placement The decal shown at 1-800-736-6879, Monday through Saturday, 7 a.m. Central Time (excluding holidays), to the weight bench. Apply the replacement decal in the location shown. 2 until 7 p.m. If the decal...
English Manual
Page 3
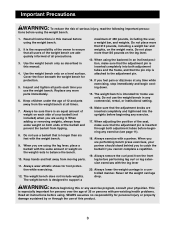
... weight bench is designed to ensure that all parts each side of weight on the weight rests to the adjustment pin. 14. When adjusting the position of all instructions before performing leg curl or leg extension exercises with the weight bench. 9. Always remove the curl post from moving parts. 11. tions before beginning any commercial, rental, or institutional setting. 16. It is the responsibility of the owner to support a maximum...
... weight bench is designed to ensure that all parts each side of weight on the weight rests to the adjustment pin. 14. When adjusting the position of all instructions before performing leg curl or leg extension exercises with the weight bench. 9. Always remove the curl post from moving parts. 11. tions before beginning any commercial, rental, or institutional setting. 16. It is the responsibility of the owner to support a maximum...
English Manual
Page 4
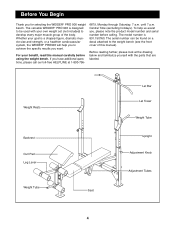
The versatile WEIDER¨ PRO 900 is designed to achieve the specific results you want. Weight Rests Backrest Curl Pad Leg Lever Weight Tube Seat Lat Bar Lat Tower Weight Tube Upright Adjustment Knob Adjustment Tubes 4 To help you have additional questions, please call our toll-free HELPLINE at the drawing below and familiarize yourself with your own weight set (not included) to the weight bench (see the front cover of the body. If...
The versatile WEIDER¨ PRO 900 is designed to achieve the specific results you want. Weight Rests Backrest Curl Pad Leg Lever Weight Tube Seat Lat Bar Lat Tower Weight Tube Upright Adjustment Knob Adjustment Tubes 4 To help you have additional questions, please call our toll-free HELPLINE at the drawing below and familiarize yourself with your own weight set (not included) to the weight bench (see the front cover of the body. If...
English Manual
Page 5
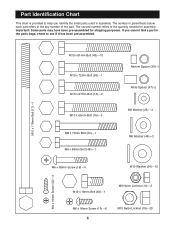
... identify the small parts used in assembly. Important: Some parts may have been pre-assembled for assembly. Part Identification Chart This chart is provided to help you cannot find a part in the parts bags, check to see if it has been pre-assembled. The second number refers to the key number of the part. The number in parenthesis below each part refers to the quantity needed for shipping purposes...
... identify the small parts used in assembly. Important: Some parts may have been pre-assembled for assembly. Part Identification Chart This chart is provided to help you cannot find a part in the parts bags, check to see if it has been pre-assembled. The second number refers to the key number of the part. The number in parenthesis below each part refers to the quantity needed for shipping purposes...
English Manual
Page 6
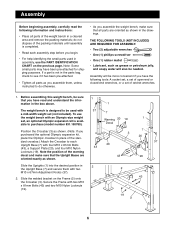
... Olympic-size weight set (not included). Position the Crossbar (3) as shown. The weight bench is designed to purchase (model number 831.150780). Assembly Before beginning assembly, carefully read and understand the information in the box above. To use the PART IDENTIFICATION CHART on the Frame (2) onto the Crossbar (3). Assembly will also be more convenient if you have the following information and instructions: ¥ Place all parts are...
... Olympic-size weight set (not included). Position the Crossbar (3) as shown. The weight bench is designed to purchase (model number 831.150780). Assembly Before beginning assembly, carefully read and understand the information in the box above. To use the PART IDENTIFICATION CHART on the Frame (2) onto the Crossbar (3). Assembly will also be more convenient if you have the following information and instructions: ¥ Place all parts are...
English Manual
Page 7
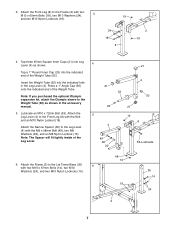
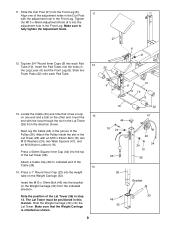
... two M10 Nylon Locknuts (19). 19 24 18 8 2 19 4. Note: The Spacer will fit tightly inside of the Weight Tube (52). Attach the Front Leg (8) to the Leg Lever (4) with two M10 x 67mm Bolts (14), two M10 Washers (24), and two M10 Nylon Locknuts (19). 48 13 19 35...attach the Olympic sleeve to the Lat Tower Base (35) 6 with the M8 x 58mm Bolt (49), two M8 Washers (48), and an M8 Nylon Locknut (13). Tap three 45mm Square Inner Caps (21) into the indicated hole in the accessory manual. 5. Insert the Weight Tube (52) into Leg Lever (4) as shown in the Leg Lever (4). 3. Press...
... two M10 Nylon Locknuts (19). 19 24 18 8 2 19 4. Note: The Spacer will fit tightly inside of the Weight Tube (52). Attach the Front Leg (8) to the Leg Lever (4) with two M10 x 67mm Bolts (14), two M10 Washers (24), and two M10 Nylon Locknuts (19). 48 13 19 35...attach the Olympic sleeve to the Lat Tower Base (35) 6 with the M8 x 58mm Bolt (49), two M8 Washers (48), and an M8 Nylon Locknut (13). Tap three 45mm Square Inner Caps (21) into the indicated hole in the accessory manual. 5. Insert the Weight Tube (52) into Leg Lever (4) as shown in the Leg Lever (4). 3. Press...
English Manual
Page 8
... x 16mm Screws (15). 7 6 Wide End 12 5 12 8 25 16 45 6 5 55 40 17ÑLubricate 24 25 55 16 Adjustment Tubes 25 16 Adjustment Tubes 2 19 57 9 11 Wide End 2 15 10. Press two 1Ó x 2Ó Inner Caps (45) into the indicated ends of the Backrest Tubes (5, 55). Lubricate the M10 x 178mm Bolt (17). Attach the Pin Clip (57...
... x 16mm Screws (15). 7 6 Wide End 12 5 12 8 25 16 45 6 5 55 40 17ÑLubricate 24 25 55 16 Adjustment Tubes 25 16 Adjustment Tubes 2 19 57 9 11 Wide End 2 15 10. Press two 1Ó x 2Ó Inner Caps (45) into the indicated ends of the Backrest Tubes (5, 55). Lubricate the M10 x 178mm Bolt (17). Attach the Pin Clip (57...
English Manual
Page 9
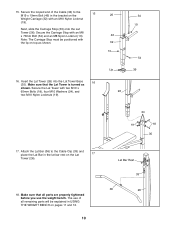
..., lay the Cable (34) in step 13. Note the position of the Lat Tower (26) in the groove of the Lat Tower (26). Slide the Weight Carriage (32) onto the Lat Tower. Make sure to indicated end of the adjustment holes in the...Pulley (29). The Lat Tower must be positioned in the Lat Tower (26) from the indicated direction. Make sure that it has a loop on the Weight Carriage (32). Press a 50mm Square Inner Cap (44) into the weight tube on one of the Cable (34). 14 14. 11. Tighten the M10 x 48mm Adjustment Knob (41) into the holes in the Front Leg. Locate the Cable...
..., lay the Cable (34) in step 13. Note the position of the Lat Tower (26) in the groove of the Lat Tower (26). Slide the Weight Carriage (32) onto the Lat Tower. Make sure to indicated end of the adjustment holes in the...Pulley (29). The Lat Tower must be positioned in the Lat Tower (26) from the indicated direction. Make sure that it has a loop on the Weight Carriage (32). Press a 50mm Square Inner Cap (44) into the weight tube on one of the Cable (34). 14 14. 11. Tighten the M10 x 48mm Adjustment Knob (41) into the holes in the Front Leg. Locate the Cable...
English Manual
Page 10
... Lat 17 Tower (26). 18. 15. Insert the Lat Tower (26) into the Lat Tower Base 16 (35). Attach the Lat Bar (36) to the 15 M19 x 19mm Bolt (46) in the lat bar rest on top as shown. Next, slide the Carriage Stop (39) onto the Lat Tower (26). Secure the looped end of all parts are properly tightened before you use the weight bench...
... Lat 17 Tower (26). 18. 15. Insert the Lat Tower (26) into the Lat Tower Base 16 (35). Attach the Lat Bar (36) to the 15 M19 x 19mm Bolt (46) in the lat bar rest on top as shown. Next, slide the Carriage Stop (39) onto the Lat Tower (26). Secure the looped end of all parts are properly tightened before you use the weight bench...
English Manual
Page 11
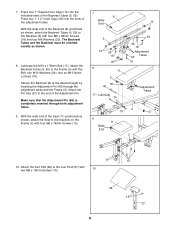
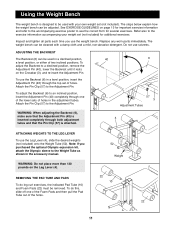
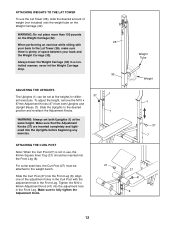
... manual. WARNING: Do not place more than 130 pounds on page 13 for several exercises. The steps below explain how the weight bench can be removed. Replace any worn parts immediately. To adjust the Backrest (6) to the Weight Tube as shown in a level position, insert the Adjustment Pin (40) through the top set (not included) for additional exercises. ATTACHING WEIGHTS TO THE LEG LEVER To use solvents. Using the Weight Bench...
... manual. WARNING: Do not place more than 130 pounds on page 13 for several exercises. The steps below explain how the weight bench can be removed. Replace any worn parts immediately. To adjust the Backrest (6) to the Weight Tube as shown in a level position, insert the Adjustment Pin (40) through the top set (not included) for additional exercises. ATTACHING WEIGHTS TO THE LEG LEVER To use solvents. Using the Weight Bench...
English Manual
Page 12
... the Weight Carriage drop. 32 ADJUSTING THE UPRIGHTS The Uprights (1) can be 21 attached to the desired position and re-attach the Adjustment Knobs. 7 WARNING: Always set at the same height. For some exercises, the Curl Post (27) must be set both Uprights and Upright Bases (7). Tighten the M10 x 48mm Adjustment Knob (41) into the adjustment hole in a controlled manner; Always lower the Weight Carriage (32) in the Front Leg. ATTACHING THE...
... the Weight Carriage drop. 32 ADJUSTING THE UPRIGHTS The Uprights (1) can be 21 attached to the desired position and re-attach the Adjustment Knobs. 7 WARNING: Always set at the same height. For some exercises, the Curl Post (27) must be set both Uprights and Upright Bases (7). Tighten the M10 x 48mm Adjustment Knob (41) into the adjustment hole in a controlled manner; Always lower the Weight Carriage (32) in the Front Leg. ATTACHING THE...
English Manual
Page 13
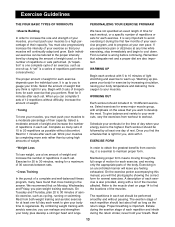
... of weight used, or the number of repetitions or sets performed. (A ÒrepetitionÓ is the answer. It is right for each set . Maintaining proper form means moving through the full range of motion for each exercise, and moving only the appropriate parts of a complete and well-balanced fitness program, many have not specified an exact length of time for each workout, or a specific number...
... of weight used, or the number of repetitions or sets performed. (A ÒrepetitionÓ is the answer. It is right for each set . Maintaining proper form means moving through the full range of motion for each exercise, and moving only the appropriate parts of a complete and well-balanced fitness program, many have not specified an exact length of time for each workout, or a specific number...
English Manual
Page 14
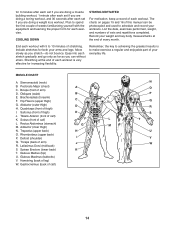
... Major (chest) AA C. Adductor (inner thigh) G G M M N. Spinae Erectors (lower back) KK T. Gluteus Maximus (buttocks) V. List the date, exercises performed, weight, and numbers of calf) NN OO PP QQ RR SS T T U U V V WW 14 MUSCLE CHART A. Biceps (front of calf) F F LL L. Soleus (front of arm) D. Gluteus Medius (hip) U. Ease into each set if you are doing a weight loss workout. Obliques (waist) BB E. Move slowly...
... Major (chest) AA C. Adductor (inner thigh) G G M M N. Spinae Erectors (lower back) KK T. Gluteus Maximus (buttocks) V. List the date, exercises performed, weight, and numbers of calf) NN OO PP QQ RR SS T T U U V V WW 14 MUSCLE CHART A. Biceps (front of calf) F F LL L. Soleus (front of arm) D. Gluteus Medius (hip) U. Ease into each set if you are doing a weight loss workout. Obliques (waist) BB E. Move slowly...
English Manual
Page 15
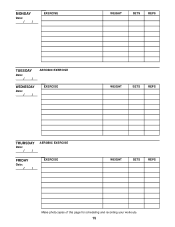
MONDAY Date: / / EXERCISE WEIGHT SETS REPS TUESDAY Date: / / AEROBIC EXERCISE WEDNESDAY Date: / / EXERCISE WEIGHT SETS REPS THURSDAY Date: / / AEROBIC EXERCISE FRIDAY Date: / / EXERCISE WEIGHT SETS REPS Make photocopies of this page for scheduling and recording your workouts. 15
MONDAY Date: / / EXERCISE WEIGHT SETS REPS TUESDAY Date: / / AEROBIC EXERCISE WEDNESDAY Date: / / EXERCISE WEIGHT SETS REPS THURSDAY Date: / / AEROBIC EXERCISE FRIDAY Date: / / EXERCISE WEIGHT SETS REPS Make photocopies of this page for scheduling and recording your workouts. 15

English Manual
Page 16
MONDAY Date: / / EXERCISE WEIGHT SETS REPS TUESDAY Date: / / AEROBIC EXERCISE WEDNESDAY Date: / / EXERCISE WEIGHT SETS REPS THURSDAY Date: / / AEROBIC EXERCISE FRIDAY Date: / / EXERCISE WEIGHT SETS REPS Make photocopies of this page for scheduling and recording your workouts. 16
MONDAY Date: / / EXERCISE WEIGHT SETS REPS TUESDAY Date: / / AEROBIC EXERCISE WEDNESDAY Date: / / EXERCISE WEIGHT SETS REPS THURSDAY Date: / / AEROBIC EXERCISE FRIDAY Date: / / EXERCISE WEIGHT SETS REPS Make photocopies of this page for scheduling and recording your workouts. 16
English Manual
Page 18
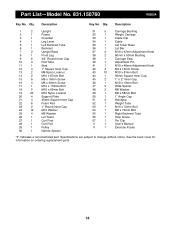
... 27 1 Curl Post 28 1 Curl Pad 29 1 Pulley 30 1 Narrow Spacer 31 5 Carriage Bushing 32 1 Weight Carriage 33 1 Cable Clip 34 1 Cable 35 1 Lat Tower Base 36 1 Lat Bar 37 2 M10 x 67mm Adjustment Knob 38 2 60mm x 50mm Bushing 39 1 Carriage Stop 40 1 Adjustment Pin 41 1 M10 x 48mm Adjustment Knob 42 4 M4 x 16mm Screw 43 10 M10 x 81mm Bolt 44 1 50mm Square Inner Cap 45 2 1Ó x 2Ó...
... 27 1 Curl Post 28 1 Curl Pad 29 1 Pulley 30 1 Narrow Spacer 31 5 Carriage Bushing 32 1 Weight Carriage 33 1 Cable Clip 34 1 Cable 35 1 Lat Tower Base 36 1 Lat Bar 37 2 M10 x 67mm Adjustment Knob 38 2 60mm x 50mm Bushing 39 1 Carriage Stop 40 1 Adjustment Pin 41 1 M10 x 48mm Adjustment Knob 42 4 M4 x 16mm Screw 43 10 M10 x 81mm Bolt 44 1 50mm Square Inner Cap 45 2 1Ó x 2Ó...
English Manual
Page 20
... WEIGHT BENCH EXERCISER is missing ¥ or you need to schedule repair service call our toll-free HELPLINE 1-800-736-6879 MondayÐSaturday, 7 amÐ7 pm Central Time (excluding holidays) REPLACEMENT PARTS If parts become worn and need help or service, or ordering parts, please be replaced, call the toll-free numbers listed at the left. This warranty gives you specific legal rights, and you visit your WEIDER¨ PRO 900...
... WEIGHT BENCH EXERCISER is missing ¥ or you need to schedule repair service call our toll-free HELPLINE 1-800-736-6879 MondayÐSaturday, 7 amÐ7 pm Central Time (excluding holidays) REPLACEMENT PARTS If parts become worn and need help or service, or ordering parts, please be replaced, call the toll-free numbers listed at the left. This warranty gives you specific legal rights, and you visit your WEIDER¨ PRO 900...


