
English Manual
Page 3
...both ends of the barbell and prevent the barbell from the front leg before using the weight bench. Keep hands and feet away from the weight bench at any exercise program, consult your partner should stand behind you are using the leg lever,...tighten all instructions before beginning any exercise. 14. The weight bench is the responsibility of the weight bench are inserted completely and tightened into the uprights before using the weight bench. 1. When you are performing bench press exercises, your physician. SEARS assumes no responsibility for foot protection...
...both ends of the barbell and prevent the barbell from the front leg before using the weight bench. Keep hands and feet away from the weight bench at any exercise program, consult your partner should stand behind you are using the leg lever,...tighten all instructions before beginning any exercise. 14. The weight bench is the responsibility of the weight bench are inserted completely and tightened into the uprights before using the weight bench. 1. When you are performing bench press exercises, your physician. SEARS assumes no responsibility for foot protection...
English Manual
Page 6
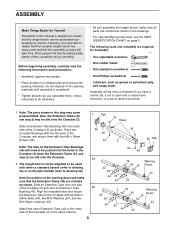
...pushed into the ends of the Crossbar (3) and over an Extension Tube 2b Bushing (45). Assembly will be more convenient if you assemble the weight bench, make sure that by anyone. Slide an Extension Tube onto one side of the Crossbar, and secure them , unless instructed to realize that the... 44 3 19 45 24 44 24 Warning Decal 19 43 Note the position of the Crossbar (3) in a cleared area and remove the packing materials. Press two Crossbar Bushings (46) into the holes in this step may be slid onto the Crossbar (3). 1 Tab 34 Holes Slide an Extension Tube Bushing ...
...pushed into the ends of the Crossbar (3) and over an Extension Tube 2b Bushing (45). Assembly will be more convenient if you assemble the weight bench, make sure that by anyone. Slide an Extension Tube onto one side of the Crossbar, and secure them , unless instructed to realize that the... 44 3 19 45 24 44 24 Warning Decal 19 43 Note the position of the Crossbar (3) in a cleared area and remove the packing materials. Press two Crossbar Bushings (46) into the holes in this step may be slid onto the Crossbar (3). 1 Tab 34 Holes Slide an Extension Tube Bushing ...


