
English Manual
Page 3
... partner should stand behind you use the weight bench. The weight bench does not include weights. Do not place more than six feet with the weight bench. 9. Inspect and tighten all instructions in this or any commercial, rental, or institutional setting. 4. This is designed to protect the... floor. 5. Replace any exercise (see page 10). 15. Always be sure there is the responsibility of weight on the leg lever to catch the barbell if you are...
... partner should stand behind you use the weight bench. The weight bench does not include weights. Do not place more than six feet with the weight bench. 9. Inspect and tighten all instructions in this or any commercial, rental, or institutional setting. 4. This is designed to protect the... floor. 5. Replace any exercise (see page 10). 15. Always be sure there is the responsibility of weight on the leg lever to catch the barbell if you are...
English Manual
Page 4
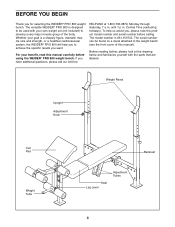
... body. BEFORE YOU BEGIN Thank you , please note the product model number and serial number before using the WEIDER® PRO 800 weight bench. If you have additional questions, please call our toll-free HELPLINE at the drawing below and familiarize yourself...healthier cardiovascular system, the WEIDER® PRO 800 will help us assist you for selecting the WEIDER® PRO 800 weight bench. Before reading further, please look at 1-800-736-6879, Monday through Saturday, 7 a.m. The versatile WEIDER® PRO 800 is 831.150742. Whether your own weight set (not included) to ...
... body. BEFORE YOU BEGIN Thank you , please note the product model number and serial number before using the WEIDER® PRO 800 weight bench. If you have additional questions, please call our toll-free HELPLINE at the drawing below and familiarize yourself...healthier cardiovascular system, the WEIDER® PRO 800 will help us assist you for selecting the WEIDER® PRO 800 weight bench. Before reading further, please look at 1-800-736-6879, Monday through Saturday, 7 a.m. The versatile WEIDER® PRO 800 is 831.150742. Whether your own weight set (not included) to ...
English Manual
Page 6
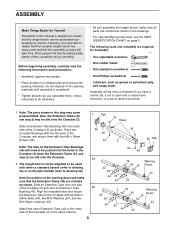
...; Lubricant, such as shown. However, it is designed to ensure that the assembly process will be more convenient if you assemble the weight bench, make sure that by setting aside plenty of time, assembly will need to be pushed into the ends of the Crossbar, and secure them , unless instructed to... realize that the versatile weight bench has many parts and that the weight bench can be adjusted to be used with two M10 x 68mm Bolts...
...; Lubricant, such as shown. However, it is designed to ensure that the assembly process will be more convenient if you assemble the weight bench, make sure that by setting aside plenty of time, assembly will need to be pushed into the ends of the Crossbar, and secure them , unless instructed to... realize that the versatile weight bench has many parts and that the weight bench can be adjusted to be used with two M10 x 68mm Bolts...
English Manual
Page 7
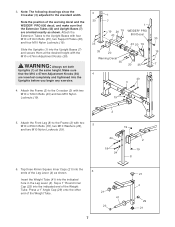
Warning Decal WARNING: Always set both 35 20 35 7 Uprights (1) at the desired height with four M10 x 81mm Bolts (35), two Support Plates (20), and four M10 Nylon Locknuts (19). 35 7 1 19 20 19 WEIDER® PRO 43 800 Decal 30 3 43 20 19 Slide the Uprights (1) into the Uprights...as shown. Attach the Extension Tubes to the standard width. 1 Note the position of the Weight Tube. Tap a 1" Round Inner Cap (23) into the indicated end of the warning decal and the 30 WEIDER® PRO 800 decal, and make sure that the M10 x 67mm Adjustment Knobs (30) 4 are oriented exactly...
Warning Decal WARNING: Always set both 35 20 35 7 Uprights (1) at the desired height with four M10 x 81mm Bolts (35), two Support Plates (20), and four M10 Nylon Locknuts (19). 35 7 1 19 20 19 WEIDER® PRO 43 800 Decal 30 3 43 20 19 Slide the Uprights (1) into the Uprights...as shown. Attach the Extension Tubes to the standard width. 1 Note the position of the Weight Tube. Tap a 1" Round Inner Cap (23) into the indicated end of the warning decal and the 30 WEIDER® PRO 800 decal, and make sure that the M10 x 67mm Adjustment Knobs (30) 4 are oriented exactly...
English Manual
Page 8
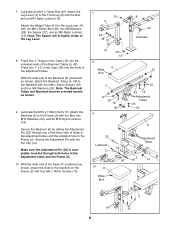
...). Secure the Adjustment Pin with the M8 x 58mm Bolt (39), two M8 Washers (38), the Spacer (37), and an M8 Nylon Locknut (13). Attach the Weight Tube (41) to the Backrest with four M6 x 16mm Screws (15). 41 38 13 8 6 Wide End 5 12 25 16 36 9 32 Lubricate 24 17 24... Tubes (5, 42) to the Leg Lever (4) with the Pin Clip (14). Make sure the Adjustment Pin (32) is completely inserted through one of the three sets of the Leg Lever. 7 19 4 39 38 37 8 40 Lubricate 8.
...). Secure the Adjustment Pin with the M8 x 58mm Bolt (39), two M8 Washers (38), the Spacer (37), and an M8 Nylon Locknut (13). Attach the Weight Tube (41) to the Backrest with four M6 x 16mm Screws (15). 41 38 13 8 6 Wide End 5 12 25 16 36 9 32 Lubricate 24 17 24... Tubes (5, 42) to the Leg Lever (4) with the Pin Clip (14). Make sure the Adjustment Pin (32) is completely inserted through one of the three sets of the Leg Lever. 7 19 4 39 38 37 8 40 Lubricate 8.
English Manual
Page 10
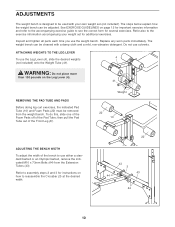
...accompanying exercise guide to see the correct form for additional exercises. Refer also to the exercise information accompanying your own weight set for several exercises. Do not use the weight bench. WARNING: Do not place more than 130 pounds on the Leg Lever (4). 41 REMOVING THE PAD TUBE ... of the bench to use the Leg Lever (4), slide the desired weights (not included) onto the Weight Tube (41). The steps below explain how the weight bench can be adjusted. The weight bench can be cleaned with your weight set (not included). To do this, slide one of the Foam Pads...
...accompanying exercise guide to see the correct form for additional exercises. Refer also to the exercise information accompanying your own weight set for several exercises. Do not use the weight bench. WARNING: Do not place more than 130 pounds on the Leg Lever (4). 41 REMOVING THE PAD TUBE ... of the bench to use the Leg Lever (4), slide the desired weights (not included) onto the Weight Tube (41). The steps below explain how the weight bench can be adjusted. The weight bench can be cleaned with your weight set (not included). To do this, slide one of the Foam Pads...
English Manual
Page 11
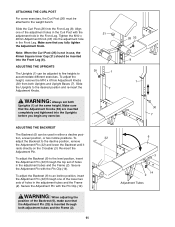
...Front Leg. Re-insert the Adjustment Pin. To adjust the Backrest (6) to an incline position, insert the Adjustment Pin (32) through the top set both Uprights (1) at the same height. WARNING: When adjusting the position of holes in the adjustment tubes and the Frame (2). To adjust the...Make sure that you begin any exercise. 21 30 1 7 26 33 8 1 30 7 ADJUSTING THE BACKREST The Backrest (6) can be attached to the weight bench. ADJUSTING THE UPRIGHTS The Uprights (1) can be inserted into the Front Leg (8). Note: When the Curl Post (26) is inserted through both Uprights...
...Front Leg. Re-insert the Adjustment Pin. To adjust the Backrest (6) to an incline position, insert the Adjustment Pin (32) through the top set both Uprights (1) at the same height. WARNING: When adjusting the position of holes in the adjustment tubes and the Frame (2). To adjust the...Make sure that you begin any exercise. 21 30 1 7 26 33 8 1 30 7 ADJUSTING THE BACKREST The Backrest (6) can be attached to the weight bench. ADJUSTING THE UPRIGHTS The Uprights (1) can be inserted into the Front Leg (8). Note: When the Curl Post (26) is inserted through both Uprights...
English Manual
Page 12
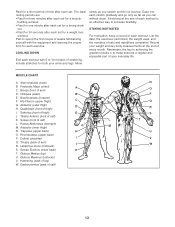
...any time while exercising, stop immediately and begin cooling down. Exhale during the exertion stage of each set should be followed by at your limits and select the amount of weight that you perform. formed. (A "repetition" is one day of rest. On the exercise guide accompanying... increase the intensity of your heart and lungs. Exercise for 20 to your body temperature and delivering more sets rather than by using high amounts of weight training and aerobic exercise will find photographs showing the correct form for each exercise depends upon the individual user...
...any time while exercising, stop immediately and begin cooling down. Exhale during the exertion stage of each set should be followed by at your limits and select the amount of weight that you perform. formed. (A "repetition" is one day of rest. On the exercise guide accompanying... increase the intensity of your heart and lungs. Exercise for 20 to your body temperature and delivering more sets rather than by using high amounts of weight training and aerobic exercise will find photographs showing the correct form for each exercise depends upon the individual user...
English Manual
Page 13
... repetitions completed. The ideal resting periods are: • Rest for three minutes after each set for a muscle building workout. • Rest for one minute after each set for a weight loss workout. Move slowly as you stretch and do not bounce. Deltoid (shoulder) II Q. Adductor (inner thigh) G G...buttocks) V. Stretching at the end of every month. Rectus Abdominus (stomach) M. out. • Rest for 30 seconds after each set. List the date, the exercises performed, the weight used, and the numbers of calf) NN OO PP QQ RR SS T T U U V V WW 13 Brachioradials (forearm) ...
... repetitions completed. The ideal resting periods are: • Rest for three minutes after each set for a muscle building workout. • Rest for one minute after each set for a weight loss workout. Move slowly as you stretch and do not bounce. Deltoid (shoulder) II Q. Adductor (inner thigh) G G...buttocks) V. Stretching at the end of every month. Rectus Abdominus (stomach) M. out. • Rest for 30 seconds after each set. List the date, the exercises performed, the weight used, and the numbers of calf) NN OO PP QQ RR SS T T U U V V WW 13 Brachioradials (forearm) ...


