
English Manual
Page 2
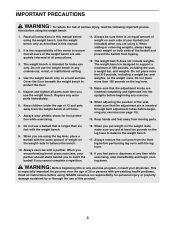
Central Time (excluding holidays), to the weight bench. Apply the replacement decal in the location shown. 2 until 7 p.m. If the decal is missing, or if it is not legible, please call our toll-free ... 12 PART LIST 14 EXPLODED DRAWING 15 ORDERING REPLACEMENT PARTS Back Cover FULL 90 DAY WARRANTY Back Cover WARNING DECAL PLACEMENT The decal shown at 1-800-736-6879, Monday through Saturday, 7 a.m.
Central Time (excluding holidays), to the weight bench. Apply the replacement decal in the location shown. 2 until 7 p.m. If the decal is missing, or if it is not legible, please call our toll-free ... 12 PART LIST 14 EXPLODED DRAWING 15 ORDERING REPLACEMENT PARTS Back Cover FULL 90 DAY WARRANTY Back Cover WARNING DECAL PLACEMENT The decal shown at 1-800-736-6879, Monday through Saturday, 7 a.m.
English Manual
Page 3
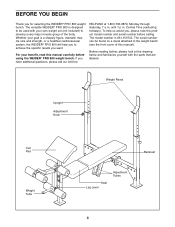
...the seat, make sure you use of the weight bench are using it. It is inserted through the use the weight bench. Cover the floor beneath the weight bench to balance the weight bench. 17. When adding or removing weights, always keep some weight on the leg lever. 13. Always remove ... from the front leg before beginning any commercial, rental, or institutional setting. 4. Read all users of this manual before using the weight bench. Make sure that all instructions in any exercise. 14. When you cannot complete a repetition. 16. When you put at all precautions...
...the seat, make sure you use of the weight bench are using it. It is inserted through the use the weight bench. Cover the floor beneath the weight bench to balance the weight bench. 17. When adding or removing weights, always keep some weight on the leg lever. 13. Always remove ... from the front leg before beginning any commercial, rental, or institutional setting. 4. Read all users of this manual before using the weight bench. Make sure that all instructions in any exercise. 14. When you cannot complete a repetition. 16. When you put at all precautions...
English Manual
Page 4
...designed to be found on a decal attached to achieve the specific results you to the weight bench (see the front cover of the body. If you for selecting the WEIDER® PRO 800 weight bench. The serial number can be used with the parts that are labeled. BEFORE YOU ... dramatic muscle size and strength, or a healthier cardiovascular system, the WEIDER® PRO 800 will help us assist you, please note the product model number and serial number before using the WEIDER® PRO 800 weight bench. Whether your own weight set (not included) to develop every major muscle group of this ...
...designed to be found on a decal attached to achieve the specific results you to the weight bench (see the front cover of the body. If you for selecting the WEIDER® PRO 800 weight bench. The serial number can be used with the parts that are labeled. BEFORE YOU ... dramatic muscle size and strength, or a healthier cardiovascular system, the WEIDER® PRO 800 will help us assist you, please note the product model number and serial number before using the WEIDER® PRO 800 weight bench. Whether your own weight set (not included) to develop every major muscle group of this ...
English Manual
Page 6
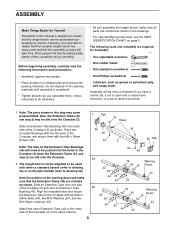
...Extension Tube to the Crossbar with either a standard barbell (refer to drawing 2a) or an Olympic barbell (refer to realize that the versatile weight bench has many parts and that by anyone. However, it is designed to ensure that the Extension Tubes (43) are oriented as shown in...carefully read the following tools (not included) are slid onto the Crossbar. 2a 2. Assembly will be more convenient if you assemble the weight bench, make sure that the weight bench can be adjusted to be slid onto the Crossbar (3). 1 Tab 34 Holes Slide an Extension Tube Bushing (45) onto each side...
...Extension Tube to the Crossbar with either a standard barbell (refer to drawing 2a) or an Olympic barbell (refer to realize that the versatile weight bench has many parts and that by anyone. However, it is designed to ensure that the Extension Tubes (43) are oriented as shown in...carefully read the following tools (not included) are slid onto the Crossbar. 2a 2. Assembly will be more convenient if you assemble the weight bench, make sure that the weight bench can be adjusted to be slid onto the Crossbar (3). 1 Tab 34 Holes Slide an Extension Tube Bushing (45) onto each side...
English Manual
Page 9
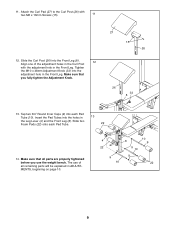
... Leg. Tighten the M10 x 48mm Adjustment Knob (33) into the holes in ADJUSTMENTS, beginning on page 10. 4 10 8 9 22 9 10 9 9 10 22 9 The use the weight bench. Tap two 3/4" Round Inner Caps (9) into the Front Leg (8). 12 Align one of all parts are properly tightened before you fully tighten the Adjustment Knob...
... Leg. Tighten the M10 x 48mm Adjustment Knob (33) into the holes in ADJUSTMENTS, beginning on page 10. 4 10 8 9 22 9 10 9 9 10 22 9 The use the weight bench. Tap two 3/4" Round Inner Caps (9) into the Front Leg (8). 12 Align one of all parts are properly tightened before you fully tighten the Adjustment Knob...
English Manual
Page 10
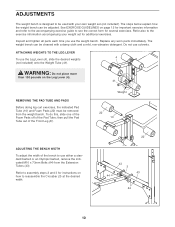
... and tighten all parts each time you use either a standard barbell or an Olympic barbell, remove the indicated M10 x 73mm Bolts (44) from the weight bench. The weight bench can be removed from the Extension Tubes (43). then pull the Pad Tube out of the Pad Tube... exercises. Replace any worn parts immediately. See EXERCISE GUIDELINES on how to see the correct form for additional exercises. The steps below explain how the weight bench can be used with a damp cloth and a mild, non-abrasive detergent. Refer to assembly steps 2 and 3 for instructions on page 12 for important ...
... and tighten all parts each time you use either a standard barbell or an Olympic barbell, remove the indicated M10 x 73mm Bolts (44) from the weight bench. The weight bench can be removed from the Extension Tubes (43). then pull the Pad Tube out of the Pad Tube... exercises. Replace any worn parts immediately. See EXERCISE GUIDELINES on how to see the correct form for additional exercises. The steps below explain how the weight bench can be used with a damp cloth and a mild, non-abrasive detergent. Refer to assembly steps 2 and 3 for instructions on page 12 for important ...
English Manual
Page 11
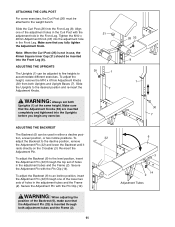
.... Note: When the Curl Post (26) is inserted through both adjustment tubes and the Frame (2). 11 32 6 3 14 2 Adjustment Tubes Slide the Uprights to the weight bench. WARNING: When adjusting the position of the adjustment holes in the Curl Post with the adjustment hole in use, the 45mm Square Inner Cap (21...
.... Note: When the Curl Post (26) is inserted through both adjustment tubes and the Frame (2). 11 32 6 3 14 2 Adjustment Tubes Slide the Uprights to the weight bench. WARNING: When adjusting the position of the adjustment holes in the Curl Post with the adjustment hole in use, the 45mm Square Inner Cap (21...
English Manual
Page 16
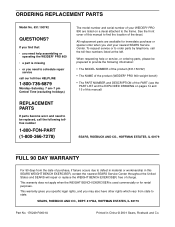
... to order parts by telephone, call the following information: • The MODEL NUMBER of the product (831.150742) • The NAME of the product (WEIDER® PRO 800 weight bench) • The PART NUMBER and DESCRIPTION of this manual) SEARS, ROEBUCK AND CO., HOFFMAN ESTATES, IL 60179 FULL 90 DAY WARRANTY For 90 days from...
... to order parts by telephone, call the following information: • The MODEL NUMBER of the product (831.150742) • The NAME of the product (WEIDER® PRO 800 weight bench) • The PART NUMBER and DESCRIPTION of this manual) SEARS, ROEBUCK AND CO., HOFFMAN ESTATES, IL 60179 FULL 90 DAY WARRANTY For 90 days from...


