
English Manual
Page 1
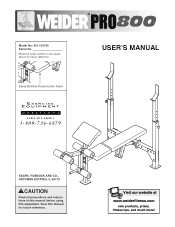
Visit our website at www.weiderfitness.com new products, prizes, fitness tips, and much more! Save this equipment. Write the serial number in this manual before using this manual for future reference. Serial Number Decal (Under Seat) USER'S MANUAL SEARS, ROEBUCK AND CO., HOFFMAN ESTATES, IL 60179 CAUTION Read all precautions and instructions in the space above for future reference. ® Model No. 831.150742 Serial No.
Visit our website at www.weiderfitness.com new products, prizes, fitness tips, and much more! Save this equipment. Write the serial number in this manual before using this manual for future reference. Serial Number Decal (Under Seat) USER'S MANUAL SEARS, ROEBUCK AND CO., HOFFMAN ESTATES, IL 60179 CAUTION Read all precautions and instructions in the space above for future reference. ® Model No. 831.150742 Serial No.
English Manual
Page 2
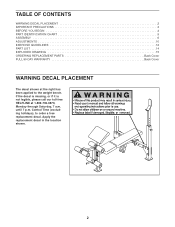
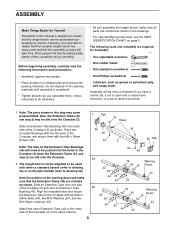
... the weight bench. Apply the replacement decal in the location shown. 2 until 7 p.m. If the decal is missing, or if it is not legible, please call our toll-free HELPLINE at the right has been applied to order a free replacement decal. TABLE OF CONTENTS WARNING DECAL PLACEMENT 2 IMPORTANT PRECAUTIONS 3 BEFORE YOU BEGIN 4 PART IDENTIFICATION CHART 5 ASSEMBLY 6 ADJUSTMENTS 10 EXERCISE GUIDELINES 12 PART LIST 14 EXPLODED...
... the weight bench. Apply the replacement decal in the location shown. 2 until 7 p.m. If the decal is missing, or if it is not legible, please call our toll-free HELPLINE at the right has been applied to order a free replacement decal. TABLE OF CONTENTS WARNING DECAL PLACEMENT 2 IMPORTANT PRECAUTIONS 3 BEFORE YOU BEGIN 4 PART IDENTIFICATION CHART 5 ASSEMBLY 6 ADJUSTMENTS 10 EXERCISE GUIDELINES 12 PART LIST 14 EXPLODED...
English Manual
Page 3
... the uprights before performing leg curls with the leg lever. 18. Always be sure there is intended for foot protection while exercising. 11. The weight bench does not include weights. Always exercise with pre-existing health problems. Read all instructions before beginning any commercial, rental, or institutional setting. 4. The weight bench is an equal amount of weight on both adjustment tubes before using. Cover the floor beneath the weight bench...
... the uprights before performing leg curls with the leg lever. 18. Always be sure there is intended for foot protection while exercising. 11. The weight bench does not include weights. Always exercise with pre-existing health problems. Read all instructions before beginning any commercial, rental, or institutional setting. 4. The weight bench is an equal amount of weight on both adjustment tubes before using. Cover the floor beneath the weight bench...
English Manual
Page 4
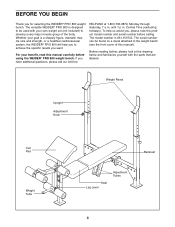
... cardiovascular system, the WEIDER® PRO 800 will help us assist you for selecting the WEIDER® PRO 800 weight bench. Whether your own weight set (not included) to achieve the specific results you want. The versatile WEIDER® PRO 800 is 831.150742. Weight Rests Upright Adjustment Knob Curl Pad Weight Tube Backrest Seat Leg Lever Adjustment Tubes 4 BEFORE YOU BEGIN Thank you , please note the product model number and serial number before using the WEIDER® PRO 800 weight bench.
... cardiovascular system, the WEIDER® PRO 800 will help us assist you for selecting the WEIDER® PRO 800 weight bench. Whether your own weight set (not included) to achieve the specific results you want. The versatile WEIDER® PRO 800 is 831.150742. Weight Rests Upright Adjustment Knob Curl Pad Weight Tube Backrest Seat Leg Lever Adjustment Tubes 4 BEFORE YOU BEGIN Thank you , please note the product model number and serial number before using the WEIDER® PRO 800 weight bench.
English Manual
Page 5
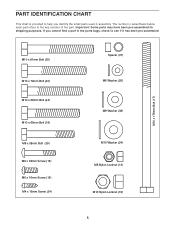
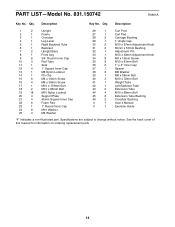
... (13) M10 Nylon Locknut (19) 5 The number in parenthesis below each part refers to see if it has been pre-assembled. PART IDENTIFICATION CHART This chart is provided to help you cannot find a part in the parts bags, check to the key number of the part. If you identify the small parts used in assembly. Important: Some parts may have been pre-assembled for shipping purposes.
... (13) M10 Nylon Locknut (19) 5 The number in parenthesis below each part refers to see if it has been pre-assembled. PART IDENTIFICATION CHART This chart is provided to help you cannot find a part in the parts bags, check to the key number of the part. If you identify the small parts used in assembly. Important: Some parts may have been pre-assembled for shipping purposes.
English Manual
Page 6
... you assemble the weight bench, make sure that by setting aside plenty of the Crossbar, and secure them , unless instructed to realize that the versatile weight bench has many parts and that the weight bench can be adjusted to be used with either a standard barbell (refer to drawing 2a) or an Olympic barbell (refer to the Crossbar with four M4 x 16mm Screws (34...
... you assemble the weight bench, make sure that by setting aside plenty of the Crossbar, and secure them , unless instructed to realize that the versatile weight bench has many parts and that the weight bench can be adjusted to be used with either a standard barbell (refer to drawing 2a) or an Olympic barbell (refer to the Crossbar with four M4 x 16mm Screws (34...
English Manual
Page 7
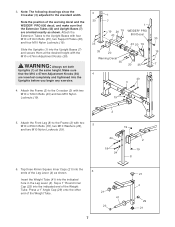
... Nylon Locknuts (19). 19 5. Attach the Front Leg (8) to the Crossbar (3) with four M10 x 81mm Bolts (35), two Support Plates (20), and four M10 Nylon Locknuts (19). 35 7 1 19 20 19 WEIDER® PRO 43 800 Decal 30 3 43 20 19 Slide the Uprights (1) into the Upright Bases (7) and secure them at the same height. Press a 1" Angle Cap (29) onto...
... Nylon Locknuts (19). 19 5. Attach the Front Leg (8) to the Crossbar (3) with four M10 x 81mm Bolts (35), two Support Plates (20), and four M10 Nylon Locknuts (19). 35 7 1 19 20 19 WEIDER® PRO 43 800 Decal 30 3 43 20 19 Slide the Uprights (1) into the Upright Bases (7) and secure them at the same height. Press a 1" Angle Cap (29) onto...
English Manual
Page 8
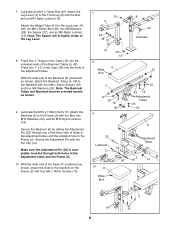
... the three sets of the adjustment tubes. Attach the Weight Tube (41) to the Front Leg (8) with the Pin Clip (14). Press two 1" x 2" Inner Caps (36) into the indicated ends of the Leg Lever. 7 19 4 39 38 37 8 40 Lubricate 8. Secure the Adjustment Pin with the Bolt and an M10 Nylon Locknut (19). Attach the Leg Lever (4) to the Leg Lever (4) with the Bolt, two M10...
... the three sets of the adjustment tubes. Attach the Weight Tube (41) to the Front Leg (8) with the Pin Clip (14). Press two 1" x 2" Inner Caps (36) into the indicated ends of the Leg Lever. 7 19 4 39 38 37 8 40 Lubricate 8. Secure the Adjustment Pin with the Bolt and an M10 Nylon Locknut (19). Attach the Leg Lever (4) to the Leg Lever (4) with the Bolt, two M10...
English Manual
Page 9
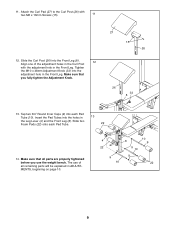
...) with the adjustment hole in the Front Leg. Insert the Pad Tubes into the adjustment hole in the Front Leg. Slide the Curl Post (26) into each Pad Tube. 22 14. The use the weight bench. Tap two 3/4" Round Inner Caps (9) into the Front Leg (8). 12 Align one of all parts are properly tightened before you fully tighten the Adjustment Knob. 27 15...
...) with the adjustment hole in the Front Leg. Insert the Pad Tubes into the adjustment hole in the Front Leg. Slide the Curl Post (26) into each Pad Tube. 22 14. The use the weight bench. Tap two 3/4" Round Inner Caps (9) into the Front Leg (8). 12 Align one of all parts are properly tightened before you fully tighten the Adjustment Knob. 27 15...
English Manual
Page 10
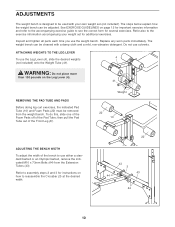
... use the weight bench. See EXERCISE GUIDELINES on page 12 for important exercise information and refer to the accompanying exercise guide to assembly steps 2 and 3 for several exercises. To do this, slide one of the Foam Pads off of the Front Leg (8). then pull the Pad Tube out of the Pad Tube; Refer to see the correct form for instructions on the Leg Lever (4). 41 REMOVING...
... use the weight bench. See EXERCISE GUIDELINES on page 12 for important exercise information and refer to the accompanying exercise guide to assembly steps 2 and 3 for several exercises. To do this, slide one of the Foam Pads off of the Front Leg (8). then pull the Pad Tube out of the Pad Tube; Refer to see the correct form for instructions on the Leg Lever (4). 41 REMOVING...
English Manual
Page 11
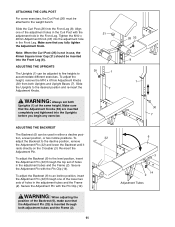
... used in the adjustment tubes and the Frame (2). WARNING: Always set of the adjustment holes in the Curl Post with the adjustment hole in the adjustment tubes and the Frame (2). To adjust the height, remove the M10 x 67mm Adjustment Knobs (30) from both Uprights (1) at the same height. To adjust the Backrest to the weight bench. To adjust the Backrest (6) to an incline position, insert the Adjustment Pin...
... used in the adjustment tubes and the Frame (2). WARNING: Always set of the adjustment holes in the Curl Post with the adjustment hole in the adjustment tubes and the Frame (2). To adjust the height, remove the M10 x 67mm Adjustment Knobs (30) from both Uprights (1) at the same height. To adjust the Backrest to the weight bench. To adjust the Backrest (6) to an incline position, insert the Adjustment Pin...
English Manual
Page 12
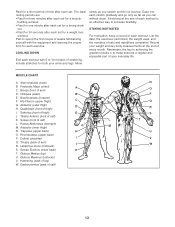
... to your workouts, vary the exercises from both weight training and aerobic exercise for each exercise depends upon the individual user. Find out what is an efficient way to warm up . WARMING UP Begin each set . On the exercise guide accompanying this manual you , stick with 5 to 10 minutes of stretching and light exercise to get a complete and well-balanced fitness program. Exhale during...
... to your workouts, vary the exercises from both weight training and aerobic exercise for each exercise depends upon the individual user. Find out what is an efficient way to warm up . WARMING UP Begin each set . On the exercise guide accompanying this manual you , stick with 5 to 10 minutes of stretching and light exercise to get a complete and well-balanced fitness program. Exhale during...
English Manual
Page 13
... minute after each workout is to 10 minutes of stretching. List the date, the exercises performed, the weight used, and the numbers of calf) NN OO PP QQ RR SS T T U U V V WW 13 Obliques (waist) BB E. Abductor (outer thigh) DD H. Quadriceps (front of calf) F F LL L. Soleus (front of thigh) I. Rectus Abdominus (stomach) M. Triceps (back of your arms and legs.
... minute after each workout is to 10 minutes of stretching. List the date, the exercises performed, the weight used, and the numbers of calf) NN OO PP QQ RR SS T T U U V V WW 13 Obliques (waist) BB E. Abductor (outer thigh) DD H. Quadriceps (front of calf) F F LL L. Soleus (front of thigh) I. Rectus Abdominus (stomach) M. Triceps (back of your arms and legs.
English Manual
Page 14
... 1 M8 x 58mm Bolt 40 3 M10 x 72mm Bolt 41 1 Weight Tube 42 1 Left Backrest Tube 43 2 Extension Tube 44 4 M10 x 68mm Bolt 45 2 Extension Tube Bushing 46 2 Crossbar Bushing # 1 User's Manual # 1 Exercise Guide "#" Indicates a non-illustrated part. See the back cover of this manual for information on ordering replacement parts. 14 PART LIST-Model No. 831.150742 R0601A Key No. Description Key No. Qty. Specifications are subject to change without notice. Qty.
... 1 M8 x 58mm Bolt 40 3 M10 x 72mm Bolt 41 1 Weight Tube 42 1 Left Backrest Tube 43 2 Extension Tube 44 4 M10 x 68mm Bolt 45 2 Extension Tube Bushing 46 2 Crossbar Bushing # 1 User's Manual # 1 Exercise Guide "#" Indicates a non-illustrated part. See the back cover of this manual for information on ordering replacement parts. 14 PART LIST-Model No. 831.150742 R0601A Key No. Description Key No. Qty. Specifications are subject to change without notice. Qty.
English Manual
Page 15
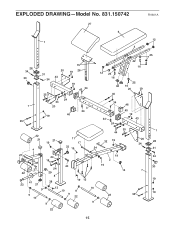
EXPLODED DRAWING-Model No. 831.150742 R0601A 27 6 12 1 5 28 34 30 7 35 15 31 34 20 43 19 26 19 45 34 35 24 44 20 3 34 19 46 12 25 16 36 40 42 16 25 16 20 19 34 34 24 46 45 19 43 22 21 21 19 4 11 17 33 19 35 44 32 19 24 21 24 3938 18 37 22 40 24 29 8 41 23 21 9 9 10 38 19 15 13 10 10 9 9 22 9 9 19 2 19 14 22 20 34 7 35 22 25 1 28 31 34 30 19 19 15
EXPLODED DRAWING-Model No. 831.150742 R0601A 27 6 12 1 5 28 34 30 7 35 15 31 34 20 43 19 26 19 45 34 35 24 44 20 3 34 19 46 12 25 16 36 40 42 16 25 16 20 19 34 34 24 46 45 19 43 22 21 21 19 4 11 17 33 19 35 44 32 19 24 21 24 3938 18 37 22 40 24 29 8 41 23 21 9 9 10 38 19 15 13 10 10 9 9 22 9 9 19 2 19 14 22 20 34 7 35 22 25 1 28 31 34 30 19 19 15
English Manual
Page 16
... SEARS will repair or replace the WEIGHT BENCH EXERCISER, free of purchase, if failure occurs due to state. To request service or to find that: • you need help or service, or ordering parts, please be replaced, call the following information: • The MODEL NUMBER of the product (831.150742) • The NAME of the product (WEIDER® PRO 800 weight bench) • The PART NUMBER and DESCRIPTION of the PART (see the PART LIST...
... SEARS will repair or replace the WEIGHT BENCH EXERCISER, free of purchase, if failure occurs due to state. To request service or to find that: • you need help or service, or ordering parts, please be replaced, call the following information: • The MODEL NUMBER of the product (831.150742) • The NAME of the product (WEIDER® PRO 800 weight bench) • The PART NUMBER and DESCRIPTION of the PART (see the PART LIST...


