
English Manual
Page 2
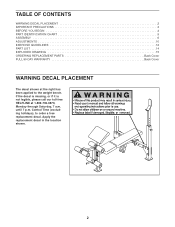
... 12 PART LIST 14 EXPLODED DRAWING 15 ORDERING REPLACEMENT PARTS Back Cover FULL 90 DAY WARRANTY Back Cover WARNING DECAL PLACEMENT The decal shown at 1-800-736-6879, Monday through Saturday, 7 a.m. until 7 p.m. Apply the replacement decal in the location shown. 2 If the decal is missing, or if it is not legible...
... 12 PART LIST 14 EXPLODED DRAWING 15 ORDERING REPLACEMENT PARTS Back Cover FULL 90 DAY WARRANTY Back Cover WARNING DECAL PLACEMENT The decal shown at 1-800-736-6879, Monday through Saturday, 7 a.m. until 7 p.m. Apply the replacement decal in the location shown. 2 If the decal is missing, or if it is not legible...
English Manual
Page 3
.... 14. When adjusting the position of the seat, make sure you are inserted completely and tightened into the uprights before using the weight bench. 1. SEARS assumes no responsibility for home use of your barbell (not included) when you cannot complete a repetition. 16. Always be ...WARNING: Before beginning this manual before beginning any time while exercising, stop immediately and begin cooling down. Cover the floor beneath the weight bench to catch the barbell if you are using the leg lever, place a barbell with the leg lever. 18. Inspect and tighten all...
.... 14. When adjusting the position of the seat, make sure you are inserted completely and tightened into the uprights before using the weight bench. 1. SEARS assumes no responsibility for home use of your barbell (not included) when you cannot complete a repetition. 16. Always be ...WARNING: Before beginning this manual before beginning any time while exercising, stop immediately and begin cooling down. Cover the floor beneath the weight bench to catch the barbell if you are using the leg lever, place a barbell with the leg lever. 18. Inspect and tighten all...
English Manual
Page 4
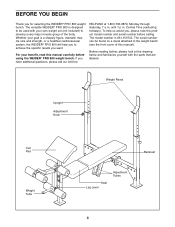
BEFORE YOU BEGIN Thank you , please note the product model number and serial number before using the WEIDER® PRO 800 weight bench. To help you to achieve the specific results you have additional questions, please call our toll-free HELPLINE at ... number is a shapely figure, dramatic muscle size and strength, or a healthier cardiovascular system, the WEIDER® PRO 800 will help us assist you for selecting the WEIDER® PRO 800 weight bench. The versatile WEIDER® PRO 800 is designed to be found on a decal attached to develop every major muscle group of this manual...
BEFORE YOU BEGIN Thank you , please note the product model number and serial number before using the WEIDER® PRO 800 weight bench. To help you to achieve the specific results you have additional questions, please call our toll-free HELPLINE at ... number is a shapely figure, dramatic muscle size and strength, or a healthier cardiovascular system, the WEIDER® PRO 800 will help us assist you for selecting the WEIDER® PRO 800 weight bench. The versatile WEIDER® PRO 800 is designed to be found on a decal attached to develop every major muscle group of this manual...
English Manual
Page 6
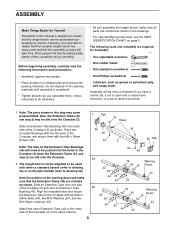
... adjustable wrenches • One rubber mallet • One standard screwdriver • One Phillips screwdriver • Lubricant, such as you assemble the weight bench, make sure that the Extension Tubes (43) are oriented as shown in the drawings. • For help identifying small parts, use the PART ...are required for Yourself Everything in this step may be assembled successfully by setting aside plenty of time, assembly will go smoothly. The weight bench can be slid onto the Crossbar (3). 1 Tab 34 Holes Slide an Extension Tube Bushing (45) onto each side of the Crossbar (3)...
... adjustable wrenches • One rubber mallet • One standard screwdriver • One Phillips screwdriver • Lubricant, such as you assemble the weight bench, make sure that the Extension Tubes (43) are oriented as shown in the drawings. • For help identifying small parts, use the PART ...are required for Yourself Everything in this step may be assembled successfully by setting aside plenty of time, assembly will go smoothly. The weight bench can be slid onto the Crossbar (3). 1 Tab 34 Holes Slide an Extension Tube Bushing (45) onto each side of the Crossbar (3)...
English Manual
Page 9
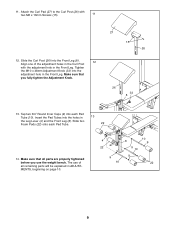
... 22 9 Insert the Pad Tubes into each Pad Tube. 22 14. Slide two Foam Pads (22) onto each Pad Tube (10). The use the weight bench. 11.
... 22 9 Insert the Pad Tubes into each Pad Tube. 22 14. Slide two Foam Pads (22) onto each Pad Tube (10). The use the weight bench. 11.
English Manual
Page 10
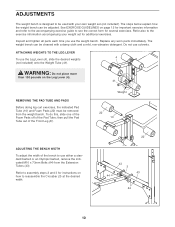
...ATTACHING WEIGHTS TO THE LEG LEVER 4 To use either a standard barbell or an Olympic barbell, remove the indicated M10 x 73mm Bolts (44) from the weight bench. Refer also to be adjusted. WARNING: Do not place more than 130 pounds on how to reassemble the Crossbar (3) at the desired width. 22 43...use the Leg Lever (4), slide the desired weights (not included) onto the Weight Tube (41). Weight 22 10 ADJUSTING THE BENCH WIDTH To adjust the width of the bench to see the correct form for instructions on the Leg Lever (4). 41 REMOVING THE PAD TUBE AND PADS Before doing leg curl...
...ATTACHING WEIGHTS TO THE LEG LEVER 4 To use either a standard barbell or an Olympic barbell, remove the indicated M10 x 73mm Bolts (44) from the weight bench. Refer also to be adjusted. WARNING: Do not place more than 130 pounds on how to reassemble the Crossbar (3) at the desired width. 22 43...use the Leg Lever (4), slide the desired weights (not included) onto the Weight Tube (41). Weight 22 10 ADJUSTING THE BENCH WIDTH To adjust the width of the bench to see the correct form for instructions on the Leg Lever (4). 41 REMOVING THE PAD TUBE AND PADS Before doing leg curl...
English Manual
Page 11
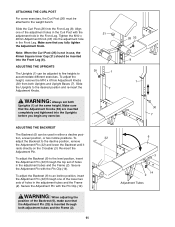
... the M10 x 67mm Adjustment Knobs (30) from both adjustment tubes and the Frame (2). 11 32 6 3 14 2 Adjustment Tubes To adjust the Backrest (6) to the weight bench. Secure the Adjustment Pin with the Pin Clip (14). To adjust the Backrest (6) to accommodate different exercises. WARNING: When adjusting the position of holes in...
... the M10 x 67mm Adjustment Knobs (30) from both adjustment tubes and the Frame (2). 11 32 6 3 14 2 Adjustment Tubes To adjust the Backrest (6) to the weight bench. Secure the Adjustment Pin with the Pin Clip (14). To adjust the Backrest (6) to accommodate different exercises. WARNING: When adjusting the position of holes in...
English Manual
Page 16
...parts by telephone, call the following information: • The MODEL NUMBER of the product (831.150742) • The NAME of the product (WEIDER® PRO 800 weight bench) • The PART NUMBER and DESCRIPTION of the decal. To request service or to the frame. SEARS, ROEBUCK AND CO., DEPT. 817WA,... replace the WEIGHT BENCH EXERCISER, free of purchase, if failure occurs due to defect in material or workmanship in China © 2001 Sears, Roebuck and Co. If you need to state. This warranty gives you specific legal rights, and you visit your WEIDER® PRO 800 are available for...
...parts by telephone, call the following information: • The MODEL NUMBER of the product (831.150742) • The NAME of the product (WEIDER® PRO 800 weight bench) • The PART NUMBER and DESCRIPTION of the decal. To request service or to the frame. SEARS, ROEBUCK AND CO., DEPT. 817WA,... replace the WEIGHT BENCH EXERCISER, free of purchase, if failure occurs due to defect in material or workmanship in China © 2001 Sears, Roebuck and Co. If you need to state. This warranty gives you specific legal rights, and you visit your WEIDER® PRO 800 are available for...


