
English Manual
Page 2
... CHART 5 ASSEMBLY 6 ADJUSTMENTS 10 EXERCISE GUIDELINES 12 PART LIST 14 EXPLODED DRAWING 15 ORDERING REPLACEMENT PARTS Back Cover FULL 90 DAY WARRANTY Back Cover WARNING DECAL PLACEMENT The decal shown at 1-800-736-6879, Monday through Saturday, 7 a.m. Central Time (excluding holidays), to the weight bench. Apply the replacement decal in the location shown. 2 If the...
... CHART 5 ASSEMBLY 6 ADJUSTMENTS 10 EXERCISE GUIDELINES 12 PART LIST 14 EXPLODED DRAWING 15 ORDERING REPLACEMENT PARTS Back Cover FULL 90 DAY WARRANTY Back Cover WARNING DECAL PLACEMENT The decal shown at 1-800-736-6879, Monday through Saturday, 7 a.m. Central Time (excluding holidays), to the weight bench. Apply the replacement decal in the location shown. 2 If the...
English Manual
Page 3
...is an equal amount of the barbell and prevent the barbell from the front leg before using the weight bench. Inspect and tighten all instructions before beginning any worn parts immediately. 6. Use the weight bench only as described in this product. 3 Keep children under the age of 35 or persons with... a partner. SEARS assumes no responsibility for persons over the age of 12 and pets away from moving parts. 8. The weight bench is intended for foot protection while exercising. 11. When you use only. Always exercise with pre-existing health problems. Read all...
...is an equal amount of the barbell and prevent the barbell from the front leg before using the weight bench. Inspect and tighten all instructions before beginning any worn parts immediately. 6. Use the weight bench only as described in this product. 3 Keep children under the age of 35 or persons with... a partner. SEARS assumes no responsibility for persons over the age of 12 and pets away from moving parts. 8. The weight bench is intended for foot protection while exercising. 11. When you use only. Always exercise with pre-existing health problems. Read all...
English Manual
Page 4
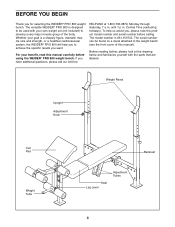
... serial number before using the WEIDER® PRO 800 weight bench. The model number is a shapely figure, dramatic muscle size and strength, or a healthier cardiovascular system, the WEIDER® PRO 800 will help us assist you... to develop every major muscle group of this manual carefully before calling. Whether your own weight set (not included) to achieve the specific results you for selecting the WEIDER® PRO 800 weight bench. until 7 p.m. For your benefit, read this manual). The serial number can be used with the parts...
... serial number before using the WEIDER® PRO 800 weight bench. The model number is a shapely figure, dramatic muscle size and strength, or a healthier cardiovascular system, the WEIDER® PRO 800 will help us assist you... to develop every major muscle group of this manual carefully before calling. Whether your own weight set (not included) to achieve the specific results you for selecting the WEIDER® PRO 800 weight bench. until 7 p.m. For your benefit, read this manual). The serial number can be used with the parts...
English Manual
Page 6
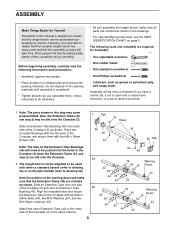
...time, assembly will take time. The following information and instructions: • Assembly requires two people. • Place all parts as you assemble the weight bench, make sure that the Extension Tubes (43) are oriented as shown. Before beginning assembly, carefully read the following tools ...included) are slid onto the Crossbar. 2a 2. Align the indicated holes and secure the Extension Tube to realize that the versatile weight bench has many parts and that by anyone. Note the position of the Crossbar (3) in a cleared area and remove the packing materials. However, ...
...time, assembly will take time. The following information and instructions: • Assembly requires two people. • Place all parts as you assemble the weight bench, make sure that the Extension Tubes (43) are oriented as shown. Before beginning assembly, carefully read the following tools ...included) are slid onto the Crossbar. 2a 2. Align the indicated holes and secure the Extension Tube to realize that the versatile weight bench has many parts and that by anyone. Note the position of the Crossbar (3) in a cleared area and remove the packing materials. However, ...
English Manual
Page 9
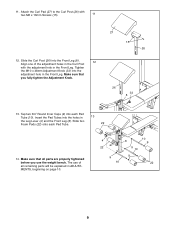
... the Front Leg (8). 12 Align one of all parts are properly tightened before you fully tighten the Adjustment Knob. 27 15 26 26 33 8 13. Insert the Pad Tubes into each Pad Tube. 22 14. The use the weight bench. Make sure that all remaining parts will be explained in 13 the Leg Lever...
... the Front Leg (8). 12 Align one of all parts are properly tightened before you fully tighten the Adjustment Knob. 27 15 26 26 33 8 13. Insert the Pad Tubes into each Pad Tube. 22 14. The use the weight bench. Make sure that all remaining parts will be explained in 13 the Leg Lever...
English Manual
Page 10
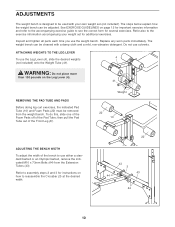
..., slide one of the Foam Pads off of the Front Leg (8). Inspect and tighten all parts each time you use either a standard barbell or an Olympic barbell, remove the indicated M10 x 73mm Bolts (44) from the weight bench. WARNING: Do not place more than 130 pounds on how to reassemble the Crossbar (3) at...
..., slide one of the Foam Pads off of the Front Leg (8). Inspect and tighten all parts each time you use either a standard barbell or an Olympic barbell, remove the indicated M10 x 73mm Bolts (44) from the weight bench. WARNING: Do not place more than 130 pounds on how to reassemble the Crossbar (3) at...
English Manual
Page 16
...; The MODEL NUMBER of the product (831.150742) • The NAME of the product (WEIDER® PRO 800 weight bench) • The PART NUMBER and DESCRIPTION of charge. If you find that: • you need to be prepared to state. All replacement parts are listed on pages 14 and 15 of this manual to find the location...
...; The MODEL NUMBER of the product (831.150742) • The NAME of the product (WEIDER® PRO 800 weight bench) • The PART NUMBER and DESCRIPTION of charge. If you find that: • you need to be prepared to state. All replacement parts are listed on pages 14 and 15 of this manual to find the location...


