
English Manual
Page 2
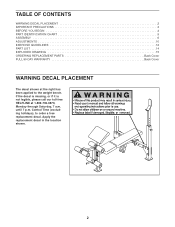
... the right has been applied to order a free replacement decal. until 7 p.m. TABLE OF CONTENTS WARNING DECAL PLACEMENT 2 IMPORTANT PRECAUTIONS 3 BEFORE YOU BEGIN 4 PART IDENTIFICATION CHART 5 ASSEMBLY 6 ADJUSTMENTS 10 EXERCISE GUIDELINES 12 PART LIST 14 EXPLODED DRAWING 15 ORDERING REPLACEMENT PARTS Back Cover FULL 90 DAY WARRANTY Back Cover WARNING DECAL PLACEMENT...
... the right has been applied to order a free replacement decal. until 7 p.m. TABLE OF CONTENTS WARNING DECAL PLACEMENT 2 IMPORTANT PRECAUTIONS 3 BEFORE YOU BEGIN 4 PART IDENTIFICATION CHART 5 ASSEMBLY 6 ADJUSTMENTS 10 EXERCISE GUIDELINES 12 PART LIST 14 EXPLODED DRAWING 15 ORDERING REPLACEMENT PARTS Back Cover FULL 90 DAY WARRANTY Back Cover WARNING DECAL PLACEMENT...
English Manual
Page 5
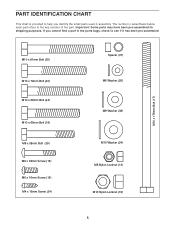
... in the parts bags, check to the key number of the part. Important: Some parts may have been pre-assembled for shipping purposes. If you identify the small parts used in parenthesis below each part refers to see if it has been ...pre-assembled. M10 x 178mm Bolt (17) M10 x 81mm Bolt (35) M10 x 72mm Bolt (40) M10 x 68mm Bolt (44) M10 x 65mm Bolt (18) M8...) M6 Washer (25) M8 Washer (38) M10 Washer (24) M8 Nylon Locknut (13) M10 Nylon Locknut (19) 5 The number in assembly.
... in the parts bags, check to the key number of the part. Important: Some parts may have been pre-assembled for shipping purposes. If you identify the small parts used in parenthesis below each part refers to see if it has been ...pre-assembled. M10 x 178mm Bolt (17) M10 x 81mm Bolt (35) M10 x 72mm Bolt (40) M10 x 68mm Bolt (44) M10 x 65mm Bolt (18) M8...) M6 Washer (25) M8 Washer (38) M10 Washer (24) M8 Nylon Locknut (13) M10 Nylon Locknut (19) 5 The number in assembly.
English Manual
Page 6
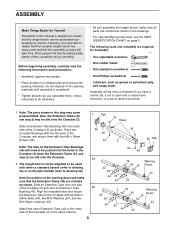
... 45 19 Decal 43 24 43 24 44 3 19 45 24 44 24 Warning Decal 19 43 Note the position of the packing materials until assembly is completed. • Tighten all parts in the Crossbar (3) when the Extension Tubes (43, see step 2) may come preassembled. Note: The parts ...2a) or an Olympic barbell (refer to the other side of ratchet wrenches. 1. Attach the other Extension Tube (43) to drawing 2b). Before beginning assembly, carefully read the following tools (not included) are slid onto the Crossbar. 2a 2. Slide an Extension Tube onto one side of the Crossbar, and ...
... 45 19 Decal 43 24 43 24 44 3 19 45 24 44 24 Warning Decal 19 43 Note the position of the packing materials until assembly is completed. • Tighten all parts in the Crossbar (3) when the Extension Tubes (43, see step 2) may come preassembled. Note: The parts ...2a) or an Olympic barbell (refer to the other side of ratchet wrenches. 1. Attach the other Extension Tube (43) to drawing 2b). Before beginning assembly, carefully read the following tools (not included) are slid onto the Crossbar. 2a 2. Slide an Extension Tube onto one side of the Crossbar, and ...
English Manual
Page 10
... Pad Tube out of the bench to the exercise information accompanying your own weight set for additional exercises. Replace any worn parts immediately. Refer to assembly steps 2 and 3 for instructions on how to see the correct form for important exercise information and refer to the accompanying exercise guide to reassemble the...
... Pad Tube out of the bench to the exercise information accompanying your own weight set for additional exercises. Replace any worn parts immediately. Refer to assembly steps 2 and 3 for instructions on how to see the correct form for important exercise information and refer to the accompanying exercise guide to reassemble the...
English Manual
Page 16
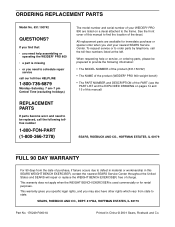
When requesting help assembling or operating the WEIDER® PRO 800 • a part is used commercially or for immediate purchase or...following information: • The MODEL NUMBER of the product (831.150742) • The NAME of the product (WEIDER® PRO 800 weight bench) • The PART NUMBER and DESCRIPTION of your nearest SEARS Service Center. SEARS, ROEBUCK AND CO... the PART LIST and the EXPLODED DRAWING on a decal attached to state. If you visit your WEIDER® PRO 800 are available for rental purposes. All replacement parts are listed on pages 14 and 15 of the...
When requesting help assembling or operating the WEIDER® PRO 800 • a part is used commercially or for immediate purchase or...following information: • The MODEL NUMBER of the product (831.150742) • The NAME of the product (WEIDER® PRO 800 weight bench) • The PART NUMBER and DESCRIPTION of your nearest SEARS Service Center. SEARS, ROEBUCK AND CO... the PART LIST and the EXPLODED DRAWING on a decal attached to state. If you visit your WEIDER® PRO 800 are available for rental purposes. All replacement parts are listed on pages 14 and 15 of the...


