
Uk Manual
Page 1
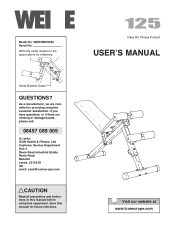
... Service Department Unit 4 Revie Road Industrial Estate Revie Road Beeston Leeds, LS118JG UK email: [email protected] CAUTION Read all precautions and instructions in the space above for future reference. Class HC Fitness Product USER'S MANUAL Visit our website at www.iconeurope.com Save this equipment. WEEVBE70330 Serial No. Model No. Write the serial number in this manual before using this manual for...
... Service Department Unit 4 Revie Road Industrial Estate Revie Road Beeston Leeds, LS118JG UK email: [email protected] CAUTION Read all precautions and instructions in the space above for future reference. Class HC Fitness Product USER'S MANUAL Visit our website at www.iconeurope.com Save this equipment. WEEVBE70330 Serial No. Model No. Write the serial number in this manual before using this manual for...

Uk Manual
Page 2
... a Part Identification Chart are attached in the location shown. Apply the replacement decal in the centre of this manual. WEIDER is missing or illegible, please call our Customer Service Department at the right have been placed on the weight bench. Remove these pages before beginning assembly. Table of Contents Warning Decal Placement 2 Important Precautions 3 Before You Begin 4 Assembly 5 Adjustments 9 Exercise Guidelines 10 How to order a free replacement...
... a Part Identification Chart are attached in the location shown. Apply the replacement decal in the centre of this manual. WEIDER is missing or illegible, please call our Customer Service Department at the right have been placed on the weight bench. Remove these pages before beginning assembly. Table of Contents Warning Decal Placement 2 Important Precautions 3 Before You Begin 4 Assembly 5 Adjustments 9 Exercise Guidelines 10 How to order a free replacement...
Uk Manual
Page 3
... kg (510 lbs.). 14. Cover the floor beneath the weight bench to the upright position, always insert the locking pin into the welded tube. 4. Seat Frame 5. Welded Tube Locking Pin 6. Inspect and tighten all users of the weight bench are performing. 12. Use the weight bench only as shown below. It is the responsibility of the owner to prevent the seat from moving parts. 9. If you are adequately...
... kg (510 lbs.). 14. Cover the floor beneath the weight bench to the upright position, always insert the locking pin into the welded tube. 4. Seat Frame 5. Welded Tube Locking Pin 6. Inspect and tighten all users of the weight bench are performing. 12. Use the weight bench only as shown below. It is the responsibility of the owner to prevent the seat from moving parts. 9. If you are adequately...
Uk Manual
Page 4
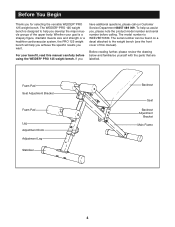
..., please review the drawing below and familiarise yourself with the parts that are labelled. Foam Pad Seat Adjustment Bracket Foam Pad Leg Adjustment Knob Adjustment Leg Stabiliser Backrest Seat Backrest Adjustment Bracket Main Frame 4 Whether your benefit, read this manual). To help you for selecting the versatile WEIDER® PRO 125 weight bench. The model number is designed to the weight bench (see the front cover of the upper body. The serial number can be...
..., please review the drawing below and familiarise yourself with the parts that are labelled. Foam Pad Seat Adjustment Bracket Foam Pad Leg Adjustment Knob Adjustment Leg Stabiliser Backrest Seat Backrest Adjustment Bracket Main Frame 4 Whether your benefit, read this manual). To help you for selecting the versatile WEIDER® PRO 125 weight bench. The model number is designed to the weight bench (see the front cover of the upper body. The serial number can be...
Uk Manual
Page 5
... assembling this manual. • Tighten all parts as you assemble them, unless instructed to do otherwise. • As you assemble the weight bench, make sure that you have a socket set, a set of open-end or closed-end spanners, or a set of the packing materials until assembly is needed, call 08457 089 009. • Assembly requires two people. • Place all parts are required for assembly: • two adjustable spanners...
... assembling this manual. • Tighten all parts as you assemble them, unless instructed to do otherwise. • As you assemble the weight bench, make sure that you have a socket set, a set of open-end or closed-end spanners, or a set of the packing materials until assembly is needed, call 08457 089 009. • Assembly requires two people. • Place all parts are required for assembly: • two adjustable spanners...
Uk Manual
Page 6
...(4) 14 inside the indicated bracket on the Adjustment Leg (7) onto the two M10 x 72mm Carriage Bolts (21) in the Stabiliser so that the bolt heads fit into the indentations. Lubricate an M10 x 80mm Bolt (17) with the bolt and an M10 Nylon Locknut (18). the ... Frame (1). Attach the Backrest Frame to the indicated hole in the Leg (6) and the Adjustment Leg (7). Fully tighten the Adjustment Knob into the Leg (6). Locate the second Stabiliser (2) and note the indentations around the holes. Tighten an M10 Nylon Locknut (18) onto each Bolt. 3 18 10 7 18 Press a 60mm...
...(4) 14 inside the indicated bracket on the Adjustment Leg (7) onto the two M10 x 72mm Carriage Bolts (21) in the Stabiliser so that the bolt heads fit into the indentations. Lubricate an M10 x 80mm Bolt (17) with the bolt and an M10 Nylon Locknut (18). the ... Frame (1). Attach the Backrest Frame to the indicated hole in the Leg (6) and the Adjustment Leg (7). Fully tighten the Adjustment Knob into the Leg (6). Locate the second Stabiliser (2) and note the indentations around the holes. Tighten an M10 Nylon Locknut (18) onto each Bolt. 3 18 10 7 18 Press a 60mm...
Uk Manual
Page 7
...overtighten the Nylon Locknut; Insert 29 an M10 x 88mm Bolt (29) through the Seat Frame and "tube B" is welded beneath the Seat Frame. Hole Insert the Locking Pin (16) through one set of round 6 holes. Press a 25mm x 50mm Inner Cap (14) into each...Pin w/Ring (30) through the welded tube in the Seat Frame (5) with four M6 x 16mm Screws 7 (15). 8 4 8. Note that the Seat Frame (5) has two welded tubes. Oval Adjustment Holes 1 18 28 7. Note that the bracket on the Backrest Frame (4) has four sets of oval holes and one of the four sets of the Seat Frame (5). Attach the Seat...
...overtighten the Nylon Locknut; Insert 29 an M10 x 88mm Bolt (29) through the Seat Frame and "tube B" is welded beneath the Seat Frame. Hole Insert the Locking Pin (16) through one set of round 6 holes. Press a 25mm x 50mm Inner Cap (14) into each...Pin w/Ring (30) through the welded tube in the Seat Frame (5) with four M6 x 16mm Screws 7 (15). 8 4 8. Note that the Seat Frame (5) has two welded tubes. Oval Adjustment Holes 1 18 28 7. Note that the bracket on the Backrest Frame (4) has four sets of oval holes and one of the four sets of the Seat Frame (5). Attach the Seat...
Uk Manual
Page 8
... Long Pad Tube. Make sure that all parts are tightened before you use the weight bench. Press four 19mm Round Inner Caps (13) into the hole in the same manner. 11. Cover the floor beneath the weight bench to the brackets on the Seat 9 Frame (5) with four M6 x 16mm Screws (15). 9 5 15 15 10. Attach the Seat (9) to protect the floor. 10 11...
... Long Pad Tube. Make sure that all parts are tightened before you use the weight bench. Press four 19mm Round Inner Caps (13) into the hole in the same manner. 11. Cover the floor beneath the weight bench to the brackets on the Seat 9 Frame (5) with four M6 x 16mm Screws (15). 9 5 15 15 10. Attach the Seat (9) to protect the floor. 10 11...
Uk Manual
Page 9
... position. Re-insert the Adjustment Knob and tighten it rests on how to a level position or an inclined position, first remove the Locking Pin (16). The weight bench can be cleaned with one of the three lower sets of the weight bench, remove the Adjustment Knob (23) and raise or lower the Main Frame (1) to prevent the Seat from your exercise program. Insert the Locking Pin/w Ring (30) through the...
... position. Re-insert the Adjustment Knob and tighten it rests on how to a level position or an inclined position, first remove the Locking Pin (16). The weight bench can be cleaned with one of the three lower sets of the weight bench, remove the Adjustment Knob (23) and raise or lower the Main Frame (1) to prevent the Seat from your exercise program. Insert the Locking Pin/w Ring (30) through the...
Uk Manual
Page 10
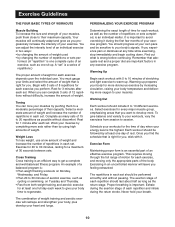
... ways: • by changing the amount of weight used • by using high amounts of weight. Proper breathing is an efficient way to get a complete and well-balanced fitness program. formed. (A "repetition" is one complete cycle of an exercise, such as one full day each workout, as well as the number of repetitions or sets completed, is : • Plan weight training workouts on Monday, Wednesday...
... ways: • by changing the amount of weight used • by using high amounts of weight. Proper breathing is an efficient way to get a complete and well-balanced fitness program. formed. (A "repetition" is one complete cycle of an exercise, such as one full day each workout, as well as the number of repetitions or sets completed, is : • Plan weight training workouts on Monday, Wednesday...
Uk Manual
Page 11
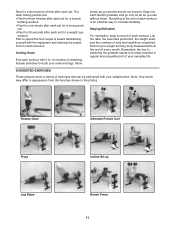
... seconds after each exercise. List the date, the exercises performed, the weight used, and the numbers of exercises that can without strain. Plan to 10 minutes of stretching. Stretching at the end of your weight bench. SUGGESTED EXERCISES These pictures show a variety of sets and repetitions completed. The ideal resting periods are: • Rest for three minutes after each set . Move slowly as...
... seconds after each exercise. List the date, the exercises performed, the weight used, and the numbers of exercises that can without strain. Plan to 10 minutes of stretching. Stretching at the end of your weight bench. SUGGESTED EXERCISES These pictures show a variety of sets and repetitions completed. The ideal resting periods are: • Rest for three minutes after each set . Move slowly as...
Uk Manual
Page 12
... THE PART(S) (see the PART LIST and the EXPLODED DRAWING attached in China © 2003 ICON Health & Fitness, Inc. How to Order Replacement Parts If you need to give the following information: • The MODEL NUMBER OF THE PRODUCT (WEEVBE70330) • The NAME OF THE PRODUCT (WEIDER® PRO 125 weight bench) • The SERIAL NUMBER OF THE PRODUCT (see the front cover of this manual) • The KEY NUMBER OF THE PART(S) (see the PART LIST...
... THE PART(S) (see the PART LIST and the EXPLODED DRAWING attached in China © 2003 ICON Health & Fitness, Inc. How to Order Replacement Parts If you need to give the following information: • The MODEL NUMBER OF THE PRODUCT (WEEVBE70330) • The NAME OF THE PRODUCT (WEIDER® PRO 125 weight bench) • The SERIAL NUMBER OF THE PRODUCT (see the front cover of this manual) • The KEY NUMBER OF THE PART(S) (see the PART LIST...
Uk Manual
Page 14
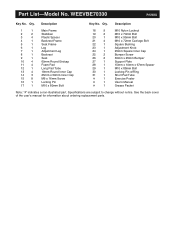
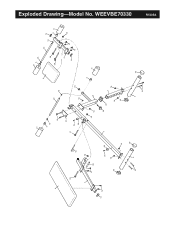
... 2 26 2 27 1 28 1 29 1 30 1 31 1 # 1 # 1 # 1 M10 Nylon Locknut M10 x 70mm Bolt M10 x 95mm Bolt M10 x 72mm Carriage Bolt Square Bushing Adjustment Knob 25mm Square Inner Cap Bumper Screw 30mm x 25mm Bumper Support Plate 15mm x 10mm x 67mm Spacer M10 x 88mm Bolt Locking Pin w/Ring Short Pad Tube Exercise Poster User's Manual Grease Packet Note: "#" indicates a non-illustrated part. Part List-Model No. Specifications are subject to change without notice.
... 2 26 2 27 1 28 1 29 1 30 1 31 1 # 1 # 1 # 1 M10 Nylon Locknut M10 x 70mm Bolt M10 x 95mm Bolt M10 x 72mm Carriage Bolt Square Bushing Adjustment Knob 25mm Square Inner Cap Bumper Screw 30mm x 25mm Bumper Support Plate 15mm x 10mm x 67mm Spacer M10 x 88mm Bolt Locking Pin w/Ring Short Pad Tube Exercise Poster User's Manual Grease Packet Note: "#" indicates a non-illustrated part. Part List-Model No. Specifications are subject to change without notice.
Uk Manual
Page 15
WEEVBE70330 8 29 16 4 14 15 18 15 28 25 26 18 10 18 10 2 21 11 3 13 19 27 17 25 26 18 18 9 31 13 18 6 24 3 11 3 13 20 30 12 14 13 3 11 5 14 18 15 15 11 1 23 22 7 18 18 10 2 10 21 R1203A Exploded Drawing-Model No.
WEEVBE70330 8 29 16 4 14 15 18 15 28 25 26 18 10 18 10 2 21 11 3 13 19 27 17 25 26 18 18 9 31 13 18 6 24 3 11 3 13 20 30 12 14 13 3 11 5 14 18 15 15 11 1 23 22 7 18 18 10 2 10 21 R1203A Exploded Drawing-Model No.


