
English Manual
Page 2
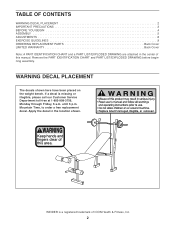
Keep hands and fingers clear of this manual. WARNING DECAL PLACEMENT The decals shown here have been placed on the weight bench. WEIDER is missing or illegible, please call our Customer Service Department toll-free at 1-800-999-3756, Monday through Friday, 6 a.m. If a decal is a registered trademark of ...
Keep hands and fingers clear of this manual. WARNING DECAL PLACEMENT The decals shown here have been placed on the weight bench. WEIDER is missing or illegible, please call our Customer Service Department toll-free at 1-800-999-3756, Monday through Friday, 6 a.m. If a decal is a registered trademark of ...
English Manual
Page 3
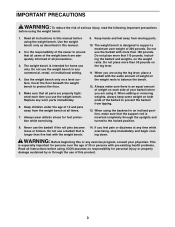
... rental, or institutional setting. 4. Do not place more than 50 pounds on the weight rests. Never use the weight bench in this manual before using the weight bench. If you use the weight bench. This is the responsibility of the owner to protect the floor. 5. Keep children ... barbell if the roll pins become loose or broken. The weight bench is intended for foot protection while exercising. 9. The weight bench is designed to the locked position. 8. When adding or removing weights, always keep some weight on each time you feel pain or dizziness at all precautions...
... rental, or institutional setting. 4. Do not place more than 50 pounds on the weight rests. Never use the weight bench in this manual before using the weight bench. If you use the weight bench. This is the responsibility of the owner to protect the floor. 5. Keep children ... barbell if the roll pins become loose or broken. The weight bench is intended for foot protection while exercising. 9. The weight bench is designed to the locked position. 8. When adding or removing weights, always keep some weight on each time you feel pain or dizziness at all precautions...
English Manual
Page 4
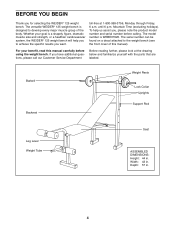
...excluding holidays). For your goal is a shapely figure, dramatic muscle size and strength, or a healthier cardiovascular system, the WEIDER® 125 weight bench will help us assist you want. The model number is designed to develop every major muscle group of this manual carefully... before calling. The versatile WEIDER® 125 weight bench is WEBE07920. To help you to the weight bench (see the front cover of the body. If you for selecting the WEIDER® 125 weight bench. Width: 43 in . 4 until 6 p.m. Depth: 57 ...
...excluding holidays). For your goal is a shapely figure, dramatic muscle size and strength, or a healthier cardiovascular system, the WEIDER® 125 weight bench will help us assist you want. The model number is designed to develop every major muscle group of this manual carefully... before calling. The versatile WEIDER® 125 weight bench is WEBE07920. To help you to the weight bench (see the front cover of the body. If you for selecting the WEIDER® 125 weight bench. Width: 43 in . 4 until 6 p.m. Depth: 57 ...
English Manual
Page 5
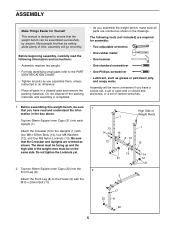
... more convenient if you have read the following tools (not included) are required for Yourself This manual is completed. • As you assemble the weight bench, make sure all parts are oriented as shown in the drawings. The decal must be facing up and the high side of ratchet wrenches. 1. ... the Front Leg (8) to ensure that the Crossbar and Uprights are oriented as shown. Do not dispose of Weight Rests 1 12 1 14 13 3 13 12 12 13 21 14 12 21 2 17 22 8 22 5 Be sure that the weight bench can be on the same side. Do not tighten the Locknuts yet. 2.
... more convenient if you have read the following tools (not included) are required for Yourself This manual is completed. • As you assemble the weight bench, make sure all parts are oriented as shown in the drawings. The decal must be facing up and the high side of ratchet wrenches. 1. ... the Front Leg (8) to ensure that the Crossbar and Uprights are oriented as shown. Do not dispose of Weight Rests 1 12 1 14 13 3 13 12 12 13 21 14 12 21 2 17 22 8 22 5 Be sure that the weight bench can be on the same side. Do not tighten the Locknuts yet. 2.

English Manual
Page 7
... all remaining parts will be explained in steps 1 and 3. 9. Tighten the M8 Nylon Locknuts (13) used in ADJUSTMENTS starting on the Frame (2). The use the weight bench.
... all remaining parts will be explained in steps 1 and 3. 9. Tighten the M8 Nylon Locknuts (13) used in ADJUSTMENTS starting on the Frame (2). The use the weight bench.
English Manual
Page 8
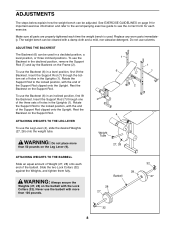
...the Backrest on page 9 for important exercise information and refer to the accompanying exercise guide to see the correct form for each time the weight bench is used in a level position, first lift the Backrest. Make sure all parts are properly tightened each exercise. The... parts immediately. To use the Backrest in an inclined position, first lift the Backrest. WARNING: Always secure the Weights (27, 28) on the Support Rod. ADJUSTMENTS The steps below explain how the weight bench can be cleaned with a damp cloth and a mild, non-abrasive detergent. Rest the Backrest on the Leg ...
...the Backrest on page 9 for important exercise information and refer to the accompanying exercise guide to see the correct form for each time the weight bench is used in a level position, first lift the Backrest. Make sure all parts are properly tightened each exercise. The... parts immediately. To use the Backrest in an inclined position, first lift the Backrest. WARNING: Always secure the Weights (27, 28) on the Support Rod. ADJUSTMENTS The steps below explain how the weight bench can be cleaned with a damp cloth and a mild, non-abrasive detergent. Rest the Backrest on the Leg ...
English Manual
Page 12
... , please be prepared to give the following information when calling: • The MODEL NUMBER of the product (WEBE07920) • The NAME of the product (WEIDER® 125 weight bench) • The SERIAL NUMBER of the product (see the front cover of this manual) • The KEY NUMBER and DESCRIPTION of the desired part(s) (see...
... , please be prepared to give the following information when calling: • The MODEL NUMBER of the product (WEBE07920) • The NAME of the product (WEIDER® 125 weight bench) • The SERIAL NUMBER of the product (see the front cover of this manual) • The KEY NUMBER and DESCRIPTION of the desired part(s) (see...


