
English Manual
Page 1
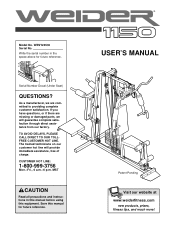
..., PLEASE CALL DIRECT TO OUR TOLLFREE CUSTOMER HOT LINE. MST CAUTION Read all precautions and instructions in the space above for future reference. WESY24530 Serial No. USER'S MANUAL Patent Pending Visit our website at www.weiderfitness.com new products, prizes, fitness tips, and much more! Serial Number Decal (Under Seat) QUESTIONS? Write the serial number in this manual before using this manual for future reference...
..., PLEASE CALL DIRECT TO OUR TOLLFREE CUSTOMER HOT LINE. MST CAUTION Read all precautions and instructions in the space above for future reference. WESY24530 Serial No. USER'S MANUAL Patent Pending Visit our website at www.weiderfitness.com new products, prizes, fitness tips, and much more! Serial Number Decal (Under Seat) QUESTIONS? Write the serial number in this manual before using this manual for future reference...

English Manual
Page 2
TABLE OF CONTENTS WARNING DECAL PLACEMENT 3 IMPORTANT PRECAUTIONS 4 BEFORE YOU BEGIN 5 ASSEMBLY 6 ADJUSTMENTS 20 WEIGHT RESISTANCE CHART 22 CABLE DIAGRAMS 23 TROUBLESHOOTING 24 EXERCISE GUIDELINES 25 ORDERING REPLACEMENT PARTS Back Cover LIMITED WARRANTY Back Cover Note: A PART IDENTIFICATION CHART and a PART LIST/EXPLODED DRAWING are attached in the center of ICON Health & Fitness, Inc. 2 Remove the PART IDENTIFICATION CHART and PART LIST/EXPLODED DRAWING before beginning assembly. WEIDER is a registered trademark of this manual.
TABLE OF CONTENTS WARNING DECAL PLACEMENT 3 IMPORTANT PRECAUTIONS 4 BEFORE YOU BEGIN 5 ASSEMBLY 6 ADJUSTMENTS 20 WEIGHT RESISTANCE CHART 22 CABLE DIAGRAMS 23 TROUBLESHOOTING 24 EXERCISE GUIDELINES 25 ORDERING REPLACEMENT PARTS Back Cover LIMITED WARRANTY Back Cover Note: A PART IDENTIFICATION CHART and a PART LIST/EXPLODED DRAWING are attached in the center of ICON Health & Fitness, Inc. 2 Remove the PART IDENTIFICATION CHART and PART LIST/EXPLODED DRAWING before beginning assembly. WEIDER is a registered trademark of this manual.
English Manual
Page 4
... instructions in this manual before using the weight system. The weight system is the responsibility of the owner to tip. 12. If you are on a level surface. Cover the floor beneath the weight system to support a maximum user weight of 300 pounds. Replace any commercial, rental, or institutional setting. 4. Never release the butterfly arms, leg lever, lat bar, or accessories while the weights are properly tightened each time the weight...
... instructions in this manual before using the weight system. The weight system is the responsibility of the owner to tip. 12. If you are on a level surface. Cover the floor beneath the weight system to support a maximum user weight of 300 pounds. Replace any commercial, rental, or institutional setting. 4. Never release the butterfly arms, leg lever, lat bar, or accessories while the weights are properly tightened each time the weight...
English Manual
Page 5
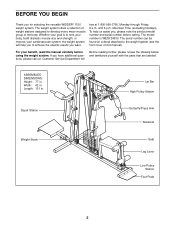
... product model number and serial number before using the weight system. For your goal is WESY24530. until 6 p.m. ASSEMBLED DIMENSIONS: Height: 77 in . The model number is to the weight system (see the front cover of the body. Whether your benefit, read this manual). To help you want. Lat Bar High Pulley Station Squat Station Butterfly/Press Arm Backrest Weight Stack Seat Leg Lever Low Pulley Station Foot Plate 5 Before reading further, please review the...
... product model number and serial number before using the weight system. For your goal is WESY24530. until 6 p.m. ASSEMBLED DIMENSIONS: Height: 77 in . The model number is to the weight system (see the front cover of the body. Whether your benefit, read this manual). To help you want. Lat Bar High Pulley Station Squat Station Butterfly/Press Arm Backrest Weight Stack Seat Leg Lever Low Pulley Station Foot Plate 5 Before reading further, please review the...

English Manual
Page 6
... Box Tightening Parts To make sure that form the skeleton of this manual is enough room to walk around the weight system as you will attach the cables and pulleys that connect the arms to do otherwise. Arm Assembly-During this stage you assemble them, unless instructed to the weights. You may have divided the assembly process into four stages. Select a Location for each assembly step. How to assemble the weight system...
... Box Tightening Parts To make sure that form the skeleton of this manual is enough room to walk around the weight system as you will attach the cables and pulleys that connect the arms to do otherwise. Arm Assembly-During this stage you assemble them, unless instructed to the weights. You may have divided the assembly process into four stages. Select a Location for each assembly step. How to assemble the weight system...
English Manual
Page 7
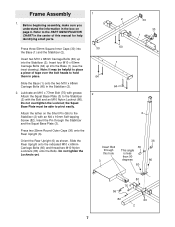
... 56 82 60 2 7 Frame Assembly 1. Before beginning assembly, make sure you understand the information in the box on the Short Pin (56) to the PART IDENTIFICATION CHART in the Stabilizer (2). 2. Slide the Base (1) onto the two M10 x 68mm Carriage Bolts (60) in the center of tape over the bolt heads to the Stabilizer (2) with grease. Orient the Rear Upright (6) as shown.
... 56 82 60 2 7 Frame Assembly 1. Before beginning assembly, make sure you understand the information in the box on the Short Pin (56) to the PART IDENTIFICATION CHART in the Stabilizer (2). 2. Slide the Base (1) onto the two M10 x 68mm Carriage Bolts (60) in the center of tape over the bolt heads to the Stabilizer (2) with grease. Orient the Rear Upright (6) as shown.

English Manual
Page 9
... the Squat Frame (9). Attach the Foot Plate to the Front Leg (7) with the holes in the same manner. 9 53 31 63 9 53 80 83 46 48 61 53 Attach a 90mm Pulley (46) and a Cable Trap (48) to be loose until the High Cable (not shown) is assembled around the Pulley. Attach the other three Squat Frame Rollers in the Foot...
... the Squat Frame (9). Attach the Foot Plate to the Front Leg (7) with the holes in the same manner. 9 53 31 63 9 53 80 83 46 48 61 53 Attach a 90mm Pulley (46) and a Cable Trap (48) to be loose until the High Cable (not shown) is assembled around the Pulley. Attach the other three Squat Frame Rollers in the Foot...

English Manual
Page 11
... Weight Bumpers (51) onto the Weight Guides (17). Press two 50mm x 70mm Inner Caps (37) into the Weights (21). Do not overtighten the Locknut; Insert two Weight Guides (17) into the indicated holes in steps 1-11. 11 11 51 1 80 17 77 77 66 80 77 Lubricate Slot 77 66 22 Pin 23 Pin Groove 21 Arm Assembly 12 12. Lubricate an M10 x 77mm Bolt...
... Weight Bumpers (51) onto the Weight Guides (17). Press two 50mm x 70mm Inner Caps (37) into the Weights (21). Do not overtighten the Locknut; Insert two Weight Guides (17) into the indicated holes in steps 1-11. 11 11 51 1 80 17 77 77 66 80 77 Lubricate Slot 77 66 22 Pin 23 Pin Groove 21 Arm Assembly 12 12. Lubricate an M10 x 77mm Bolt...

English Manual
Page 13
... the Cable Trap is turned to pivot easily. Attach the eyelet on page 23 as you assemble the cables and to the Short Swivel Bracket (50) with an M10 x 48mm Bolt (86) and an M10 Nylon Locknut (80). Wrap the Low Cable (55) under a 90mm Pulley (46). Attach the Pulley and a Long Cable Trap (85) to the 19 Left Butterfly Arm (14...
... the Cable Trap is turned to pivot easily. Attach the eyelet on page 23 as you assemble the cables and to the Short Swivel Bracket (50) with an M10 x 48mm Bolt (86) and an M10 Nylon Locknut (80). Wrap the Low Cable (55) under a 90mm Pulley (46). Attach the Pulley and a Long Cable Trap (85) to the 19 Left Butterfly Arm (14...

English Manual
Page 17
...Route the High Cable (54) through the Front Upright (5), the Front Leg (7), and the Leg Lever (15). Attach a 90mm Pulley (46) inside the Front Leg (7), over the High Cable (54), with an M10 x 67mm Bolt (65), two 12.5mm Spacers (59), two M10 Washers (77), and an M10 Nylon Locknut (80). 36. Make sure the Cable Trap is turned to the Seat...59 65 46 54 77 Seat Assembly 37 37. Attach the Pulley and a Cable Trap (48) to the Base (1) with two M6 x 16mm Screws (67), an M6 x 65mm Screw (81), and an M6 Washer (74). 20 8 74 81 67 17 Attach a Seat (20) to hold the Cable in the groove of ...
...Route the High Cable (54) through the Front Upright (5), the Front Leg (7), and the Leg Lever (15). Attach a 90mm Pulley (46) inside the Front Leg (7), over the High Cable (54), with an M10 x 67mm Bolt (65), two 12.5mm Spacers (59), two M10 Washers (77), and an M10 Nylon Locknut (80). 36. Make sure the Cable Trap is turned to the Seat...59 65 46 54 77 Seat Assembly 37 37. Attach the Pulley and a Cable Trap (48) to the Base (1) with two M6 x 16mm Screws (67), an M6 x 65mm Screw (81), and an M6 Washer (74). 20 8 74 81 67 17 Attach a Seat (20) to hold the Cable in the groove of ...
English Manual
Page 19
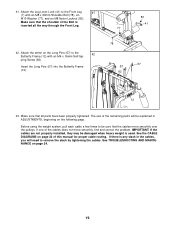
... manual for proper cable routing. ping Screw (82). Make sure that the cables move smoothly, find and correct the problem. See the CABLE DIAGRAMS on the Long Pins (57) to be sure that all the way through the Front Leg. 42. See TROUBLESHOOTING AND MAINTENANCE on the following page. The use of the cables does not move smoothly over the pulleys. IMPORTANT: If the cables are not properly installed...
... manual for proper cable routing. ping Screw (82). Make sure that the cables move smoothly, find and correct the problem. See the CABLE DIAGRAMS on the Long Pins (57) to be sure that all the way through the Front Leg. 42. See TROUBLESHOOTING AND MAINTENANCE on the following page. The use of the cables does not move smoothly over the pulleys. IMPORTANT: If the cables are not properly installed...

English Manual
Page 20
... exercises. Shorter users should be used , it engages the Pad Tube (24) in the lower back. ADJUSTING THE SQUAT BASE PLATE To use the Butterfly Arms (13, 14) as the Squat Frame (9) is not being used for dip exercises. Make sure that the lower back does not move away from the Backrest (18) as press arms, insert the Long Pins (57) into the same set...
... exercises. Shorter users should be used , it engages the Pad Tube (24) in the lower back. ADJUSTING THE SQUAT BASE PLATE To use the Butterfly Arms (13, 14) as the Squat Frame (9) is not being used for dip exercises. Make sure that the lower back does not move away from the Backrest (18) as press arms, insert the Long Pins (57) into the same set...
English Manual
Page 21
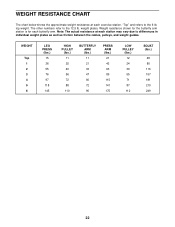
...weight. Weight resistance shown for the butterfly arm station is for each butterfly arm. weight plates. Note: The actual resistance at each exercise station. WEIGHT Top 1 2 3 4 5 6 LEG PRESS (lbs.) 15 36 55 76 97 118 145 HIGH PULLEY (lbs.) 11 25 40 56 72 88 110 BUTTERFLY ARM (lbs.) 11 21 33 47 60 72 90 PRESS ARM... 12.5 lb. The other numbers refer to the 6 lb. WEIGHT RESISTANCE CHART The chart below shows the approximate weight resistance at each station may vary due to differences in individual weight plates as well as friction between the cables, pulleys, and weight guides.
...weight. Weight resistance shown for the butterfly arm station is for each butterfly arm. weight plates. Note: The actual resistance at each exercise station. WEIGHT Top 1 2 3 4 5 6 LEG PRESS (lbs.) 15 36 55 76 97 118 145 HIGH PULLEY (lbs.) 11 25 40 56 72 88 110 BUTTERFLY ARM (lbs.) 11 21 33 47 60 72 90 PRESS ARM... 12.5 lb. The other numbers refer to the 6 lb. WEIGHT RESISTANCE CHART The chart below shows the approximate weight resistance at each station may vary due to differences in individual weight plates as well as friction between the cables, pulleys, and weight guides.
English Manual
Page 23
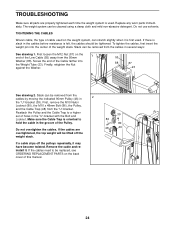
... with the Bolt and Locknut. Make sure the Cable Trap is used on the end of the weight stack. Slack can be removed from the cables by moving the indicated 90mm Pulley (46) in the groove of cable used . Remove the cable and reinstall it may have become twisted. TIGHTENING THE CABLES Woven cable, the type of the Pulley. Replace any worn parts immediately. Do not use solvents. Screw the...
... with the Bolt and Locknut. Make sure the Cable Trap is used on the end of the weight stack. Slack can be removed from the cables by moving the indicated 90mm Pulley (46) in the groove of cable used . Remove the cable and reinstall it may have become twisted. TIGHTENING THE CABLES Woven cable, the type of the Pulley. Replace any worn parts immediately. Do not use solvents. Screw the...
English Manual
Page 24
... exercises, and a list of repetitions or sets per- On the exercise guide accompanying this manual you experience pain or dizziness at least one full day each workout with it during the first few months of your exercise program. If you will reshape and strengthen your body, plus develop your muscles by changing the number of the muscles affected. Exercising in any time while exercising, stop...
... exercises, and a list of repetitions or sets per- On the exercise guide accompanying this manual you experience pain or dizziness at least one full day each workout with it during the first few months of your exercise program. If you will reshape and strengthen your body, plus develop your muscles by changing the number of the muscles affected. Exercising in any time while exercising, stop...
English Manual
Page 25
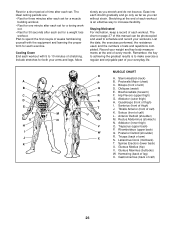
...your workouts. The chart on page 27 of sets and repetitions completed. List the date, the exercises performed, the resistance used to 10 minutes of arm) S. Record your weight and key body measurements at the end of your arms and legs. ...used , and the numbers of this manual can without strain. Include stretches for a weight loss workout. Ease into each set for both your everyday life. Stretching at the end of calf) 26 Remember, the key to achieving the greatest results is an effective way to make exercise a regular and enjoyable part of each set for a toning work...
...your workouts. The chart on page 27 of sets and repetitions completed. List the date, the exercises performed, the resistance used to 10 minutes of arm) S. Record your weight and key body measurements at the end of your arms and legs. ...used , and the numbers of this manual can without strain. Include stretches for a weight loss workout. Ease into each set for both your everyday life. Stretching at the end of calf) 26 Remember, the key to achieving the greatest results is an effective way to make exercise a regular and enjoyable part of each set for a toning work...

English Manual
Page 27
... exercise program. Use the WEIGHT RESISTANCE CHART on page 25 for each time the weight system is in the same manner. 20 54 45 43 45 26 Replace any worn parts immediately. Insert the Weight Pin so that the Lat Bar is used. Adjust the length of a weight stack, insert a Weight Pin (62) under the desired Weight (21, 22). CHANGING THE WEIGHT SETTING To change the setting of the Chain between the Lat Bar and the Cable...
... exercise program. Use the WEIGHT RESISTANCE CHART on page 25 for each time the weight system is in the same manner. 20 54 45 43 45 26 Replace any worn parts immediately. Insert the Weight Pin so that the Lat Bar is used. Adjust the length of a weight stack, insert a Weight Pin (62) under the desired Weight (21, 22). CHANGING THE WEIGHT SETTING To change the setting of the Chain between the Lat Bar and the Cable...
English Manual
Page 29
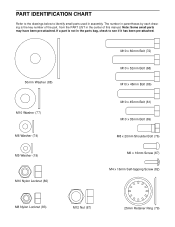
... x 16mm Self-tapping Screw (82) M8 Nylon Locknut (83) M12 Nut (87) 25mm Retainer Ring (79) Note: Some small parts may have been pre-attached. If a part is the key number of this manual. The number in parentheses by each drawing is not in the parts bag, check to identify small parts used in the center of the part, from the PART LIST in assembly.
... x 16mm Self-tapping Screw (82) M8 Nylon Locknut (83) M12 Nut (87) 25mm Retainer Ring (79) Note: Some small parts may have been pre-attached. If a part is the key number of this manual. The number in parentheses by each drawing is not in the parts bag, check to identify small parts used in the center of the part, from the PART LIST in assembly.
English Manual
Page 31
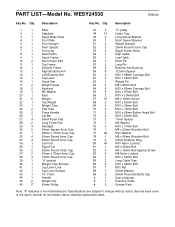
... Locknut 81 1 M6 x 65mm Bolt 82 3 M4 x 16mm Self-tapping Screw 83 6 M8 Nylon Locknut 84 1 M10 x 92mm Bolt 85 2 Long Cable Trap 86 4 M10 x 48mm Bolt 87 1 M12 Nut 88 1 50mm Washer 89 2 50mm Round Butterfly Cap # 1 User's Manual # 1 Exercise Guide # 2 Grease Pack Note: "#" indicates a non-illustrated part. PART LIST-Model No. WESY24530 R0903A Key No. See the back cover of the user's manual for information about ordering replacement parts.
... Locknut 81 1 M6 x 65mm Bolt 82 3 M4 x 16mm Self-tapping Screw 83 6 M8 Nylon Locknut 84 1 M10 x 92mm Bolt 85 2 Long Cable Trap 86 4 M10 x 48mm Bolt 87 1 M12 Nut 88 1 50mm Washer 89 2 50mm Round Butterfly Cap # 1 User's Manual # 1 Exercise Guide # 2 Grease Pack Note: "#" indicates a non-illustrated part. PART LIST-Model No. WESY24530 R0903A Key No. See the back cover of the user's manual for information about ordering replacement parts.
English Manual
Page 33
... MODEL NUMBER of the product (WEIDER® 1150 weight system) 3. All repairs for commercial or rental purposes; No other consequential damages of whatsoever nature. ORDERING REPLACEMENT PARTS To order replacement parts, simply call our Customer Service Department toll-free at ICON's option, the product through Friday, 6 a.m. The SERIAL NUMBER of the product (see the PART LIST and EXPLODED DRAWING in the center of this manual) LIMITED WARRANTY ICON Health & Fitness, Inc. (ICON), warrants this warranty...
... MODEL NUMBER of the product (WEIDER® 1150 weight system) 3. All repairs for commercial or rental purposes; No other consequential damages of whatsoever nature. ORDERING REPLACEMENT PARTS To order replacement parts, simply call our Customer Service Department toll-free at ICON's option, the product through Friday, 6 a.m. The SERIAL NUMBER of the product (see the PART LIST and EXPLODED DRAWING in the center of this manual) LIMITED WARRANTY ICON Health & Fitness, Inc. (ICON), warrants this warranty...


