Safety Information
Page 81
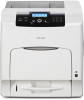
...configuring authentication using the management tool to manual. • The printed and electronic versions of the printer. Quick Installation Guide Contains procedures for installing the printer driver. It explains security functions that are relevant to what you can use to a computer. Be sure... to the printer, be installed in English only. 11 To avoid injury and prevent damage to read this printer. This manual is for using the printer driver, and logging on the driver CD-ROM. Software Guide Contains information about ...
...configuring authentication using the management tool to manual. • The printed and electronic versions of the printer. Quick Installation Guide Contains procedures for installing the printer driver. It explains security functions that are relevant to what you can use to a computer. Be sure... to the printer, be installed in English only. 11 To avoid injury and prevent damage to read this printer. This manual is for using the printer driver, and logging on the driver CD-ROM. Software Guide Contains information about ...
Safety Information
Page 101
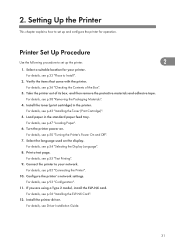
...of its box, and then remove the protective materials and adhesive tape. Install the printer driver. Take the printer out of the Box". 3. Load paper in the printer. For details, see Driver Installation Guide. 31 Install the toner (print cartridge) in the standard paper feed tray.... For details, see p.50 "Turning the Printer's Power On and Off". 7. For details, see p.43 "Installing the Toner (Print...
...of its box, and then remove the protective materials and adhesive tape. Install the printer driver. Take the printer out of the Box". 3. Load paper in the printer. For details, see Driver Installation Guide. 31 Install the toner (print cartridge) in the standard paper feed tray.... For details, see p.50 "Turning the Printer's Power On and Off". 7. For details, see p.43 "Installing the Toner (Print...
Safety Information
Page 106
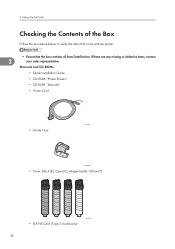
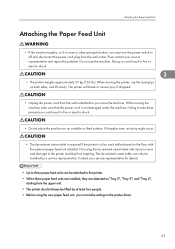
Manuals and CD-ROMs • Quick Installation Guide • CD-ROM "Printer Drivers" • CD-ROM "Manuals" • Power Cord BYK154 • Ferrite Core BYK012 • Toner: Black (K), Cyan (C), Magenta (M), Yellow (Y) BYK013 • ELP-NX Card (Type 2 model only) 36 2. Setting Up the Printer Checking the Contents of the Box Follow the procedure below to verify the items that come with the printer. • Ensure that the box contains all items listed below. If there are any missing or defective items, contact 2 your sales representative.
Manuals and CD-ROMs • Quick Installation Guide • CD-ROM "Printer Drivers" • CD-ROM "Manuals" • Power Cord BYK154 • Ferrite Core BYK012 • Toner: Black (K), Cyan (C), Magenta (M), Yellow (Y) BYK013 • ELP-NX Card (Type 2 model only) 36 2. Setting Up the Printer Checking the Contents of the Box Follow the procedure below to verify the items that come with the printer. • Ensure that the box contains all items listed below. If there are any missing or defective items, contact 2 your sales representative.
Safety Information
Page 133
... machine topples, or if a cover or other part gets broken, you move the machine. Doing so could result in fire or electric shock. 3 • The printer weights approximately 57 kg (126 lb.). If it topples over, an injury might occur. • The tip-resistant caster table is required if the..., you must turn the power switch to off and disconnect the power cord plug from the wall outlet before you must make settings in the printer driver. 63 When moving the machine, take these precautions could result in fire or electric shock. • Do not place the machine on an unstable or...
... machine topples, or if a cover or other part gets broken, you move the machine. Doing so could result in fire or electric shock. 3 • The printer weights approximately 57 kg (126 lb.). If it topples over, an injury might occur. • The tip-resistant caster table is required if the..., you must turn the power switch to off and disconnect the power cord plug from the wall outlet before you must make settings in the printer driver. 63 When moving the machine, take these precautions could result in fire or electric shock. • Do not place the machine on an unstable or...
Safety Information
Page 137
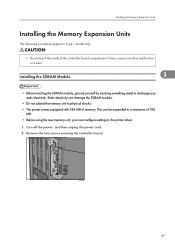
Static electricity can be expanded to a maximum of 768 MB. • Before using the new memory unit, you must configure settings in the printer driver. 1. It may cause a machine malfunction or a burn. Remove the two screws securing the controller board. BYK041 67 Installing the Memory Expansion Units Installing the Memory ... discharge any static electricity. Installing the SDRAM Module 3 • Before touching the SDRAM module, ground yourself by touching something metal to physical shocks. • The printer comes equipped with 384 MB of the controller board compartment.
Static electricity can be expanded to a maximum of 768 MB. • Before using the new memory unit, you must configure settings in the printer driver. 1. It may cause a machine malfunction or a burn. Remove the two screws securing the controller board. BYK041 67 Installing the Memory Expansion Units Installing the Memory ... discharge any static electricity. Installing the SDRAM Module 3 • Before touching the SDRAM module, ground yourself by touching something metal to physical shocks. • The printer comes equipped with 384 MB of the controller board compartment.

Safety Information
Page 140
... "Test Printing". • p.55 "Test Printing" Installing the Hard Disk • Before touching the hard disk, touch something metal to reconfigure the printer driver settings. 70 Installing Options 9. If you can damage the hard disk. • Do not subject the hard disk to physical shocks. • Install...from the [List/Test Print] menu. Static electricity can check the memory unit is already installed. Fasten the controller board to the printer using the new hard disk, be sure to discharge any static electricity. If the hard disk comes into contact with the SDRAM module,...
... "Test Printing". • p.55 "Test Printing" Installing the Hard Disk • Before touching the hard disk, touch something metal to reconfigure the printer driver settings. 70 Installing Options 9. If you can damage the hard disk. • Do not subject the hard disk to physical shocks. • Install...from the [List/Test Print] menu. Static electricity can check the memory unit is already installed. Fasten the controller board to the printer using the new hard disk, be sure to discharge any static electricity. If the hard disk comes into contact with the SDRAM module,...

Safety Information
Page 160
... to print images taken with your digital camera. • Make sure your computer's USB interface, or a USB hub. 4 The printer is now connected to the printer. For details, see "Installing the Printer Driver Using USB", Driver Installation Guide. Connect the opposite end's flat connector to the desired device such as your digital camera supports PictBridge...
... to print images taken with your digital camera. • Make sure your computer's USB interface, or a USB hub. 4 The printer is now connected to the printer. For details, see "Installing the Printer Driver Using USB", Driver Installation Guide. Connect the opposite end's flat connector to the desired device such as your digital camera supports PictBridge...

Safety Information
Page 162
... half pitch 36-pin parallel cable and host computer parallel port. • Use shielded interface cable. Install the printer driver. Connecting the Printer Parallel Cable Connection The type of America: properly shielded and grounded cables and connectors must be used for connections to... with your computer, and then secure the cable. Make sure to the computer. 4. For details, see " Installing the Printer Driver Using Parallel Cable", Driver Installation Guide. • For details about installing the 1284 interface board, see "Installing the Interface Units". • p.75...
... half pitch 36-pin parallel cable and host computer parallel port. • Use shielded interface cable. Install the printer driver. Connecting the Printer Parallel Cable Connection The type of America: properly shielded and grounded cables and connectors must be used for connections to... with your computer, and then secure the cable. Make sure to the computer. 4. For details, see " Installing the Printer Driver Using Parallel Cable", Driver Installation Guide. • For details about installing the 1284 interface board, see "Installing the Interface Units". • p.75...
Safety Information
Page 190
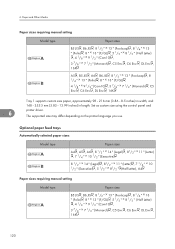
The supported size may differ depending on the printer language you use. Optional paper feed trays Automatically selected paper sizes Model type Paper sizes A4 , A5 , A6 , 8 1/2 " 14 " (Legal) , 81/2 " 11 " (Letter) , 7 1/4 " 10 1/2 " (Executive) 8 1/2 " ... - 216 mm (3.86 - 8.5 inches) in width, and 148 - 355.5 mm (5.83 - 13.99 inches) in length. Set as custom size using the control panel and 6 printer driver.
The supported size may differ depending on the printer language you use. Optional paper feed trays Automatically selected paper sizes Model type Paper sizes A4 , A5 , A6 , 8 1/2 " 14 " (Legal) , 81/2 " 11 " (Letter) , 7 1/4 " 10 1/2 " (Executive) 8 1/2 " ... - 216 mm (3.86 - 8.5 inches) in width, and 148 - 355.5 mm (5.83 - 13.99 inches) in length. Set as custom size using the control panel and 6 printer driver.
Safety Information
Page 191
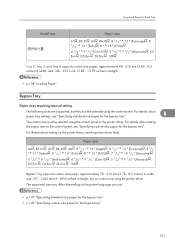
...inches) in width, and 148 - 355.5 mm (5.83 - 13.99 inches) in length. For details about setting the paper size on the printer driver, see the printer driver Help. For details about paper size settings, see "Specifying custom size paper for the bypass tray". Paper sizes A4 , B5 JIS , A5 , ...sizes requiring manual setting The following sizes are supported, but they must be selected using the control panel or the printer driver. The supported size may differ depending on the printer language you use. • p.147 "Specifying standard size paper for the bypass tray" • p.149 "...
...inches) in width, and 148 - 355.5 mm (5.83 - 13.99 inches) in length. For details about setting the paper size on the printer driver, see the printer driver Help. For details about paper size settings, see "Specifying custom size paper for the bypass tray". Paper sizes A4 , B5 JIS , A5 , ...sizes requiring manual setting The following sizes are supported, but they must be selected using the control panel or the printer driver. The supported size may differ depending on the printer language you use. • p.147 "Specifying standard size paper for the bypass tray" • p.149 "...
Safety Information
Page 193
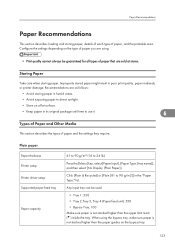
... to 24 lb.) Press the [Menu] key, select [Paper Input], [Paper Type: (tray name)], and then select [No Display (Plain Paper)]. Plain paper Paper thickness Printer setup Printer driver setup Supported paper feed tray Paper capacity 61 to 90 g/m2 (16 to 90 g/m2)] in poor print quality, paper misfeeds, or...
... to 24 lb.) Press the [Menu] key, select [Paper Input], [Paper Type: (tray name)], and then select [No Display (Plain Paper)]. Plain paper Paper thickness Printer setup Printer driver setup Supported paper feed tray Paper capacity 61 to 90 g/m2 (16 to 90 g/m2)] in poor print quality, paper misfeeds, or...
Safety Information
Page 194
...] key, select [Paper Input], [Paper Type: (tray name)], and then select [Middle Thick]. Paper and Other Media Duplex printing Maintenance 6 Middle thick Paper thickness Printer setup Printer driver setup Supported paper feed tray Duplex printing Additional cautions Supported • [Plain Paper 1]: 61 to 80 g/m2 (16 to 21 lb.) • [Plain Paper 2]: 81...
...] key, select [Paper Input], [Paper Type: (tray name)], and then select [Middle Thick]. Paper and Other Media Duplex printing Maintenance 6 Middle thick Paper thickness Printer setup Printer driver setup Supported paper feed tray Duplex printing Additional cautions Supported • [Plain Paper 1]: 61 to 80 g/m2 (16 to 21 lb.) • [Plain Paper 2]: 81...

Safety Information
Page 195
Printer driver setup • [Thick Paper 1]: Click [Thick 1 (106 to 130 g/m2)] in the "Paper Type:" list. • ... the bypass tray. Supported paper feed tray Any input tray can be used. When using plain paper. Thin paper Paper thickness Printer setup 52 to 60.2 g/m2 (14 to 256 g/m2)] in "Input Tray:" list, and then Click [Thick 4 ...[Thick Paper 3]: 164 to 220 g/m2 (44 to 59 lb.) • [Thick Paper 4]: 221 to 256 g/m2 (59 to 68 lb.) Printer setup • Press the [Menu] key, select [Paper Input], [Paper Type: (tray name)], and then select [Thick Paper 1], [Thick Paper 2]...
Printer driver setup • [Thick Paper 1]: Click [Thick 1 (106 to 130 g/m2)] in the "Paper Type:" list. • ... the bypass tray. Supported paper feed tray Any input tray can be used. When using plain paper. Thin paper Paper thickness Printer setup 52 to 60.2 g/m2 (14 to 256 g/m2)] in "Input Tray:" list, and then Click [Thick 4 ...[Thick Paper 3]: 164 to 220 g/m2 (44 to 59 lb.) • [Thick Paper 4]: 221 to 256 g/m2 (59 to 68 lb.) Printer setup • Press the [Menu] key, select [Paper Input], [Paper Type: (tray name)], and then select [Thick Paper 1], [Thick Paper 2]...
Safety Information
Page 196
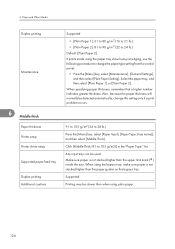
... when using the bypass tray, make sure paper is not stacked higher than the upper limit mark ( ) inside the tray. Letterhead Printer setup Printer driver setup Press the [Menu] key, select [Paper Input], [Paper Type: (tray name)], and then select [Letterhead]. This paper type...[Bypass Tray] in "Input Tray:" list, and then click [Transparency] in the "Paper Type:" list. 126 Not supported OHP transparencies Printer setup Printer driver setup 6 Supported paper feed tray Paper capacity Duplex printing Additional cautions Press the [Menu] key, select [Paper Input], [Paper Type: ...
... when using the bypass tray, make sure paper is not stacked higher than the upper limit mark ( ) inside the tray. Letterhead Printer setup Printer driver setup Press the [Menu] key, select [Paper Input], [Paper Type: (tray name)], and then select [Letterhead]. This paper type...[Bypass Tray] in "Input Tray:" list, and then click [Transparency] in the "Paper Type:" list. 126 Not supported OHP transparencies Printer setup Printer driver setup 6 Supported paper feed tray Paper capacity Duplex printing Additional cautions Press the [Menu] key, select [Paper Input], [Paper Type: ...
Safety Information
Page 197
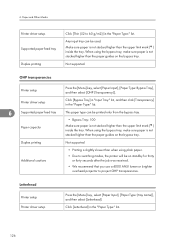
... than the upper limit mark ( ) inside the tray. Make sure paper is not stacked higher than the upper limit mark ( ) inside the tray. Label paper Printer setup Printer driver setup Supported paper feed tray Duplex printing Press the [Menu] key, select [Paper Input], [Paper Type: (tray name)], and then select [Label Paper].
... than the upper limit mark ( ) inside the tray. Make sure paper is not stacked higher than the upper limit mark ( ) inside the tray. Label paper Printer setup Printer driver setup Supported paper feed tray Duplex printing Press the [Menu] key, select [Paper Input], [Paper Type: (tray name)], and then select [Label Paper].
Safety Information
Page 198
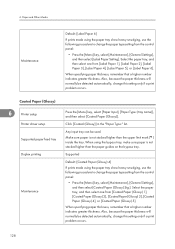
... the paper tray, and then select one from [Label Paper 1], [Label Paper 2], [Label Paper 3], [Label Paper 4], [Label Paper 5], or [Label Paper 6]. Coated Paper (Glossy) 6 Printer setup Printer driver setup Supported paper feed tray Duplex printing Maintenance Press the [Menu] key, select [Paper Input], [Paper Type: (tray name)], and then select [Coated Paper (Glossy...
... the paper tray, and then select one from [Label Paper 1], [Label Paper 2], [Label Paper 3], [Label Paper 4], [Label Paper 5], or [Label Paper 6]. Coated Paper (Glossy) 6 Printer setup Printer driver setup Supported paper feed tray Duplex printing Maintenance Press the [Menu] key, select [Paper Input], [Paper Type: (tray name)], and then select [Coated Paper (Glossy...
Safety Information
Page 199
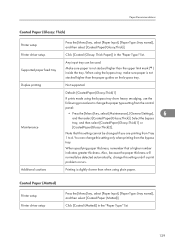
...Also, because the paper thickness will normally be detected automatically, change the paper type setting from the bypass tray. Coated Paper (Matted) Printer setup Printer driver setup Press the [Menu] key, select [Paper Input], [Paper Type: (tray name)], and then select [Coated Paper (Matted)]. ... [Paper Input], [Paper Type: (tray name)], and then select [Coated Paper(Glossy:Thick)]. Note that a higher number indicates greater thickness. Printer driver setup Click [Coated (Glossy: Thick Paper)] in the "Paper Type:" list. 129 When using the bypass tray show heavy smudging, use the...
...Also, because the paper thickness will normally be detected automatically, change the paper type setting from the bypass tray. Coated Paper (Matted) Printer setup Printer driver setup Press the [Menu] key, select [Paper Input], [Paper Type: (tray name)], and then select [Coated Paper (Matted)]. ... [Paper Input], [Paper Type: (tray name)], and then select [Coated Paper(Glossy:Thick)]. Note that a higher number indicates greater thickness. Printer driver setup Click [Coated (Glossy: Thick Paper)] in the "Paper Type:" list. 129 When using the bypass tray show heavy smudging, use the...

Safety Information
Page 200
... from the control panel: • Press the [Menu] key, select [Maintenance], [General Settings], and then select [Coated Paper (Matted) Stg.]. Coated Paper (Matted: Thick) Printer setup Printer driver setup Supported paper feed tray Duplex printing Press the [Menu] key, select [Paper Input], [Paper Type: (tray name)], and then select [Coated Paper(Matted:Thick...
... from the control panel: • Press the [Menu] key, select [Maintenance], [General Settings], and then select [Coated Paper (Matted) Stg.]. Coated Paper (Matted: Thick) Printer setup Printer driver setup Supported paper feed tray Duplex printing Press the [Menu] key, select [Paper Input], [Paper Type: (tray name)], and then select [Coated Paper(Matted:Thick...
Safety Information
Page 201
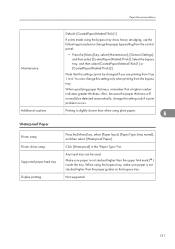
... on the bypass tray. Make sure paper is not stacked higher than the upper limit mark ( ) inside the tray. When using plain paper. 6 Waterproof Paper Printer setup Printer driver setup Supported paper feed tray Duplex printing Press the [Menu] key, select [Paper Input], [Paper Type: (tray name)], and then select [Waterproof Paper]. Paper...
... on the bypass tray. Make sure paper is not stacked higher than the upper limit mark ( ) inside the tray. When using plain paper. 6 Waterproof Paper Printer setup Printer driver setup Supported paper feed tray Duplex printing Press the [Menu] key, select [Paper Input], [Paper Type: (tray name)], and then select [Waterproof Paper]. Paper...
Safety Information
Page 202
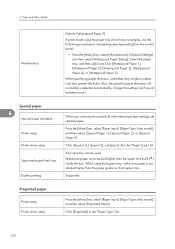
... one from the control panel: • Press the [Menu] key, select [Maintenance], [General Settings], and then select [Waterproof Paper Setting]. Special paper 6 Special paper standard Printer setup Printer driver setup Supported paper feed tray Duplex printing When you cannot print successfully with other paper type settings, set special paper. Supported Preprinted paper...
... one from the control panel: • Press the [Menu] key, select [Maintenance], [General Settings], and then select [Waterproof Paper Setting]. Special paper 6 Special paper standard Printer setup Printer driver setup Supported paper feed tray Duplex printing When you cannot print successfully with other paper type settings, set special paper. Supported Preprinted paper...


