
Safety Information
Page 6
... equipment and receiver. • Connect the equipment into an outlet on Responsible party: Ricoh Americas Corporation. Address: 5 Dedrick Place, West Caldwell, NJ 07006 Telephone number: 973-882-2000 Product Name: Laser Printer Model Number: CLP37DN/SP C430DN/LP137CN/Aficio SP C430DN CLP42DN/SP C431DN/LP142CN/Aficio SP C431DN ❖ Note This equipment has been tested and found to provide reasonable...
... equipment and receiver. • Connect the equipment into an outlet on Responsible party: Ricoh Americas Corporation. Address: 5 Dedrick Place, West Caldwell, NJ 07006 Telephone number: 973-882-2000 Product Name: Laser Printer Model Number: CLP37DN/SP C430DN/LP137CN/Aficio SP C430DN CLP42DN/SP C431DN/LP142CN/Aficio SP C431DN ❖ Note This equipment has been tested and found to provide reasonable...
Safety Information
Page 9
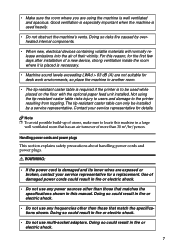
...after installation of more than those that matches the specifications shown in another room. • The tip-resistant caster table is required if the printer is necessary. • Machine sound levels exceeding LWAd > 63 dB (A) are not suitable for details. The tip-resistant caster table can ...large well ventilated room that has an air turnover of a new device, strong ventilation inside the room where it is placed is to the printer resulting from toppling. • Make sure the room where you are exposed or broken, contact your service representative for desk work environments, ...
...after installation of more than those that matches the specifications shown in another room. • The tip-resistant caster table is required if the printer is necessary. • Machine sound levels exceeding LWAd > 63 dB (A) are not suitable for details. The tip-resistant caster table can ...large well ventilated room that has an air turnover of a new device, strong ventilation inside the room where it is placed is to the printer resulting from toppling. • Make sure the room where you are exposed or broken, contact your service representative for desk work environments, ...

Safety Information
Page 11
... off its power immediately by pressing the power switch. Voltage must turn the power switch to take place at both sides, and then lift the printer slowly. Then contact your service representative and report the problem. Then contact your sales or service representative and report the problem. While moving the machine...
... off its power immediately by pressing the power switch. Voltage must turn the power switch to take place at both sides, and then lift the printer slowly. Then contact your service representative and report the problem. Then contact your sales or service representative and report the problem. While moving the machine...

Safety Information
Page 14
... of the used toner. Disposal should take place at the positions shown below. Toner dust is flammable and might ignite when exposed to move the printer. Four people are required to an open flame. Lifting it carelessly or dropping it slowly. If you dispose of RWARNING and RCAUTION labels This machine... toner containers yourself, dispose of This Machine This section explains the machine's safety information labels. Safety Labels of them according to local regulations. 2 BYK144 The printer weights approximately 57 kg (126 lb.).
... of the used toner. Disposal should take place at the positions shown below. Toner dust is flammable and might ignite when exposed to move the printer. Four people are required to an open flame. Lifting it carelessly or dropping it slowly. If you dispose of RWARNING and RCAUTION labels This machine... toner containers yourself, dispose of This Machine This section explains the machine's safety information labels. Safety Labels of them according to local regulations. 2 BYK144 The printer weights approximately 57 kg (126 lb.).

Safety Information
Page 15
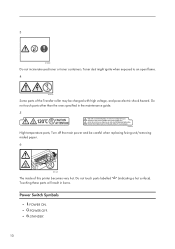
... of the Transfer roller may be careful when replacing fusing unit/removing misfed paper. 6 BYK145 The inside of the symbols for the switches on this printer becomes very hot. Do not touch parts other than the ones specified in burns.
... of the Transfer roller may be careful when replacing fusing unit/removing misfed paper. 6 BYK145 The inside of the symbols for the switches on this printer becomes very hot. Do not touch parts other than the ones specified in burns.

Safety Information
Page 16
Energy Star standards and logos are computers, monitors, printers, facsimiles, copiers, scanners, and multifunction devices. The default delay time the machine waits before entering Auto Off Mode 11 minutes. This default time can be ... electrical consumption. This default time can print jobs from Energy Saver mode when it automatically enters Sleep mode to configure Energy Saver modes, see "Making Printer Settings Using the Control Panel", Software Guide as a HTML file on the CD-ROM. ❖ Panel Off Mode The default delay time the machine waits...
Energy Star standards and logos are computers, monitors, printers, facsimiles, copiers, scanners, and multifunction devices. The default delay time the machine waits before entering Auto Off Mode 11 minutes. This default time can be ... electrical consumption. This default time can print jobs from Energy Saver mode when it automatically enters Sleep mode to configure Energy Saver modes, see "Making Printer Settings Using the Control Panel", Software Guide as a HTML file on the CD-ROM. ❖ Panel Off Mode The default delay time the machine waits...

Safety Information
Page 69
Operating Instructions Hardware Guide 1 Guide to read "Safety Information" before using the machine. For safe and correct use this manual carefully before you use , be sure to the Printer 2 Setting Up the Printer 3 Installing Options 4 Connecting the Printer 5 Configuration 6 Paper and Other Media 7 Maintaining the Printer 8 Adjusting the Printer 9 Troubleshooting 10 Removing Misfed Paper 11 Appendix Read this machine and keep it handy for future reference.
Operating Instructions Hardware Guide 1 Guide to read "Safety Information" before using the machine. For safe and correct use this manual carefully before you use , be sure to the Printer 2 Setting Up the Printer 3 Installing Options 4 Connecting the Printer 5 Configuration 6 Paper and Other Media 7 Maintaining the Printer 8 Adjusting the Printer 9 Troubleshooting 10 Removing Misfed Paper 11 Appendix Read this machine and keep it handy for future reference.

Safety Information
Page 71
......6 Symbols...6 Model-Specific Information...7 Machine Types...7 Positions of WARNING and CAUTION Labels 9 Power Switch Symbols...10 Manuals for This Printer...11 List of the Box...36 Removing the Packaging Materials...38 Installing the Toner (Print Cartridge)...43 Loading Paper...47 Turning the...Turning off the Power...51 Selecting the Display Language...54 Test Printing...55 Installing the ELP-NX Card...56 1 Setting Up the Printer Printer Set Up Procedure...31 Place to Install...32 Checking the Contents of Options...13 Installing the Operating Instructions...14 Installing the HTML Format...
......6 Symbols...6 Model-Specific Information...7 Machine Types...7 Positions of WARNING and CAUTION Labels 9 Power Switch Symbols...10 Manuals for This Printer...11 List of the Box...36 Removing the Packaging Materials...38 Installing the Toner (Print Cartridge)...43 Loading Paper...47 Turning the...Turning off the Power...51 Selecting the Display Language...54 Test Printing...55 Installing the ELP-NX Card...56 1 Setting Up the Printer Printer Set Up Procedure...31 Place to Install...32 Checking the Contents of Options...13 Installing the Operating Instructions...14 Installing the HTML Format...
Safety Information
Page 72
3. Connecting the Printer Ethernet Cable Connection...85 Reading the LED Lamps...87 USB Cable Connection...89 Digital Camera Connection...90 Parallel Cable Connection...92 5. Configuration Ethernet Configuration...93 ...
3. Connecting the Printer Ethernet Cable Connection...85 Reading the LED Lamps...87 USB Cable Connection...89 Digital Camera Connection...90 Parallel Cable Connection...92 5. Configuration Ethernet Configuration...93 ...
Safety Information
Page 73
Maintaining the Printer Adding Toner (Print Cartridge)...163 Replacing the Drum Unit...168 Replacing the Transfer Unit and Transfer Roller 170 Replacing the Waste Toner Bottle...172 Replacing ... Tray...121 Paper Weight and Capacity...122 Paper Recommendations...123 Storing Paper...123 Types of Paper and Other Media...123 Paper Not Supported by This Printer...135 Print Area...136 Loading Paper...138 Loading Paper into Standard Paper Feed Tray or Optional Paper Feed Trays 138 Loading Paper in Bypass Tray...
Maintaining the Printer Adding Toner (Print Cartridge)...163 Replacing the Drum Unit...168 Replacing the Transfer Unit and Transfer Roller 170 Replacing the Waste Toner Bottle...172 Replacing ... Tray...121 Paper Weight and Capacity...122 Paper Recommendations...123 Storing Paper...123 Types of Paper and Other Media...123 Paper Not Supported by This Printer...135 Print Area...136 Loading Paper...138 Loading Paper into Standard Paper Feed Tray or Optional Paper Feed Trays 138 Loading Paper in Bypass Tray...
Safety Information
Page 74
... (A)...218 Paper Misfeed Message (B) (C)...219 Paper Misfeed Message (Y)...222 Paper Misfeed Message (Z)...224 11. Appendix Moving and Transporting the Printer...227 Moving the Printer a Short Distance...228 Consumables...230 Toner (Print Cartridge)...230 4 Troubleshooting Error and Status Messages Appear on the Control Panel 197... Panel Tones...203 Printer Does Not Print...204 Checking the Port Connection...205 Other Printing Problems...207 When You Cannot Print Properly...207 Paper ...
... (A)...218 Paper Misfeed Message (B) (C)...219 Paper Misfeed Message (Y)...222 Paper Misfeed Message (Z)...224 11. Appendix Moving and Transporting the Printer...227 Moving the Printer a Short Distance...228 Consumables...230 Toner (Print Cartridge)...230 4 Troubleshooting Error and Status Messages Appear on the Control Panel 197... Panel Tones...203 Printer Does Not Print...204 Checking the Port Connection...205 Other Printing Problems...207 When You Cannot Print Properly...207 Paper ...

Safety Information
Page 77
... machine is a Region B model, refer to the inch units. If your machine belongs to. Machine Types This printer comes in two units of the machine, located in this manual refers to the different printer models as Type 1 or Type 2. Read the label. Model-Specific Information This section explains how you can identify...
... machine is a Region B model, refer to the inch units. If your machine belongs to. Machine Types This printer comes in two units of the machine, located in this manual refers to the different printer models as Type 1 or Type 2. Read the label. Model-Specific Information This section explains how you can identify...
Safety Information
Page 79
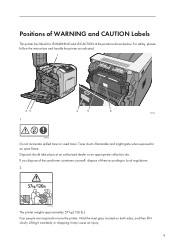
... 4 5 6 BYK001 BYK140 Do not incinerate spilled toner or used toner containers yourself, dispose of them according to local regulations. 2 BYK144 The printer weights approximately 57 kg (126 lb.). If you dispose of the used toner. Lifting it carelessly or dropping it slowly. Positions of WARNING and ...CAUTION Labels This printer has labels for WARNING and CAUTION at an authorized dealer or an appropriate collection site. Hold the inset grips located on both sides,...
... 4 5 6 BYK001 BYK140 Do not incinerate spilled toner or used toner containers yourself, dispose of them according to local regulations. 2 BYK144 The printer weights approximately 57 kg (126 lb.). If you dispose of the used toner. Lifting it carelessly or dropping it slowly. Positions of WARNING and ...CAUTION Labels This printer has labels for WARNING and CAUTION at an authorized dealer or an appropriate collection site. Hold the inset grips located on both sides,...
Safety Information
Page 80
... an open flame. 4 BYK147 Some parts of the Transfer roller may be careful when replacing fusing unit/removing misfed paper. 6 BYK145 The inside of this printer becomes very hot.
... an open flame. 4 BYK147 Some parts of the Transfer roller may be careful when replacing fusing unit/removing misfed paper. 6 BYK145 The inside of this printer becomes very hot.
Safety Information
Page 81
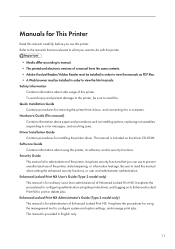
... about using the management tool to print or delete jobs. It explains the procedures for administrators of the printer. Security Guide This manual is for configuring authentication using the printer driver, and logging on the driver CD-ROM. Enhanced Locked Print NX User's Guide (Type 2 model... manuals. Enhanced Locked Print NX Administrator's Guide (Type 2 model only) This manual is for This Printer Read this manual carefully before you can use to read this printer. Be sure to prevent unauthorized use this manual when setting the enhanced security functions, or user and ...
... about using the management tool to print or delete jobs. It explains the procedures for administrators of the printer. Security Guide This manual is for configuring authentication using the printer driver, and logging on the driver CD-ROM. Enhanced Locked Print NX User's Guide (Type 2 model... manuals. Enhanced Locked Print NX Administrator's Guide (Type 2 model only) This manual is for This Printer Read this manual carefully before you can use to read this printer. Be sure to prevent unauthorized use this manual when setting the enhanced security functions, or user and ...
Safety Information
Page 82
This manual is provided in English only. • Manuals provided are specific to operate this printer. UNIX Supplement Contains information about setting up the extended features settings using Web Image Monitor. To obtain the "UNIX Supplement", visit our Web site or consult an authorized dealer. This manual includes explanations of commands to printer types. 12 VM Card Extended Feature Settings Web Reference Contains information about the usage of functions and settings that might not be available on this printer.
This manual is provided in English only. • Manuals provided are specific to operate this printer. UNIX Supplement Contains information about setting up the extended features settings using Web Image Monitor. To obtain the "UNIX Supplement", visit our Web site or consult an authorized dealer. This manual includes explanations of commands to printer types. 12 VM Card Extended Feature Settings Web Reference Contains information about the usage of functions and settings that might not be available on this printer.

Safety Information
Page 83
... C Hard Disk Drive Option Type 5000 Memory Unit Type G 256 MB Memory Unit Type I 512 MB Gigabit Ethernet Board Type A Referred to as in this printer, and how they are referred to as Paper feed unit Tip-resistant caster table Hard disk SDRAM module SDRAM module Gigabit Ethernet board IEEE 802...
... C Hard Disk Drive Option Type 5000 Memory Unit Type G 256 MB Memory Unit Type I 512 MB Gigabit Ethernet Board Type A Referred to as in this printer, and how they are referred to as Paper feed unit Tip-resistant caster table Hard disk SDRAM module SDRAM module Gigabit Ethernet board IEEE 802...

Safety Information
Page 84
... only. • If you want to the displayed instructions. 6. Follow the instructions to use HTML format manuals. If this happens, launch "Setup.exe" on the printer model, PDF manuals may not work with certain operating system settings. Click [Finish]. • Depending on the CD-ROM root directory. 3.
... only. • If you want to the displayed instructions. 6. Follow the instructions to use HTML format manuals. If this happens, launch "Setup.exe" on the printer model, PDF manuals may not work with certain operating system settings. Click [Finish]. • Depending on the CD-ROM root directory. 3.

Safety Information
Page 87
1. The Remaining Paper Indicator Indicates the approximate amount of the printer's components. Bypass Tray Up to 550 sheets of the printer. 7 6 8 9 5 4 3 2 1 10 BYK004 1. Control Panel Contains keys for printer control and a display that is larger than A5 on the front and right sides of plain paper can be ... the names and functions of plain paper can be loaded. 5. Bypass Tray Extension Pull this out when loading a sheet that shows the printer status. 17 Standard Paper Feed Tray (Tray 1) Up to 100 sheets of the parts on the bypass tray. 4. Guide to remove jammed...
1. The Remaining Paper Indicator Indicates the approximate amount of the printer's components. Bypass Tray Up to 550 sheets of the printer. 7 6 8 9 5 4 3 2 1 10 BYK004 1. Control Panel Contains keys for printer control and a display that is larger than A5 on the front and right sides of plain paper can be ... the names and functions of plain paper can be loaded. 5. Bypass Tray Extension Pull this out when loading a sheet that shows the printer status. 17 Standard Paper Feed Tray (Tray 1) Up to 100 sheets of the parts on the bypass tray. 4. Guide to remove jammed...

Safety Information
Page 88
Vents The right side of the printer to the Printer 7. Malfunctions and failure can result if these vents. The dustproof filter needs to replace the toner. 1 8. Paper Feed Roller This ensures only one sheet of ... or obstructed. Open this cover to be replaced regularly for proper maintenance. Front Cover Open Levers Pull these levers toward the front side of the printer features two vents. Guide to open the front cover. 9. If multi-sheet feeds occur, clean the paper feed roller carefully. • For details about the...
Vents The right side of the printer to the Printer 7. Malfunctions and failure can result if these vents. The dustproof filter needs to replace the toner. 1 8. Paper Feed Roller This ensures only one sheet of ... or obstructed. Open this cover to be replaced regularly for proper maintenance. Front Cover Open Levers Pull these levers toward the front side of the printer features two vents. Guide to open the front cover. 9. If multi-sheet feeds occur, clean the paper feed roller carefully. • For details about the...


