Safety Information
Page 74
... image is different from the image on the computer 210 When Printer is Not Functioning Properly 212 Additional Troubleshooting...215 10. Appendix Moving and Transporting the Printer...227 Moving the Printer a Short Distance...228 Consumables...230 Toner (Print Cartridge)...230 4... Feed Roller...177 Cleaning the Registration Roller...180 8. Adjusting the Printer Adjusting the Color Registration...183 Correcting the Color Gradation...185 Setting the Gradation Correction Value 185 Viewing the Color Calibration Sample Sheet and Gradation Correction Sheet 188 Resetting the Gradation Correction...
... image is different from the image on the computer 210 When Printer is Not Functioning Properly 212 Additional Troubleshooting...215 10. Appendix Moving and Transporting the Printer...227 Moving the Printer a Short Distance...228 Consumables...230 Toner (Print Cartridge)...230 4... Feed Roller...177 Cleaning the Registration Roller...180 8. Adjusting the Printer Adjusting the Color Registration...183 Correcting the Color Gradation...185 Setting the Gradation Correction Value 185 Viewing the Color Calibration Sample Sheet and Gradation Correction Sheet 188 Resetting the Gradation Correction...
Safety Information
Page 91
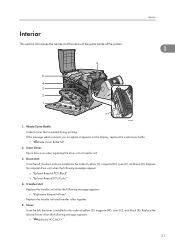
... unit and transfer roller together. 5. Transfer Unit Replace the transfer unit when the following messages appear: • "Rplcmnt Requird:PCU:Black" • "Rplcmnt Requrd:PCU:Color" 4. Toner From the left , the drum units are installed in the order of yellow (Y), magenta (M), cyan (C), and black (K). Inner Cover Open this cover when replacing... and functions of the parts inside of yellow (Y), magenta (M), cyan (C), and black (K). Waste Toner Bottle Collects toner that is installed in the order of the printer. 1 6 5 4 3 2 1 7 BYK006 1.
... unit and transfer roller together. 5. Transfer Unit Replace the transfer unit when the following messages appear: • "Rplcmnt Requird:PCU:Black" • "Rplcmnt Requrd:PCU:Color" 4. Toner From the left , the drum units are installed in the order of yellow (Y), magenta (M), cyan (C), and black (K). Inner Cover Open this cover when replacing... and functions of the parts inside of yellow (Y), magenta (M), cyan (C), and black (K). Waste Toner Bottle Collects toner that is installed in the order of the printer. 1 6 5 4 3 2 1 7 BYK006 1.

Safety Information
Page 107
• Paper Feed Unit Labels BYK019 • Color Calibration Sample Sheet Checking the Contents of the Box 2 • Paper Weight/Grade Chart (mainly North America) BYK120 • Additional Documentation • This package does not include an interface cable. Purchase one as necessary to connect to the printer. 37
• Paper Feed Unit Labels BYK019 • Color Calibration Sample Sheet Checking the Contents of the Box 2 • Paper Weight/Grade Chart (mainly North America) BYK120 • Additional Documentation • This package does not include an interface cable. Purchase one as necessary to connect to the printer. 37
Safety Information
Page 205
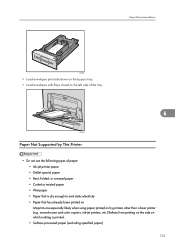
Paper Recommendations BYK096 • Load envelopes print side down on by This Printer • Do not use the following types of paper: • Ink-jet printer paper • GelJet special paper • Bent, folded, or creased paper • Curled or twisted paper • Wet paper •... • Load envelopes with flaps closed to the left side of the tray. 6 BYK095 Paper Not Supported by printers other than a laser printer (e.g. monochrome and color copiers, ink-jet printers, etc.) Refrain from printing on the side on which nothing is dry enough to emit static electricity • Paper...
Paper Recommendations BYK096 • Load envelopes print side down on by This Printer • Do not use the following types of paper: • Ink-jet printer paper • GelJet special paper • Bent, folded, or creased paper • Curled or twisted paper • Wet paper •... • Load envelopes with flaps closed to the left side of the tray. 6 BYK095 Paper Not Supported by printers other than a laser printer (e.g. monochrome and color copiers, ink-jet printers, etc.) Refrain from printing on the side on which nothing is dry enough to emit static electricity • Paper...
Safety Information
Page 234
...of one to Black and White using black toner. Change the color mode setting to four colors, yellow, magenta, cyan, black, appears in "(color)". • If cyan, magenta, or yellow toner runs out, you cannot print in black and white using the printer driver. • If black toner runs out, you can... print in black and white or color until the black toner cartridge is problem, contact the store where they were purchased. When the following...
...of one to Black and White using black toner. Change the color mode setting to four colors, yellow, magenta, cyan, black, appears in "(color)". • If cyan, magenta, or yellow toner runs out, you cannot print in black and white using the printer driver. • If black toner runs out, you can... print in black and white or color until the black toner cartridge is problem, contact the store where they were purchased. When the following...
Safety Information
Page 238
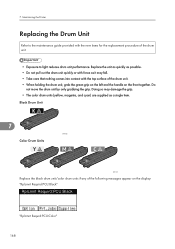
... possible. • Do not pull out the drum unit quickly or with force as a single item. Black Drum Unit 7 BYK100 Color Drum Units BYK101 Replace the black drum unit/color drum units if any of the drum unit. • When holding the drum unit, grab the green grip on the left... grip. • The color drum units (yellow, magenta, and cyan) are supplied as it may fall. • Take care that nothing comes into contact with the new items for the replacement procedure of the drum unit. • Exposure to light reduces drum unit performance. Maintaining the Printer Replacing the Drum Unit...
... possible. • Do not pull out the drum unit quickly or with force as a single item. Black Drum Unit 7 BYK100 Color Drum Units BYK101 Replace the black drum unit/color drum units if any of the drum unit. • When holding the drum unit, grab the green grip on the left... grip. • The color drum units (yellow, magenta, and cyan) are supplied as it may fall. • Take care that nothing comes into contact with the new items for the replacement procedure of the drum unit. • Exposure to light reduces drum unit performance. Maintaining the Printer Replacing the Drum Unit...
Safety Information
Page 253
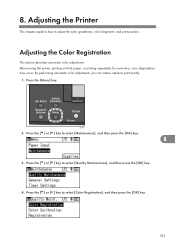
... the [ ] or [ ] key to adjust the color gradations, color alignment, and print position. Adjusting the Color Registration This section describes automatic color adjustment. BYK087 2. After moving the printer, printing on thick paper, or printing repeatedly for some time, color degradation may occur. 8. Adjusting the Printer This chapter explains how to select [Color Registration], and then press the [OK...
... the [ ] or [ ] key to adjust the color gradations, color alignment, and print position. Adjusting the Color Registration This section describes automatic color adjustment. BYK087 2. After moving the printer, printing on thick paper, or printing repeatedly for some time, color degradation may occur. 8. Adjusting the Printer This chapter explains how to select [Color Registration], and then press the [OK...
Safety Information
Page 254
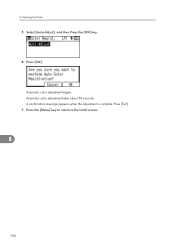
Press [OK]. Automatic color adjustment begins. Press [Exit]. 7. A confirmation message appears when the adjustment is complete. Select [Auto Adjust], and then Press the [OK] key. 6. Automatic color adjustment takes about 50 seconds. Press the [Menu] key to return to the initial screen. 8 184 Adjusting the Printer 5. 8.
Press [OK]. Automatic color adjustment begins. Press [Exit]. 7. A confirmation message appears when the adjustment is complete. Select [Auto Adjust], and then Press the [OK] key. 6. Automatic color adjustment takes about 50 seconds. Press the [Menu] key to return to the initial screen. 8 184 Adjusting the Printer 5. 8.

Safety Information
Page 256
Press the [ ] or [ ] key to select [Color Calibration], and then press the [OK] key. 5. Press the [ ] or [ ] key to select [Maintenance], and then press the [OK] key. 3. Press [OK] to select [Quality Maintenance], and then press the [OK] key. 8 4. Adjusting the Printer 1. Press the [ ] or [ ] key to adjust Auto Density. 186 8. The confirmation message appears. BYK087 2. If you want to perform only auto color adjusting, press the [ ] or [ ] key select [Adjust Auto Density], and then press the [OK] key. Press the [Menu] key.
Press the [ ] or [ ] key to select [Color Calibration], and then press the [OK] key. 5. Press the [ ] or [ ] key to select [Maintenance], and then press the [OK] key. 3. Press [OK] to select [Quality Maintenance], and then press the [OK] key. 8 4. Adjusting the Printer 1. Press the [ ] or [ ] key to adjust Auto Density. 186 8. The confirmation message appears. BYK087 2. If you want to perform only auto color adjusting, press the [ ] or [ ] key select [Adjust Auto Density], and then press the [OK] key. Press the [Menu] key.

Safety Information
Page 258
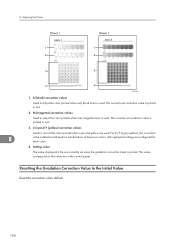
...the correction value for adjusting midtones. 188 Viewing the Color Calibration Sample Sheet and Gradation Correction Sheet The Color Calibration Sample Sheet contains two color sample columns: "sample 1" column for adjusting highlights and "sample 2" column for the selected color, and then press the [OK] key. 10.... Press [Result]. 11. After printing, press [Yes] to the initial screen. Adjusting the Printer 9. After completing all settings, press the [Menu] key to return ...
...the correction value for adjusting midtones. 188 Viewing the Color Calibration Sample Sheet and Gradation Correction Sheet The Color Calibration Sample Sheet contains two color sample columns: "sample 1" column for adjusting highlights and "sample 2" column for the selected color, and then press the [OK] key. 10.... Press [Result]. 11. After printing, press [Yes] to the initial screen. Adjusting the Printer 9. After completing all settings, press the [Menu] key to return ...
Safety Information
Page 260
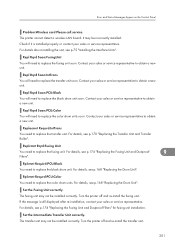
... the Gradation Correction Value to the value set correction value is used. Adjusting the Printer 1 1 2 2 3 3 4 4 BYK108 1. The currently set on combinations of these two colors, although panel settings are used . C (cyan)/Y (yellow) correction values Used to adjust the color printed when only black toner is printed in red. 2. K (black) correction values Used to...
... the Gradation Correction Value to the value set correction value is used. Adjusting the Printer 1 1 2 2 3 3 4 4 BYK108 1. The currently set on combinations of these two colors, although panel settings are used . C (cyan)/Y (yellow) correction values Used to adjust the color printed when only black toner is printed in red. 2. K (black) correction values Used to...

Safety Information
Page 267
... . Wait a while. To cancel the suspension, turn the printer off the printer after printing, and then turn it also explains how to the normal mode..., the printer receives data in Energy Saver mode. Printing... Resetting Job... Turn off , wait a few seconds. The printer is in hexadecimal format. Wait a while. Wait a while. The printer is printing... It means the printer is loading toner. The printer is initializing, replenishing toner, or executing maintenance operations. Printing Suspended Printing is required. No action is suspended. The printer is the default ...
... . Wait a while. To cancel the suspension, turn the printer off the printer after printing, and then turn it also explains how to the normal mode..., the printer receives data in Energy Saver mode. Printing... Resetting Job... Turn off , wait a few seconds. The printer is in hexadecimal format. Wait a while. Wait a while. The printer is printing... It means the printer is loading toner. The printer is initializing, replenishing toner, or executing maintenance operations. Printing Suspended Printing is required. No action is suspended. The printer is the default ...
Safety Information
Page 271
... Panel Problem:Wireless card Please call service. Repl Rqrd Soon:FusingUnit You will need to obtain a new unit. Rplcmnt Requrd:PCU:Color You need to replace the fusing unit. Turn the printer off and re-install the transfer unit. 201 For details about installing the unit, see p.170 "Replacing the Transfer Unit...
... Panel Problem:Wireless card Please call service. Repl Rqrd Soon:FusingUnit You will need to obtain a new unit. Rplcmnt Requrd:PCU:Color You need to replace the fusing unit. Turn the printer off and re-install the transfer unit. 201 For details about installing the unit, see p.170 "Replacing the Transfer Unit...

Safety Information
Page 277
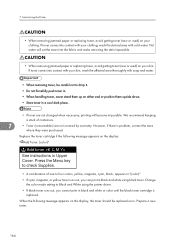
...8226; The paper is almost depleted. Use dry paper that the paper is almost empty" /"(color)" message appears on the display panel, or the toner indicator on the [Print Quality] menu in the printer driver's dialog box. 9 For details, see p.163 "Adding Toner (Print Cartridge)". •...; When the message "Rplcmnt Requird:PCU:Black" or "Rplcmnt Requrd:PCU:Color" appears on the display, replace the drum unit. For details, see the printer driver Help. When the "Out of the appropriate color. Photo images are printed as broken lines. • Change the [Dithering:] ...
...8226; The paper is almost depleted. Use dry paper that the paper is almost empty" /"(color)" message appears on the display panel, or the toner indicator on the [Print Quality] menu in the printer driver's dialog box. 9 For details, see p.163 "Adding Toner (Print Cartridge)". •...; When the message "Rplcmnt Requird:PCU:Black" or "Rplcmnt Requrd:PCU:Color" appears on the display, replace the drum unit. For details, see the printer driver Help. When the "Out of the appropriate color. Photo images are printed as broken lines. • Change the [Dithering:] ...

Safety Information
Page 278
... on OHP transparencies, a color is deteriorated or damaged. Specks of paper may not be attached to the registration roller. Clean the registration roller. For details, see p.174 "Replacing the Fusing Unit and Dustproof Filters". For details, see the printer driver Help. • The...stored at a suitable temperature and humidity. The backs of this printer only after it smears out. • The setting of paper may be dirtied. 9 If rubbed with your finger, it has acclimatized. 9. White streaks or color streaks appear. • Toner is larger than paper size, ...
... on OHP transparencies, a color is deteriorated or damaged. Specks of paper may not be attached to the registration roller. Clean the registration roller. For details, see p.174 "Replacing the Fusing Unit and Dustproof Filters". For details, see the printer driver Help. • The...stored at a suitable temperature and humidity. The backs of this printer only after it smears out. • The setting of paper may be dirtied. 9 If rubbed with your finger, it has acclimatized. 9. White streaks or color streaks appear. • Toner is larger than paper size, ...

Safety Information
Page 281
... (Text/Line Art):] in the paper tray, or perform Form Feed. Note that the sample image displayed in the printer driver is loaded in the printer driver's dialog box, the color gradation may not match the print results. Solid areas, lines or text are shiny or glossy when created as a ... Monitor, see Web Image Monitor Help. • PDF files not allowed to the opposite case. For details, see the printer driver Help. • Some applications print color files in the printer driver's dialog box. The paper size appears on the [Print Quality] menu in the paper tray, the file will be...
... (Text/Line Art):] in the paper tray, or perform Form Feed. Note that the sample image displayed in the printer driver is loaded in the printer driver's dialog box, the color gradation may not match the print results. Solid areas, lines or text are shiny or glossy when created as a ... Monitor, see Web Image Monitor Help. • PDF files not allowed to the opposite case. For details, see the printer driver Help. • Some applications print color files in the printer driver's dialog box. The paper size appears on the [Print Quality] menu in the paper tray, the file will be...

Safety Information
Page 282
... p.168 "Replacing the Drum Unit". 9 Printed pages are using a Windows operating system, the printer driver settings override those set using the printer driver. For details, see the printer driver Help. To avoid this printer only after it is almost empty." /"(color)", or "Add Toner:" message appears on the display panel, or the toner indicator on...
... p.168 "Replacing the Drum Unit". 9 Printed pages are using a Windows operating system, the printer driver settings override those set using the printer driver. For details, see the printer driver Help. To avoid this printer only after it is almost empty." /"(color)", or "Add Toner:" message appears on the display panel, or the toner indicator on...

Safety Information
Page 302
... and Electrophotographic printing Four-drums tandem method First Print Speed: Monochrome: 10 seconds or less (A4 , 81/2 " 11 " (Letter) ) Color:15 seconds or less (A4 , 81/2 " 11 " (Letter) ) Note that if the printer has not been used for Each Tray". 11 Paper Weight: For details, see p.123 "Types of Paper and Other...
... and Electrophotographic printing Four-drums tandem method First Print Speed: Monochrome: 10 seconds or less (A4 , 81/2 " 11 " (Letter) ) Color:15 seconds or less (A4 , 81/2 " 11 " (Letter) ) Note that if the printer has not been used for Each Tray". 11 Paper Weight: For details, see p.123 "Types of Paper and Other...
Safety Information
Page 309
...180 Clear key 26 Coated paper (glossy thick 129 Coated paper (glossy 128 Coated paper (matted thick 130 Coated paper (matted 129 Color calibration sample sheet 188 Color gradation 185 Consumables 230 Control panel 17, 23 Controller board 19, 62 Custom size paper 142, 149 D Data in indicator 24 Data... cover open levers 18 Fusing unit 22, 174, 231 G Gigabit Ethernet board 75 Gradation correction sheet 188 Gradation correction value 185, 190 Guide to the printer 17, 19, 21, 23 H hard disk 70 HDD encryption unit 82 How to enter character 27 How to read this manual 6 HTML 14 I...
...180 Clear key 26 Coated paper (glossy thick 129 Coated paper (glossy 128 Coated paper (matted thick 130 Coated paper (matted 129 Color calibration sample sheet 188 Color gradation 185 Consumables 230 Control panel 17, 23 Controller board 19, 62 Custom size paper 142, 149 D Data in indicator 24 Data... cover open levers 18 Fusing unit 22, 174, 231 G Gigabit Ethernet board 75 Gradation correction sheet 188 Gradation correction value 185, 190 Guide to the printer 17, 19, 21, 23 H hard disk 70 HDD encryption unit 82 How to enter character 27 How to read this manual 6 HTML 14 I...

Safety Information
Page 321
...86 4. Canceling a Print Job from a Digital Camera (PictBridge) What is PictBridge?...87 PictBridge Printing...88 What Can be Done on This Printer...89 Index Printing...89 Trimming...90 Date and File Name Printing...91 Paper Size...91 Image Print Size...91 Multi-Image-Layout...92 Duplex Printing......94 Printing Quality...94 Color Matching...94 Paper Type Specification...94 Form Printing...95 Toner Saving...95 Camera Memo Printing...95 Exiting PictBridge...96 When PictBridge Printing Does...
...86 4. Canceling a Print Job from a Digital Camera (PictBridge) What is PictBridge?...87 PictBridge Printing...88 What Can be Done on This Printer...89 Index Printing...89 Trimming...90 Date and File Name Printing...91 Paper Size...91 Image Print Size...91 Multi-Image-Layout...92 Duplex Printing......94 Printing Quality...94 Color Matching...94 Paper Type Specification...94 Form Printing...95 Toner Saving...95 Camera Memo Printing...95 Exiting PictBridge...96 When PictBridge Printing Does...


