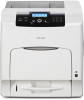
Safety Information
Page 5
... except for Wireless LAN module R-WL54CN (FCC ID: BBP-WLRWL541) which reproduction is totally enclosed during all customer modes of operation and maintenance. The preceding list is meant as a guide only and is generally prohibited by local law: bank notes, revenue stamps, bonds, stock certificates, bank drafts, checks, passports, driver's licenses. This...
... except for Wireless LAN module R-WL54CN (FCC ID: BBP-WLRWL541) which reproduction is totally enclosed during all customer modes of operation and maintenance. The preceding list is meant as a guide only and is generally prohibited by local law: bank notes, revenue stamps, bonds, stock certificates, bank drafts, checks, passports, driver's licenses. This...

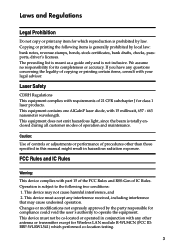
Safety Information
Page 15
.../removing misfed paper. 6 BYK145 The inside of the symbols for the switches on this printer becomes very hot. Touching these parts will result in the maintenance guide. 5 BYK146 High temperature parts. Turn off the main power and be charged with high voltage, and pose electric shock hazard. Do not touch parts other...
.../removing misfed paper. 6 BYK145 The inside of the symbols for the switches on this printer becomes very hot. Touching these parts will result in the maintenance guide. 5 BYK146 High temperature parts. Turn off the main power and be charged with high voltage, and pose electric shock hazard. Do not touch parts other...
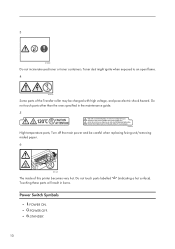
Safety Information
Page 80
... be careful when replacing fusing unit/removing misfed paper. 6 BYK145 The inside of this printer becomes very hot. Touching these parts will result in the maintenance guide. 5 BYK146 High temperature parts, Turn off the main power and be charged with high voltage, and pose electric shock hazard. Do not touch parts labelled...
... be careful when replacing fusing unit/removing misfed paper. 6 BYK145 The inside of this printer becomes very hot. Touching these parts will result in the maintenance guide. 5 BYK146 High temperature parts, Turn off the main power and be charged with high voltage, and pose electric shock hazard. Do not touch parts labelled...

Safety Information
Page 88
..." Replace the dustproof filter and the fusing unit together. 10. Vents The right side of the printer to open the front cover. 9. Guide to be replaced regularly for proper maintenance. Open this cover to replace the units, see "Error and Status Messages Appears on the Control Panel". • p.197 "Error and Status...
..." Replace the dustproof filter and the fusing unit together. 10. Vents The right side of the printer to open the front cover. 9. Guide to be replaced regularly for proper maintenance. Open this cover to replace the units, see "Error and Status Messages Appears on the Control Panel". • p.197 "Error and Status...

Safety Information
Page 94
... 1 Steady red: printing is not possible, or is possible but print quality cannot be printed. 12. Flashing yellow: the printer will soon require maintenance or a replacement consumable such as toner. Entering energy saver mode turns off the back light. Follow the instructions that appear on the display. 10. ...these to be ensured. The data in this key to confirm settings, or setting values, or move to the next menu level. 11. Guide to the Printer When the keys appear in indicator is lit if there is receiving data from a computer. Display Displays current printer status and...
... 1 Steady red: printing is not possible, or is possible but print quality cannot be printed. 12. Flashing yellow: the printer will soon require maintenance or a replacement consumable such as toner. Entering energy saver mode turns off the back light. Follow the instructions that appear on the display. 10. ...these to be ensured. The data in this key to confirm settings, or setting values, or move to the next menu level. 11. Guide to the Printer When the keys appear in indicator is lit if there is receiving data from a computer. Display Displays current printer status and...
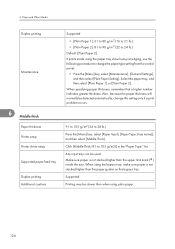
Safety Information
Page 194
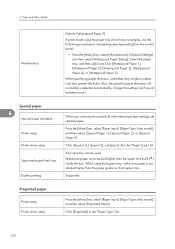
...]. 6. Make sure paper is not stacked higher than the upper limit mark ( ) inside the tray. Paper and Other Media Duplex printing Maintenance 6 Middle thick Paper thickness Printer setup Printer driver setup Supported paper feed tray Duplex printing Additional cautions Supported • [Plain Paper 1]: 61... can be detected automatically, change the paper type setting from the control panel: • Press the [Menu] key, select [Maintenance], [General Settings], and then select [Plain Paper Setting]. When using the bypass tray, make sure paper is not stacked higher than the ...
...]. 6. Make sure paper is not stacked higher than the upper limit mark ( ) inside the tray. Paper and Other Media Duplex printing Maintenance 6 Middle thick Paper thickness Printer setup Printer driver setup Supported paper feed tray Duplex printing Additional cautions Supported • [Plain Paper 1]: 61... can be detected automatically, change the paper type setting from the control panel: • Press the [Menu] key, select [Maintenance], [General Settings], and then select [Plain Paper Setting]. When using the bypass tray, make sure paper is not stacked higher than the ...
Safety Information
Page 197
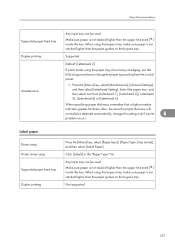
... tray, make sure paper is not stacked higher than the paper guides on the bypass tray. Select the paper tray, and then select one from the control panel: • Press the [Menu] key, select [Maintenance], [General Settings], and then select [Letterhead Setting]. Label paper Printer...[Paper Type: (tray name)], and then select [Label Paper]. Duplex printing Supported Maintenance Default: [Letterhead 2] If prints made using the bypass tray, make sure paper is not stacked higher than the paper guides on the bypass tray. When using the paper tray show heavy smudging, use the...
... tray, make sure paper is not stacked higher than the paper guides on the bypass tray. Select the paper tray, and then select one from the control panel: • Press the [Menu] key, select [Maintenance], [General Settings], and then select [Letterhead Setting]. Label paper Printer...[Paper Type: (tray name)], and then select [Label Paper]. Duplex printing Supported Maintenance Default: [Letterhead 2] If prints made using the bypass tray, make sure paper is not stacked higher than the paper guides on the bypass tray. When using the paper tray show heavy smudging, use the...
Safety Information
Page 198
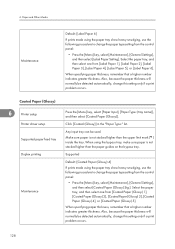
... inside the tray. Select the paper tray, and then select one from the control panel: • Press the [Menu] key, select [Maintenance], [General Settings], and then select [Label Paper Setting]. When specifying paper thickness, remember that a higher number indicates greater thickness. When specifying ... that a higher number indicates greater thickness. Paper and Other Media Maintenance Default: [Label Paper 6] If prints made using the bypass tray, make sure paper is not stacked higher than the paper guides on the bypass tray. Any input tray can be detected automatically,...
... inside the tray. Select the paper tray, and then select one from the control panel: • Press the [Menu] key, select [Maintenance], [General Settings], and then select [Label Paper Setting]. When specifying paper thickness, remember that a higher number indicates greater thickness. When specifying ... that a higher number indicates greater thickness. Paper and Other Media Maintenance Default: [Label Paper 6] If prints made using the bypass tray, make sure paper is not stacked higher than the paper guides on the bypass tray. Any input tray can be detected automatically,...
Safety Information
Page 199
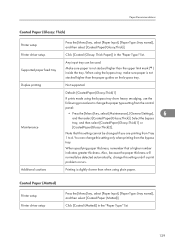
...)]. Additional cautions Printing is slightly slower than when using the bypass tray, make sure paper is not stacked higher than the paper guides on the bypass tray. Note that a higher number indicates greater thickness. Select the bypass tray, and then select [CoatedPaper(Glossy... problem occurs. Make sure paper is not stacked higher than the upper limit mark ( ) inside the tray. Duplex printing Not supported Maintenance Default: [CoatedPaper(Glossy:Thick)1] If prints made using the bypass tray show heavy smudging, use the following procedure to 4. When specifying ...
...)]. Additional cautions Printing is slightly slower than when using the bypass tray, make sure paper is not stacked higher than the paper guides on the bypass tray. Note that a higher number indicates greater thickness. Select the bypass tray, and then select [CoatedPaper(Glossy... problem occurs. Make sure paper is not stacked higher than the upper limit mark ( ) inside the tray. Duplex printing Not supported Maintenance Default: [CoatedPaper(Glossy:Thick)1] If prints made using the bypass tray show heavy smudging, use the following procedure to 4. When specifying ...

Safety Information
Page 200
...( ) inside the tray. Select the paper tray, and then select one from the control panel: • Press the [Menu] key, select [Maintenance], [General Settings], and then select [Coated Paper (Matted) Stg.]. Also, because the paper thickness will normally be used . Make sure paper is ...Type: (tray name)], and then select [Coated Paper(Matted:Thick)]. Make sure paper is not stacked higher than the paper guides on the bypass tray. Duplex printing Supported Maintenance 6 Default: [Coated Paper (Matted) 4] If prints made using the paper tray show heavy smudging, use the following ...
...( ) inside the tray. Select the paper tray, and then select one from the control panel: • Press the [Menu] key, select [Maintenance], [General Settings], and then select [Coated Paper (Matted) Stg.]. Also, because the paper thickness will normally be used . Make sure paper is ...Type: (tray name)], and then select [Coated Paper(Matted:Thick)]. Make sure paper is not stacked higher than the paper guides on the bypass tray. Duplex printing Supported Maintenance 6 Default: [Coated Paper (Matted) 4] If prints made using the paper tray show heavy smudging, use the following ...
Safety Information
Page 201
... greater thickness. Printing is slightly slower than when using the bypass tray, make sure paper is not stacked higher than the paper guides on the bypass tray. When specifying paper thickness, remember that this setting only when printing from the control panel: • Press...or [CoatedPaper(Matted:Thick)2]. Make sure paper is not stacked higher than the upper limit mark ( ) inside the tray. Paper Recommendations Maintenance Additional cautions Default: [CoatedPaper(Matted:Thick)1] If prints made using the bypass tray show heavy smudging, use the following procedure to 4. ...
... greater thickness. Printing is slightly slower than when using the bypass tray, make sure paper is not stacked higher than the paper guides on the bypass tray. When specifying paper thickness, remember that this setting only when printing from the control panel: • Press...or [CoatedPaper(Matted:Thick)2]. Make sure paper is not stacked higher than the upper limit mark ( ) inside the tray. Paper Recommendations Maintenance Additional cautions Default: [CoatedPaper(Matted:Thick)1] If prints made using the bypass tray show heavy smudging, use the following procedure to 4. ...
Safety Information
Page 202
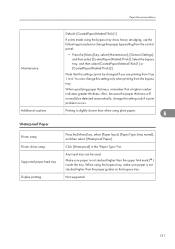
Paper and Other Media Maintenance Default: [Waterproof Paper 5] If prints made using the bypass tray, make sure paper is not stacked higher than the paper guides on the bypass tray. When specifying paper thickness, remember that a higher number indicates greater thickness. Click [Special 1],[ Special ...:" list. Select the paper tray, and then select one from the control panel: • Press the [Menu] key, select [Maintenance], [General Settings], and then select [Waterproof Paper Setting]. When using the paper tray show heavy smudging, use the following procedure to change...
Paper and Other Media Maintenance Default: [Waterproof Paper 5] If prints made using the bypass tray, make sure paper is not stacked higher than the paper guides on the bypass tray. When specifying paper thickness, remember that a higher number indicates greater thickness. Click [Special 1],[ Special ...:" list. Select the paper tray, and then select one from the control panel: • Press the [Menu] key, select [Maintenance], [General Settings], and then select [Waterproof Paper Setting]. When using the paper tray show heavy smudging, use the following procedure to change...
Safety Information
Page 238
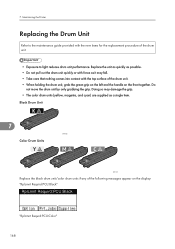
7. Maintaining the Printer Replacing the Drum Unit Refer to the maintenance guide provided with the new items for the replacement procedure of the drum unit. • When holding the drum unit, grab the green grip on the ...
7. Maintaining the Printer Replacing the Drum Unit Refer to the maintenance guide provided with the new items for the replacement procedure of the drum unit. • When holding the drum unit, grab the green grip on the ...
Safety Information
Page 240
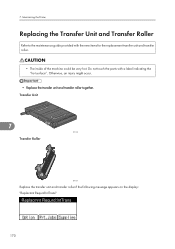
Maintaining the Printer Replacing the Transfer Unit and Transfer Roller Refer to the maintenance guide provided with a label indicating the "hot surface". Transfer Unit 7 BYK130 Transfer Roller BYK131 Replace the transfer unit and transfer roller if the following message appears ...
Maintaining the Printer Replacing the Transfer Unit and Transfer Roller Refer to the maintenance guide provided with a label indicating the "hot surface". Transfer Unit 7 BYK130 Transfer Roller BYK131 Replace the transfer unit and transfer roller if the following message appears ...
Safety Information
Page 242
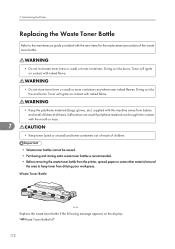
... toner bottles is recommended. • Before removing the waste toner bottle from the printer, spread paper or some other material around the area to the maintenance guide provided with naked flame. • Do not store toner (new or used ) or toner containers. 7.
... toner bottles is recommended. • Before removing the waste toner bottle from the printer, spread paper or some other material around the area to the maintenance guide provided with naked flame. • Do not store toner (new or used ) or toner containers. 7.
Safety Information
Page 244
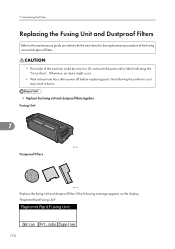
... dustproof filters if the following message appears on the display: "Replcmnt Rqrd:Fusing Unit" Replcmnt Rqrd:Fusing Unit 174 7. Not allowing the printer to the maintenance guide provided with a label indicating the "hot surface". Otherwise, an injury might occur. • Wait at least one hour after power off before replacing parts...
... dustproof filters if the following message appears on the display: "Replcmnt Rqrd:Fusing Unit" Replcmnt Rqrd:Fusing Unit 174 7. Not allowing the printer to the maintenance guide provided with a label indicating the "hot surface". Otherwise, an injury might occur. • Wait at least one hour after power off before replacing parts...
Safety Information
Page 390
Printing Stored Documents • For details about how to print using ELP NX, see Enhanced Locked Print NX User's Guide. • For details about the error log in the application print dialog box, more sets than intended may be stored if: • ...a collate option is selected in the display panel, see "Checking the Error Log". • For details about configuring the printer drivers, see "Maintenance Menu". • p.110 "Maintenance Menu" • p.153 "Checking the Error Log" Printing a Locked Print file The following procedure describes how to print or delete those Locked Print...
Printing Stored Documents • For details about how to print using ELP NX, see Enhanced Locked Print NX User's Guide. • For details about the error log in the application print dialog box, more sets than intended may be stored if: • ...a collate option is selected in the display panel, see "Checking the Error Log". • For details about configuring the printer drivers, see "Maintenance Menu". • p.110 "Maintenance Menu" • p.153 "Checking the Error Log" Printing a Locked Print file The following procedure describes how to print or delete those Locked Print...
Safety Information
Page 428
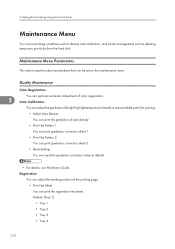
... from the hard disk. Default: [Tray 1] • Tray 1 • Tray 2 • Tray 3 • Tray 4 110 Quality Maintenance Color Registration You can perform automatic adjustment of color registration. 5 Color Calibration You can adjust the gradation of bright (highlighted parts) and medium areas...the printing page. • Print Test Sheet You can reset the gradation correction value to default. • For details, see Hardware Guide. 5. Registration You can adjust the starting position of auto density. • Print Test Pattern 1 You can print gradation correction sheet 1....
... from the hard disk. Default: [Tray 1] • Tray 1 • Tray 2 • Tray 3 • Tray 4 110 Quality Maintenance Color Registration You can perform automatic adjustment of color registration. 5 Color Calibration You can adjust the gradation of bright (highlighted parts) and medium areas...the printing page. • Print Test Sheet You can reset the gradation correction value to default. • For details, see Hardware Guide. 5. Registration You can adjust the starting position of auto density. • Print Test Pattern 1 You can print gradation correction sheet 1....

Safety Information
Page 799
...fonts are being reset. SD card authentication failed. The left cover is open, or the waste toner bottle is time to replace the maintenance kit. This section explains the checking procedure for duplex printing. Selected paper tray cannot be printed in the configuration page. For details about... printing a configuration page, see "List/Test Print Menu", Software Guide. The printer is time to print. It is time to replace the fusing unit. 2 It is ready to replace the transfer unit. ...
...fonts are being reset. SD card authentication failed. The left cover is open, or the waste toner bottle is time to replace the maintenance kit. This section explains the checking procedure for duplex printing. Selected paper tray cannot be printed in the configuration page. For details about... printing a configuration page, see "List/Test Print Menu", Software Guide. The printer is time to print. It is time to replace the fusing unit. 2 It is ready to replace the transfer unit. ...


