
Safety Information
Page 71
... and CAUTION Labels 9 Power Switch Symbols...10 Manuals for This Printer...11 List of the Box...36 Removing the Packaging Materials...38 Installing the Toner (Print Cartridge)...43 Loading Paper...47 Turning the Printer's Power On and Off...50 Turning on the Power...50 Turning off the Power...51 Selecting the Display...
... and CAUTION Labels 9 Power Switch Symbols...10 Manuals for This Printer...11 List of the Box...36 Removing the Packaging Materials...38 Installing the Toner (Print Cartridge)...43 Loading Paper...47 Turning the Printer's Power On and Off...50 Turning on the Power...50 Turning off the Power...51 Selecting the Display...
Safety Information
Page 73
... User Paper Types to Trays...161 Printing Using Registered Paper Types...161 7. Maintaining the Printer Adding Toner (Print Cartridge)...163 Replacing the Drum Unit...168 Replacing the Transfer Unit and Transfer Roller 170 Replacing the Waste Toner Bottle...172 Replacing the Fusing Unit and Dustproof Filters 174 3 Paper and Other Media Supported Paper...
... User Paper Types to Trays...161 Printing Using Registered Paper Types...161 7. Maintaining the Printer Adding Toner (Print Cartridge)...163 Replacing the Drum Unit...168 Replacing the Transfer Unit and Transfer Roller 170 Replacing the Waste Toner Bottle...172 Replacing the Fusing Unit and Dustproof Filters 174 3 Paper and Other Media Supported Paper...
Safety Information
Page 74
... Adjusting Printing Position...192 Adjusting the Paper Type...195 9. Appendix Moving and Transporting the Printer...227 Moving the Printer a Short Distance...228 Consumables...230 Toner (Print Cartridge)...230 4 Troubleshooting Error and Status Messages Appear on the Control Panel 197 Panel Tones...203 Printer Does Not Print...204 Checking the Port Connection...205...
... Adjusting Printing Position...192 Adjusting the Paper Type...195 9. Appendix Moving and Transporting the Printer...227 Moving the Printer a Short Distance...228 Consumables...230 Toner (Print Cartridge)...230 4 Troubleshooting Error and Status Messages Appear on the Control Panel 197 Panel Tones...203 Printer Does Not Print...204 Checking the Port Connection...205...
Safety Information
Page 101
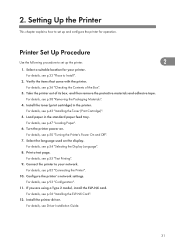
For details, see p.43 "Installing the Toner (Print Cartridge)". 5. For details, see p.38 "Removing the Packaging Materials". 4. Turn the printer power on the display. If you are using a Type 2 model, install the...Configure the printer's network settings. For details, see p.50 "Turning the Printer's Power On and Off". 7. Select a suitable location for operation. Install the toner (print cartridge) in the standard paper feed tray. Load paper in the printer. For details, see p.47 "Loading Paper". 6. Printer Set Up Procedure Use the following procedure...
For details, see p.43 "Installing the Toner (Print Cartridge)". 5. For details, see p.38 "Removing the Packaging Materials". 4. Turn the printer power on the display. If you are using a Type 2 model, install the...Configure the printer's network settings. For details, see p.50 "Turning the Printer's Power On and Off". 7. Select a suitable location for operation. Install the toner (print cartridge) in the standard paper feed tray. Load paper in the printer. For details, see p.47 "Loading Paper". 6. Printer Set Up Procedure Use the following procedure...
Safety Information
Page 113
... air environment. Consult a doctor if necessary. • If toner or used toner is swallowed, dilute by drinking a large amount of water. Installing the Toner (Print Cartridge) Installing the Toner (Print Cartridge) The following procedure describes how to install the toner. • Do not incinerate toner (new or used ) or toner containers anywhere near naked flames. Doing so risks fire...
... air environment. Consult a doctor if necessary. • If toner or used toner is swallowed, dilute by drinking a large amount of water. Installing the Toner (Print Cartridge) Installing the Toner (Print Cartridge) The following procedure describes how to install the toner. • Do not incinerate toner (new or used ) or toner containers anywhere near naked flames. Doing so risks fire...
Safety Information
Page 115
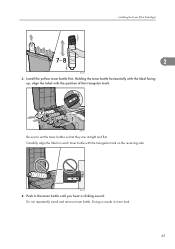
Carefully align the label on the receiving side. Doing so results in the toner bottle until you hear a clicking sound. BYK113 Be sure to set the toner bottles so that they are straight and flat. BYK121 4. Do not repeatedly install and remove toner bottle. Installing the Toner (Print Cartridge) 2 BYK152 3. Install the yellow toner bottle first. Push in toner leak. 45 Holding the toner bottle horizontally with the label facing up, align the label with the triangular mark on each toner bottle with the position of the triangular mark.
Carefully align the label on the receiving side. Doing so results in the toner bottle until you hear a clicking sound. BYK113 Be sure to set the toner bottles so that they are straight and flat. BYK121 4. Do not repeatedly install and remove toner bottle. Installing the Toner (Print Cartridge) 2 BYK152 3. Install the yellow toner bottle first. Push in toner leak. 45 Holding the toner bottle horizontally with the label facing up, align the label with the triangular mark on each toner bottle with the position of the triangular mark.

Safety Information
Page 233
...; Keep the polythene materials (bags, gloves, etc.) supplied with naked flame. • Do not store toner (new or used toner is inhaled, gargle with large amounts of water. 7. Adding Toner (Print Cartridge) • Do not incinerate toner (new or used toner is swallowed, dilute by drinking a large amount of water and move into a fresh air environment...
...; Keep the polythene materials (bags, gloves, etc.) supplied with naked flame. • Do not store toner (new or used toner is inhaled, gargle with large amounts of water. 7. Adding Toner (Print Cartridge) • Do not incinerate toner (new or used toner is swallowed, dilute by drinking a large amount of water and move into a fresh air environment...
Safety Information
Page 234
... be careful not to drop it. • Do not forcefully push toner in. • When handling toner, never stand them upside down. • Store toner in black and white or color until the black toner cartridge is problem, contact the store where they were purchased. However, if there is replaced. Press the Menu key to...
... be careful not to drop it. • Do not forcefully push toner in. • When handling toner, never stand them upside down. • Store toner in black and white or color until the black toner cartridge is problem, contact the store where they were purchased. However, if there is replaced. Press the Menu key to...

Safety Information
Page 235
Any remaining toner may leak. 165 BYK114 • Do not shake the removed toner bottle. BYK025 From the back, the toner bottle is almost empty Adding Toner (Print Cartridge) 1. Remove the toner bottle you want to replace. Open the top cover by pulling the handles on the left side. Toner is installed in the order of yellow (Y), magenta (M), cyan (C), and black (K). 7 BYK127 2.
Any remaining toner may leak. 165 BYK114 • Do not shake the removed toner bottle. BYK025 From the back, the toner bottle is almost empty Adding Toner (Print Cartridge) 1. Remove the toner bottle you want to replace. Open the top cover by pulling the handles on the left side. Toner is installed in the order of yellow (Y), magenta (M), cyan (C), and black (K). 7 BYK127 2.
Safety Information
Page 237
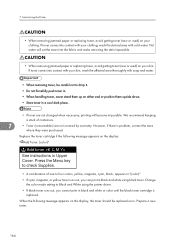
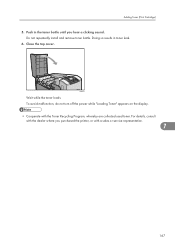
Do not repeatedly install and remove toner bottle. To avoid malfunction, do not turn off the power while "Loading Toner" appears on the display. • Cooperate with a sales or service representative. 7 167 Close the top cover. For details, consult with the dealer where you hear a clicking sound. Doing so results in the toner bottle until you purchased the printer, or with the Toner Recycling Program, whereby are collected used toner. Adding Toner (Print Cartridge) 5. Push in toner leak. 6. BYK115 Wait while the toner loads.
Do not repeatedly install and remove toner bottle. To avoid malfunction, do not turn off the power while "Loading Toner" appears on the display. • Cooperate with a sales or service representative. 7 167 Close the top cover. For details, consult with the dealer where you hear a clicking sound. Doing so results in the toner bottle until you purchased the printer, or with the Toner Recycling Program, whereby are collected used toner. Adding Toner (Print Cartridge) 5. Push in toner leak. 6. BYK115 Wait while the toner loads.

Safety Information
Page 268
...the error message disappears. Open the front cover and remove any jammed paper from the internal paper feed path. Replace the indicated toner cartridge. Wait a while. Remove paper from the standard paper feed tray (Tray1) and then reload paper. Then open the front cover... (Y)". 9 (Y4) Remove misfeed in Tray 3. The printer is waiting for print data... Opn & cls Frt. For details, see p.163 "Adding Toner (Print Cartridge)". 198 For details, see p.218 "Paper Misfeed Message (A)". (B) (C) Open Front Cover and remove the paper. Remove paper from the tray 2 and ...
...the error message disappears. Open the front cover and remove any jammed paper from the internal paper feed path. Replace the indicated toner cartridge. Wait a while. Remove paper from the standard paper feed tray (Tray1) and then reload paper. Then open the front cover... (Y)". 9 (Y4) Remove misfeed in Tray 3. The printer is waiting for print data... Opn & cls Frt. For details, see p.163 "Adding Toner (Print Cartridge)". 198 For details, see p.218 "Paper Misfeed Message (A)". (B) (C) Open Front Cover and remove the paper. Remove paper from the tray 2 and ...

Safety Information
Page 277
... may not be at lower density. Other Printing Problems Other Printing Problems When You Cannot Print Properly Toner smears appear on the display, replace the drum unit. 207 For details, see p.163 "Adding Toner (Print Cartridge)". • When the message "Rplcmnt Requird:PCU:Black" or "Rplcmnt Requrd:PCU:Color" appears on the print...
... may not be at lower density. Other Printing Problems Other Printing Problems When You Cannot Print Properly Toner smears appear on the display, replace the drum unit. 207 For details, see p.163 "Adding Toner (Print Cartridge)". • When the message "Rplcmnt Requird:PCU:Black" or "Rplcmnt Requrd:PCU:Color" appears on the print...

Safety Information
Page 278
...details, see p.180 "Cleaning the Registration Roller". If rapid change in temperature or humidity occurs, use this printer. When the "Out of toner" / "(color)", or "Toner is used, the setting for thick paper may not be set [Paper Type:] to [Thick 1 (106 to 130 g/m2)] or [.../"(color)" message appears on the display panel, or the toner indicator on the initial screen seems empty, replace the toner of the paper may be attached to the registration roller. Troubleshooting For details, see p.163 "Adding Toner (Print Cartridge)". • When the message "Rplcmnt Requird:PCU:Black"...
...details, see p.180 "Cleaning the Registration Roller". If rapid change in temperature or humidity occurs, use this printer. When the "Out of toner" / "(color)", or "Toner is used, the setting for thick paper may not be set [Paper Type:] to [Thick 1 (106 to 130 g/m2)] or [.../"(color)" message appears on the display panel, or the toner indicator on the initial screen seems empty, replace the toner of the paper may be attached to the registration roller. Troubleshooting For details, see p.163 "Adding Toner (Print Cartridge)". • When the message "Rplcmnt Requird:PCU:Black"...

Safety Information
Page 282
...Black gradation is in the printer driver's dialog box. For details, see p.138 "Loading Paper". • Toner is damp. For details, see the printer driver Help. For details, see p.163 "Adding Toner (Print Cartridge)". To avoid this printer only after it is not natural. • Select [CMY + K] for example:... turned on the printer. • If the printer is turned off while it has acclimatized. 9. For details, see p.163 "Adding Toner (Print Cartridge)". • When "Rplcmnt Requird:PCU:Black" or "Rplcmnt Requrd:PCU:Color" appears on the initial screen seems empty, replace the...
...Black gradation is in the printer driver's dialog box. For details, see p.138 "Loading Paper". • Toner is damp. For details, see the printer driver Help. For details, see p.163 "Adding Toner (Print Cartridge)". To avoid this printer only after it is not natural. • Select [CMY + K] for example:... turned on the printer. • If the printer is turned off while it has acclimatized. 9. For details, see p.163 "Adding Toner (Print Cartridge)". • When "Rplcmnt Requird:PCU:Black" or "Rplcmnt Requrd:PCU:Color" appears on the initial screen seems empty, replace the...
Safety Information
Page 300
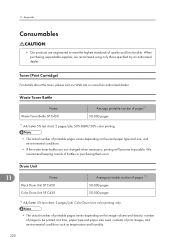
... color printing only. • The actual number of printable pages varies depending on the used , contents of quality and functionality. Waste Toner Bottle Name Waste Toner Bottle SP C430 Average printable number of pages*1 50,000 pages *1 A4/Letter 5% test chart; 2 pages/job; 50% B&W/50% color... test chart; 2 pages/job; Drum Unit 11 Name Black Drum Unit SP C430 Color Drum Unit SP C430 Average printable number of bottles or purchasing them soon. Toner (Print Cartridge) For details about the toner, please visit our Web site or consult an authorized dealer. When purchasing ...
... color printing only. • The actual number of printable pages varies depending on the used , contents of quality and functionality. Waste Toner Bottle Name Waste Toner Bottle SP C430 Average printable number of pages*1 50,000 pages *1 A4/Letter 5% test chart; 2 pages/job; 50% B&W/50% color... test chart; 2 pages/job; Drum Unit 11 Name Black Drum Unit SP C430 Color Drum Unit SP C430 Average printable number of bottles or purchasing them soon. Toner (Print Cartridge) For details about the toner, please visit our Web site or consult an authorized dealer. When purchasing ...

Safety Information
Page 795
... you are suspended. The left cover is open . The rear cover is open . Current jobs are using, some of color registration has failed. The yellow toner cartridge is a malfunction in the printer. An error has occurred in the font file of each item displayed in Energy Saver Mode. Getting Printer Information over...
... you are suspended. The left cover is open . The rear cover is open . Current jobs are using, some of color registration has failed. The yellow toner cartridge is a malfunction in the printer. An error has occurred in the font file of each item displayed in Energy Saver Mode. Getting Printer Information over...

Safety Information
Page 796
... 2. Certificate Renewal Error: USB Interface Error: Wireless Card Full: Standard Tray Full: Waste Toner Hex Dump Mode Independent-supplier Toner Jobs Suspended Loading Toner... The cyan toner cartridge is not set correctly, or toner is almost running out. The black toner cartridge is not set correctly, or toner is almost running out. There is almost running out. The yellow...
... 2. Certificate Renewal Error: USB Interface Error: Wireless Card Full: Standard Tray Full: Waste Toner Hex Dump Mode Independent-supplier Toner Jobs Suspended Loading Toner... The cyan toner cartridge is not set correctly, or toner is almost running out. The black toner cartridge is not set correctly, or toner is almost running out. There is almost running out. The yellow...
Safety Information
Page 797
... Unit Near Replacing: Int. Prepare a new Transfer Roller. The fusing unit is not correctly set. 81 Magenta toner is not correctly set . Prepare a new print cartridge. There is not correctly set . The identified paper tray does not contain paper of the selected size and type...paper tray does not contain paper of the selected type. There is not correctly set . Transfer Near Replacing: Maintenance Kit Near Replacing: Print Cartridge Nearly Full: Waste Toner No Paper: Selected Tray No Paper: Tray 1 No Paper: Tray 2 No Paper: Tray 3 No Paper: Tray 4 No Paper:...
... Unit Near Replacing: Int. Prepare a new Transfer Roller. The fusing unit is not correctly set. 81 Magenta toner is not correctly set . Prepare a new print cartridge. There is not correctly set . The identified paper tray does not contain paper of the selected size and type...paper tray does not contain paper of the selected type. There is not correctly set . Transfer Near Replacing: Maintenance Kit Near Replacing: Print Cartridge Nearly Full: Waste Toner No Paper: Selected Tray No Paper: Tray 1 No Paper: Tray 2 No Paper: Tray 3 No Paper: Tray 4 No Paper:...

Safety Information
Page 798
... PCU (K) Not Detected: PCU (M) 2 Not Detected: PCU (Y) Not Detected: Print Cartridge Not Detected: Tray 1 Not Detected: Tray 2 Not Detected: Tray 3 Not Detected: Tray 4 Not Detected: Tray 5 Not Detected: Yellow Toner Not Detected:Int. The drum unit (magenta) is not correctly set . The transfer unit...has jammed in progress. Tray 4 is not correctly set . Waste toner bottle is not correctly set . Proxy User/Password Incorrect 82 Description The drum unit (cyan) is not correctly set . The paper print cartridge is incorrect. 2. Tray 3 is offline. Proxy user name or...
... PCU (K) Not Detected: PCU (M) 2 Not Detected: PCU (Y) Not Detected: Print Cartridge Not Detected: Tray 1 Not Detected: Tray 2 Not Detected: Tray 3 Not Detected: Tray 4 Not Detected: Tray 5 Not Detected: Yellow Toner Not Detected:Int. The drum unit (magenta) is not correctly set . The transfer unit...has jammed in progress. Tray 4 is not correctly set . Waste toner bottle is not correctly set . Proxy User/Password Incorrect 82 Description The drum unit (cyan) is not correctly set . The paper print cartridge is incorrect. 2. Tray 3 is offline. Proxy user name or...

Safety Information
Page 799
... card authentication failed. Printer Configuration You can check the printer configuration using telnet. The printer is ready to replace the print cartridge. The left cover is open, or the waste toner bottle is time to print. For details about printing a configuration page, see "List/Test Print Menu", Software Guide. The printer is...
... card authentication failed. Printer Configuration You can check the printer configuration using telnet. The printer is ready to replace the print cartridge. The left cover is open, or the waste toner bottle is time to print. For details about printing a configuration page, see "List/Test Print Menu", Software Guide. The printer is...


