
Safety Information
Page 6
...Dedrick Place, West Caldwell, NJ 07006 Telephone number: 973-882-2000 Product Name: Laser Printer Model Number: CLP37DN/SP C430DN/LP137CN/Aficio SP C430DN CLP42DN/SP C431DN/LP142CN/Aficio SP C431DN ❖ Note This equipment has been tested and found to comply with the instructions, may cause undesired ... can radiate radio frequency energy and, if not installed and used in a residential installation. This equipment generates, uses and can be determined by turning the equipment off and on Responsible party: Ricoh Americas Corporation. Operation is subject to the following measures...
...Dedrick Place, West Caldwell, NJ 07006 Telephone number: 973-882-2000 Product Name: Laser Printer Model Number: CLP37DN/SP C430DN/LP137CN/Aficio SP C430DN CLP42DN/SP C431DN/LP142CN/Aficio SP C431DN ❖ Note This equipment has been tested and found to comply with the instructions, may cause undesired ... can radiate radio frequency energy and, if not installed and used in a residential installation. This equipment generates, uses and can be determined by turning the equipment off and on Responsible party: Ricoh Americas Corporation. Operation is subject to the following measures...
Safety Information
Page 9
Good ventilation is especially important when the machine is used while placed on the floor with the optional paper feed unit installed. Use of more than 30 m3/hr/person. Doing so could result in this manual. The tip-resistant caster table can only be... Machine sound levels exceeding LWAd > 63 dB (A) are not suitable for the first few days after installation of their vicinity. Note To avoid possible build-up of ozone, make sure to be installed by overheated internal components. • When new, electrical devices containing volatile materials will normally release emissions ...
Good ventilation is especially important when the machine is used while placed on the floor with the optional paper feed unit installed. Use of more than 30 m3/hr/person. Doing so could result in this manual. The tip-resistant caster table can only be... Machine sound levels exceeding LWAd > 63 dB (A) are not suitable for the first few days after installation of their vicinity. Note To avoid possible build-up of ozone, make sure to be installed by overheated internal components. • When new, electrical devices containing volatile materials will normally release emissions ...

Safety Information
Page 11
.... Then contact your service representative and report the problem. Do not use the machine. Doing so could result in fire or electric shock. • Before installing or removing options, always remove the power cords from babies and small children at all times. Then contact your service representative and report the problem...
.... Then contact your service representative and report the problem. Do not use the machine. Doing so could result in fire or electric shock. • Before installing or removing options, always remove the power cords from babies and small children at all times. Then contact your service representative and report the problem...

Safety Information
Page 12
... components inside this machine are high voltage components that are an electric shock hazard and laser components that could cause blindness. A safety device has been installed so that exposure to disassemble or modify this reason, take care when removing misfed paper. Doing so risks burns and electric shock. Dispose of explosion...
... components inside this machine are high voltage components that are an electric shock hazard and laser components that could cause blindness. A safety device has been installed so that exposure to disassemble or modify this reason, take care when removing misfed paper. Doing so risks burns and electric shock. Dispose of explosion...

Safety Information
Page 69
Operating Instructions Hardware Guide 1 Guide to read "Safety Information" before you use this machine and keep it handy for future reference. For safe and correct use, be sure to the Printer 2 Setting Up the Printer 3 Installing Options 4 Connecting the Printer 5 Configuration 6 Paper and Other Media 7 Maintaining the Printer 8 Adjusting the Printer 9 Troubleshooting 10 Removing Misfed Paper 11 Appendix Read this manual carefully before using the machine.
Operating Instructions Hardware Guide 1 Guide to read "Safety Information" before you use this machine and keep it handy for future reference. For safe and correct use, be sure to the Printer 2 Setting Up the Printer 3 Installing Options 4 Connecting the Printer 5 Configuration 6 Paper and Other Media 7 Maintaining the Printer 8 Adjusting the Printer 9 Troubleshooting 10 Removing Misfed Paper 11 Appendix Read this manual carefully before using the machine.

Safety Information
Page 71
... of WARNING and CAUTION Labels 9 Power Switch Symbols...10 Manuals for This Printer...11 List of the Box...36 Removing the Packaging Materials...38 Installing the Toner (Print Cartridge)...43 Loading Paper...47 Turning the Printer's Power On and Off...50 Turning on the Power...50 Turning off the ...Power...51 Selecting the Display Language...54 Test Printing...55 Installing the ELP-NX Card...56 1 Setting Up the Printer Printer Set Up Procedure...31 Place to Enter Characters...27 2. Guide to the Printer Exterior...
... of WARNING and CAUTION Labels 9 Power Switch Symbols...10 Manuals for This Printer...11 List of the Box...36 Removing the Packaging Materials...38 Installing the Toner (Print Cartridge)...43 Loading Paper...47 Turning the Printer's Power On and Off...50 Turning on the Power...50 Turning off the ...Power...51 Selecting the Display Language...54 Test Printing...55 Installing the ELP-NX Card...56 1 Setting Up the Printer Printer Set Up Procedure...31 Place to Enter Characters...27 2. Guide to the Printer Exterior...
Safety Information
Page 72
... Board 62 Attaching the Paper Feed Unit...63 Installing the Memory Expansion Units...67 Installing the SDRAM Module...67 Installing the Hard Disk...70 Installing the Interface Units...75 Installing the Gigabit Ethernet Board...75 Installing the Wireless LAN Interface Board 77 Installing the IEEE 1284 Interface Board 79 Installing the SD Memory Card Options...82 4. Connecting the...
... Board 62 Attaching the Paper Feed Unit...63 Installing the Memory Expansion Units...67 Installing the SDRAM Module...67 Installing the Hard Disk...70 Installing the Interface Units...75 Installing the Gigabit Ethernet Board...75 Installing the Wireless LAN Interface Board 77 Installing the IEEE 1284 Interface Board 79 Installing the SD Memory Card Options...82 4. Connecting the...
Safety Information
Page 73
... 170 Replacing the Waste Toner Bottle...172 Replacing the Fusing Unit and Dustproof Filters 174 3 Setting WPA...110 Configuring IEEE 802.1X...115 Installing a Site Certificate...115 Installing Device Certificate...115 Setting Items of User Paper Types to Use 159 Registering Names to Paper Types...160 Setting User Paper Types to Trays...
... 170 Replacing the Waste Toner Bottle...172 Replacing the Fusing Unit and Dustproof Filters 174 3 Setting WPA...110 Configuring IEEE 802.1X...115 Installing a Site Certificate...115 Installing Device Certificate...115 Setting Items of User Paper Types to Use 159 Registering Names to Paper Types...160 Setting User Paper Types to Trays...
Safety Information
Page 81
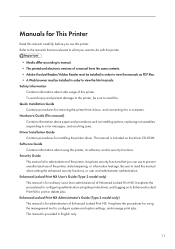
...functions, or user and administrator authentication. This manual is for installing the printer driver. To avoid injury and prevent damage to the printer, be installed in order to view the manuals as installing options, replacing consumables, responding to view the html manuals.... versions of a manual have the same contents. • Adobe Acrobat Reader/Adobe Reader must be installed in order to error messages, and resolving jams. Driver Installation Guide Contains procedures for ordinary users (non-administrators) of this printer. Safety Information Contains information about ...
...functions, or user and administrator authentication. This manual is for installing the printer driver. To avoid injury and prevent damage to the printer, be installed in order to view the manuals as installing options, replacing consumables, responding to view the html manuals.... versions of a manual have the same contents. • Adobe Acrobat Reader/Adobe Reader must be installed in order to error messages, and resolving jams. Driver Installation Guide Contains procedures for ordinary users (non-administrators) of this printer. Safety Information Contains information about ...

Safety Information
Page 84
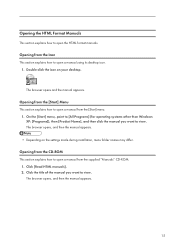
...copy the "MANUAL_HTML" folder to your computer's hard drive, and then run "Setup.exe". • To delete an installed manual, on a computer. • The system requirements for installing the manuals are as follows: • Minimum display resolution: 800 × 600 pixels • Recommended browsers: •... If you want to view manuals. 1. To open PDF manuals, click [Read PDF manuals] in the CD-ROM. For easy access, we recommend you install the manuals on the [Start] menu, point to the displayed instructions. 6. Select a language and a product, and then click [OK]. 4. Click [...
...copy the "MANUAL_HTML" folder to your computer's hard drive, and then run "Setup.exe". • To delete an installed manual, on a computer. • The system requirements for installing the manuals are as follows: • Minimum display resolution: 800 × 600 pixels • Recommended browsers: •... If you want to view manuals. 1. To open PDF manuals, click [Read PDF manuals] in the CD-ROM. For easy access, we recommend you install the manuals on the [Start] menu, point to the displayed instructions. 6. Select a language and a product, and then click [OK]. 4. Click [...
Safety Information
Page 85
... manual appears. • Depending on your desktop. The browser opens, and then the manual appears. 15 Double-click the icon on the settings made during installation, menu folder names may differ. The browser opens and the manual appears. On the [Start] menu, point to [All Programs] (for operating systems other than...
... manual appears. • Depending on your desktop. The browser opens, and then the manual appears. 15 Double-click the icon on the settings made during installation, menu folder names may differ. The browser opens and the manual appears. On the [Start] menu, point to [All Programs] (for operating systems other than...
Safety Information
Page 89
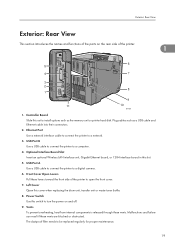
... board, or 1284 interface board in this cover when replacing the drum unit, transfer unit or waste toner bottle. 8. Power Switch Use this out to install options such as a USB cable and Ethernet cable into their connectors. 2. Vents To prevent overheating, heat from internal components is released through these vents are...
... board, or 1284 interface board in this cover when replacing the drum unit, transfer unit or waste toner bottle. 8. Power Switch Use this out to install options such as a USB cable and Ethernet cable into their connectors. 2. Vents To prevent overheating, heat from internal components is released through these vents are...

Safety Information
Page 90
... Appears on the Control Panel". • p.197 "Error and Status Messages Appear on the Control Panel" 20 SD Card Slots Remove the cover and install SD cards here. 1. Insert the other end of the cable into a nearby wall outlet. 11. Power Connector Connect the power cord to the printer... here. Install the data overwrite security unit, NetWare card or camera direct print card in the lower slot. • For details about the messages which appear on...
... Appears on the Control Panel". • p.197 "Error and Status Messages Appear on the Control Panel" 20 SD Card Slots Remove the cover and install SD cards here. 1. Insert the other end of the cable into a nearby wall outlet. 11. Power Connector Connect the power cord to the printer... here. Install the data overwrite security unit, NetWare card or camera direct print card in the lower slot. • For details about the messages which appear on...
Safety Information
Page 91
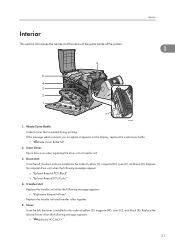
...the display, replace the waste toner bottle. • " Waste Toner Bottle full" 2. Toner From the left , the drum units are installed in the order of yellow (Y), magenta (M), cyan (C), and black (K). Interior Interior This section introduces the names and functions of the parts ...inside of the printer. 1 6 5 4 3 2 1 7 BYK006 1. Waste Toner Bottle Collects toner that is installed in the order of yellow (Y), magenta (M), cyan (C), and black (K). Replace the relevant drum unit when the following messages appear: • "Rplcmnt Requird:PCU:...
...the display, replace the waste toner bottle. • " Waste Toner Bottle full" 2. Toner From the left , the drum units are installed in the order of yellow (Y), magenta (M), cyan (C), and black (K). Interior Interior This section introduces the names and functions of the parts ...inside of the printer. 1 6 5 4 3 2 1 7 BYK006 1. Waste Toner Bottle Collects toner that is installed in the order of yellow (Y), magenta (M), cyan (C), and black (K). Replace the relevant drum unit when the following messages appear: • "Rplcmnt Requird:PCU:...
Safety Information
Page 95
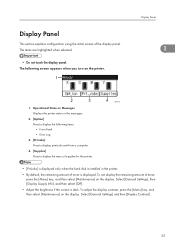
... then select [Maintenance] on the printer. Select [General Settings], then [Display Supply Info], and then select [Off]. • Adjust the brightness if the screen is installed in the printer. • By default, the remaining amount of the display panel. To adjust the display contrast, press the [Menu] key, and then select...
... then select [Maintenance] on the printer. Select [General Settings], then [Display Supply Info], and then select [Off]. • Adjust the brightness if the screen is installed in the printer. • By default, the remaining amount of the display panel. To adjust the display contrast, press the [Menu] key, and then select...
Safety Information
Page 101
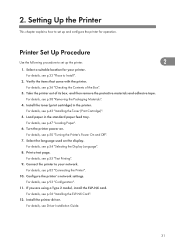
...its box, and then remove the protective materials and adhesive tape. Take the printer out of the Box". 3. For details, see p.56 "Installing the ELP-NX Card". 12. For details, see p.85 "Connecting the Printer". 10. Connect the printer to set up and configure the ...printer for your network. Configure the printer's network settings. Install the printer driver. Setting Up the Printer This chapter explains how to your printer. Install the toner (print cartridge) in the standard paper feed tray. 2. For details, see p.32 ...
...its box, and then remove the protective materials and adhesive tape. Take the printer out of the Box". 3. For details, see p.56 "Installing the ELP-NX Card". 12. For details, see p.85 "Connecting the Printer". 10. Connect the printer to set up and configure the ...printer for your network. Configure the printer's network settings. Install the printer driver. Setting Up the Printer This chapter explains how to your printer. Install the toner (print cartridge) in the standard paper feed tray. 2. For details, see p.32 ...
Safety Information
Page 102
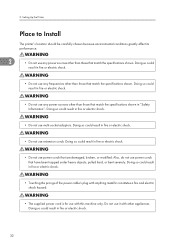
... the specifications shown. Doing so could result in fire or electric shock. • Do not use multi-socket adaptors. Setting Up the Printer Place to Install The printer's location should be carefully chosen because environmental conditions greatly affect its performance. 2 • Do not use with anything metallic constitutes a fire and electric...
... the specifications shown. Doing so could result in fire or electric shock. • Do not use multi-socket adaptors. Setting Up the Printer Place to Install The printer's location should be carefully chosen because environmental conditions greatly affect its performance. 2 • Do not use with anything metallic constitutes a fire and electric...

Safety Information
Page 103
... follows: 33 If it topples over, an injury might occur. • Do not place the machine on an unstable or tilted surface. Place to Install • It is dangerous to a wall outlet. Doing so could result in fire or electric shock. • Keep the machine away from humidity ... a fire or an electric shock might occur. • Make sure the room where you are exposed or broken, contact your service 2 representative for Installation The recommended (or minimum) space requirements are as possible to handle the power cord plug with wet hands. Space Required for a replacement.
... follows: 33 If it topples over, an injury might occur. • Do not place the machine on an unstable or tilted surface. Place to Install • It is dangerous to a wall outlet. Doing so could result in fire or electric shock. • Keep the machine away from humidity ... a fire or an electric shock might occur. • Make sure the room where you are exposed or broken, contact your service 2 representative for Installation The recommended (or minimum) space requirements are as possible to handle the power cord plug with wet hands. Space Required for a replacement.
Safety Information
Page 105
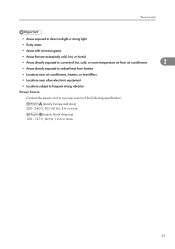
Place to Install • Areas exposed to direct sunlight or strong light • Dusty areas • Areas with corrosive gases • Areas that are excessively cold, hot, or ...
Place to Install • Areas exposed to direct sunlight or strong light • Dusty areas • Areas with corrosive gases • Areas that are excessively cold, hot, or ...
Safety Information
Page 106
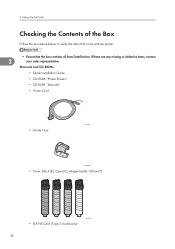
Manuals and CD-ROMs • Quick Installation Guide • CD-ROM "Printer Drivers" • CD-ROM "Manuals" • Power Cord BYK154 • Ferrite Core BYK012 • Toner: Black (K), Cyan (C), Magenta (M), Yellow (Y) BYK013 • ELP-NX Card (Type 2 model only) 36 If there are any missing or defective items, contact 2 your sales representative. 2. Setting Up the Printer Checking the Contents of the Box Follow the procedure below to verify the items that come with the printer. • Ensure that the box contains all items listed below.
Manuals and CD-ROMs • Quick Installation Guide • CD-ROM "Printer Drivers" • CD-ROM "Manuals" • Power Cord BYK154 • Ferrite Core BYK012 • Toner: Black (K), Cyan (C), Magenta (M), Yellow (Y) BYK013 • ELP-NX Card (Type 2 model only) 36 If there are any missing or defective items, contact 2 your sales representative. 2. Setting Up the Printer Checking the Contents of the Box Follow the procedure below to verify the items that come with the printer. • Ensure that the box contains all items listed below.

