Safety Information
Page 74
......185 Setting the Gradation Correction Value 185 Viewing the Color Calibration Sample Sheet and Gradation Correction Sheet 188 Resetting the Gradation Correction Value to the Initial Value 190 Adjusting Printing Position...192 Adjusting the Paper ...
......185 Setting the Gradation Correction Value 185 Viewing the Color Calibration Sample Sheet and Gradation Correction Sheet 188 Resetting the Gradation Correction Value to the Initial Value 190 Adjusting Printing Position...192 Adjusting the Paper ...
Safety Information
Page 91
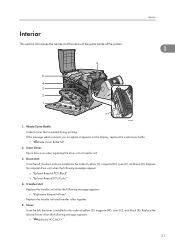
... bottle. • " Waste Toner Bottle full" 2. Replace the relevant drum unit when the following messages appear: • "Rplcmnt Requird:PCU:Black" • "Rplcmnt Requrd:PCU:Color" 4. Drum Unit From the left , the toner is wasted during printing. Waste Toner Bottle Collects toner that is installed in the order of the printer...
... bottle. • " Waste Toner Bottle full" 2. Replace the relevant drum unit when the following messages appear: • "Rplcmnt Requird:PCU:Black" • "Rplcmnt Requrd:PCU:Color" 4. Drum Unit From the left , the toner is wasted during printing. Waste Toner Bottle Collects toner that is installed in the order of the printer...

Safety Information
Page 107
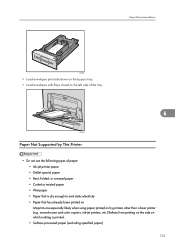
Purchase one as necessary to connect to the printer. 37 • Paper Feed Unit Labels BYK019 • Color Calibration Sample Sheet Checking the Contents of the Box 2 • Paper Weight/Grade Chart (mainly North America) BYK120 • Additional Documentation • This package does not include an interface cable.
Purchase one as necessary to connect to the printer. 37 • Paper Feed Unit Labels BYK019 • Color Calibration Sample Sheet Checking the Contents of the Box 2 • Paper Weight/Grade Chart (mainly North America) BYK120 • Additional Documentation • This package does not include an interface cable.
Safety Information
Page 205
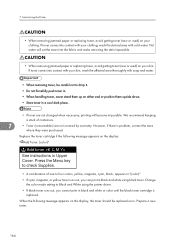
monochrome and color copiers, ink-jet printers, etc.) Refrain from printing on the side on which nothing is dry enough to emit static electricity • Paper that has ...
monochrome and color copiers, ink-jet printers, etc.) Refrain from printing on the side on which nothing is dry enough to emit static electricity • Paper that has ...
Safety Information
Page 234
...to drop it. • Do not forcefully push toner in. • When handling toner, never stand them up on the display: " Add Toner: (color)" Add toner See instructions in black and white using black toner. 7. Prepare a new toner. 164 If toner comes into contact with soap and water. ...by warranty. When the following message appears on either end or position them upside down. • Store toner in black and white or color until the black toner cartridge is problem, contact the store where they were purchased. If toner comes into contact with cold water. Maintaining the...
...to drop it. • Do not forcefully push toner in. • When handling toner, never stand them up on the display: " Add Toner: (color)" Add toner See instructions in black and white using black toner. 7. Prepare a new toner. 164 If toner comes into contact with soap and water. ...by warranty. When the following message appears on either end or position them upside down. • Store toner in black and white or color until the black toner cartridge is problem, contact the store where they were purchased. If toner comes into contact with cold water. Maintaining the...
Safety Information
Page 238
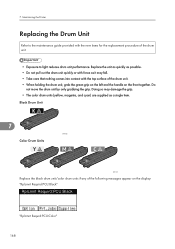
... grip on the left and the handle on the display: "Rplcmnt Requird:PCU:Black" Rplcmnt Requird:PCU:Black "Rplcmnt Requrd:PCU:Color" 168 Doing so may damage the grip. • The color drum units (yellow, magenta, and cyan) are supplied as it may fall. • Take care that nothing comes into contact... to the maintenance guide provided with force as a single item. 7. Do not move the drum unit by only grabbing the grip. Black Drum Unit 7 BYK100 Color Drum Units BYK101 Replace the black drum unit/color drum units if any of the following messages appear on the front together.
... grip on the left and the handle on the display: "Rplcmnt Requird:PCU:Black" Rplcmnt Requird:PCU:Black "Rplcmnt Requrd:PCU:Color" 168 Doing so may damage the grip. • The color drum units (yellow, magenta, and cyan) are supplied as it may fall. • Take care that nothing comes into contact... to the maintenance guide provided with force as a single item. 7. Do not move the drum unit by only grabbing the grip. Black Drum Unit 7 BYK100 Color Drum Units BYK101 Replace the black drum unit/color drum units if any of the following messages appear on the front together.

Safety Information
Page 239
"Repl Rqrd Soon:PCU:Black" Repl Rqrd Soon:PCU:Black "Repl Rqrd Soon:PCU:Color" Repl Rqrd Soon:PCU:Color 7 169 Prepare a new Black Drum Unit/Color Drum Unit. Rplcmnt Requrd:PCU:Color Replacing the Drum Unit When the following messages appear on the display, the black drum unit/color drum units should be replaced soon.
"Repl Rqrd Soon:PCU:Black" Repl Rqrd Soon:PCU:Black "Repl Rqrd Soon:PCU:Color" Repl Rqrd Soon:PCU:Color 7 169 Prepare a new Black Drum Unit/Color Drum Unit. Rplcmnt Requrd:PCU:Color Replacing the Drum Unit When the following messages appear on the display, the black drum unit/color drum units should be replaced soon.
Safety Information
Page 253
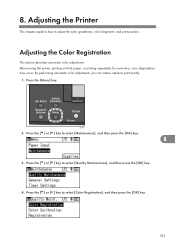
...], and then press the [OK] key. 183 After moving the printer, printing on thick paper, or printing repeatedly for some time, color degradation may occur. Press the [ ] or [ ] key to select [Maintenance], and then press the [OK] key. 8 3. Adjusting the Printer This chapter... explains how to select [Quality Maintenance], and then press the [OK] key. 4. BYK087 2. Press the [ ] or [ ] key to adjust the color gradations, color alignment, and print position. By performing automatic color adjustment, you can restore optimum print quality. 1. Press the [Menu] key.
...], and then press the [OK] key. 183 After moving the printer, printing on thick paper, or printing repeatedly for some time, color degradation may occur. Press the [ ] or [ ] key to select [Maintenance], and then press the [OK] key. 8 3. Adjusting the Printer This chapter... explains how to select [Quality Maintenance], and then press the [OK] key. 4. BYK087 2. Press the [ ] or [ ] key to adjust the color gradations, color alignment, and print position. By performing automatic color adjustment, you can restore optimum print quality. 1. Press the [Menu] key.
Safety Information
Page 254
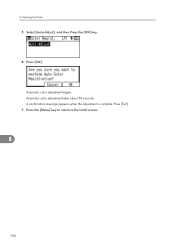
Select [Auto Adjust], and then Press the [OK] key. 6. Automatic color adjustment begins. A confirmation message appears when the adjustment is complete. Automatic color adjustment takes about 50 seconds. Adjusting the Printer 5. Press [OK]. 8. Press [Exit]. 7. Press the [Menu] key to return to the initial screen. 8 184
Select [Auto Adjust], and then Press the [OK] key. 6. Automatic color adjustment begins. A confirmation message appears when the adjustment is complete. Automatic color adjustment takes about 50 seconds. Adjusting the Printer 5. Press [OK]. 8. Press [Exit]. 7. Press the [Menu] key to return to the initial screen. 8 184
Safety Information
Page 255
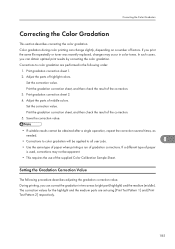
..., repeat the correction several times, as needed. • Corrections to color gradation will be apparent. • This requires the use of middle colors. If a different type of paper is used, corrections may occur in color tones. Setting the Gradation Correction Value The following order: 1. The correction... jobs. 8 • Use the same type of paper when printing a run of gradation corrections. Adjust the parts of the supplied Color Calibration Sample Sheet. Print the gradation correction sheet, and then check the result of factors. If you can correct the gradation in the...
..., repeat the correction several times, as needed. • Corrections to color gradation will be apparent. • This requires the use of middle colors. If a different type of paper is used, corrections may occur in color tones. Setting the Gradation Correction Value The following order: 1. The correction... jobs. 8 • Use the same type of paper when printing a run of gradation corrections. Adjust the parts of the supplied Color Calibration Sample Sheet. Print the gradation correction sheet, and then check the result of factors. If you can correct the gradation in the...

Safety Information
Page 256
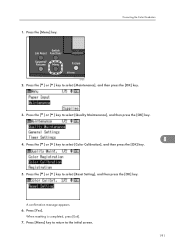
Adjusting the Printer 1. Press the [Menu] key. Press the [ ] or [ ] key to select [Quality Maintenance], and then press the [OK] key. 8 4. BYK087 2. The confirmation message appears. Press the [ ] or [ ] key to select [Color Calibration], and then press the [OK] key. 5. If you want to adjust Auto Density. 186 8. Press [OK] to perform only auto color adjusting, press the [ ] or [ ] key select [Adjust Auto Density], and then press the [OK] key. Press the [ ] or [ ] key to select [Maintenance], and then press the [OK] key. 3.
Adjusting the Printer 1. Press the [Menu] key. Press the [ ] or [ ] key to select [Quality Maintenance], and then press the [OK] key. 8 4. BYK087 2. The confirmation message appears. Press the [ ] or [ ] key to select [Color Calibration], and then press the [OK] key. 5. If you want to adjust Auto Density. 186 8. Press [OK] to perform only auto color adjusting, press the [ ] or [ ] key select [Adjust Auto Density], and then press the [OK] key. Press the [ ] or [ ] key to select [Maintenance], and then press the [OK] key. 3.

Safety Information
Page 257
...want to adjust, and then press the [OK] key. 187 Press [Exit]. When the selected sheet is printed, a confirmation message will appear. Correcting the Color Gradation The confirmation message appears when complete. Press [Print]. To cancel printing, press [Cancel]. 7. The display returns to select [Print Test Pattern 1] or ...[Print Test Pattern 2], and then press the [OK] key. Press the [ ] or [ ] key to select the color you want to exit from this menu, press [Exit]. 8. In the Color Calibration menu, press the [ ] or [ ] key to the...
...want to adjust, and then press the [OK] key. 187 Press [Exit]. When the selected sheet is printed, a confirmation message will appear. Correcting the Color Gradation The confirmation message appears when complete. Press [Print]. To cancel printing, press [Cancel]. 7. The display returns to select [Print Test Pattern 1] or ...[Print Test Pattern 2], and then press the [OK] key. Press the [ ] or [ ] key to select the color you want to exit from this menu, press [Exit]. 8. In the Color Calibration menu, press the [ ] or [ ] key to the...

Safety Information
Page 258
... columns: "sample 1" column for adjusting highlights and "sample 2" column for the selected color, and then press the [OK] key. 10. After printing, press [Yes] to the initial screen. After completing all settings, press the [Menu] key to return ...
... columns: "sample 1" column for adjusting highlights and "sample 2" column for the selected color, and then press the [OK] key. 10. After printing, press [Yes] to the initial screen. After completing all settings, press the [Menu] key to return ...

Safety Information
Page 259
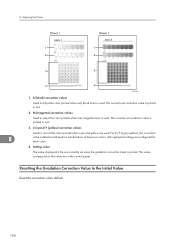
... in red. 8 BFL360S Reading the gradation correction sheet The printed gradation correction sheet is determined based on combinations of these two colors, although panel settings are configured for adjusting midtones. Color sample and correction values The following explains how to that of the gradation correction sheet. For C/Y (cyan/yellow), the correction value...
... in red. 8 BFL360S Reading the gradation correction sheet The printed gradation correction sheet is determined based on combinations of these two colors, although panel settings are configured for adjusting midtones. Color sample and correction values The following explains how to that of the gradation correction sheet. For C/Y (cyan/yellow), the correction value...
Safety Information
Page 260
... based on the control panel. For C/Y (cyan/yellow), the correction 8 value is used . Resetting the Gradation Correction Value to adjust the color printed when only black toner is printed in red. 3. C (cyan)/Y (yellow) correction values Used to the value set when the gradation ...correction sheet is printed in red. 2. Setting value The value displayed is the one currently set on combinations of these two colors, although panel settings are used . K (black) correction values Used to the Initial Value Reset the correction value default. 190 This ...
... based on the control panel. For C/Y (cyan/yellow), the correction 8 value is used . Resetting the Gradation Correction Value to adjust the color printed when only black toner is printed in red. 3. C (cyan)/Y (yellow) correction values Used to the value set when the gradation ...correction sheet is printed in red. 2. Setting value The value displayed is the one currently set on combinations of these two colors, although panel settings are used . K (black) correction values Used to the Initial Value Reset the correction value default. 190 This ...
Safety Information
Page 261
1. Press the [ ] or [ ] key to select [Color Calibration], and then press the [OK] key. 5. Press the [ ] or [ ] key to select [Quality Maintenance], and then press the [OK] key. 8 4. A confirmation message appears. 6. Press the [ ] or [ ] key to the initial screen. 191 Press [Yes]. Correcting the Color Gradation BYK087 2. When resetting is completed, press [Exit]. 7. Press [Menu] key to return to select [Maintenance], and then press the [OK] key. 3. Press the [ ] or [ ] key to select [Reset Setting], and then press the [OK] key. Press the [Menu] key.
1. Press the [ ] or [ ] key to select [Color Calibration], and then press the [OK] key. 5. Press the [ ] or [ ] key to select [Quality Maintenance], and then press the [OK] key. 8 4. A confirmation message appears. 6. Press the [ ] or [ ] key to the initial screen. 191 Press [Yes]. Correcting the Color Gradation BYK087 2. When resetting is completed, press [Exit]. 7. Press [Menu] key to return to select [Maintenance], and then press the [OK] key. 3. Press the [ ] or [ ] key to select [Reset Setting], and then press the [OK] key. Press the [Menu] key.

Safety Information
Page 267
The printer is required. Wait a while. Turn off , wait a few seconds. Wait a while. No action is calibrating the color. Hex Dump Mode In Hex Dump mode, the printer receives data in alphabetical order) Calibrating... It means the printer is the default ready message. Ready ...
The printer is required. Wait a while. Turn off , wait a few seconds. Wait a while. No action is calibrating the color. Hex Dump Mode In Hex Dump mode, the printer receives data in alphabetical order) Calibrating... It means the printer is the default ready message. Ready ...
Safety Information
Page 271
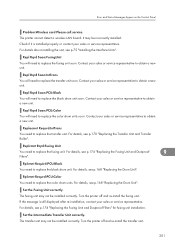
... properly or contact your sales or service representative. It may not be installed correctly. Replacmnt Requrd:IntTrans You need to replace the color drum units. Replcmnt Rqrd:Fusing Unit You need to replace the black drum unit. The fusing unit may be installed correctly. The... printer cannot detect a wireless LAN board. Turn the printer off and re-install the transfer unit. 201 Rplcmnt Requrd:PCU:Color You need to obtain a new unit. For details, see p.75 "Installing the Interface Units". Set the Fusing Unit correctly. Contact your ...
... properly or contact your sales or service representative. It may not be installed correctly. Replacmnt Requrd:IntTrans You need to replace the color drum units. Replcmnt Rqrd:Fusing Unit You need to replace the black drum unit. The fusing unit may be installed correctly. The... printer cannot detect a wireless LAN board. Turn the printer off and re-install the transfer unit. 201 Rplcmnt Requrd:PCU:Color You need to obtain a new unit. For details, see p.75 "Installing the Interface Units". Set the Fusing Unit correctly. Contact your ...

Safety Information
Page 277
...Paper Recommendations". For details, see p.163 "Adding Toner (Print Cartridge)". • When the message "Rplcmnt Requird:PCU:Black" or "Rplcmnt Requrd:PCU:Color" appears on the [Print Quality] menu in the settings of the page. • The paper setting may not be set. • Check the... driver Help. For details, see p.123 "Paper Recommendations". • If you are coarse. • Some applications lower the resolution for [Economy Color:] on the display, replace the drum unit. 207 Fine dot patterns do not print. • Change the [Dithering:] setting in the printer driver...
...Paper Recommendations". For details, see p.163 "Adding Toner (Print Cartridge)". • When the message "Rplcmnt Requird:PCU:Black" or "Rplcmnt Requrd:PCU:Color" appears on the [Print Quality] menu in the settings of the page. • The paper setting may not be set. • Check the... driver Help. For details, see p.123 "Paper Recommendations". • If you are coarse. • Some applications lower the resolution for [Economy Color:] on the display, replace the drum unit. 207 Fine dot patterns do not print. • Change the [Dithering:] setting in the printer driver...

Safety Information
Page 278
...The setting of the printer may not be attached to the registration roller. Clean the registration roller. 208 When the "Out of toner" / "(color)", or "Toner is missing or black or white dots are blemished. • When removing a jammed sheet, the inside of the paper may ...have collected. Clean the registration roller. When printing on OHP transparencies, a color is almost empty" /"(color)" message appears on the display panel, or the toner indicator on B5 paper, the back of the next printed sheet may be dirtied...
...The setting of the printer may not be attached to the registration roller. Clean the registration roller. 208 When the "Out of toner" / "(color)", or "Toner is missing or black or white dots are blemished. • When removing a jammed sheet, the inside of the paper may ...have collected. Clean the registration roller. When printing on OHP transparencies, a color is almost empty" /"(color)" message appears on the display panel, or the toner indicator on B5 paper, the back of the next printed sheet may be dirtied...


