
Safety Information
Page 11
... broken, you must turn off its power immediately by pressing the power switch. Then contact your service representative and report the problem. Then contact your sales or service representative and report the problem. R CAUTION: • Unplug the power cord from babies and small children at all times. Failing to fully cool...
... broken, you must turn off its power immediately by pressing the power switch. Then contact your service representative and report the problem. Then contact your sales or service representative and report the problem. R CAUTION: • Unplug the power cord from babies and small children at all times. Failing to fully cool...

Safety Information
Page 12
...For this machine risks blindness. Otherwise, an injury might occur. • When loading paper, take care not to trap or injure your sales or service representative for transporting the paper and originals revolve. Otherwise, an injury might be very hot. Caution should be operated safely. If ...to disassemble or modify this machine might occur. • If the machine's interior is replaced by an incorrect type. Contact your sales or service representative if any covers or screws other than those explicitly mentioned in this machine are high voltage components that are an ...
...For this machine risks blindness. Otherwise, an injury might occur. • When loading paper, take care not to trap or injure your sales or service representative for transporting the paper and originals revolve. Otherwise, an injury might be very hot. Caution should be operated safely. If ...to disassemble or modify this machine might occur. • If the machine's interior is replaced by an incorrect type. Contact your sales or service representative if any covers or screws other than those explicitly mentioned in this machine are high voltage components that are an ...
Safety Information
Page 17
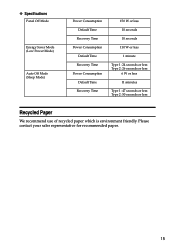
Please contact your sales representative for recommended paper. 15 ❖ Specifications Panel Off Mode Energy Saver Mode (Low Power Mode) Auto Off Mode (Sleep Mode) Power Consumption Default Time Recovery Time Power Consumption Default Time Recovery Time Power Consumption Default Time Recovery Time 150 W or less 10 seconds 10 seconds 110 W or less 1 minute Type 1: 24 seconds or less Type 2: 26 seconds or less 6 W or less 11 minutes Type 1: 47 seconds or less Type 2: 50 seconds or less Recycled Paper We recommend use of recycled paper which is environment friendly.
Please contact your sales representative for recommended paper. 15 ❖ Specifications Panel Off Mode Energy Saver Mode (Low Power Mode) Auto Off Mode (Sleep Mode) Power Consumption Default Time Recovery Time Power Consumption Default Time Recovery Time Power Consumption Default Time Recovery Time 150 W or less 10 seconds 10 seconds 110 W or less 1 minute Type 1: 24 seconds or less Type 2: 26 seconds or less 6 W or less 11 minutes Type 1: 47 seconds or less Type 2: 50 seconds or less Recycled Paper We recommend use of recycled paper which is environment friendly.
Safety Information
Page 106
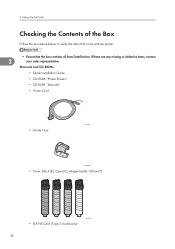
If there are any missing or defective items, contact 2 your sales representative. Setting Up the Printer Checking the Contents of the Box Follow the procedure below to verify the items that come with the printer. • Ensure that the box contains all items listed below. Manuals and CD-ROMs • Quick Installation Guide • CD-ROM "Printer Drivers" • CD-ROM "Manuals" • Power Cord BYK154 • Ferrite Core BYK012 • Toner: Black (K), Cyan (C), Magenta (M), Yellow (Y) BYK013 • ELP-NX Card (Type 2 model only) 36 2.
If there are any missing or defective items, contact 2 your sales representative. Setting Up the Printer Checking the Contents of the Box Follow the procedure below to verify the items that come with the printer. • Ensure that the box contains all items listed below. Manuals and CD-ROMs • Quick Installation Guide • CD-ROM "Printer Drivers" • CD-ROM "Manuals" • Power Cord BYK154 • Ferrite Core BYK012 • Toner: Black (K), Cyan (C), Magenta (M), Yellow (Y) BYK013 • ELP-NX Card (Type 2 model only) 36 2.

Safety Information
Page 128
2. It may come loose, even if pushed only slightly. The slot cover must be installed correctly even after reattempting installation, contact your sales or service representative. 58 Setting Up the Printer • Do not touch the card while the printer is not installed properly, repeat the procedure from the beginning. If it cannot be reattached. • You can confirm that the ELP-NX card was installed correctly by checking Web Image Monitor. For details, see "Extended Feature Info", VM Card Extended Feature Settings Web Reference. 2 • If the card is in use.
2. It may come loose, even if pushed only slightly. The slot cover must be installed correctly even after reattempting installation, contact your sales or service representative. 58 Setting Up the Printer • Do not touch the card while the printer is not installed properly, repeat the procedure from the beginning. If it cannot be reattached. • You can confirm that the ELP-NX card was installed correctly by checking Web Image Monitor. For details, see "Extended Feature Info", VM Card Extended Feature Settings Web Reference. 2 • If the card is in use.

Safety Information
Page 129
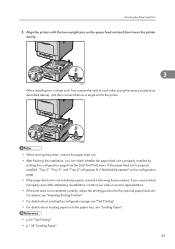
.... Available Options By installing options, you are using Type 1 model, install the hard disk. 4. Order of paper can be installed by a service representative. Contact your sales and service representative. 59 If you can only be loaded in burns. Up to install various options for details. 2. Attach the paper feed unit. Installing...
.... Available Options By installing options, you are using Type 1 model, install the hard disk. 4. Order of paper can be installed by a service representative. Contact your sales and service representative. 59 If you can only be loaded in burns. Up to install various options for details. 2. Attach the paper feed unit. Installing...
Safety Information
Page 135
... paper feed unit. If you can check whether the paper feed unit is not installed properly, reinstall it properly even after attempting reinstallation, contact your sales or service representative. • If the print area is not centered correctly, adjust the printing position for "Attached Equipment" on the paper feed unit and...
... paper feed unit. If you can check whether the paper feed unit is not installed properly, reinstall it properly even after attempting reinstallation, contact your sales or service representative. • If the print area is not centered correctly, adjust the printing position for "Attached Equipment" on the paper feed unit and...

Safety Information
Page 140
.... 3 BYK044 • After finishing the installation, you cannot install it is not properly installed, repeat this procedure. If it properly even after reinstallation, contact your sales or service representative. • For details on the configuration page. • The following table shows the total capacities of the SDRAM modules in Type 1 model.
.... 3 BYK044 • After finishing the installation, you cannot install it is not properly installed, repeat this procedure. If it properly even after reinstallation, contact your sales or service representative. • For details on the configuration page. • The following table shows the total capacities of the SDRAM modules in Type 1 model.
Safety Information
Page 144
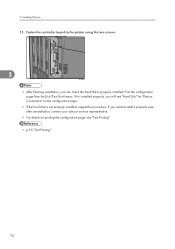
3. Installing Options 11. If it properly even after reinstallation, contact your sales or service representative. • For details on the configuration page. • If the hard disk is properly installed: Print the configuration page from the [List/...
3. Installing Options 11. If it properly even after reinstallation, contact your sales or service representative. • For details on the configuration page. • If the hard disk is properly installed: Print the configuration page from the [List/...
Safety Information
Page 147
If it cannot be installed correctly even after reattempting installation, contact your sales or service representative. • For details about printing the configuration page, see "Ethernet Configuration". • p.55 "Test Printing" • p.93 "Ethernet Configuration" Installing the Wireless ...
If it cannot be installed correctly even after reattempting installation, contact your sales or service representative. • For details about printing the configuration page, see "Ethernet Configuration". • p.55 "Test Printing" • p.93 "Ethernet Configuration" Installing the Wireless ...
Safety Information
Page 149
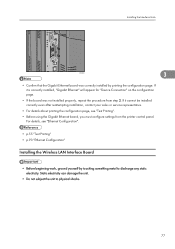
... interface board to physical shocks. • For connection to discharge any static electricity. If it cannot be installed correctly even after reattempting installation, contact your sales or service representative. • For details about printing the configuration page, see "Wireless LAN Configuration". • p.55 "Test Printing" • p.104 "Wireless LAN Configuration" Installing...
... interface board to physical shocks. • For connection to discharge any static electricity. If it cannot be installed correctly even after reattempting installation, contact your sales or service representative. • For details about printing the configuration page, see "Wireless LAN Configuration". • p.55 "Test Printing" • p.104 "Wireless LAN Configuration" Installing...
Safety Information
Page 151
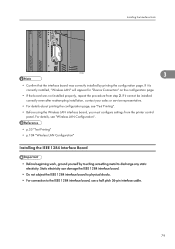
If it is correctly installed, "Parallel Interface" will appear for "Device Connection" on the configuration page. • If the board was correctly installed by printing the configuration page. Installing the Interface Units BYK065 3 • Confirm that the IEEE 1284 interface board was not installed properly, repeat the procedure from step 2. If it cannot be installed correctly even after reattempting installation, contact your sales or service representative. • For details about printing the configuration page, see "Test Printing". • p.55 "Test Printing" 81
If it is correctly installed, "Parallel Interface" will appear for "Device Connection" on the configuration page. • If the board was correctly installed by printing the configuration page. Installing the Interface Units BYK065 3 • Confirm that the IEEE 1284 interface board was not installed properly, repeat the procedure from step 2. If it cannot be installed correctly even after reattempting installation, contact your sales or service representative. • For details about printing the configuration page, see "Test Printing". • p.55 "Test Printing" 81

Safety Information
Page 153
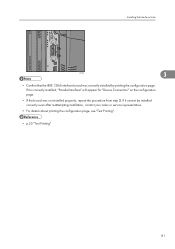
... the printer is not installed properly, repeat the procedure from the beginning. The slot cover must be installed correctly even after reattempting installation, contact your sales or service representative. • For details about printing the configuration page, see "Test Printing". 83 If it clicks into place. 3 BYK067 Insert the SD card...
... the printer is not installed properly, repeat the procedure from the beginning. The slot cover must be installed correctly even after reattempting installation, contact your sales or service representative. • For details about printing the configuration page, see "Test Printing". 83 If it clicks into place. 3 BYK067 Insert the SD card...

Safety Information
Page 189
... Paper and Other Media This chapter explains the paper sizes and types supported by this printer, and how to change the default setting, contact your sales or service representative. The direction is determined for Each Tray This section describes the paper size, feed direction, and the maximum amount of the paper...
... Paper and Other Media This chapter explains the paper sizes and types supported by this printer, and how to change the default setting, contact your sales or service representative. The direction is determined for Each Tray This section describes the paper size, feed direction, and the maximum amount of the paper...
Safety Information
Page 237
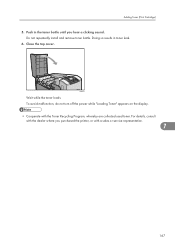
BYK115 Wait while the toner loads. Close the top cover. For details, consult with the dealer where you hear a clicking sound. Push in toner leak. 6. Do not repeatedly install and remove toner bottle. To avoid malfunction, do not turn off the power while "Loading Toner" appears on the display. • Cooperate with a sales or service representative. 7 167 Doing so results in the toner bottle until you purchased the printer, or with the Toner Recycling Program, whereby are collected used toner. Adding Toner (Print Cartridge) 5.
BYK115 Wait while the toner loads. Close the top cover. For details, consult with the dealer where you hear a clicking sound. Push in toner leak. 6. Do not repeatedly install and remove toner bottle. To avoid malfunction, do not turn off the power while "Loading Toner" appears on the display. • Cooperate with a sales or service representative. 7 167 Doing so results in the toner bottle until you purchased the printer, or with the Toner Recycling Program, whereby are collected used toner. Adding Toner (Print Cartridge) 5.

Safety Information
Page 246
... the prongs at least once a year. Otherwise, an injury might occur. • Be sure to maintain fine printing. Contact your sales or service representative if any covers or screws other than those explicitly mentioned in this manual.Inside this machine. Doing so risks burns and...shock. Dry wipe the exterior with a label indicating the "hot surface". Accumulated dust and grime pose a fire hazard. 176 Contact your sales or service representative for details about and charges for cleaning the machine's interior. Fire and breakdown can result from the plug and outlet before...
... the prongs at least once a year. Otherwise, an injury might occur. • Be sure to maintain fine printing. Contact your sales or service representative if any covers or screws other than those explicitly mentioned in this manual.Inside this machine. Doing so risks burns and...shock. Dry wipe the exterior with a label indicating the "hot surface". Accumulated dust and grime pose a fire hazard. 176 Contact your sales or service representative for details about and charges for cleaning the machine's interior. Fire and breakdown can result from the plug and outlet before...
Safety Information
Page 269
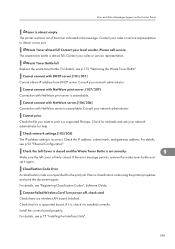
... correct board properly. Error and Status Messages Appear on the Control Panel Toner is unavailable. Waste Toner almost full Contact your sales or service representative. Contact your local vendor. Consult your sales or service representative to print is unavailable. Classification Code Error A classification code is almost out of the toner indicated in...
... correct board properly. Error and Status Messages Appear on the Control Panel Toner is unavailable. Waste Toner almost full Contact your sales or service representative. Contact your local vendor. Consult your sales or service representative to print is unavailable. Classification Code Error A classification code is almost out of the toner indicated in...
Safety Information
Page 270
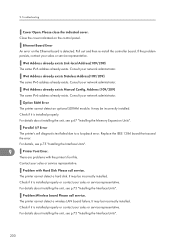
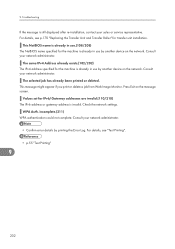
... to a loopback error. The printer cannot detect a hard disk. It may be incorrectly installed. Consult your network administrator. Consult your sales or service representative. Replace the IEEE 1284 board that caused the error. There are problems with Hard Disk Please call service. Option RAM... Board Error An error on the control panel. Close the cover indicated on the Ethernet board is installed properly or contact your sales or service representative. IPv6 Address already exists Stateless Address(109/209) The same IPv6 address already exists. It may be incorrectly ...
... to a loopback error. The printer cannot detect a hard disk. It may be incorrectly installed. Consult your network administrator. Consult your sales or service representative. Replace the IEEE 1284 board that caused the error. There are problems with Hard Disk Please call service. Option RAM... Board Error An error on the control panel. Close the cover indicated on the Ethernet board is installed properly or contact your sales or service representative. IPv6 Address already exists Stateless Address(109/209) The same IPv6 address already exists. It may be incorrectly ...
Safety Information
Page 271
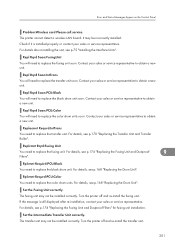
... need to replace the color drum units. Set the Intermediate Transfer Unit correctly. The transfer unit may be installed correctly. Contact your sales or service representative. Replacmnt Requrd:IntTrans You need to replace the transfer unit. For details, see p.168 "Replacing the Drum Unit"....see p.168 "Replacing the Drum Unit". Check if it is still displayed after re-installation, contact your sales or service representative to replace the fusing unit soon. Contact your sales or service representative to obtain a new unit. Replcmnt Rqrd:Fusing Unit You need to obtain a new...
... need to replace the color drum units. Set the Intermediate Transfer Unit correctly. The transfer unit may be installed correctly. Contact your sales or service representative. Replacmnt Requrd:IntTrans You need to replace the transfer unit. For details, see p.168 "Replacing the Drum Unit"....see p.168 "Replacing the Drum Unit". Check if it is still displayed after re-installation, contact your sales or service representative to replace the fusing unit soon. Contact your sales or service representative to obtain a new unit. Replcmnt Rqrd:Fusing Unit You need to obtain a new...
Safety Information
Page 272
.... The selected job has already been printed or deleted. This message might appear if you print or delete a job from Web Image Monitor. Consult your sales or service representative.
.... The selected job has already been printed or deleted. This message might appear if you print or delete a job from Web Image Monitor. Consult your sales or service representative.