
Safety Information
Page 15
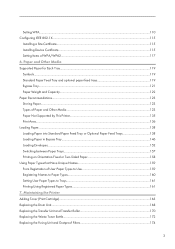
... hazard. 3 BKY202 Do not incinerate used toner or toner containers. Toner dust might ignite when exposed to an open flame. 4 BYK147 Some parts of the Transfer roller may be careful when replacing fusing unit/removing misfed paper. 6 BYK145 The inside of the symbols for the switches on this printer becomes very hot.
... hazard. 3 BKY202 Do not incinerate used toner or toner containers. Toner dust might ignite when exposed to an open flame. 4 BYK147 Some parts of the Transfer roller may be careful when replacing fusing unit/removing misfed paper. 6 BYK145 The inside of the symbols for the switches on this printer becomes very hot.
Safety Information
Page 73
... Using Paper Types that Have Unique Names 159 From Registration of WPA/WPA2...117 6. Maintaining the Printer Adding Toner (Print Cartridge)...163 Replacing the Drum Unit...168 Replacing the Transfer Unit and Transfer Roller 170 Replacing the Waste Toner Bottle...172 Replacing the Fusing...
... Using Paper Types that Have Unique Names 159 From Registration of WPA/WPA2...117 6. Maintaining the Printer Adding Toner (Print Cartridge)...163 Replacing the Drum Unit...168 Replacing the Transfer Unit and Transfer Roller 170 Replacing the Waste Toner Bottle...172 Replacing the Fusing...

Safety Information
Page 75
Waste Toner Bottle...230 Drum Unit...230 Transfer Unit...231 Fusing Unit...231 Specifications...232 Mainframe...232 Options...235 INDEX...239 5
Waste Toner Bottle...230 Drum Unit...230 Transfer Unit...231 Fusing Unit...231 Specifications...232 Mainframe...232 Options...235 INDEX...239 5
Safety Information
Page 80
... will result in the maintenance guide. 5 BYK146 High temperature parts, Turn off the main power and be careful when replacing fusing unit/removing misfed paper. 6 BYK145 The inside of the Transfer roller may be charged with high voltage, and pose electric shock hazard. 3 BYK202 Do not incinerate used toner or toner containers...
... will result in the maintenance guide. 5 BYK146 High temperature parts, Turn off the main power and be careful when replacing fusing unit/removing misfed paper. 6 BYK145 The inside of the Transfer roller may be charged with high voltage, and pose electric shock hazard. 3 BYK202 Do not incinerate used toner or toner containers...

Safety Information
Page 87
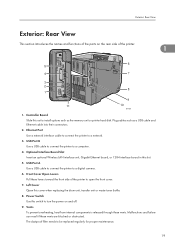
... Paper Feed Tray (Tray 1) Up to 100 sheets of the parts on the bypass tray. 4. Front Cover Open the front cover to replace the fusing unit or transfer roller, or to the Printer This chapter explains the names and functions of paper remaining in the tray. 3. Guide to remove jammed paper. 6. Control...
... Paper Feed Tray (Tray 1) Up to 100 sheets of the parts on the bypass tray. 4. Front Cover Open the front cover to replace the fusing unit or transfer roller, or to the Printer This chapter explains the names and functions of paper remaining in the tray. 3. Guide to remove jammed paper. 6. Control...
Safety Information
Page 89
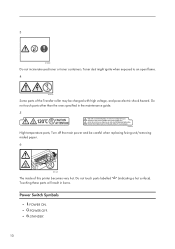
.... 2. Left Cover Open this slot. 5. Plug cables such as the memory unit or printer hard disk. Optional Interface Board Slot Insert an optional Wireless LAN interface unit, Gigabit Ethernet board, or 1284 interface board in this cover when replacing the drum unit, transfer unit or waste toner bottle. 8. Exterior: Rear View Exterior: Rear View This...
.... 2. Left Cover Open this slot. 5. Plug cables such as the memory unit or printer hard disk. Optional Interface Board Slot Insert an optional Wireless LAN interface unit, Gigabit Ethernet board, or 1284 interface board in this cover when replacing the drum unit, transfer unit or waste toner bottle. 8. Exterior: Rear View Exterior: Rear View This...
Safety Information
Page 91
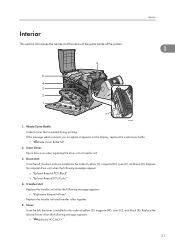
...toner when the following message appears: • "Replacmnt Requrd:IntTrans" Replace the transfer unit and transfer roller together. 5. Drum Unit From the left , the toner is wasted during printing. Replace the relevant drum unit when the following messages appear: • "Rplcmnt Requird:PCU:Black" •... bottle. • " Waste Toner Bottle full" 2. Inner Cover Open this cover when replacing the drum unit or transfer unit. 3. Toner From the left , the drum units are installed in the order of yellow (Y), magenta (M), cyan (C), and black (K). Interior Interior This section ...
...toner when the following message appears: • "Replacmnt Requrd:IntTrans" Replace the transfer unit and transfer roller together. 5. Drum Unit From the left , the toner is wasted during printing. Replace the relevant drum unit when the following messages appear: • "Rplcmnt Requird:PCU:Black" •... bottle. • " Waste Toner Bottle full" 2. Inner Cover Open this cover when replacing the drum unit or transfer unit. 3. Toner From the left , the drum units are installed in the order of yellow (Y), magenta (M), cyan (C), and black (K). Interior Interior This section ...

Safety Information
Page 92
... Appear on the Control Panel" 22 1. Transfer Roller Replace the transfer roller when the following message appears: • "Replcmnt Rqrd:Fusing Unit" 1 Replace the fusing unit and the dustproof filter together. 7. Fusing Unit Replace the fusing unit when the following message appears: • "Replacmnt Requrd:IntTrans" Replace the transfer roller and the transfer unit together. • For details about...
... Appear on the Control Panel" 22 1. Transfer Roller Replace the transfer roller when the following message appears: • "Replcmnt Rqrd:Fusing Unit" 1 Replace the fusing unit and the dustproof filter together. 7. Fusing Unit Replace the fusing unit when the following message appears: • "Replacmnt Requrd:IntTrans" Replace the transfer roller and the transfer unit together. • For details about...

Safety Information
Page 110
2. Remove the securing pin, as shown. Remove the protective sheet, as shown, from the transfer unit. Pinch the orange tape ( ), and then pull it out ( - ). 1 2 3 BYK020 7. Pinch it ( ), and then pull it out ( ). 1 2 3 BYK021 40 Setting Up the Printer 5. Turn the green lever of the transfer unit counterclockwise to unlock the unit ( ). Turn the green lever counterclockwise ( ), and then slowly open the inner cover ( ). 1 2 2 BYK017 6.
2. Remove the securing pin, as shown. Remove the protective sheet, as shown, from the transfer unit. Pinch the orange tape ( ), and then pull it out ( - ). 1 2 3 BYK020 7. Pinch it ( ), and then pull it out ( ). 1 2 3 BYK021 40 Setting Up the Printer 5. Turn the green lever of the transfer unit counterclockwise to unlock the unit ( ). Turn the green lever counterclockwise ( ), and then slowly open the inner cover ( ). 1 2 2 BYK017 6.
Safety Information
Page 240
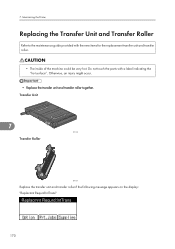
..." Replacmnt Requrd:IntTrans 170 Do not touch the parts with the new items for the replacement transfer unit and transfer roller. • The inside of the machine could be very hot. Maintaining the Printer Replacing the Transfer Unit and Transfer Roller Refer to the maintenance guide provided with a label indicating the "hot surface". Otherwise, an injury...
..." Replacmnt Requrd:IntTrans 170 Do not touch the parts with the new items for the replacement transfer unit and transfer roller. • The inside of the machine could be very hot. Maintaining the Printer Replacing the Transfer Unit and Transfer Roller Refer to the maintenance guide provided with a label indicating the "hot surface". Otherwise, an injury...

Safety Information
Page 241
"Repl Rqrd Soon:IntTrans" Repl Rqrd Soon:IntTrans 7 171 Prepare a new Transfer Unit and Transfer Roller. Replacing the Transfer Unit and Transfer Roller When the following message appears on the display, the transfer unit and transfer roller should be replaced soon.
"Repl Rqrd Soon:IntTrans" Repl Rqrd Soon:IntTrans 7 171 Prepare a new Transfer Unit and Transfer Roller. Replacing the Transfer Unit and Transfer Roller When the following message appears on the display, the transfer unit and transfer roller should be replaced soon.
Safety Information
Page 271
... your sales or service representative. Replcmnt Rqrd:Fusing Unit You need to replace the color drum units soon. For details, see p.174 "Replacing the Fusing Unit and Dustproof Filters" for fusing unit installation. For details, see p.168 "Replacing the Drum Unit". Set the Intermediate Transfer Unit correctly. The transfer unit may not be installed correctly. Error and Status Messages...
... your sales or service representative. Replcmnt Rqrd:Fusing Unit You need to replace the color drum units soon. For details, see p.174 "Replacing the Fusing Unit and Dustproof Filters" for fusing unit installation. For details, see p.168 "Replacing the Drum Unit". Set the Intermediate Transfer Unit correctly. The transfer unit may not be installed correctly. Error and Status Messages...
Safety Information
Page 272
... Log. Consult your network administrator. 9. Consult your sales or service representative. For details, see p.170 "Replacing the Transfer Unit and Transfer Roller" for the machine is already in use .(108/208) The NetBIOS name specified for transfer unit installation. The selected job has already been printed or deleted. WPA Auth. Check the network settings. This...
... Log. Consult your network administrator. 9. Consult your sales or service representative. For details, see p.170 "Replacing the Transfer Unit and Transfer Roller" for the machine is already in use .(108/208) The NetBIOS name specified for transfer unit installation. The selected job has already been printed or deleted. WPA Auth. Check the network settings. This...

Safety Information
Page 301
... a time, paper type and paper size used , and environmental conditions such as temperature and humidity. • If the transfer unit is not changed when necessary, print quality is not guaranteed. Fusing Unit Fusing Unit SP C430 Name Fusing unit Dustproof filter 3 Average printable number of pages*1 120,000 pages 120,000 pages 11 *1 A4/Letter 5% test...
... a time, paper type and paper size used , and environmental conditions such as temperature and humidity. • If the transfer unit is not changed when necessary, print quality is not guaranteed. Fusing Unit Fusing Unit SP C430 Name Fusing unit Dustproof filter 3 Average printable number of pages*1 120,000 pages 120,000 pages 11 *1 A4/Letter 5% test...
Safety Information
Page 310
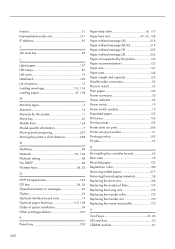
Interior 21 Intermediate transfer unit 231 IP address 93 J Job reset key 23 L Label paper...138 Order of option installation 59 Other printing problems 207 P Panel tone 203 Paper feed roller 18, 177 Paper feed unit 47, 63, 138 Paper misfeed message (A 218 Paper misfeed message (B) (C 219 Paper misfeed message (Y 222 Paper ...paper 217 Removing the packaging materials 38 Replacing the drum unit 168 Replacing the dustproof filters 174 Replacing the fusing unit 174 Replacing the transfer roller 170 Replacing the transfer unit 170 Replacing the waste toner bottle 172 S Scroll keys ...
Interior 21 Intermediate transfer unit 231 IP address 93 J Job reset key 23 L Label paper...138 Order of option installation 59 Other printing problems 207 P Panel tone 203 Paper feed roller 18, 177 Paper feed unit 47, 63, 138 Paper misfeed message (A 218 Paper misfeed message (B) (C 219 Paper misfeed message (Y 222 Paper ...paper 217 Removing the packaging materials 38 Replacing the drum unit 168 Replacing the dustproof filters 174 Replacing the fusing unit 174 Replacing the transfer roller 170 Replacing the transfer unit 170 Replacing the waste toner bottle 172 S Scroll keys ...

Safety Information
Page 311
... 157 T Test printing 55 The remaining paper indicator 17 Thick paper 125 Thin paper 125 Toner 21, 43, 163, 230 Top cover 18 Transfer roller 22, 170, 231 Transfer unit 21, 170, 231 Tray 1 17, 47 Tray priority 157 Troubleshooting 197 Turning off the power 51 Turning on the power 50 Turning the... 131 Web Image Monitor 159 WEP key 109 Wireless LAN 104, 107, 108, 109 Wireless LAN configuration 104 Wireless LAN connectivity 107 Wireless LAN interface unit 77 WPA 110, 115, 117 WPA2 110, 115, 117 241
... 157 T Test printing 55 The remaining paper indicator 17 Thick paper 125 Thin paper 125 Toner 21, 43, 163, 230 Top cover 18 Transfer roller 22, 170, 231 Transfer unit 21, 170, 231 Tray 1 17, 47 Tray priority 157 Troubleshooting 197 Turning off the power 51 Turning on the power 50 Turning the... 131 Web Image Monitor 159 WEP key 109 Wireless LAN 104, 107, 108, 109 Wireless LAN configuration 104 Wireless LAN connectivity 107 Wireless LAN interface unit 77 WPA 110, 115, 117 WPA2 110, 115, 117 241
Safety Information
Page 431
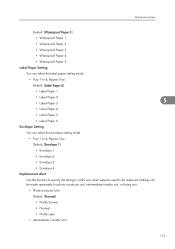
... You can select the label paper setting mode. • Tray 1 to be made separately for photo conductor unit, intermediate transfer unit, or fusing unit. • Photoconductor Unit Default: [Normal] • Notify Sooner • Normal • Notify Later • Intermediate Transfer Unit 113 Settings can select the envelope setting mode. • Tray 1 to 4, Bypass Tray Default: [Envelope 1] •...
... You can select the label paper setting mode. • Tray 1 to be made separately for photo conductor unit, intermediate transfer unit, or fusing unit. • Photoconductor Unit Default: [Normal] • Notify Sooner • Normal • Notify Later • Intermediate Transfer Unit 113 Settings can select the envelope setting mode. • Tray 1 to 4, Bypass Tray Default: [Envelope 1] •...
Safety Information
Page 432
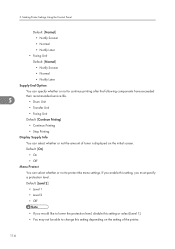
... Supply End Option You can specify whether or not to continue printing after the following components have exceeded their recommended service life. 5 • Drum Unit • Transfer Unit • Fusing Unit Default: [Continue Printing] • Continue Printing • Stop Printing Display Supply Info You can select whether or not to change this setting depending...
... Supply End Option You can specify whether or not to continue printing after the following components have exceeded their recommended service life. 5 • Drum Unit • Transfer Unit • Fusing Unit Default: [Continue Printing] • Continue Printing • Stop Printing Display Supply Info You can select whether or not to change this setting depending...

Safety Information
Page 798
...Detected: Tray 3 Not Detected: Tray 4 Not Detected: Tray 5 Not Detected: Yellow Toner Not Detected:Int. The transfer unit is not correctly set . Transfer Unit Not Detected: WasteToner Bottle Offline Panel Off Mode Paper in the optional tray 4. The paper has jammed in Duplex... Unit Paper Misfeed: Duplex Unit Paper Misfeed: Input Tray Paper Misfeed: Internal/Output Paper Misfeed: Optional Tray 1 Paper Misfeed: Optional ...
...Detected: Tray 3 Not Detected: Tray 4 Not Detected: Tray 5 Not Detected: Yellow Toner Not Detected:Int. The transfer unit is not correctly set . Transfer Unit Not Detected: WasteToner Bottle Offline Panel Off Mode Paper in the optional tray 4. The paper has jammed in Duplex... Unit Paper Misfeed: Duplex Unit Paper Misfeed: Input Tray Paper Misfeed: Internal/Output Paper Misfeed: Optional Tray 1 Paper Misfeed: Optional ...

Safety Information
Page 799
...cannot be printed in the configuration page. Printer Configuration You can check the printer configuration using telnet. Input Tray Item No. Transfer Unit Replace Maintenance Kit Replace PCU (Color) Replace Print Cartridge Reset IPDS fonts SD Card Authentication failed Supplies Order Call failed Tray ...of the paper tray 83 Getting Printer Information over the Network Messages RC Gate Connection Error Ready Replace Black PCU Replace Fusing Unit Replace Int. This section explains the checking procedure for duplex printing. It is warming up. The supply order call has ...
...cannot be printed in the configuration page. Printer Configuration You can check the printer configuration using telnet. Input Tray Item No. Transfer Unit Replace Maintenance Kit Replace PCU (Color) Replace Print Cartridge Reset IPDS fonts SD Card Authentication failed Supplies Order Call failed Tray ...of the paper tray 83 Getting Printer Information over the Network Messages RC Gate Connection Error Ready Replace Black PCU Replace Fusing Unit Replace Int. This section explains the checking procedure for duplex printing. It is warming up. The supply order call has ...


