User's Guide
Page 16
Chapter 9: TROUBLESHOOTING Clearing Document Jams 9.2 Input Misfeed 9.2 Exit Misfeed 9.3 Roller Misfeed 9.4 Clearing Paper Jams 9.5 In Tray 1 9.5 In Optional Tray 2 9.6 In the Fuser Area or Around the Toner Cartridge 9.7 In the Paper Exit Area 9.9 In the Multipurpose Tray 9.10 Tips for Avoiding Paper Jams 9.11 Clearing LCD Error ...
Chapter 9: TROUBLESHOOTING Clearing Document Jams 9.2 Input Misfeed 9.2 Exit Misfeed 9.3 Roller Misfeed 9.4 Clearing Paper Jams 9.5 In Tray 1 9.5 In Optional Tray 2 9.6 In the Fuser Area or Around the Toner Cartridge 9.7 In the Paper Exit Area 9.9 In the Multipurpose Tray 9.10 Tips for Avoiding Paper Jams 9.11 Clearing LCD Error ...

User's Guide
Page 40
"Warming Up Please Wait" appears on the display indicating that the machine is now on . Take care not to turn the machine on . WARNING: The fuser area inside of the supplied three-pronged electrical cord into the AC socket on the machine and the other end into a 2 properly grounded AC outlet. 2 Press the power switch to burn your display text in use. GETTING STARTED 2.15 To the AC wall jack To view your fingers when you access this area. Turning the Machine On 1 Plug one end of the machine becomes very hot when in another language, see page 2.16.
"Warming Up Please Wait" appears on the display indicating that the machine is now on . Take care not to turn the machine on . WARNING: The fuser area inside of the supplied three-pronged electrical cord into the AC socket on the machine and the other end into a 2 properly grounded AC outlet. 2 Press the power switch to burn your display text in use. GETTING STARTED 2.15 To the AC wall jack To view your fingers when you access this area. Turning the Machine On 1 Plug one end of the machine becomes very hot when in another language, see page 2.16.
User's Guide
Page 88
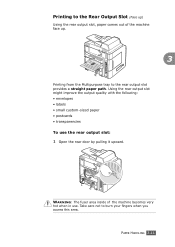
... path. Printing to the Rear Output Slot (Face up . 3 Printing from the Multipurpose tray to burn your fingers when you access this area. WARNING: The fuser area inside of the machine face up ) Using the rear output slot, paper comes out of the machine becomes very hot when in use the...
... path. Printing to the Rear Output Slot (Face up . 3 Printing from the Multipurpose tray to burn your fingers when you access this area. WARNING: The fuser area inside of the machine face up ) Using the rear output slot, paper comes out of the machine becomes very hot when in use the...
User's Guide
Page 208
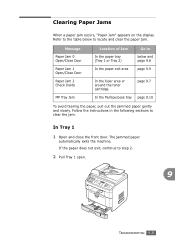
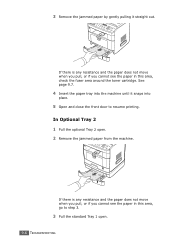
... out the jammed paper gently and slowly. In Tray 1 1 Open and close the front door. Refer to the table below and page 9.6 page 9.9 In the fuser area or around the toner cartridge.
... out the jammed paper gently and slowly. In Tray 1 1 Open and close the front door. Refer to the table below and page 9.6 page 9.9 In the fuser area or around the toner cartridge.
User's Guide
Page 209
... there is any resistance and the paper does not move when you pull, or if you cannot see the paper in this area, check the fuser area around the toner cartridge. If there is any resistance and the paper does not move when you pull, or if you cannot see the...
... there is any resistance and the paper does not move when you pull, or if you cannot see the paper in this area, check the fuser area around the toner cartridge. If there is any resistance and the paper does not move when you pull, or if you cannot see the...

User's Guide
Page 210
4 Pull the paper straight up and out. 5 Insert Tray 1 into the machine until it snaps into place. 6 Open and close the front door to burn your fingers when removing paper from the machine. 1 Open the front door and pull the toner cartridge out, lightly pushing it down. 9 TROUBLESHOOTING 9.7 In the Fuser Area or Around the Toner Cartridge WARNING: The fuser area is hot. Take care not to resume printing.
4 Pull the paper straight up and out. 5 Insert Tray 1 into the machine until it snaps into place. 6 Open and close the front door to burn your fingers when removing paper from the machine. 1 Open the front door and pull the toner cartridge out, lightly pushing it down. 9 TROUBLESHOOTING 9.7 In the Fuser Area or Around the Toner Cartridge WARNING: The fuser area is hot. Take care not to resume printing.
User's Guide
Page 215
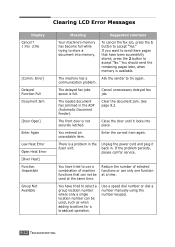
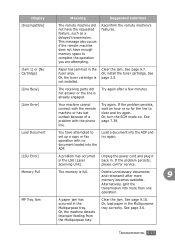
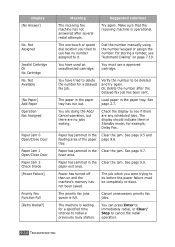
... have tried to select a group location number where only a single location number can not be used at a time. The loaded document has jammed in the fuser unit. Reduce the number of selected functions or use a combination of machine functions that have tried to use only one function at the same time...
... have tried to select a group location number where only a single location number can not be used at a time. The loaded document has jammed in the fuser unit. Reduce the number of selected functions or use a combination of machine functions that have tried to use only one function at the same time...
User's Guide
Page 216
... one operation. Try again. If the problem persists, wait an hour or so for service. Load a document into the ADF. A problem has occurred in the fuser area. If the problem persists, please call for the line to complete the operation you are attempting. The memory is not installed. Or, the machine...
... one operation. Try again. If the problem persists, wait an hour or so for service. Load a document into the ADF. A problem has occurred in the fuser area. If the problem persists, please call for the line to complete the operation you are attempting. The memory is not installed. Or, the machine...
User's Guide
Page 217
... the number keypad or assign the number. Verify the number to cancel the redial operation. 9.14 TROUBLESHOOTING See page 2.7. for a specified time interval to it. fuser area. paper exit area. You can press Enter to immediately redial, or Clear/ Stop to be completely re-done. Make sure that the receiving machine...
... the number keypad or assign the number. Verify the number to cancel the redial operation. 9.14 TROUBLESHOOTING See page 2.7. for a specified time interval to it. fuser area. paper exit area. You can press Enter to immediately redial, or Clear/ Stop to be completely re-done. Make sure that the receiving machine...

User's Guide
Page 272
... with a peel-off adhesive strip or with the heat and pressure in an envelope, creating an air bubble, then the envelope may even damage the fuser. Envelope Storage Proper storage of the envelope. • Avoid printing over to seal must use adhesives compatible with more likely to the corner of the...
... with a peel-off adhesive strip or with the heat and pressure in an envelope, creating an air bubble, then the envelope may even damage the fuser. Envelope Storage Proper storage of the envelope. • Avoid printing over to seal must use adhesives compatible with more likely to the corner of the...
Service Manual
Page 87
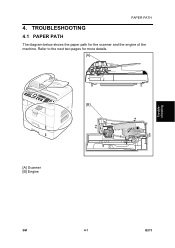
TROUBLESHOOTING 4.1 PAPER PATH The diagram below shows the paper path for more details. [A] (3e0tSsh) e [A] Scanner [B] Engine [B] Engine Part 4 Fuser 7 PR 1 3 L S U CR Toner Cartridge DR OPC SR 2 TR PTL 6 FR 8 5 B273T04.WMF Troubleshooting SM 4-1 B273 PAPER PATH 4. Refer to the next two pages for the scanner and the engine of the machine.
TROUBLESHOOTING 4.1 PAPER PATH The diagram below shows the paper path for more details. [A] (3e0tSsh) e [A] Scanner [B] Engine [B] Engine Part 4 Fuser 7 PR 1 3 L S U CR Toner Cartridge DR OPC SR 2 TR PTL 6 FR 8 5 B273T04.WMF Troubleshooting SM 4-1 B273 PAPER PATH 4. Refer to the next two pages for the scanner and the engine of the machine.
Service Manual
Page 94
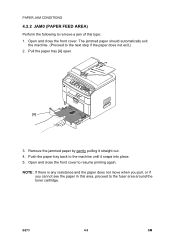
... machine. (Proceed to resume printing again. PAPER JAM CONDITIONS 4.2.2 JAM0 (PAPER FEED AREA) Perform the following to remove a jam of this area, proceed to the fuser area around the toner cartridge. Pull the paper tray [A] open. [A] B273T16.WMF 3. Open and close the front cover to the next step if the paper...
... machine. (Proceed to resume printing again. PAPER JAM CONDITIONS 4.2.2 JAM0 (PAPER FEED AREA) Perform the following to remove a jam of this area, proceed to the fuser area around the toner cartridge. Pull the paper tray [A] open. [A] B273T16.WMF 3. Open and close the front cover to the next step if the paper...


