User's Guide
Page 1
User's Guide Laser MFP For safe and correct use of this machine, please be sure to read the Safety Information in this manual before you use it.
User's Guide Laser MFP For safe and correct use of this machine, please be sure to read the Safety Information in this manual before you use it.
User's Guide
Page 2
... maintaining and troubleshooting the machine. SmarThru allows you to scan and edit images and to use a USB flash drive with your computer. Contents of this manual are trademarks of handling or operating the machine. i About the User's Guide This Laser MFP User's Guide provides information you need for copying. The User...
... maintaining and troubleshooting the machine. SmarThru allows you to scan and edit images and to use a USB flash drive with your computer. Contents of this manual are trademarks of handling or operating the machine. i About the User's Guide This Laser MFP User's Guide provides information you need for copying. The User...

User's Guide
Page 3
Safety During Operation In this manual, the following important symbols are used: WARNING: Indicates a potentially hazardous situation which , if instructions are not followed, could result in this machine, the following occurs: &#... the cable) if any covers or screws other than those specified in death or serious injury. Toner dust might occur. Safety Information When using this manual. • Turn off the power and disconnect the power plug (by pulling the plug, not the cable) if the power cable or plug becomes frayed...
Safety During Operation In this manual, the following important symbols are used: WARNING: Indicates a potentially hazardous situation which , if instructions are not followed, could result in this machine, the following occurs: &#... the cable) if any covers or screws other than those specified in death or serious injury. Toner dust might occur. Safety Information When using this manual. • Turn off the power and disconnect the power plug (by pulling the plug, not the cable) if the power cable or plug becomes frayed...
User's Guide
Page 4
... line cord. The following ; Ozone Safety This product generates ozone during an electrical storm. If ozone odor may be easily accessible. Do not use this manual might occur. This equipment contains a 5 milliwatt, 770795 nanometer wavelength, AlGaAs laser diode.
... line cord. The following ; Ozone Safety This product generates ozone during an electrical storm. If ozone odor may be easily accessible. Do not use this manual might occur. This equipment contains a 5 milliwatt, 770795 nanometer wavelength, AlGaAs laser diode.
User's Guide
Page 5
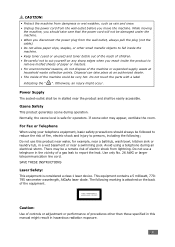
This equipment does not emit hazardous radiation, since the beam is totally enclosed during all customer modes of procedures other than those specified in this manual might result in hazardous radiation exposure. Caution: Use of controls or adjustment or performance of operation and maintenance. For details see lamprecycle.org, eiae.org, ...
This equipment does not emit hazardous radiation, since the beam is totally enclosed during all customer modes of procedures other than those specified in this manual might result in hazardous radiation exposure. Caution: Use of controls or adjustment or performance of operation and maintenance. For details see lamprecycle.org, eiae.org, ...
User's Guide
Page 8
... to enter the business identification and telephone number of the terminal or business. Follow the steps provided there to "Setting the Machine ID"in this manual. Notice about the Telephone Consumer Protection Act (Valid in a residential installation. The Telephone Consumer Protection Act of 1991 makes it unlawful for any person to...
... to enter the business identification and telephone number of the terminal or business. Follow the steps provided there to "Setting the Machine ID"in this manual. Notice about the Telephone Consumer Protection Act (Valid in a residential installation. The Telephone Consumer Protection Act of 1991 makes it unlawful for any person to...
User's Guide
Page 9
...to the telephone network, the telephone company may make necessary modifications to maintain uninterrupted service. 7.If trouble is experienced with this manual. 9.Connection to party line service is a label that could affect the operation of this product is also compliant. The ..., among other information, a product identifier in response to the dispatcher the reason for repair or warranty information, please contact RICOH CORP. CUSTOMER SUPPORT DEPT. This product meets the applicable Industry Canada technical specifications. WHEN PROGRAMMING EMERGENCY NUMBERS AND/OR MAKING ...
...to the telephone network, the telephone company may make necessary modifications to maintain uninterrupted service. 7.If trouble is experienced with this manual. 9.Connection to party line service is a label that could affect the operation of this product is also compliant. The ..., among other information, a product identifier in response to the dispatcher the reason for repair or warranty information, please contact RICOH CORP. CUSTOMER SUPPORT DEPT. This product meets the applicable Industry Canada technical specifications. WHEN PROGRAMMING EMERGENCY NUMBERS AND/OR MAKING ...
User's Guide
Page 13
... Materials 3.2 Paper Type, Input Sources, and Capacities 3.2 Guidelines for Paper and Special Materials 3.3 Loading Paper 3.4 In the Standard Tray 3.4 In the Multipurpose Tray 3.6 Using the Manual Feed Mode 3.8 Selecting an Output Location 3.10 Printing to the Front Output Tray (Face down 3.10 Printing to the Rear Output Slot (Face up 3.11...
... Materials 3.2 Paper Type, Input Sources, and Capacities 3.2 Guidelines for Paper and Special Materials 3.3 Loading Paper 3.4 In the Standard Tray 3.4 In the Multipurpose Tray 3.6 Using the Manual Feed Mode 3.8 Selecting an Output Location 3.10 Printing to the Front Output Tray (Face down 3.10 Printing to the Rear Output Slot (Face up 3.11...

User's Guide
Page 14
... Changing the Fax Setup options 7.2 Available Fax Setup Options 7.3 Loading a Document 7.6 Selecting the Paper Tray 7.9 Adjusting the Document Resolution 7.9 Sending a Fax Automatically 7.11 Sending a Fax Manually 7.12 Redialing the Last Number 7.12 Confirming Transmission 7.13 Automatic Redialing 7.13 About Receiving Modes 7.14 Loading Paper for Receiving Faxes 7.15 Receiving Automatically in...
... Changing the Fax Setup options 7.2 Available Fax Setup Options 7.3 Loading a Document 7.6 Selecting the Paper Tray 7.9 Adjusting the Document Resolution 7.9 Sending a Fax Automatically 7.11 Sending a Fax Manually 7.12 Redialing the Last Number 7.12 Confirming Transmission 7.13 Automatic Redialing 7.13 About Receiving Modes 7.14 Loading Paper for Receiving Faxes 7.15 Receiving Automatically in...

User's Guide
Page 15
Receiving Manually Using an Extension Telephone 7.16 Receiving Faxes Using the DRPD Mode 7.17 Receiving Faxes in the Memory 7.18 One-touch Dialing 7.19 Storing a Number for ...
Receiving Manually Using an Extension Telephone 7.16 Receiving Faxes Using the DRPD Mode 7.17 Receiving Faxes in the Memory 7.18 One-touch Dialing 7.19 Storing a Number for ...

User's Guide
Page 61
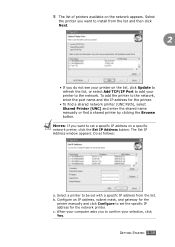
... you to confirm your printer to add your selection, click Yes. 2.36 GETTING STARTED Configure an IP address, subnet mask, and gateway for the printer manually and click Configure to set a specific IP address on the list, click Update to refresh the list, or select Add TCP/IP Port to the... set the specific IP address for the printer. • To find a shared network printer (UNC Path), select Shared Printer [UNC] and enter the shared name manually or find a shared printer by clicking the Browse button. 5 The list of printers available on the network appears.
... you to confirm your printer to add your selection, click Yes. 2.36 GETTING STARTED Configure an IP address, subnet mask, and gateway for the printer manually and click Configure to set a specific IP address on the list, click Update to refresh the list, or select Add TCP/IP Port to the... set the specific IP address for the printer. • To find a shared network printer (UNC Path), select Shared Printer [UNC] and enter the shared name manually or find a shared printer by clicking the Browse button. 5 The list of printers available on the network appears.
User's Guide
Page 64
...select Add TCP/IP Port to set a specific IP address on the network appears. Configure an IP address, subnet mask, and gateway for the printer manually and click Configure to the network, enter the port name and the IP address for the network printer. c. Do as follows: a. Select a ... specific IP address for the printer. • To find a shared network printer (UNC Path), select Shared Printer [UNC] and enter the shared name manually or find a shared printer by clicking the Browse button. Select the printer you want to add your selection, click Yes. 5 The list of printers ...
...select Add TCP/IP Port to set a specific IP address on the network appears. Configure an IP address, subnet mask, and gateway for the printer manually and click Configure to the network, enter the port name and the IP address for the network printer. c. Do as follows: a. Select a ... specific IP address for the printer. • To find a shared network printer (UNC Path), select Shared Printer [UNC] and enter the shared name manually or find a shared printer by clicking the Browse button. Select the printer you want to add your selection, click Yes. 5 The list of printers ...
User's Guide
Page 85
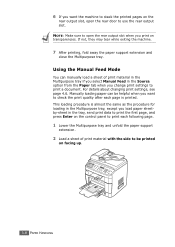
... print settings, see page 4.6. NOTE: Make sure to open the rear door to use the rear output slot. This loading procedure is printed. Using the Manual Feed Mode You can be printed on facing up. 3.8 PAPER HANDLING If not, they may tear while exiting the machine. 7 After printing, fold away... in the Multipurpose tray, except you load paper sheetby-sheet in the Source option from the Paper tab when you print on transparencies. Manually loading paper can manually load a sheet of print material with the side to be helpful when you want the machine to stack the printed pages on the...
... print settings, see page 4.6. NOTE: Make sure to open the rear door to use the rear output slot. This loading procedure is printed. Using the Manual Feed Mode You can be printed on facing up. 3.8 PAPER HANDLING If not, they may tear while exiting the machine. 7 After printing, fold away... in the Multipurpose tray, except you load paper sheetby-sheet in the Source option from the Paper tab when you print on transparencies. Manually loading paper can manually load a sheet of print material with the side to be helpful when you want the machine to stack the printed pages on the...

User's Guide
Page 96
...75g/m2 to 90g/m2 (20lb to 24lb), or colored paper, select Color Paper. 5 First Page This property allows you to automatically or manually scale your print job on a page. You need to load one sheet at a time into Tray1. PRINTING TASKS 4.7 To use cotton paper...automatically picks up print material in printer properties (see page 4.16~4.17. For example, load thick stock for the best printing. Use the Manual Feed source when printing to special material. For more information about print materials, see Chapter 3, Paper Handling. Property Description 3 Source Make sure ...
...75g/m2 to 90g/m2 (20lb to 24lb), or colored paper, select Color Paper. 5 First Page This property allows you to automatically or manually scale your print job on a page. You need to load one sheet at a time into Tray1. PRINTING TASKS 4.7 To use cotton paper...automatically picks up print material in printer properties (see page 4.16~4.17. For example, load thick stock for the best printing. Use the Manual Feed source when printing to special material. For more information about print materials, see Chapter 3, Paper Handling. Property Description 3 Source Make sure ...
User's Guide
Page 104
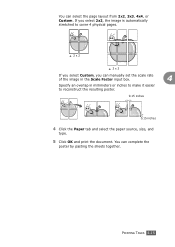
You can manually set the scale rate of the image in the Scale Factor input box. 4 Specify an overlap in millimeters or inches to make it easier to reconstruct the resulting poster. 0.15 inches 0.15 inches 4 Click the Paper tab and select the paper source, size, and type. 5 Click OK and print the document. PRINTING TASKS 4.15 If you select 2x2, the image is automatically stretched to cover 4 physical pages. 2 x 2 3 x 3 If you select Custom, you can complete the poster by pasting the sheets together. You can select the page layout from 2x2, 3x3, 4x4, or Custom.
You can manually set the scale rate of the image in the Scale Factor input box. 4 Specify an overlap in millimeters or inches to make it easier to reconstruct the resulting poster. 0.15 inches 0.15 inches 4 Click the Paper tab and select the paper source, size, and type. 5 Click OK and print the document. PRINTING TASKS 4.15 If you select 2x2, the image is automatically stretched to cover 4 physical pages. 2 x 2 3 x 3 If you select Custom, you can complete the poster by pasting the sheets together. You can select the page layout from 2x2, 3x3, 4x4, or Custom.

User's Guide
Page 145
...-down list. 2 Click OK or Apply. For some scanners, the Scan Area option is not available. Deleting Quick Sets 1 Select the setting you want to manually enter a scan area. You can adjust the brightness. Saving Quick Sets 1 Enter the settings you want to save. 2 Enter a Quick Sets name. 3 Click Save to...
...-down list. 2 Click OK or Apply. For some scanners, the Scan Area option is not available. Deleting Quick Sets 1 Select the setting you want to manually enter a scan area. You can adjust the brightness. Saving Quick Sets 1 Enter the settings you want to save. 2 Enter a Quick Sets name. 3 Click Save to...
User's Guide
Page 157
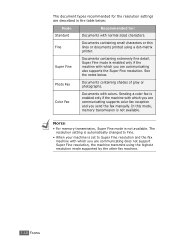
... available. Sending a color fax is set to Super Fine resolution and the fax machine with colors. Color Fax Documents with which you send the fax manually. Photo Fax Documents containing shades of gray or photographs. Documents containing small characters or thin Fine lines or documents printed using the highest resolution mode...
... available. Sending a color fax is set to Super Fine resolution and the fax machine with colors. Color Fax Documents with which you send the fax manually. Photo Fax Documents containing shades of gray or photographs. Documents containing small characters or thin Fine lines or documents printed using the highest resolution mode...
User's Guide
Page 159
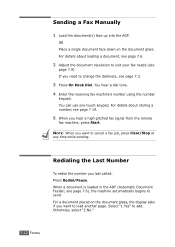
... want to cancel a fax job, press Clear/Stop at any time while sending. When a document is loaded in the ADF (Automatic Document Feeder; Sending a Fax Manually 1 Load the document(s) face up into the ADF. For details about storing a number, see page 7.3. 3 Press On Hook Dial. For details about loading a document, see...
... want to cancel a fax job, press Clear/Stop at any time while sending. When a document is loaded in the ADF (Automatic Document Feeder; Sending a Fax Manually 1 Load the document(s) face up into the ADF. For details about storing a number, see page 7.3. 3 Press On Hook Dial. For details about loading a document, see...
User's Guide
Page 162
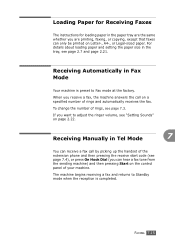
... faxes can hear a fax tone from the sending machine) and then pressing Start on the control panel of rings and automatically receives the fax. Receiving Manually in Tel Mode 7 You can receive a fax call on a specified number of your machine. The machine begins receiving a fax and returns to adjust the ringer...
... faxes can hear a fax tone from the sending machine) and then pressing Start on the control panel of rings and automatically receives the fax. Receiving Manually in Tel Mode 7 You can receive a fax call on a specified number of your machine. The machine begins receiving a fax and returns to adjust the ringer...

User's Guide
Page 163
...phone and hear fax tones, press the keys 9 on the extension telephone. The machine receives the document. Press the buttons slowly in Tel mode (manual reception) when the answering machine is connected to the EXT jack on the line, it would normally. For details about changing the code, see ...page 7.4 7.16 FAXING If you are talking to on the extension telephone without going to the EXT jack on the back of your machine. Receiving Manually Using an Extension Telephone This features works best when you still hear the fax tone from the remote machine, try pressing 9 once again. 9 ...
...phone and hear fax tones, press the keys 9 on the extension telephone. The machine receives the document. Press the buttons slowly in Tel mode (manual reception) when the answering machine is connected to the EXT jack on the line, it would normally. For details about changing the code, see ...page 7.4 7.16 FAXING If you are talking to on the extension telephone without going to the EXT jack on the back of your machine. Receiving Manually Using an Extension Telephone This features works best when you still hear the fax tone from the remote machine, try pressing 9 once again. 9 ...


