User's Guide
Page 12
... a Location 2.4 Installing the Toner Cartridge 2.5 Loading Paper 2.7 Making Connections 2.11 Turning the Machine On 2.15 Changing the Display Language 2.16 Setting the Machine ID 2.17 Entering Characters Using the Number Keypad 2.18 Setting the Date and Time 2.20 Changing the Clock Mode 2.21 Setting the Paper Size and Type 2.21 Setting Sounds 2.22 Speaker, Ringer, Key Sound, and Alarm Sound 2.22 Speaker Volume 2.23 Using the Save Modes 2.24 Power Save Mode 2.24 Scan Lamp Save Mode 2.24 About the Software 2.26 Printer Driver Features 2.27 Installing the Software in Windows...
... a Location 2.4 Installing the Toner Cartridge 2.5 Loading Paper 2.7 Making Connections 2.11 Turning the Machine On 2.15 Changing the Display Language 2.16 Setting the Machine ID 2.17 Entering Characters Using the Number Keypad 2.18 Setting the Date and Time 2.20 Changing the Clock Mode 2.21 Setting the Paper Size and Type 2.21 Setting Sounds 2.22 Speaker, Ringer, Key Sound, and Alarm Sound 2.22 Speaker Volume 2.23 Using the Save Modes 2.24 Power Save Mode 2.24 Scan Lamp Save Mode 2.24 About the Software 2.26 Printer Driver Features 2.27 Installing the Software in Windows...
User's Guide
Page 13
... Special Materials 3.3 Loading Paper 3.4 In the Standard Tray 3.4 In the Multipurpose Tray 3.6 Using the Manual Feed Mode 3.8 Selecting an Output Location 3.10 Printing to the Front Output Tray (Face down 3.10 Printing to the Rear Output Slot (Face up 3.11 Chapter 4: PRINTING TASKS Printing a Document in Windows 4.2 Canceling a Print Job 4.3 Printer Settings 4.4 Layout tab 4.5 Paper Tab 4.6 Graphics Tab 4.8 Extras Tab 4.10 About Tab 4.11 Printer Tab 4.11 Using a Favorite Setting 4.12 Using Help 4.12 Printing Multiple Pages on One Sheet of Paper 4.13 Printing Posters 4.14...
... Special Materials 3.3 Loading Paper 3.4 In the Standard Tray 3.4 In the Multipurpose Tray 3.6 Using the Manual Feed Mode 3.8 Selecting an Output Location 3.10 Printing to the Front Output Tray (Face down 3.10 Printing to the Rear Output Slot (Face up 3.11 Chapter 4: PRINTING TASKS Printing a Document in Windows 4.2 Canceling a Print Job 4.3 Printer Settings 4.4 Layout tab 4.5 Paper Tab 4.6 Graphics Tab 4.8 Extras Tab 4.10 About Tab 4.11 Printer Tab 4.11 Using a Favorite Setting 4.12 Using Help 4.12 Printing Multiple Pages on One Sheet of Paper 4.13 Printing Posters 4.14...
User's Guide
Page 24
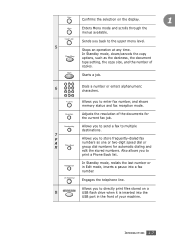
... dialing and edit the stored numbers. Clear/Stop In Standby mode, clears/cancels the copy options, such as one or two-digit speed dial or group dial numbers for the current fax job. Also allows you to print a Phone Book list. Allows you back to multiple destinations. Engages the telephone line. Enter Confirms the selection on a USB flash drive when it is inserted into a fax number. Upper Level Sends you to send a fax to the upper menu level. 5 Stops an operation at any time...
... dialing and edit the stored numbers. Clear/Stop In Standby mode, clears/cancels the copy options, such as one or two-digit speed dial or group dial numbers for the current fax job. Also allows you to print a Phone Book list. Allows you back to multiple destinations. Engages the telephone line. Enter Confirms the selection on a USB flash drive when it is inserted into a fax number. Upper Level Sends you to send a fax to the upper menu level. 5 Stops an operation at any time...
User's Guide
Page 27
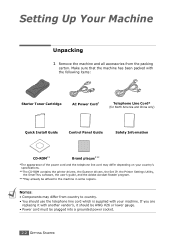
... lower gauge. • Power cord must be affixed to the machine in some regions. NOTES: • Components may differ depending on your machine. Make sure that the machine has been packed with your country's specifications. **The CD-ROM contains the printer drivers, the Scanner drivers, the Set IP, the Printer Settings Utility, the SmarThru software, the user's guide, and the Adobe Acrobat Reader program. ***May already be...
... lower gauge. • Power cord must be affixed to the machine in some regions. NOTES: • Components may differ depending on your machine. Make sure that the machine has been packed with your country's specifications. **The CD-ROM contains the printer drivers, the Scanner drivers, the Set IP, the Printer Settings Utility, the SmarThru software, the user's guide, and the Adobe Acrobat Reader program. ***May already be...
User's Guide
Page 51
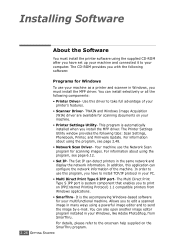
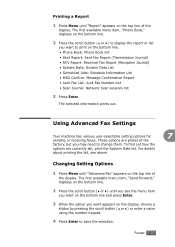
...; Network Scan Driver- For details, please refer to send the image by e-mail. Installing Software About the Software You must install the MFP driver. The Printer Settings Utility window provides the following components: • Printer Driver- For information about using a powerful image editor and to the onscreen help supplied on the SmarThru program. 2.26 GETTING STARTED The Multi Direct Print Type S IPP port is system component that enables you to edit a scanned image in the same network and display the network...
...; Network Scan Driver- For details, please refer to send the image by e-mail. Installing Software About the Software You must install the MFP driver. The Printer Settings Utility window provides the following components: • Printer Driver- For information about using a powerful image editor and to the onscreen help supplied on the SmarThru program. 2.26 GETTING STARTED The Multi Direct Print Type S IPP port is system component that enables you to edit a scanned image in the same network and display the network...
User's Guide
Page 90
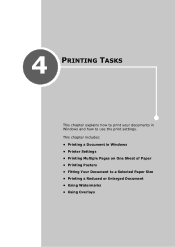
4 PRINTING TASKS This chapter explains how to print your documents in Windows • Printer Settings • Printing Multiple Pages on One Sheet of Paper • Printing Posters • Fitting Your Document to use the print settings. This chapter includes: • Printing a Document in Windows and how to a Selected Paper Size • Printing a Reduced or Enlarged Document • Using Watermarks • Using Overlays
4 PRINTING TASKS This chapter explains how to print your documents in Windows • Printer Settings • Printing Multiple Pages on One Sheet of Paper • Printing Posters • Fitting Your Document to use the print settings. This chapter includes: • Printing a Document in Windows and how to a Selected Paper Size • Printing a Reduced or Enlarged Document • Using Watermarks • Using Overlays

User's Guide
Page 93
... remaining settings using the printer driver. • Printer driver does not support Windows 95. • The settings you change whatever settings are using your machine. For Windows XP, select Printers and Faxes. 3. To make your operating system. Click the Windows Start menu. 2. Follow this procedure: 1. Select the Printer Driver Type 103 PCL 6 machine icon. 4. This User's Guide shows the Printing Preferences window for your print job. Change all of the printer options you need when using the current program. If you access printer properties through the Printers folder, you...
... remaining settings using the printer driver. • Printer driver does not support Windows 95. • The settings you change whatever settings are using your machine. For Windows XP, select Printers and Faxes. 3. To make your operating system. Click the Windows Start menu. 2. Follow this procedure: 1. Select the Printer Driver Type 103 PCL 6 machine icon. 4. This User's Guide shows the Printing Preferences window for your print job. Change all of the printer options you need when using the current program. If you access printer properties through the Printers folder, you...

User's Guide
Page 96
...: the Multipurpose tray, Tray 1, and optional Tray 2. 4 4 Type Make sure that Source is set to the appropriate paper tray. PRINTING TASKS 4.7 To use cotton paper, set the paper type to Thick for the best printing. For details, see page B.7), you load a different type of the document. If the paper source is set to Auto Select, the machine automatically picks up print material in the First Page option. 6 Scaling Scaling allows you to load one sheet at a time into Tray1. You...
...: the Multipurpose tray, Tray 1, and optional Tray 2. 4 4 Type Make sure that Source is set to the appropriate paper tray. PRINTING TASKS 4.7 To use cotton paper, set the paper type to Thick for the best printing. For details, see page B.7), you load a different type of the document. If the paper source is set to Auto Select, the machine automatically picks up print material in the First Page option. 6 Scaling Scaling allows you to load one sheet at a time into Tray1. You...
User's Guide
Page 100
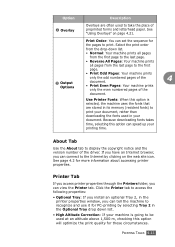
... and use it for the pages to the first page. • Print Odd Pages: Your machine prints 3 Output only the odd numbered pages of the document. 4 Options • Print Even Pages: Your machine prints only the even numbered pages of the driver. Printer Tab If you access printer properties through the Printers folder, you can view the Printer tab. Click the Printer tab to access the following properties: • Optional Tray: If you install an optional Tray 2, in the Optional Tray drop down list. •...
... and use it for the pages to the first page. • Print Odd Pages: Your machine prints 3 Output only the odd numbered pages of the document. 4 Options • Print Even Pages: Your machine prints only the even numbered pages of the driver. Printer Tab If you access printer properties through the Printers folder, you can view the Printer tab. Click the Printer tab to access the following properties: • Optional Tray: If you install an optional Tray 2, in the Optional Tray drop down list. •...
User's Guide
Page 131
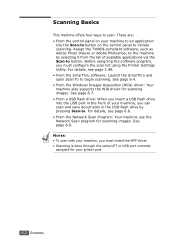
...; From the control panel on your machine, you must install the MFP driver. • Scanning is done through the same LPT or USB port currently assigned for scanning images. For details, see page 6.8. • From the Network Scan Program: Your machine use the Network Scan program for your machine, you must configure the scan list using the Printer Settings Utility. For details, see page 2.48. • From the SmarThru software: Launch the SmarThru and open Scan To to begin scanning. NOTES: •...
...; From the control panel on your machine, you must install the MFP driver. • Scanning is done through the same LPT or USB port currently assigned for scanning images. For details, see page 6.8. • From the Network Scan Program: Your machine use the Network Scan program for your machine, you must configure the scan list using the Printer Settings Utility. For details, see page 2.48. • From the SmarThru software: Launch the SmarThru and open Scan To to begin scanning. NOTES: •...
User's Guide
Page 156
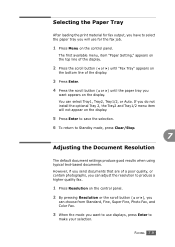
... bottom line of a poor quality, or contain photographs, you can select Tray1, Tray2, Tray1/2, or Auto. FAXING 7.9 If you do not install the optional Tray 2, the Tray2 and Tray1/2 menu item will use displays, press Enter to produce a higher quality fax. 1 Press Resolution on the display. Selecting the Paper Tray After loading the print material for the fax job. 1 Press Menu on the control panel. You can adjust the resolution to make your...
... bottom line of a poor quality, or contain photographs, you can select Tray1, Tray2, Tray1/2, or Auto. FAXING 7.9 If you do not install the optional Tray 2, the Tray2 and Tray1/2 menu item will use displays, press Enter to produce a higher quality fax. 1 Press Resolution on the display. Selecting the Paper Tray After loading the print material for the fax job. 1 Press Menu on the control panel. You can adjust the resolution to make your...
User's Guide
Page 183
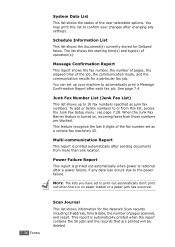
... set as junk fax numbers. 7.36 FAXING System Data List This list shows the status of operation(s). Junk Fax Number List (Junk Fax List) This list shows up your changes after sending documents from this list to print out automatically don't print out when there is no paper loaded or a paper jam has occurred. The list shows the starting time(s) and type(s) of the user-selectable options. To add or delete numbers to or from more than one location. You may print this list, access the Junk Fax Setup menu: see page...
... set as junk fax numbers. 7.36 FAXING System Data List This list shows the status of operation(s). Junk Fax Number List (Junk Fax List) This list shows up your changes after sending documents from this list to print out automatically don't print out when there is no paper loaded or a paper jam has occurred. The list shows the starting time(s) and type(s) of the user-selectable options. To add or delete numbers to or from more than one location. You may print this list, access the Junk Fax Setup menu: see page...
User's Guide
Page 184
... Enter to change them. For details about printing the list, see the menu item you want on the bottom line and press Enter. 3 When the option you want appears on the bottom line. • Phone Book: Phone Book list • Sent Report: Sent Fax Report (Transmission Journal) • RCV Report: Received Fax Report (Reception Journal) • System Data: System Data List • Scheduled Jobs: Schedule Information List • MSG Confirm: Message Confirmation Report • Junk Fax List: Junk Fax Number List • Scan Journal: Network Scan sessions list 3 Press Enter...
... Enter to change them. For details about printing the list, see the menu item you want on the bottom line and press Enter. 3 When the option you want appears on the bottom line. • Phone Book: Phone Book list • Sent Report: Sent Fax Report (Transmission Journal) • RCV Report: Received Fax Report (Reception Journal) • System Data: System Data List • Scheduled Jobs: Schedule Information List • MSG Confirm: Message Confirmation Report • Junk Fax List: Junk Fax Number List • Scan Journal: Network Scan sessions list 3 Press Enter...
User's Guide
Page 189
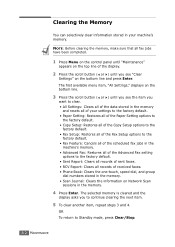
... Fax setting options to the factory default. • Sent Report: Clears all records of sent faxes. • RCV Report: Clears all fax jobs have been completed. 1 Press Menu on the control panel until "Maintenance" appears on the top line of the display. 2 Press the scroll button ( or ) until you see "Clear Settings" on the bottom line and press Enter. NOTE: Before clearing the memory, make sure that all records of received faxes. • Phone Book: Clears the one-touch, speed dial, and group dial numbers...
... Fax setting options to the factory default. • Sent Report: Clears all records of sent faxes. • RCV Report: Clears all fax jobs have been completed. 1 Press Menu on the control panel until "Maintenance" appears on the top line of the display. 2 Press the scroll button ( or ) until you see "Clear Settings" on the bottom line and press Enter. NOTE: Before clearing the memory, make sure that all records of received faxes. • Phone Book: Clears the one-touch, speed dial, and group dial numbers...

User's Guide
Page 221
... defective. Try printing a job from another computer and try adjusting the print quality settings. If you know works. From the Start menu, choose Settings and Printers. Or, ensure that the paper size in the printer driver settings matches the paper selection in the software application settings you have already printed successfully. The printer cable is malfunctioning. Check the application's printer selection menu to another application. The operating system is wrong, garbled, or incomplete. The machine prints, but...
... defective. Try printing a job from another computer and try adjusting the print quality settings. If you know works. From the Start menu, choose Settings and Printers. Or, ensure that the paper size in the printer driver settings matches the paper selection in the software application settings you have already printed successfully. The printer cable is malfunctioning. Check the application's printer selection menu to another application. The operating system is wrong, garbled, or incomplete. The machine prints, but...
User's Guide
Page 276
...copying 5.8 printing 4.17 replacing toner cartridge 8.8 reports, print 7.35 resolution faxing 7.9 printing 4.8 S scanning contol panel 6.3 SmarThru 6.4 USB flash drive 10.3 WIA driver 6.7 searching Phone Book 7.26 Secure Receiving mode 7.34 sending a fax automatically 7.11 manually 7.12 Set IP Installing 2.46 Using 2.47 sharing printer, set A.2 SmarThru install 2.28 uninstall 2.45 software uninstall Windows 2.44 sounds, set 2.22 specifications facsimile C.5 general C.2 paper C.6 printer C.4 scanner and copier C.3 speed dial dialing 7.22 storing 7.21 system requirements Windows 2.28 T tel line...
...copying 5.8 printing 4.17 replacing toner cartridge 8.8 reports, print 7.35 resolution faxing 7.9 printing 4.8 S scanning contol panel 6.3 SmarThru 6.4 USB flash drive 10.3 WIA driver 6.7 searching Phone Book 7.26 Secure Receiving mode 7.34 sending a fax automatically 7.11 manually 7.12 Set IP Installing 2.46 Using 2.47 sharing printer, set A.2 SmarThru install 2.28 uninstall 2.45 software uninstall Windows 2.44 sounds, set 2.22 specifications facsimile C.5 general C.2 paper C.6 printer C.4 scanner and copier C.3 speed dial dialing 7.22 storing 7.21 system requirements Windows 2.28 T tel line...
Service Manual
Page 19
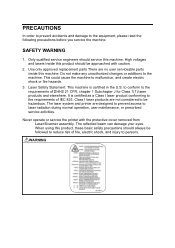
... 825. It is certified in the U.S. This could cause the machine to the equipment, please read the following precautions before you service the machine. Do not make any unauthorized changes or additions to laser radiation during normal operation, user maintenance, or prescribed service activities. The reflected beam can damage your eyes. Use only approved replacement parts There are designed to prevent access to the...
... 825. It is certified in the U.S. This could cause the machine to the equipment, please read the following precautions before you service the machine. Do not make any unauthorized changes or additions to laser radiation during normal operation, user maintenance, or prescribed service activities. The reflected beam can damage your eyes. Use only approved replacement parts There are designed to prevent access to the...
Service Manual
Page 129
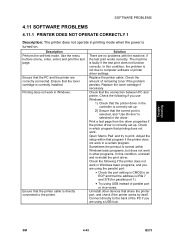
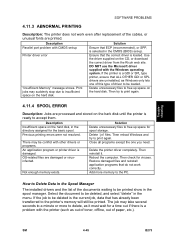
... the printer are using a USB hub. Connect directly to print. Ensure that the toner cartridge is correctly installed. Ensure that the printer cable is directly connected to computer software or printer driver settings. Check that share the printer port, and check if the printer works by itself. In this condition, uninstall and re-install the print driver. SM 4-43 B273 Troubleshooting SOFTWARE PROBLEMS 4.11 SOFTWARE PROBLEMS 4.11.1 PRINTER DOES NOT OPERATE CORRECTLY 1 Description: The printer does not operate in printing mode when the power is turned on...
... the printer are using a USB hub. Connect directly to print. Ensure that the toner cartridge is correctly installed. Ensure that the printer cable is directly connected to computer software or printer driver settings. Check that share the printer port, and check if the printer works by itself. In this condition, uninstall and re-install the print driver. SM 4-43 B273 Troubleshooting SOFTWARE PROBLEMS 4.11 SOFTWARE PROBLEMS 4.11.1 PRINTER DOES NOT OPERATE CORRECTLY 1 Description: The printer does not operate in printing mode when the power is turned on...
Service Manual
Page 131
... or more memory to Delete Data in the menu. Ensure that do not work even after replacement of driver to insufficient space on the hark disk until the printer is loaded. Reboot the computer. Add more to delete, as out of toner, offline, out of the documents waiting to accept them. Use the driver supplied on the hard disk. Delete unnecessary files to print again. 4.11.4 SPOOL ERROR Description: Jobs are damaged...
... or more memory to Delete Data in the menu. Ensure that do not work even after replacement of driver to insufficient space on the hark disk until the printer is loaded. Reboot the computer. Add more to delete, as out of toner, offline, out of the documents waiting to accept them. Use the driver supplied on the hard disk. Delete unnecessary files to print again. 4.11.4 SPOOL ERROR Description: Jobs are damaged...

Service Manual
Page 143
... Confirm Junk Fax List Scan Journal Reset Network Config Network Set to Default Print net CFG Speaker Ringer Key Sound Alarm Sound Clean Drum Auto Cleaning Notify Toner Clear Settings Network Scan Contents Phone Book List Transmission Journal Reception Journal System Data List Schedule Information List Message Confirmation Report Junk Fax List Yes/No TCP/IP Yes/No Yes/No On / Off / Comm. Off / Low / Med / High On / Off On / Off Yes/No On / Off On / Off All/Paper/Copy/Fax/Fax features/Advanced fax/Send report/RCV report/Phonebook/Scan journal Enable / Disable Service Program Mode...
... Confirm Junk Fax List Scan Journal Reset Network Config Network Set to Default Print net CFG Speaker Ringer Key Sound Alarm Sound Clean Drum Auto Cleaning Notify Toner Clear Settings Network Scan Contents Phone Book List Transmission Journal Reception Journal System Data List Schedule Information List Message Confirmation Report Junk Fax List Yes/No TCP/IP Yes/No Yes/No On / Off / Comm. Off / Low / Med / High On / Off On / Off Yes/No On / Off On / Off All/Paper/Copy/Fax/Fax features/Advanced fax/Send report/RCV report/Phonebook/Scan journal Enable / Disable Service Program Mode...


