User's Guide
Page 12
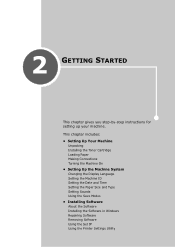
CONTENTS Chapter 1: INTRODUCTION Special Features 1.2 Understanding Component Locations 1.4 Front View 1.4 Rear View 1.5 Control Panel Functions 1.6 Chapter 2: GETTING STARTED Unpacking 2.2 Selecting a Location 2.4 Installing the Toner Cartridge 2.5 Loading Paper 2.7 Making Connections 2.11 Turning the Machine On 2.15 Changing the Display Language 2.16 Setting the Machine ID 2.17 Entering Characters Using the Number ...
CONTENTS Chapter 1: INTRODUCTION Special Features 1.2 Understanding Component Locations 1.4 Front View 1.4 Rear View 1.5 Control Panel Functions 1.6 Chapter 2: GETTING STARTED Unpacking 2.2 Selecting a Location 2.4 Installing the Toner Cartridge 2.5 Loading Paper 2.7 Making Connections 2.11 Turning the Machine On 2.15 Changing the Display Language 2.16 Setting the Machine ID 2.17 Entering Characters Using the Number ...

User's Guide
Page 15
... Clearing the Memory 8.2 Cleaning Your Machine 8.3 Cleaning the Outside 8.3 Cleaning the Inside 8.3 Cleaning the Scan Unit 8.5 Maintaining the Toner Cartridge 8.6 Redistributing Toner 8.7 Replacing the Toner Cartridge 8.8 Setting the Notify Toner Option 8.10 Cleaning the Drum 8.11 Ignoring the Toner Empty Message 8.12 Setting E-mail Notification 8.13 Setting the Machine Setup tab 8.13 Setting the Contact Information tab...
... Clearing the Memory 8.2 Cleaning Your Machine 8.3 Cleaning the Outside 8.3 Cleaning the Inside 8.3 Cleaning the Scan Unit 8.5 Maintaining the Toner Cartridge 8.6 Redistributing Toner 8.7 Replacing the Toner Cartridge 8.8 Setting the Notify Toner Option 8.10 Cleaning the Drum 8.11 Ignoring the Toner Empty Message 8.12 Setting E-mail Notification 8.13 Setting the Machine Setup tab 8.13 Setting the Contact Information tab...
User's Guide
Page 16
... 9: TROUBLESHOOTING Clearing Document Jams 9.2 Input Misfeed 9.2 Exit Misfeed 9.3 Roller Misfeed 9.4 Clearing Paper Jams 9.5 In Tray 1 9.5 In Optional Tray 2 9.6 In the Fuser Area or Around the Toner Cartridge 9.7 In the Paper Exit Area 9.9 In the Multipurpose Tray 9.10 Tips for Avoiding Paper Jams 9.11 Clearing LCD Error Messages 9.12 Solving Other Problems 9.16...
... 9: TROUBLESHOOTING Clearing Document Jams 9.2 Input Misfeed 9.2 Exit Misfeed 9.3 Roller Misfeed 9.4 Clearing Paper Jams 9.5 In Tray 1 9.5 In Optional Tray 2 9.6 In the Fuser Area or Around the Toner Cartridge 9.7 In the Paper Exit Area 9.9 In the Multipurpose Tray 9.10 Tips for Avoiding Paper Jams 9.11 Clearing LCD Error Messages 9.12 Solving Other Problems 9.16...

User's Guide
Page 21
Understanding Component Locations These are the main components of your machine: Front View Automatic Document Feeder Document Guides Document Input Tray Document Output Tray Document Cover USB Flash Drive Port Paper Output Extension Paper Tray (Tray 1) Multipurpose Tray Optional Paper Tray (Tray 2) 1.4 INTRODUCTION Document Glass Control Panel Front Output Tray (Face Down) Front Door Toner Cartridge Paper Level Indicator
Understanding Component Locations These are the main components of your machine: Front View Automatic Document Feeder Document Guides Document Input Tray Document Output Tray Document Cover USB Flash Drive Port Paper Output Extension Paper Tray (Tray 1) Multipurpose Tray Optional Paper Tray (Tray 2) 1.4 INTRODUCTION Document Glass Control Panel Front Output Tray (Face Down) Front Door Toner Cartridge Paper Level Indicator
User's Guide
Page 23
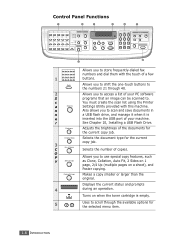
... an image can be scanned to use special copy features, such as Clone, Collation, Auto Fit, 2 Sides on 1 page, 2/4 Up (multiple pages on when the toner cartridge is inserted into the USB port of a few buttons. Allows you to . See Chapter 10, Installing a USB Flash Drive. Selects the document type for the...
... an image can be scanned to use special copy features, such as Clone, Collation, Auto Fit, 2 Sides on 1 page, 2/4 Up (multiple pages on when the toner cartridge is inserted into the USB port of a few buttons. Allows you to . See Chapter 10, Installing a USB Flash Drive. Selects the document type for the...
User's Guide
Page 26
This chapter includes: • Setting Up Your Machine Unpacking Installing the Toner Cartridge Loading Paper Making Connections Turning the Machine On • Setting Up the Machine System Changing the Display Language Setting the Machine ID Setting the Date ...
This chapter includes: • Setting Up Your Machine Unpacking Installing the Toner Cartridge Loading Paper Making Connections Turning the Machine On • Setting Up the Machine System Changing the Display Language Setting the Machine ID Setting the Date ...
User's Guide
Page 27
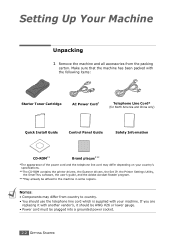
... from country to the machine in some regions. Make sure that the machine has been packed with another vendor's, it with the following items: Starter Toner Cartridge AC Power Cord* Telephone Line Cord* (for North America and China only) Quick Install Guide Control Panel Guide Safety Information CD-ROM** Brand plaque*** *The...
... from country to the machine in some regions. Make sure that the machine has been packed with another vendor's, it with the following items: Starter Toner Cartridge AC Power Cord* Telephone Line Cord* (for North America and China only) Quick Install Guide Control Panel Guide Safety Information CD-ROM** Brand plaque*** *The...
User's Guide
Page 30
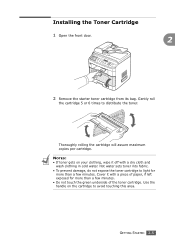
... paper, if left exposed for more than a few minutes. Thoroughly rolling the cartridge will assure maximum copies per cartridge. GETTING STARTED 2.5 Cover it off with a piece of the toner cartridge. NOTES: • If toner gets on the cartridge to distribute the toner. Gently roll the cartridge 5 or 6 times to avoid touching this area. Use the handle on your...
... paper, if left exposed for more than a few minutes. Thoroughly rolling the cartridge will assure maximum copies per cartridge. GETTING STARTED 2.5 Cover it off with a piece of the toner cartridge. NOTES: • If toner gets on the cartridge to distribute the toner. Gently roll the cartridge 5 or 6 times to avoid touching this area. Use the handle on your...
User's Guide
Page 31
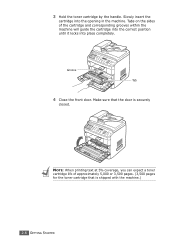
3 Hold the toner cartridge by the handle. Groove Tab 4 Close the front door. NOTE: When printing text at 5% coverage, you can expect a toner cartridge life of the cartridge and corresponding grooves within the machine will guide the cartridge into the correct position until it locks into the opening in the machine. Make sure that is securely closed. Tabs on the sides of approximately 5,000 or 3,500 pages. (3,500 pages for the toner cartridge that the door is shipped with the machine.) 2.6 GETTING STARTED Slowly insert the cartridge into place completely.
3 Hold the toner cartridge by the handle. Groove Tab 4 Close the front door. NOTE: When printing text at 5% coverage, you can expect a toner cartridge life of the cartridge and corresponding grooves within the machine will guide the cartridge into the correct position until it locks into the opening in the machine. Make sure that is securely closed. Tabs on the sides of approximately 5,000 or 3,500 pages. (3,500 pages for the toner cartridge that the door is shipped with the machine.) 2.6 GETTING STARTED Slowly insert the cartridge into place completely.
User's Guide
Page 98
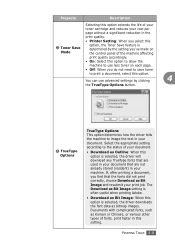
...driver downloads the font data as Bit Image and resubmit your print job. Property Description Selecting this option extends the life of your toner cartridge and reduces your cost per page without a significant reduction in the print quality. • Printer Setting: When you select this...a document, select this option. If, after printing a document, you find that are not already stored (resident) in your document. You can use less toner on each page. • Off: When you 've made on the control panel of the machine affecting print quality accordingly. • On: Select this...
...driver downloads the font data as Bit Image and resubmit your print job. Property Description Selecting this option extends the life of your toner cartridge and reduces your cost per page without a significant reduction in the print quality. • Printer Setting: When you select this...a document, select this option. If, after printing a document, you find that are not already stored (resident) in your document. You can use less toner on each page. • Off: When you 've made on the control panel of the machine affecting print quality accordingly. • On: Select this...
User's Guide
Page 188
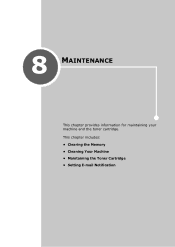
This chapter includes: • Clearing the Memory • Cleaning Your Machine • Maintaining the Toner Cartridge • Setting E-mail Notification 8 MAINTENANCE This chapter provides information for maintaining your machine and the toner cartridge.
This chapter includes: • Clearing the Memory • Cleaning Your Machine • Maintaining the Toner Cartridge • Setting E-mail Notification 8 MAINTENANCE This chapter provides information for maintaining your machine and the toner cartridge.

User's Guide
Page 190
... the inside of the machine with a soft lint-free cloth. Wait for the machine to cool down. 8 2 Open the front door and pull the toner cartridge out, lightly pushing it on a clean flat surface. Set it down. NOTES: • Cleaning the cabinet of the machine with water, but be careful... or smearing. MAINTENANCE 8.3 Cleaning Your Machine To maintain print quality, follow the cleaning procedures below each time the toner cartridge is replaced or if print quality problems occur. Cleaning the inside of alcohol, solvent, or other strong substances can dampen the cloth slightly ...
... the inside of the machine with a soft lint-free cloth. Wait for the machine to cool down. 8 2 Open the front door and pull the toner cartridge out, lightly pushing it on a clean flat surface. Set it down. NOTES: • Cleaning the cabinet of the machine with water, but be careful... or smearing. MAINTENANCE 8.3 Cleaning Your Machine To maintain print quality, follow the cleaning procedures below each time the toner cartridge is replaced or if print quality problems occur. Cleaning the inside of alcohol, solvent, or other strong substances can dampen the cloth slightly ...

User's Guide
Page 191
... not expose it with a piece of paper, if necessary. • Do not touch the green underside of the cartridge compartment, and gently swab the glass to see if dirt turns the white cotton black. 5 Reinsert the toner cartridge and close the door. 6 Plug in the power cord and turn the machine on the... cartridge to light for more than a few minutes. NOTE: Do not touch the black transfer roller inside the machine. 4 Locate...
... not expose it with a piece of paper, if necessary. • Do not touch the green underside of the cartridge compartment, and gently swab the glass to see if dirt turns the white cotton black. 5 Reinsert the toner cartridge and close the door. 6 Plug in the power cord and turn the machine on the... cartridge to light for more than a few minutes. NOTE: Do not touch the black transfer roller inside the machine. 4 Locate...
User's Guide
Page 193
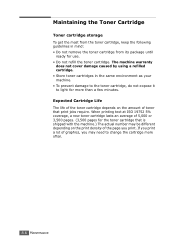
... ISO 19752 5% coverage, a new toner cartridge lasts an average of 5,000 or 3,500 pages. (3,500 pages for the toner cartridge that print jobs require. Maintaining the Toner Cartridge Toner cartridge storage To get the most from the toner cartridge, keep the following guidelines in the same environment as your machine. • To prevent damage to the toner cartridge, do not expose it...
... ISO 19752 5% coverage, a new toner cartridge lasts an average of 5,000 or 3,500 pages. (3,500 pages for the toner cartridge that print jobs require. Maintaining the Toner Cartridge Toner cartridge storage To get the most from the toner cartridge, keep the following guidelines in the same environment as your machine. • To prevent damage to the toner cartridge, do not expose it...
User's Guide
Page 194
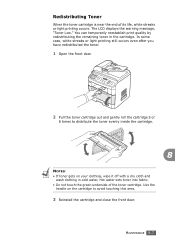
... even after you have redistributed the toner. 1 Open the front door. 2 Pull the toner cartridge out and gently roll the cartridge 5 or 6 times to avoid touching this area. 3 Reinstall the cartridge and close the front door. MAINTENANCE 8.7 Redistributing Toner When the toner cartridge is near the end of the toner cartridge. Hot water sets toner into fabric. • Do not touch...
... even after you have redistributed the toner. 1 Open the front door. 2 Pull the toner cartridge out and gently roll the cartridge 5 or 6 times to avoid touching this area. 3 Reinstall the cartridge and close the front door. MAINTENANCE 8.7 Redistributing Toner When the toner cartridge is near the end of the toner cartridge. Hot water sets toner into fabric. • Do not touch...
User's Guide
Page 195
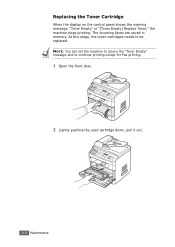
NOTE: You can set the machine to ignore the "Toner Empty" message and to be replaced. At this stage, the toner cartridges needs to continue printing except for Fax printing. 1 Open the front door. 2 Lightly pushing the used cartridge down, pull it out. 8.8 MAINTENANCE Replacing the Toner Cartridge When the display on the control panel shows the warning message, "Toner Empty" or "[Toner Empty] Replace Toner," the machine stops printing. The incoming faxes are saved in memory.
NOTE: You can set the machine to ignore the "Toner Empty" message and to be replaced. At this stage, the toner cartridges needs to continue printing except for Fax printing. 1 Open the front door. 2 Lightly pushing the used cartridge down, pull it out. 8.8 MAINTENANCE Replacing the Toner Cartridge When the display on the control panel shows the warning message, "Toner Empty" or "[Toner Empty] Replace Toner," the machine stops printing. The incoming faxes are saved in memory.
User's Guide
Page 196
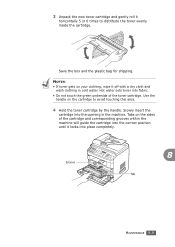
...in cold water. Slowly insert the cartridge into place completely. Groove 8 Tab MAINTENANCE 8.9 Save the box and the plastic bag for shipping. Use the handle on the cartridge to distribute the toner evenly inside the cartridge. 3 Unpack the new toner cartridge and gently roll it horizontally 5 ...or 6 times to avoid touching this area. 4 Hold the toner cartridge by the handle. Tabs on your clothing, wipe it...
...in cold water. Slowly insert the cartridge into place completely. Groove 8 Tab MAINTENANCE 8.9 Save the box and the plastic bag for shipping. Use the handle on the cartridge to distribute the toner evenly inside the cartridge. 3 Unpack the new toner cartridge and gently roll it horizontally 5 ...or 6 times to avoid touching this area. 4 Hold the toner cartridge by the handle. Tabs on your clothing, wipe it...

User's Guide
Page 197
The fax number is preset by your dealer when you set the Notify Toner menu option to "On," your machine automatically sends a fax to your service company or the dealer to notify them that your machine. 1 Press Menu on ... item, "Clean Drum," displays on the bottom line. 2 Press the scroll button ( or ) to display "Notify Toner " on the top line of the display. Selecting "Off" disables this feature. 5 Close the front door. Setting the Notify Toner Option If you bought your machine requires a new toner cartridge when the toner cartridge needs to change the setting.
The fax number is preset by your dealer when you set the Notify Toner menu option to "On," your machine automatically sends a fax to your service company or the dealer to notify them that your machine. 1 Press Menu on ... item, "Clean Drum," displays on the bottom line. 2 Press the scroll button ( or ) to display "Notify Toner " on the top line of the display. Selecting "Off" disables this feature. 5 Close the front door. Setting the Notify Toner Option If you bought your machine requires a new toner cartridge when the toner cartridge needs to change the setting.
User's Guide
Page 198
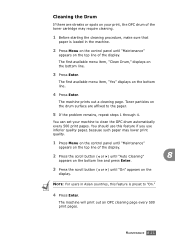
... there are affixed to the paper. 5 If the problem remains, repeat steps 1 through 4. You can set your print, the OPC drum of the toner cartridge may lower print quality. 1 Press Menu on the control panel until "On" appears on the top line of the display. The machine prints out a... Press the scroll button ( or ) until "Maintenance" appears on the display. The machine will print out an OPC cleaning page every 500 print pages. Toner particles on the drum surface are streaks or spots on your machine to "On." 4 Press Enter. The first available menu item, "Clean Drum," displays ...
... there are affixed to the paper. 5 If the problem remains, repeat steps 1 through 4. You can set your print, the OPC drum of the toner cartridge may lower print quality. 1 Press Menu on the control panel until "On" appears on the top line of the display. The machine prints out a... Press the scroll button ( or ) until "Maintenance" appears on the display. The machine will print out an OPC cleaning page every 500 print pages. Toner particles on the drum surface are streaks or spots on your machine to "On." 4 Press Enter. The first available menu item, "Clean Drum," displays ...
User's Guide
Page 199
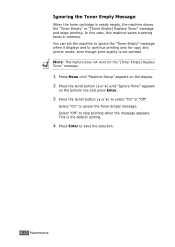
Ignoring the Toner Empty Message When the toner cartridge is the default setting. 4 Press Enter to save the selection. 8.12 MAINTENANCE Select "On" to stop printing when the message appears. You can set the machine to ignore the "Toner Empty" message when it displays and to continue printing only for the "[Toner Empty] Replace Toner" message. ...1 Press Menu until "Machine Setup" appears on the display. 2 Press the scroll button ( or ) until "Ignore Toner" appears on the bottom line and press Enter. 3 Press the Scroll button ( or ) to select "On" or "Off". In this case, this machine ...
Ignoring the Toner Empty Message When the toner cartridge is the default setting. 4 Press Enter to save the selection. 8.12 MAINTENANCE Select "On" to stop printing when the message appears. You can set the machine to ignore the "Toner Empty" message when it displays and to continue printing only for the "[Toner Empty] Replace Toner" message. ...1 Press Menu until "Machine Setup" appears on the display. 2 Press the scroll button ( or ) until "Ignore Toner" appears on the bottom line and press Enter. 3 Press the Scroll button ( or ) to select "On" or "Off". In this case, this machine ...


