
User Manual
Page 3
......2 Introduction 4 Product Features 4 Package Overview 5 Product Overview 6 Main Unit...6 Control Panel ...7 Connection Ports ...8 Remote Control with Mouse Function and Laser Pointer 9 Installation 10 Connecting the Projector 10 Connect the Computer/Notebook 10 Connect ...14 Adjusting the Projector Zoom / Focus 15 Adjusting Projected Image Size 15 User Controls 16 Control Panel & Remote Control 16 On-Screen Display Menus 18 How to Operate ...18 Menu Tree...19 Image-I ...20 Image-II... Modes 37 RS232 Commands 38 Ceiling Mount Installation 39 Optoma Global Offices 40 1 English
......2 Introduction 4 Product Features 4 Package Overview 5 Product Overview 6 Main Unit...6 Control Panel ...7 Connection Ports ...8 Remote Control with Mouse Function and Laser Pointer 9 Installation 10 Connecting the Projector 10 Connect the Computer/Notebook 10 Connect ...14 Adjusting the Projector Zoom / Focus 15 Adjusting Projected Image Size 15 User Controls 16 Control Panel & Remote Control 16 On-Screen Display Menus 18 How to Operate ...18 Menu Tree...19 Image-I ...20 Image-II... Modes 37 RS232 Commands 38 Ceiling Mount Installation 39 Optoma Global Offices 40 1 English
User Manual
Page 6
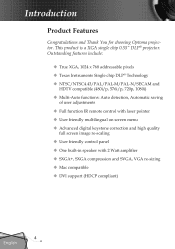
.../PAL-M/PAL-N/SECAM and HDTV compatible (480i/p, 576i/p, 720p, 1080i) Multi-Auto functions: Auto detection, Automatic saving of user adjustments Full function IR remote control with laser pointer User friendly multilingual on screen menu Advanced digital keystone correction and high quality full screen image re-scaling ...+, SXGA compression and SVGA, VGA re-sizing Mac compatible DVI support (HDCP compliant) 4 English Introduction Product Features Congratulations and Thank You for choosing Optoma projector.
.../PAL-M/PAL-N/SECAM and HDTV compatible (480i/p, 576i/p, 720p, 1080i) Multi-Auto functions: Auto detection, Automatic saving of user adjustments Full function IR remote control with laser pointer User friendly multilingual on screen menu Advanced digital keystone correction and high quality full screen image re-scaling ...+, SXGA compression and SVGA, VGA re-sizing Mac compatible DVI support (HDCP compliant) 4 English Introduction Product Features Congratulations and Thank You for choosing Optoma projector.
User Manual
Page 7
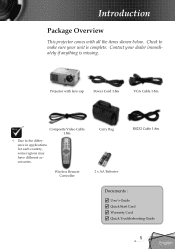
Projector with all the items shown below. Check to the difference in applications for each country, some regions may have different accessories. Wireless Remote Controller Carry Bag 2 x AA Batteries RS232 Cable 1.8m Documents : User's Guide Quick Start Card Warranty Card Quick Troubleshooting Guide 5 English Contact your unit is missing. Introduction Package Overview This projector comes with lens cap Power Cord 1.8m VGA Cable 1.8m Composite Video Cable 1.8m Due to make sure your dealer immediately if anything is complete.
Projector with all the items shown below. Check to the difference in applications for each country, some regions may have different accessories. Wireless Remote Controller Carry Bag 2 x AA Batteries RS232 Cable 1.8m Documents : User's Guide Quick Start Card Warranty Card Quick Troubleshooting Guide 5 English Contact your unit is missing. Introduction Package Overview This projector comes with lens cap Power Cord 1.8m VGA Cable 1.8m Composite Video Cable 1.8m Due to make sure your dealer immediately if anything is complete.
User Manual
Page 11
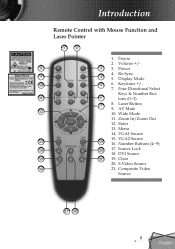
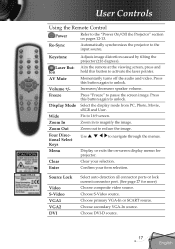
Re-Sync 9 4 5. Four Directional Select Keys & Number But- 11 6 tons (0~3) 7 8. DVI Source 15 21 19. Clear 20. Laser Button 9. VGA2 Source 13 19 16. Number Buttons (4~9) 14 20 17. Composite Video Source 17 18 9 English VGA1 Source 15. Zoom In/Zoom Out 12. Menu 14. Source Lock 18. S-Video Source 16 21. Freeze 2. Display Mode 10 5 6. AV Mute 12 10. Enter 13. Keystone +/- 7. Power 4. Wide Mode 11. Introduction Remote Control with Mouse Function and Laser Pointer 1 2 1. Volume +/- 8 3 3.
Re-Sync 9 4 5. Four Directional Select Keys & Number But- 11 6 tons (0~3) 7 8. DVI Source 15 21 19. Clear 20. Laser Button 9. VGA2 Source 13 19 16. Number Buttons (4~9) 14 20 17. Composite Video Source 17 18 9 English VGA1 Source 15. Zoom In/Zoom Out 12. Menu 14. Source Lock 18. S-Video Source 16 21. Freeze 2. Display Mode 10 5 6. AV Mute 12 10. Enter 13. Keystone +/- 7. Power 4. Wide Mode 11. Introduction Remote Control with Mouse Function and Laser Pointer 1 2 1. Volume +/- 8 3 3.
User Manual
Page 14
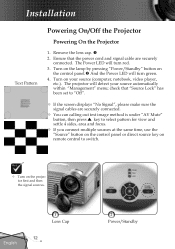
..., video player, etc.). Installation Text Pattern Powering On/Off the Projector Powering On the Projector 1. Turn on the lamp by pressing "Power/Standby" button on remote control to "Off". If the screen displays "No Signal", please make sure the signal cables are securely connected. check that the power cord and...
..., video player, etc.). Installation Text Pattern Powering On/Off the Projector Powering On the Projector 1. Turn on the lamp by pressing "Power/Standby" button on remote control to "Off". If the screen displays "No Signal", please make sure the signal cables are securely connected. check that the power cord and...
User Manual
Page 18
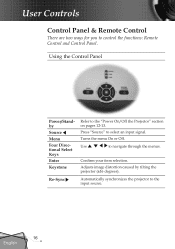
... menu On or Off. Automatically synchronizes the projector to select an input signal. Use to control the functions: Remote Control and Control Panel. Confirm your item selection. User Controls Control Panel & Remote Control There are two ways for you to navigate through the menus. Adjusts image distortion caused by tilting...
... menu On or Off. Automatically synchronizes the projector to select an input signal. Use to control the functions: Remote Control and Control Panel. Confirm your item selection. User Controls Control Panel & Remote Control There are two ways for you to navigate through the menus. Adjusts image distortion caused by tilting...
User Manual
Page 19
User Controls Using the Remote Control Power Refer to unlock. Press this button again to the "Power On/Off the Projector" section on -screen display menus for more) Choose composite ... connector ports or lock current connector port. (See page 27 for projector. Re-Sync Automatically synchronizes the projector to pause the screen image. Aim the remote at the viewing screen, press and hold this button again to magnify the image. Zoom out to activate the laser pointer. Keystone Laser Button AV...
User Controls Using the Remote Control Power Refer to unlock. Press this button again to the "Power On/Off the Projector" section on -screen display menus for more) Choose composite ... connector ports or lock current connector port. (See page 27 for projector. Re-Sync Automatically synchronizes the projector to pause the screen image. Aim the remote at the viewing screen, press and hold this button again to magnify the image. Zoom out to activate the laser pointer. Keystone Laser Button AV...
User Manual
Page 20
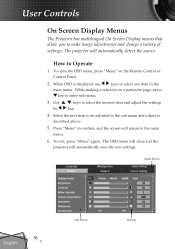
When OSD is displayed, use keys to enter sub menu. 3. Main Menu 18 English Sub Menu Setting While making a selection on the Remote Control or Control Panel. 2. How to select the desired item and adjust the settings key. 4. To exit, press "Menu" again. The OSD menu will close ...
When OSD is displayed, use keys to enter sub menu. 3. Main Menu 18 English Sub Menu Setting While making a selection on the Remote Control or Control Panel. 2. How to select the desired item and adjust the settings key. 4. To exit, press "Menu" again. The OSD menu will close ...
User Manual
Page 30
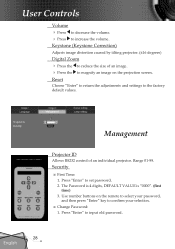
... size of an individual projector. Range 01-99. User Controls Volume Press to decrease the volume. Press to magnify an image on the remote to select your selection. ■ Change Password: 1.
... size of an individual projector. Range 01-99. User Controls Volume Press to decrease the volume. Press to magnify an image on the remote to select your selection. ■ Change Password: 1.
User Manual
Page 31
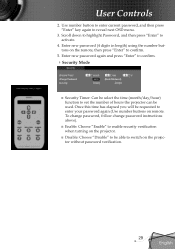
... password, and then press "Enter" key again to confirm. 5. Enter new password (4 digits in length) using the number buttons on the remote, then press "Enter" to reveal next OSD menu. 3. To change password, follow change password instructions above). ■ Enable: Choose "Enable" to ...enable security verification when turning on the projector. ■ Disable: Choose "Disable" to switch on remote. Enter new password again and press "Enter" to confirm. Security Mode ■ Security Timer: Can be select the time (month/...
... password, and then press "Enter" key again to confirm. 5. Enter new password (4 digits in length) using the number buttons on the remote, then press "Enter" to reveal next OSD menu. 3. To change password, follow change password instructions above). ■ Enable: Choose "Enable" to ...enable security verification when turning on the projector. ■ Disable: Choose "Disable" to switch on remote. Enter new password again and press "Enter" to confirm. Security Mode ■ Security Timer: Can be select the time (month/...
User Manual
Page 34
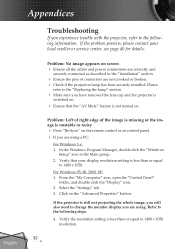
... center, see page 40 for details. For Windows 95, 98, 2000, XP: 1. If the projector is unstable or noisy Press "Re-Sync" on the remote control or on . Appendices Troubleshooting If you experience trouble with the projector, refer to change the monitor display you are using a PC: For Windows 3.x: 1. If...
... center, see page 40 for details. For Windows 95, 98, 2000, XP: 1. If the projector is unstable or noisy Press "Re-Sync" on the remote control or on . Appendices Troubleshooting If you experience trouble with the projector, refer to change the monitor display you are using a PC: For Windows 3.x: 1. If...


