
User Manual
Page 1
... for a Class B digital device pursuant to Part 15 of your Projector. If this computer. These limits are designed to which can radiate radio frequency energy and, if not installed and used in accordance with FCC regulations. Notice: Shielded cables All connections to other computing devices must be determined by turning the device off and on, the user is encouraged...
... for a Class B digital device pursuant to Part 15 of your Projector. If this computer. These limits are designed to which can radiate radio frequency energy and, if not installed and used in accordance with FCC regulations. Notice: Shielded cables All connections to other computing devices must be determined by turning the device off and on, the user is encouraged...
User Manual
Page 3
...12 Powering On the Projector 12 Powering Off the projector 13 Warning Indicator...13 Adjusting the Projected Image 14 Adjusting the Projector Image Height 14 Adjusting the Projector Zoom / Focus 15 Adjusting Projected Image Size 15 User Controls 16 Control Panel & Remote Control 16 On-Screen Display Menus 18 How to Operate ...18 Menu Tree...19 Image-I ...20 Image-II ...22 Colour Setting ...24 Language ...26 Management ...27 Lamp Setting...30 Appendices 32 Troubleshooting 32 Replacing the Lamp 36 Compatibility Modes 37 RS232 Commands 38 Ceiling Mount Installation 39 Optoma Global...
...12 Powering On the Projector 12 Powering Off the projector 13 Warning Indicator...13 Adjusting the Projected Image 14 Adjusting the Projector Image Height 14 Adjusting the Projector Zoom / Focus 15 Adjusting Projected Image Size 15 User Controls 16 Control Panel & Remote Control 16 On-Screen Display Menus 18 How to Operate ...18 Menu Tree...19 Image-I ...20 Image-II ...22 Colour Setting ...24 Language ...26 Management ...27 Lamp Setting...30 Appendices 32 Troubleshooting 32 Replacing the Lamp 36 Compatibility Modes 37 RS232 Commands 38 Ceiling Mount Installation 39 Optoma Global...
User Manual
Page 4
... lamp module has been replaced. Reset the "Reset Lamp Hours" function from the On Screen Display "Lamp Setting" menu after replacing the lamp module (refer to change the lamp when it will detect the life of your eyes. When the lamp reaches the end of fire or electric shock, do not open or disassemble the product as recommended in operation. Please be sure to page 30). Warning- Warning- When switching the projector...
... lamp module has been replaced. Reset the "Reset Lamp Hours" function from the On Screen Display "Lamp Setting" menu after replacing the lamp module (refer to change the lamp when it will detect the life of your eyes. When the lamp reaches the end of fire or electric shock, do not open or disassemble the product as recommended in operation. Please be sure to page 30). Warning- Warning- When switching the projector...

User Manual
Page 6
...; Full function IR remote control with laser pointer User friendly multilingual on screen menu Advanced digital keystone correction and high quality full screen image re-scaling User friendly control panel One built-in speaker with 2 Watt amplifier SXGA+, SXGA compression and SVGA, VGA re-sizing Mac compatible DVI support (HDCP compliant) 4 English This product is a XGA single chip 0.55" DLP® projector.
...; Full function IR remote control with laser pointer User friendly multilingual on screen menu Advanced digital keystone correction and high quality full screen image re-scaling User friendly control panel One built-in speaker with 2 Watt amplifier SXGA+, SXGA compression and SVGA, VGA re-sizing Mac compatible DVI support (HDCP compliant) 4 English This product is a XGA single chip 0.55" DLP® projector.
User Manual
Page 14
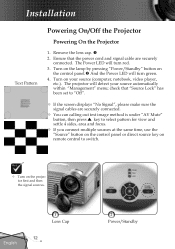
... "Power/Standby" button on the control panel. And the Power LED will turn red. 3. The Power LED will detect your source (computer, notebook, video player, etc.). The projector will turn green. 4. Remove the lens cap. 2. Turn on the projector first and then the signal sources. check that the power cord and signal cable are securely connected. You can calling out test image method is under "AV Mute" button, then press key to select pattern for view and...
... "Power/Standby" button on the control panel. And the Power LED will turn red. 3. The Power LED will detect your source (computer, notebook, video player, etc.). The projector will turn green. 4. Remove the lens cap. 2. Turn on the projector first and then the signal sources. check that the power cord and signal cable are securely connected. You can calling out test image method is under "AV Mute" button, then press key to select pattern for view and...
User Manual
Page 15
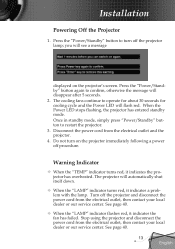
... the power cord from the electrical outlet, then contact your local dealer or our service center. Once in standby mode, simply press "Power/Standby" button to confirm, otherwise the message will automatically shut itself down. When the "LAMP" indicator turns red, it indicates the fan has failed. Warning Indicator When the "TEMP" indicator turns red, it indicates the projector has overheated. Press the "Power/Standby" button again to restart the projector. 3. Installation Powering Off the Projector 1. When the Power LED...
... the power cord from the electrical outlet, then contact your local dealer or our service center. Once in standby mode, simply press "Power/Standby" button to confirm, otherwise the message will automatically shut itself down. When the "LAMP" indicator turns red, it indicates the fan has failed. Warning Indicator When the "TEMP" indicator turns red, it indicates the projector has overheated. Press the "Power/Standby" button again to restart the projector. 3. Installation Powering Off the Projector 1. When the Power LED...
User Manual
Page 17
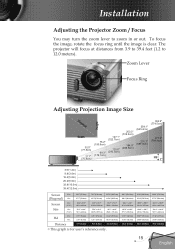
Zoom Lever Focus Ring Adjusting Projection Image Size Diagonal Width 30.5" (77.5cm) 27.7" (70.4cm) Height 76.2" (193.6cm) 69.3" (176.1cm) 127.1" (322.7cm) 115.6" (293.5cm) 203.3" (516.3cm...29.0cm) 10.40" (26.4cm) Distance 3.9' (1.2m) 9.8' (3.0m) 16.4' (5.0m) This graph is clear. Installation Adjusting the Projector Zoom / Focus You may turn the zoom lever to 12.0 meters). The projector will focus at distances from 3.9 to 39.4 feet (1.2 to zoom in or out. To focus the image, rotate the focus ring until the image is for user's reference only. 203.3"(516.3cm) 184.9"(...
Zoom Lever Focus Ring Adjusting Projection Image Size Diagonal Width 30.5" (77.5cm) 27.7" (70.4cm) Height 76.2" (193.6cm) 69.3" (176.1cm) 127.1" (322.7cm) 115.6" (293.5cm) 203.3" (516.3cm...29.0cm) 10.40" (26.4cm) Distance 3.9' (1.2m) 9.8' (3.0m) 16.4' (5.0m) This graph is clear. Installation Adjusting the Projector Zoom / Focus You may turn the zoom lever to 12.0 meters). The projector will focus at distances from 3.9 to 39.4 feet (1.2 to zoom in or out. To focus the image, rotate the focus ring until the image is for user's reference only. 203.3"(516.3cm) 184.9"(...
User Manual
Page 18
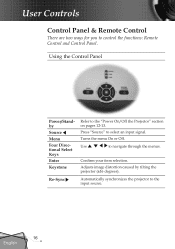
Using the Control Panel Power/Standby Source Menu Four Directional Select Keys Enter Keystone Re-Sync Refer to navigate through the menus. Use to the "Power On/Off the Projector" section on pages 12-13. Adjusts image distortion caused by tilting the projector (±16 degrees). Confirm your item selection. Turns the menu On or Off. User Controls Control Panel & Remote Control There are two ways for you to select an input signal. Press...
Using the Control Panel Power/Standby Source Menu Four Directional Select Keys Enter Keystone Re-Sync Refer to navigate through the menus. Use to the "Power On/Off the Projector" section on pages 12-13. Adjusts image distortion caused by tilting the projector (±16 degrees). Confirm your item selection. Turns the menu On or Off. User Controls Control Panel & Remote Control There are two ways for you to select an input signal. Press...
User Manual
Page 19
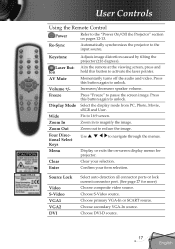
.... Source Lock Video S-Video VGA1 VGA2 DVI Select auto detection all connector ports or lock current connector port. (See page 27 for projector. Momentarily turns off the audio and video. Zoom in to pause the screen image. Zoom out to unlock. Choose S-Video source. Choose primary VGA-In or SCART source. Choose DVI-D source. 17 English Keystone Laser Button AV Mute Volume +/Freeze Display Mode Wide Zoom In Zoom Out Four Directional Select Keys Menu Clear Enter Adjusts image distortion...
.... Source Lock Video S-Video VGA1 VGA2 DVI Select auto detection all connector ports or lock current connector port. (See page 27 for projector. Momentarily turns off the audio and video. Zoom in to pause the screen image. Zoom out to unlock. Choose S-Video source. Choose primary VGA-In or SCART source. Choose DVI-D source. 17 English Keystone Laser Button AV Mute Volume +/Freeze Display Mode Wide Zoom In Zoom Out Four Directional Select Keys Menu Clear Enter Adjusts image distortion...
User Manual
Page 20
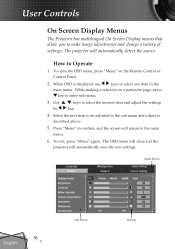
... in the sub menu and adjust as described above. 5. Use by keys to make image adjustments and change a variety of settings. The OSD menu will close and the projector will automatically save the new settings. User Controls On Screen Display Menus The Projector has multilingual On Screen Display menus that allow you to select the desired item and adjust the settings key. 4. While making a selection on the Remote Control or Control Panel. 2. Select the...
... in the sub menu and adjust as described above. 5. Use by keys to make image adjustments and change a variety of settings. The OSD menu will close and the projector will automatically save the new settings. User Controls On Screen Display Menus The Projector has multilingual On Screen Display menus that allow you to select the desired item and adjust the settings key. 4. While making a selection on the Remote Control or Control Panel. 2. Select the...
User Manual
Page 23
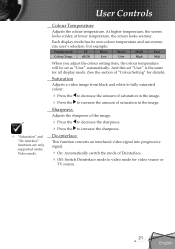
... colour temperature and can memorize user's selection. Colour Temperature Adjusts the colour temperature. at lower temperature, the screen looks warmer. De-interlace This function converts an interlaced video signal into progressive signal. On: Automatically switch the mode of saturation in the image. For example: Display mode PC Photo Movie sRGB User Colour Temp. And this set as "User" automatically. User Controls "Saturation" and "De-interlace" functions are only supported under Video mode.
... colour temperature and can memorize user's selection. Colour Temperature Adjusts the colour temperature. at lower temperature, the screen looks warmer. De-interlace This function converts an interlaced video signal into progressive signal. On: Automatically switch the mode of saturation in the image. For example: Display mode PC Photo Movie sRGB User Colour Temp. And this set as "User" automatically. User Controls "Saturation" and "De-interlace" functions are only supported under Video mode.

User Manual
Page 24
... flickering image, use this function to fit the image onto the screen without changing the projection distance. 22 English position" and "Ver. position" functions are only supported under Computer mode. Hor. Degamma This allows you experience a vertical flickering bar, use external 16x9 lens to display 2.35:1 aspect ratio using full resolution. Window: When a 4:3 image is for non-16x9, letterbox source and for the input. Position...
... flickering image, use this function to fit the image onto the screen without changing the projection distance. 22 English position" and "Ver. position" functions are only supported under Computer mode. Hor. Degamma This allows you experience a vertical flickering bar, use external 16x9 lens to display 2.35:1 aspect ratio using full resolution. Window: When a 4:3 image is for non-16x9, letterbox source and for the input. Position...
User Manual
Page 29
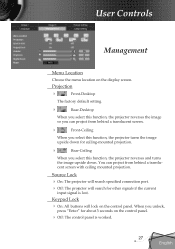
... ceiling mounted projection. Source Lock On: The projector will search specified connection port. Off: The projector will lock on the control panel. Keypad Lock On: All buttons will search for other signals if the current input signal is worked. 27 English You can project from behind a translucent screen. Front-Ceiling When you select this function, the projector reverses and turns the image upside down for about 3 seconds on the display screen...
... ceiling mounted projection. Source Lock On: The projector will search specified connection port. Off: The projector will lock on the control panel. Keypad Lock On: All buttons will search for other signals if the current input signal is worked. 27 English You can project from behind a translucent screen. Front-Ceiling When you select this function, the projector reverses and turns the image upside down for about 3 seconds on the display screen...
User Manual
Page 30
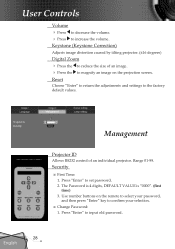
... projector. The Password is 4 digits, DEFAULT VALUE is "0000". (first time) 3. Press "Enter" to set password. 2. Management Projector ID Allows RS232 control of an image. Press the to magnify an image on the remote to select your password, and then press "Enter" key to confirm your selection. ■ Change Password: 1. Range 01-99. Press "Enter" to input old password. 28 English Use number buttons on the projection screen...
... projector. The Password is 4 digits, DEFAULT VALUE is "0000". (first time) 3. Press "Enter" to set password. 2. Management Projector ID Allows RS232 control of an image. Press the to magnify an image on the remote to select your password, and then press "Enter" key to confirm your selection. ■ Change Password: 1. Range 01-99. Press "Enter" to input old password. 28 English Use number buttons on the projection screen...
User Manual
Page 31
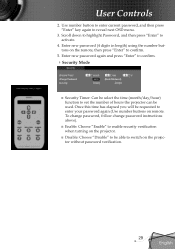
... reveal next OSD menu. 3. User Controls 2. Enter new password again and press "Enter" to confirm. Security Mode ■ Security Timer: Can be select the time (month/day/hour) function to set the number of hours the projector can be requested to confirm. 5. Enter new password (4 digits in length) using the number buttons on the projector without password verification. 29 English To change password, follow change password instructions above). ■...
... reveal next OSD menu. 3. User Controls 2. Enter new password again and press "Enter" to confirm. Security Mode ■ Security Timer: Can be select the time (month/day/hour) function to set the number of hours the projector can be requested to confirm. 5. Enter new password (4 digits in length) using the number buttons on the projector without password verification. 29 English To change password, follow change password instructions above). ■...

User Manual
Page 32
... projector will lower power consumption and extend the lamp life by up to normal mode. High Altitude Choose "On" to normal mode. Choose "Off" to return to turn on the projector automatically when the power cord has connected. The countdown timer will appear 30 hours before end of the projector. User Controls Lamp Setting Projection Hours Displays the projection time. Reset Lamp Hours Resets the lamp life hour counter after replacing the lamp. Choose "Off" to return to 130%. The message will start, when there is displayed...
... projector will lower power consumption and extend the lamp life by up to normal mode. High Altitude Choose "On" to normal mode. Choose "Off" to return to turn on the projector automatically when the power cord has connected. The countdown timer will appear 30 hours before end of the projector. User Controls Lamp Setting Projection Hours Displays the projection time. Reset Lamp Hours Resets the lamp life hour counter after replacing the lamp. Choose "Off" to return to 130%. The message will start, when there is displayed...
User Manual
Page 34
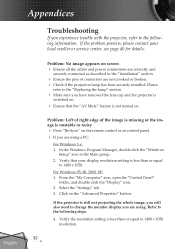
... "Re-Sync" on the remote control or on control panel. If you are using . From the "My Computer" icon, open the "Control Panel" folder, and double click the "Display" icon. 2. If the projector is still not projecting the whole image, you will also need to change the monitor display you are using a PC: For Windows 3.x: 1. Verify that the "AV Mute" feature is not turned on. Problem: No image appears...
... "Re-Sync" on the remote control or on control panel. If you are using . From the "My Computer" icon, open the "Control Panel" folder, and double click the "Display" icon. 2. If the projector is still not projecting the whole image, you will also need to change the monitor display you are using a PC: For Windows 3.x: 1. Verify that the "AV Mute" feature is not turned on. Problem: No image appears...

User Manual
Page 35
...; Change the monitor colour setting on the projector lens. 33 English Problem: Image has vertical flickering bar Use "Frequency" to make an adjustment. (See page 22) Check and reconfigure the display mode of the Notebook or PowerBook computer is not displaying a presentation If you are using a Notebook: 1. Press the toggle output settings. choose the resolution mode you need under the "Models...
...; Change the monitor colour setting on the projector lens. 33 English Problem: Image has vertical flickering bar Use "Frequency" to make an adjustment. (See page 22) Check and reconfigure the display mode of the Notebook or PowerBook computer is not displaying a presentation If you are using a Notebook: 1. Press the toggle output settings. choose the resolution mode you need under the "Models...
User Manual
Page 36
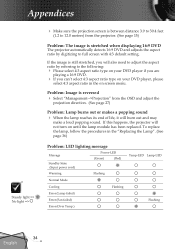
... projector. (See page 15) Problem: The image is stretched when displaying 16:9 DVD The projector automatically detects 16:9 DVD and adjusts the aspect ratio by referring to the following: Please select 4:3 aspect ratio type on your DVD player, please select 4:3 aspect ratio in the "Replacing the Lamp". (See page 36) Problem: LED lighting message Message Standby State (Input power cord) Power-LED (Green) (Red) Warming Flashing Normal Mode Cooling Flashing Error (Lamp failed) Error (Fan failed) Error (Over Temp.) Temp-LED Lamp-LED Flashing...
... projector. (See page 15) Problem: The image is stretched when displaying 16:9 DVD The projector automatically detects 16:9 DVD and adjusts the aspect ratio by referring to the following: Please select 4:3 aspect ratio type on your DVD player, please select 4:3 aspect ratio in the "Replacing the Lamp". (See page 36) Problem: LED lighting message Message Standby State (Input power cord) Power-LED (Green) (Red) Warming Flashing Normal Mode Cooling Flashing Error (Lamp failed) Error (Fan failed) Error (Over Temp.) Temp-LED Lamp-LED Flashing...
User Manual
Page 38
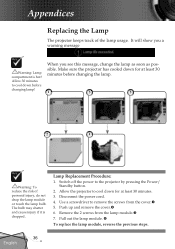
... power cord. 4. Remove the 2 screws from the cover. 5. When you a warning message Warning: Lamp compartment is dropped. Switch off the power to cool down for at least 30 minutes before changing lamp! Appendices Replacing the Lamp The projector keeps track of personal injury, do not drop the lamp module or touch the lamp bulb. Allow 30 minutes to the projector by pressing the Power/ Standby button. 2. Lamp Replacement Procedure: 1. Pull out the lamp module. To replace...
... power cord. 4. Remove the 2 screws from the cover. 5. When you a warning message Warning: Lamp compartment is dropped. Switch off the power to cool down for at least 30 minutes before changing lamp! Appendices Replacing the Lamp The projector keeps track of personal injury, do not drop the lamp module or touch the lamp bulb. Allow 30 minutes to the projector by pressing the Power/ Standby button. 2. Lamp Replacement Procedure: 1. Pull out the lamp module. To replace...


