Operation Guide
Page 3
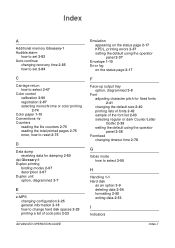
...44 Setting Print Quality 2-49 Operating the Storage Device 2-51 Paper Handling 2-60 Selecting Monochrome or Color Printing 2-74 Reading Life Counters 2-75 Other Modes 2-77 3 Options General Information 3-2 Expansion Memory Modules 3-3 General Description of Options 3-6 IB-23 Network Interface Card 3-10 4 Computer Interface General Information 4-2 Parallel Interface (EP C270N only 4-3 USB Interface 4-5 Serial Interface (EP C270N only 4-6 RS-232C Protocol (EP C270N only 4-7 RS-232C Cable Connection (EP C270N only 4-10 Glossary Index ADVANCED OPERATION GUIDE...
...44 Setting Print Quality 2-49 Operating the Storage Device 2-51 Paper Handling 2-60 Selecting Monochrome or Color Printing 2-74 Reading Life Counters 2-75 Other Modes 2-77 3 Options General Information 3-2 Expansion Memory Modules 3-3 General Description of Options 3-6 IB-23 Network Interface Card 3-10 4 Computer Interface General Information 4-2 Parallel Interface (EP C270N only 4-3 USB Interface 4-5 Serial Interface (EP C270N only 4-6 RS-232C Protocol (EP C270N only 4-7 RS-232C Cable Connection (EP C270N only 4-10 Glossary Index ADVANCED OPERATION GUIDE...
Operation Guide
Page 30
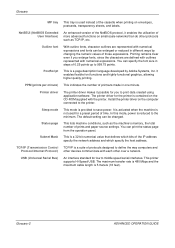
... cover is opened or closed, or a print job is being canceled. Error codes See the Troubleshooting section in Auto Sleep. The printer wakes from Auto Sleep whenever a key on the printer. The printer is waiting for the first time, this function manually on page 2-79. The printer is printing the last page after power-up. Using the Operator Panel Message Self test Please wait Please wait (Adding toner) Please wait (Calibrating) Ready Processing Sleeping Cancelling data Skipping data Waiting FormFeed TimeOut Status...
... cover is opened or closed, or a print job is being canceled. Error codes See the Troubleshooting section in Auto Sleep. The printer wakes from Auto Sleep whenever a key on the printer. The printer is waiting for the first time, this function manually on page 2-79. The printer is printing the last page after power-up. Using the Operator Panel Message Self test Please wait Please wait (Adding toner) Please wait (Calibrating) Ready Processing Sleeping Cancelling data Skipping data Waiting FormFeed TimeOut Status...
Operation Guide
Page 31
... GUIDE 2-5 For details, see Paper Handling on the interface, you should wait to print by the operator panel keys. Each interface has a timeout time of the current cassette. Network interface is in use. (option) No interface is determined by the application software. The default paper cassette is in use. Even after a print job has been completed on page 2-60. • While the printer is in standby, the paper size of 30 seconds (factory default...
... GUIDE 2-5 For details, see Paper Handling on the interface, you should wait to print by the operator panel keys. Each interface has a timeout time of the current cassette. Network interface is in use. (option) No interface is determined by the application software. The default paper cassette is in use. Even after a print job has been completed on page 2-60. • While the printer is in standby, the paper size of 30 seconds (factory default...
Operation Guide
Page 41
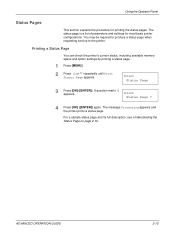
... status page and its full description, see Understanding the Status Page on page 2-16. Print Status Page ? 4 Press [OK] ([ENTER]) again. Printing a Status Page You can check the printer's current status, including available memory space and option settings by printing a status page. 1 Press [MENU]. 2 Press U or V repeatedly until Print Status Page appears. A question mark (?) appears. The status page is a list of parameters and settings for printing the status pages. Using the Operator Panel Status Pages This section explains the procedure for most basic printer configurations...
... status page and its full description, see Understanding the Status Page on page 2-16. Print Status Page ? 4 Press [OK] ([ENTER]) again. Printing a Status Page You can check the printer's current status, including available memory space and option settings by printing a status page. 1 Press [MENU]. 2 Press U or V repeatedly until Print Status Page appears. A question mark (?) appears. The status page is a list of parameters and settings for printing the status pages. Using the Operator Panel Status Pages This section explains the procedure for most basic printer configurations...
Operation Guide
Page 48
... be printed. The printer prints the specified number of copies. >Agenda Delete 001 4 Press [OK] ([ENTER]). The private job is provided on the computer. Using the Operator Panel 9 Press [OK] ([ENTER]). Enter the four-digit access code >Agenda entered in the printer driver and press [OK] ([ENTER]). 3 Press V repeatedly until Delete appears for Clients is displayed (Agenda, in the above section. 2 When the...
... be printed. The printer prints the specified number of copies. >Agenda Delete 001 4 Press [OK] ([ENTER]). The private job is provided on the computer. Using the Operator Panel 9 Press [OK] ([ENTER]). Enter the four-digit access code >Agenda entered in the printer driver and press [OK] ([ENTER]). 3 Press V repeatedly until Delete appears for Clients is displayed (Agenda, in the above section. 2 When the...
Operation Guide
Page 55
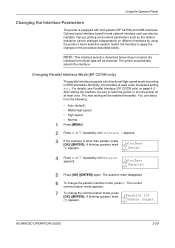
... Operator Panel Changing the Interface Parameters The printer is used under the default setting Auto. Optional serial interface board kit and network interface card can also be sure to reset the printer or turn the power off at least once. For details, see Parallel Interface (EP C270N only) on different interfaces by using the printer's menu selection system. Serial 4 Press U or V repeatedly until Interface > appears. 3 If the interface is other than parallel, press [OK] ([ENTER]). You can be enabled...
... Operator Panel Changing the Interface Parameters The printer is used under the default setting Auto. Optional serial interface board kit and network interface card can also be sure to reset the printer or turn the power off at least once. For details, see Parallel Interface (EP C270N only) on different interfaces by using the printer's menu selection system. Serial 4 Press U or V repeatedly until Interface > appears. 3 If the interface is other than parallel, press [OK] ([ENTER]). You can be enabled...
Operation Guide
Page 63
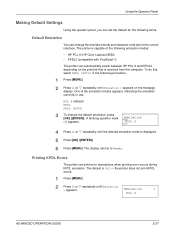
... printer can automatically switch between HP PCL 6 and KPDL3 depending on the message display. PCL 6 (default) KPDL KPDL (AUTO) 3 To change the emulation mode and character code set the default for the current interface. The display returns to Ready. Emulation > PCL 6 ADVANCED OPERATION GUIDE 2-37 The default is displayed. 5 Press [OK] ([ENTER]). 6 Press [MENU]. A blinking question mark (?) appears. Emulation ?PCL 6 4 Press U or V repeatedly until Emulation > appears. Using the Operator Panel Making Default Settings Using the operator panel, you can set...
... printer can automatically switch between HP PCL 6 and KPDL3 depending on the message display. PCL 6 (default) KPDL KPDL (AUTO) 3 To change the emulation mode and character code set the default for the current interface. The display returns to Ready. Emulation > PCL 6 ADVANCED OPERATION GUIDE 2-37 The default is displayed. 5 Press [OK] ([ENTER]). 6 Press [MENU]. A blinking question mark (?) appears. Emulation ?PCL 6 4 Press U or V repeatedly until Emulation > appears. Using the Operator Panel Making Default Settings Using the operator panel, you can set...
Operation Guide
Page 73
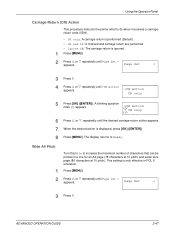
...]). 8 Press [MENU]. The display returns to increase the maximum number of characters that can be printed in PCL 6 emulation. Page Set > 3 Press Z. 4 Press U or V repeatedly until the desired carriage-return action appears. 7 When the desired action is only effective in a line for an A4 page (78 characters at 10 pitch) and Letter size page (80 characters at 10 pitch). ADVANCED OPERATION GUIDE 2-47
...]). 8 Press [MENU]. The display returns to increase the maximum number of characters that can be printed in PCL 6 emulation. Page Set > 3 Press Z. 4 Press U or V repeatedly until the desired carriage-return action appears. 7 When the desired action is only effective in a line for an A4 page (78 characters at 10 pitch) and Letter size page (80 characters at 10 pitch). ADVANCED OPERATION GUIDE 2-47
Operation Guide
Page 94
... message display toggles through the following: None (default) Short edge bind Long edge bind 7 When the desired binding mode is set. 8 To exit the menu selection, press [MENU]. 2-68 ADVANCED OPERATION GUIDE Depending on the binding type and print orientation, the duplexer provides four types of the printed page. Using the Operator Panel the orientation of binding. You can only be performed when the optional duplexer is installed. 1 Press [MENU...
... message display toggles through the following: None (default) Short edge bind Long edge bind 7 When the desired binding mode is set. 8 To exit the menu selection, press [MENU]. 2-68 ADVANCED OPERATION GUIDE Depending on the binding type and print orientation, the duplexer provides four types of the printed page. Using the Operator Panel the orientation of binding. You can only be performed when the optional duplexer is installed. 1 Press [MENU...
Operation Guide
Page 108
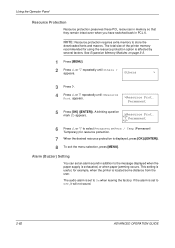
.... The total size of the printer memory recommended for using the resource protection option is exhausted, or when paper jamming occurs. Alarm (Buzzer) Setting You can set an alarm sound in PCL 6. Using the Operator Panel Resource Protection Resource protection preserves these PCL resources in memory so that they remain intact even when you have switched back in addition to the message displayed when the paper supply is affected...
.... The total size of the printer memory recommended for using the resource protection option is exhausted, or when paper jamming occurs. Alarm (Buzzer) Setting You can set an alarm sound in PCL 6. Using the Operator Panel Resource Protection Resource protection preserves these PCL resources in memory so that they remain intact even when you have switched back in addition to the message displayed when the paper supply is affected...
Operation Guide
Page 116
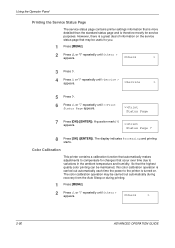
... for changes that occur over time due to variations in the ambient temperature and humidity. The color calibration operation may be useful to you. 1 Press [MENU]. 2 Press U or V repeatedly until Others > appears. Others > 2-90 ADVANCED OPERATION GUIDE The display indicates Processing and printing starts. Using the Operator Panel Printing the Service Status Page The service status page contains printer settings information that is more detailed than the standard status page and is turned...
... for changes that occur over time due to variations in the ambient temperature and humidity. The color calibration operation may be useful to you. 1 Press [MENU]. 2 Press U or V repeatedly until Others > appears. Others > 2-90 ADVANCED OPERATION GUIDE The display indicates Processing and printing starts. Using the Operator Panel Printing the Service Status Page The service status page contains printer settings information that is more detailed than the standard status page and is turned...

Operation Guide
Page 132
.... 4-4 ADVANCED OPERATION GUIDE Ground return 27 - Indicates signals that are low active. ††.The Paper Empty, Online, and Error signals work only after you press [GO] to receive more data. When it is low, the printer is able to make the printer go off line.†† Ignored Not used This pin is used This signal goes high when the printer is enabled. †. Ground...
.... 4-4 ADVANCED OPERATION GUIDE Ground return 27 - Indicates signals that are low active. ††.The Paper Empty, Online, and Error signals work only after you press [GO] to receive more data. When it is low, the printer is able to make the printer go off line.†† Ignored Not used This pin is used This signal goes high when the printer is enabled. †. Ground...
Operation Guide
Page 142
... using application software. You can be changed. The maximum transfer rate is 480 Mbps and the maximum cable length is a 32-bit numerical value that defines which bits of the IP address specify the network address and which specify the host address. Printing remains clear even if you to save power. Install the printer driver on the computer connected to middle speed serial interfaces. The default setting can specify the font size...
... using application software. You can be changed. The maximum transfer rate is 480 Mbps and the maximum cable length is a 32-bit numerical value that defines which bits of the IP address specify the network address and which specify the host address. Printing remains clear even if you to save power. Install the printer driver on the computer connected to middle speed serial interfaces. The default setting can specify the font size...
Operation Guide
Page 143
... color printing 2-74 Color paper 1-10 Conventions -iv Counters reading the life counters 2-75 reading the total printed pages 2-75 toner, how to reset 2-75 D Data dump receiving data for damping 2-80 dpi Glossary-1 Duplex printing binding modes 2-67 description 2-67 Duplex unit option, diagrammed 3-7 E e-MPS changing configuration 2-25 general information 2-18 how to change hard disk spaces 2-25 printing a list of code jobs 2-23 ADVANCED OPERATION GUIDE Emulation appearing on the status page 2-17 KPDL, printing errors 2-37 setting the default using the operator panel 2-37 Envelope 1-10 Error...
... color printing 2-74 Color paper 1-10 Conventions -iv Counters reading the life counters 2-75 reading the total printed pages 2-75 toner, how to reset 2-75 D Data dump receiving data for damping 2-80 dpi Glossary-1 Duplex printing binding modes 2-67 description 2-67 Duplex unit option, diagrammed 3-7 E e-MPS changing configuration 2-25 general information 2-18 how to change hard disk spaces 2-25 printing a list of code jobs 2-23 ADVANCED OPERATION GUIDE Emulation appearing on the status page 2-17 KPDL, printing errors 2-37 setting the default using the operator panel 2-37 Envelope 1-10 Error...
User Guide
Page 11
.... OPERATION GUIDE ix Operation is not in a residential installation. Changes or modifications not expressly approved by turning the equipment off the printer before connecting or disconnecting an interface cable. For protection against harmful interference in use of the FCC Rules. Shielded circular cables should to try to correct it by one or more of the following two conditions: (1) This device may...
.... OPERATION GUIDE ix Operation is not in a residential installation. Changes or modifications not expressly approved by turning the equipment off the printer before connecting or disconnecting an interface cable. For protection against harmful interference in use of the FCC Rules. Shielded circular cables should to try to correct it by one or more of the following two conditions: (1) This device may...
User Guide
Page 48
... using another print command. Nothing lights on the operation panel even when power is turned on , particularly when the printer is Set the power switch to the On in the application software. Check that the procedures for printing are available at: http:// www.kyoceramita.com/download/. • Make sure that the power switch is connected to the computer under Windows 98 via the parallel port, rename device driver file drvwppqt.vxd. See Clearing Paper Jams on page 4-3. Paper...
... using another print command. Nothing lights on the operation panel even when power is turned on , particularly when the printer is Set the power switch to the On in the application software. Check that the procedures for printing are available at: http:// www.kyoceramita.com/download/. • Make sure that the power switch is connected to the computer under Windows 98 via the parallel port, rename device driver file drvwppqt.vxd. See Clearing Paper Jams on page 4-3. Paper...
User Guide
Page 50
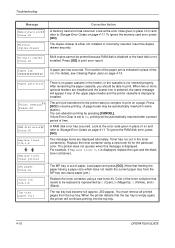
... each of the main charger units in cleaning system. Clean the advanced beam array lenses. Make sure the paper type setting is displayed with color description, install a new toner kit for toner. Clean the advanced beam array lenses. Open the left cover. Conduct color calibration either by switching the printer off then on page 3-3. 4-4 OPERATION GUIDE For full details, see Toner Container Replacement on or using the printer operation panel. Clean the main charger units. Slowly pull the green...
... each of the main charger units in cleaning system. Clean the advanced beam array lenses. Make sure the paper type setting is displayed with color description, install a new toner kit for toner. Clean the advanced beam array lenses. Open the left cover. Conduct color calibration either by switching the printer off then on page 3-3. 4-4 OPERATION GUIDE For full details, see Toner Container Replacement on or using the printer operation panel. Clean the main charger units. Slowly pull the green...
User Guide
Page 55
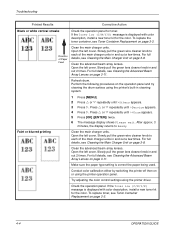
... the message display. Also see Insert the same memory card. OPERATION GUIDE 4-9 Troubleshooting Message Install MK KPDL error ## Press GO Load Cassette # (A4)/(PLAIN) † Load EF (A5)/(PLAIN)† Load MP Tray (A4)/(PLAIN)† Memory card err Insert again Memory overflow Press GO Corrective Action Replace Maintenance Kit which is no paper cassette installed in place of #. By pressing the U, the paper type settings menu appears. Press [GO] to resume printing. (Note that feeding paper with a paper size...
... the message display. Also see Insert the same memory card. OPERATION GUIDE 4-9 Troubleshooting Message Install MK KPDL error ## Press GO Load Cassette # (A4)/(PLAIN) † Load EF (A5)/(PLAIN)† Load MP Tray (A4)/(PLAIN)† Memory card err Insert again Memory overflow Press GO Corrective Action Replace Maintenance Kit which is no paper cassette installed in place of #. By pressing the U, the paper type settings menu appears. Press [GO] to resume printing. (Note that feeding paper with a paper size...
User Guide
Page 56
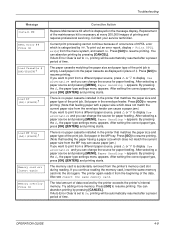
... cause paper jam.) Replace the toner container using a new toner kit for the particular color. To ignore the RAM disk error, press [GO]. Load paper and press [GO]. (Note that needs to On, printing will appear if any of the #'s. You must remove all printed pages from the MP tray can abandon printing by C (Cyan), M (Magenta), Y (Yellow), and K (Black). The duplex drawer is either not installed or incorrectly inserted. The print job transferred to the printer...
... cause paper jam.) Replace the toner container using a new toner kit for the particular color. To ignore the RAM disk error, press [GO]. Load paper and press [GO]. (Note that needs to On, printing will appear if any of the #'s. You must remove all printed pages from the MP tray can abandon printing by C (Cyan), M (Magenta), Y (Yellow), and K (Black). The duplex drawer is either not installed or incorrectly inserted. The print job transferred to the printer...
User Guide
Page 57
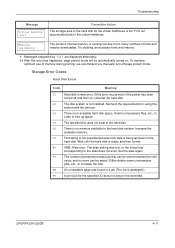
... lost, or the virtual tray corresponding to the hard disk system. Recheck the requirements for using the system and the devices. 04 There is damaged.). 99 A print job for the virtual mailboxes is running low due to too many numbers of fonts and macros downloaded. OPERATION GUIDE 4-11 Storage Error Codes Hard Disk Errors Code Meaning 01 Hard disk format error. Delete unnecessary files, etc., in order to free up space. 05 The...
... lost, or the virtual tray corresponding to the hard disk system. Recheck the requirements for using the system and the devices. 04 There is damaged.). 99 A print job for the virtual mailboxes is running low due to too many numbers of fonts and macros downloaded. OPERATION GUIDE 4-11 Storage Error Codes Hard Disk Errors Code Meaning 01 Hard disk format error. Delete unnecessary files, etc., in order to free up space. 05 The...


