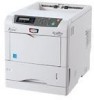
Operation Guide
Page 3
... 2-37 Pagination 2-44 Setting Print Quality 2-49 Operating the Storage Device 2-51 Paper Handling 2-60 Selecting Monochrome or Color Printing 2-74 Reading Life Counters 2-75 Other Modes 2-77 3 Options General Information 3-2 Expansion Memory Modules 3-3 General ... IB-23 Network Interface Card 3-10 4 Computer Interface General Information 4-2 Parallel Interface (EP C270N only 4-3 USB Interface 4-5 Serial Interface (EP C270N only 4-6 RS-232C Protocol (EP C270N only 4-7 RS-232C Cable Connection (EP C270N only 4-10 Glossary Index ADVANCED OPERATION GUIDE i
... 2-37 Pagination 2-44 Setting Print Quality 2-49 Operating the Storage Device 2-51 Paper Handling 2-60 Selecting Monochrome or Color Printing 2-74 Reading Life Counters 2-75 Other Modes 2-77 3 Options General Information 3-2 Expansion Memory Modules 3-3 General ... IB-23 Network Interface Card 3-10 4 Computer Interface General Information 4-2 Parallel Interface (EP C270N only 4-3 USB Interface 4-5 Serial Interface (EP C270N only 4-6 RS-232C Protocol (EP C270N only 4-7 RS-232C Cable Connection (EP C270N only 4-10 Glossary Index ADVANCED OPERATION GUIDE i
Operation Guide
Page 18
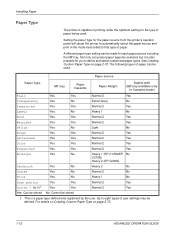
...Yes: Can be stored No: Cannot be defined. For details on Creating Custom Paper Type on page 2-70. Handling Paper Paper Type The printer is a paper type defined and registered by the user. See Creating Custom Paper Type on page 2-70. 1-12 ADVANCED OPERATION GUIDE A ...Vellum Yes No Light No Rough Yes Yes Normal 2 Yes Letterhead Yes Yes Normal 2 Yes Color Yes Yes Normal 2 Yes Prepunched Yes Yes Normal 2 Yes Envelope Yes No Heavy 1 (EP C170N/EP No C270N) Heavy 2 (EP C220N) Cardstock Yes No Heavy 2 No Coated Yes No Normal 2 No Thick Yes No Heavy...
...Yes: Can be stored No: Cannot be defined. For details on Creating Custom Paper Type on page 2-70. Handling Paper Paper Type The printer is a paper type defined and registered by the user. See Creating Custom Paper Type on page 2-70. 1-12 ADVANCED OPERATION GUIDE A ...Vellum Yes No Light No Rough Yes Yes Normal 2 Yes Letterhead Yes Yes Normal 2 Yes Color Yes Yes Normal 2 Yes Prepunched Yes Yes Normal 2 Yes Envelope Yes No Heavy 1 (EP C170N/EP No C270N) Heavy 2 (EP C220N) Cardstock Yes No Heavy 2 No Coated Yes No Normal 2 No Thick Yes No Heavy...
Operation Guide
Page 31
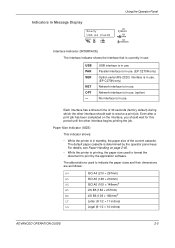
... begins printing the job. Parallel interface is in use. (EP C270N only) Option serial (RS-232C) interface is in use. (EP C270N only) Network interface is in use . Paper Size Indicator (SIZE) This indicator shows: • While the printer is determined by the application software. For details, see Paper... size used to print by the operator panel keys. Even after a print job has been completed on page 2-60. • While the printer is currently in use . The abbreviations used to format the document to indicate the paper sizes and their dimensions are as follows: A4 ISO ...
... begins printing the job. Parallel interface is in use. (EP C270N only) Option serial (RS-232C) interface is in use. (EP C270N only) Network interface is in use . Paper Size Indicator (SIZE) This indicator shows: • While the printer is determined by the application software. For details, see Paper... size used to print by the operator panel keys. Even after a print job has been completed on page 2-60. • While the printer is currently in use . The abbreviations used to format the document to indicate the paper sizes and their dimensions are as follows: A4 ISO ...
Operation Guide
Page 33
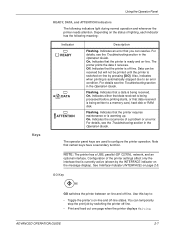
...line. • Print and feed out one page when the printer displays Waiting. Indicates that the printer is being received. On. For details, see the Troubleshooting section in the Operation Guide. NOTE: The printer has a USB, parallel (EP C270N), network, and an optional interface. See Interface Indicator ... only the interface that is being processed before printing starts, or that data received is being written to configure the printer operation. Keys Using the Operator Panel READY, DATA, and ATTENTION Indicators The following meaning: Indicator Description Flashing. Indicates...
...line. • Print and feed out one page when the printer displays Waiting. Indicates that the printer is being received. On. For details, see the Troubleshooting section in the Operation Guide. NOTE: The printer has a USB, parallel (EP C270N), network, and an optional interface. See Interface Indicator ... only the interface that is being processed before printing starts, or that data received is being written to configure the printer operation. Keys Using the Operator Panel READY, DATA, and ATTENTION Indicators The following meaning: Indicator Description Flashing. Indicates...
Operation Guide
Page 34
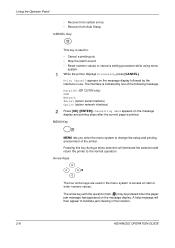
... job. • Stop the alarm sound. • Reset numeric values or cancel a setting procedure while using menu system. 1 While the printer displays Processing, press [CANCEL]. Using the Operator Panel • Recover from certain errors. • Recover from Auto Sleep. Pressing this key during...access an item or enter numeric values. A help message will terminate the selection and return the printer to change the setup and printing environment of the following message: Parallel (EP C270N only) USB Network Serial (option serial interface) Option (option network interface) 2 Press ...
... job. • Stop the alarm sound. • Reset numeric values or cancel a setting procedure while using menu system. 1 While the printer displays Processing, press [CANCEL]. Using the Operator Panel • Recover from certain errors. • Recover from Auto Sleep. Pressing this key during...access an item or enter numeric values. A help message will terminate the selection and return the printer to change the setup and printing environment of the following message: Parallel (EP C270N only) USB Network Serial (option serial interface) Option (option network interface) 2 Press ...
Operation Guide
Page 36
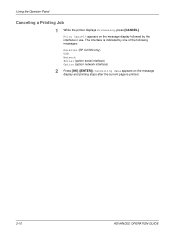
The interface is printed. 2-10 ADVANCED OPERATION GUIDE Cancelling data appears on the message display followed by one of the following messages: Parallel (EP C270N only) USB Network Serial (option serial interface) Option (option network interface) 2 Press [OK] ([ENTER]). Using the Operator Panel Canceling a Printing Job 1 While the printer displays Processing, press [CANCEL]. Print Cancel? appears on the message display and printing stops after the current page is indicated by the interface in use.
The interface is printed. 2-10 ADVANCED OPERATION GUIDE Cancelling data appears on the message display followed by one of the following messages: Parallel (EP C270N only) USB Network Serial (option serial interface) Option (option network interface) 2 Press [OK] ([ENTER]). Using the Operator Panel Canceling a Printing Job 1 While the printer displays Processing, press [CANCEL]. Print Cancel? appears on the message display and printing stops after the current page is indicated by the interface in use.
Operation Guide
Page 55
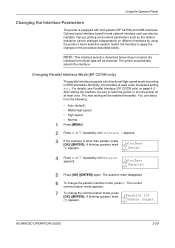
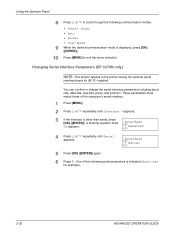
... appears. ? Interface ? Using the Operator Panel Changing the Interface Parameters The printer is used under the default setting Auto. The printer automatically selects the interface. Changing Parallel Interface Mode (EP C270N only) The parallel interface supports a bi-directional/high-speed mode according to...interface card can select from which data will be received. For details, see Parallel Interface (EP C270N only) on different interfaces by using the printer's menu selection system. The new setting will be enabled thereafter. Nibble (high) ADVANCED ...
... appears. ? Interface ? Using the Operator Panel Changing the Interface Parameters The printer is used under the default setting Auto. The printer automatically selects the interface. Changing Parallel Interface Mode (EP C270N only) The parallel interface supports a bi-directional/high-speed mode according to...interface card can select from which data will be received. For details, see Parallel Interface (EP C270N only) on different interfaces by using the printer's menu selection system. The new setting will be enabled thereafter. Nibble (high) ADVANCED ...
Operation Guide
Page 56
... Auto • Normal • High Speed 9 When the desired communication mode is displayed, press [OK] ([ENTER]). 10 Press [MENU] to the printer having the optional serial interface board kit (IB-11) installed. Interface ? One of the computer's serial interface. 1 Press [MENU]. 2 Press U or... V repeatedly until Serial appears. Interface ? Changing Serial Interface Parameters (EP C270N only) NOTE: This section applies to exit the menu selection. Using the Operator Panel 8 Press U or V to scroll through the following...
... Auto • Normal • High Speed 9 When the desired communication mode is displayed, press [OK] ([ENTER]). 10 Press [MENU] to the printer having the optional serial interface board kit (IB-11) installed. Interface ? One of the computer's serial interface. 1 Press [MENU]. 2 Press U or... V repeatedly until Serial appears. Interface ? Changing Serial Interface Parameters (EP C270N only) NOTE: This section applies to exit the menu selection. Using the Operator Panel 8 Press U or V to scroll through the following...
Operation Guide
Page 109
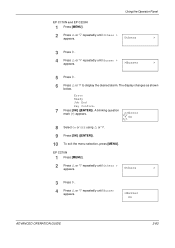
EP C270N 1 Press [MENU]. 2 Press U or V repeatedly until Buzzer appears. >Buzzer On ADVANCED OPERATION GUIDE 2-83 A blinking question mark (?) appears. >>Error ? Others > 3 Press Z. 4 Press U or V repeatedly ... U or V. 9 Press [OK] ([ENTER]). 10 To exit the menu selection, press [MENU]. Error Ready Job End Key Confirm. 7 Press [OK] ([ENTER]). Using the Operator Panel EP C170N and EP C220N 1 Press [MENU]. 2 Press U or V repeatedly until Buzzer > appears. >Buzzer > 5 Press Z. 6 Press U or V to display the desired alarm. The display changes as shown below...
EP C270N 1 Press [MENU]. 2 Press U or V repeatedly until Buzzer appears. >Buzzer On ADVANCED OPERATION GUIDE 2-83 A blinking question mark (?) appears. >>Error ? Others > 3 Press Z. 4 Press U or V repeatedly ... U or V. 9 Press [OK] ([ENTER]). 10 To exit the menu selection, press [MENU]. Error Ready Job End Key Confirm. 7 Press [OK] ([ENTER]). Using the Operator Panel EP C170N and EP C220N 1 Press [MENU]. 2 Press U or V repeatedly until Buzzer > appears. >Buzzer > 5 Press Z. 6 Press U or V to display the desired alarm. The display changes as shown below...
Operation Guide
Page 120
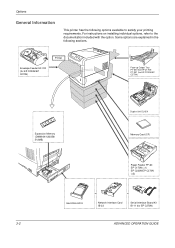
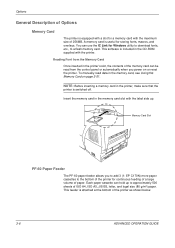
...Envelope Feeder EF-310 (for EP C220N/EP C270N) Printer Face-up Output Tray PT-300 (for EP C170N PT-301 (for EP C220N/EP C270N) Expansion Memory (DIMM 64/128/256/ 512MB) Duplex Unit DU-301 Memory Card (CF) Paper Feeder PF-60 EP C170N (×1) EP C220N/EP C270N (×3) Hard Disk ...HD-5 Network Interface Card IB-23 Serial Interface Board Kit IB-11 (for EP C270N) 3-2 ADVANCED OPERATION GUIDE Options General Information This printer has the following sections. For instructions on installing...
...Envelope Feeder EF-310 (for EP C220N/EP C270N) Printer Face-up Output Tray PT-300 (for EP C170N PT-301 (for EP C220N/EP C270N) Expansion Memory (DIMM 64/128/256/ 512MB) Duplex Unit DU-301 Memory Card (CF) Paper Feeder PF-60 EP C170N (×1) EP C220N/EP C270N (×3) Hard Disk ...HD-5 Network Interface Card IB-23 Serial Interface Board Kit IB-11 (for EP C270N) 3-2 ADVANCED OPERATION GUIDE Options General Information This printer has the following sections. For instructions on installing...
Operation Guide
Page 121
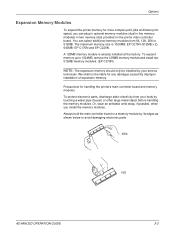
...hold the main controller board or a memory module by improper installation of expansion memory. A 128MB memory module is 1024MB: EP C270N (512MB x 2), 640MB: EP C170N and EP C220N. We shall not be installed by your body by touching a water pipe (faucet) or other large metal object before... handling the memory modules. Precautions for handling the printer's main controller board and memory modules To protect electronic parts, discharge ...
...hold the main controller board or a memory module by improper installation of expansion memory. A 128MB memory module is 1024MB: EP C270N (512MB x 2), 640MB: EP C170N and EP C220N. We shall not be installed by your body by touching a water pipe (faucet) or other large metal object before... handling the memory modules. Precautions for handling the printer's main controller board and memory modules To protect electronic parts, discharge ...
Operation Guide
Page 124
...in the CD-ROM supplied with a slot for storing fonts, macros, and overlays. Options General Description of Options Memory Card The printer is attached at the bottom of the printer as shown below. 3-6 ADVANCED OPERATION GUIDE Reading Font from the control panel or automatically when you to add... 3 (1: EP C170N) more paper cassettes to the bottom of the memory card can hold up . Insert the memory card in the printer's slot, the contents of the printer for Windows utility to download fonts, etc., to approximately 500 sheets...
...in the CD-ROM supplied with a slot for storing fonts, macros, and overlays. Options General Description of Options Memory Card The printer is attached at the bottom of the printer as shown below. 3-6 ADVANCED OPERATION GUIDE Reading Font from the control panel or automatically when you to add... 3 (1: EP C170N) more paper cassettes to the bottom of the memory card can hold up . Insert the memory card in the printer's slot, the contents of the printer for Windows utility to download fonts, etc., to approximately 500 sheets...
Operation Guide
Page 129
4 Computer Interface This chapter contains explanations on the following topics: • General Information 4-2 • Parallel Interface (EP C270N only 4-3 • USB Interface 4-5 • Serial Interface (EP C270N only 4-6 • RS-232C Protocol (EP C270N only 4-7 • RS-232C Cable Connection (EP C270N only 4-10 ADVANCED OPERATION GUIDE 4-1
4 Computer Interface This chapter contains explanations on the following topics: • General Information 4-2 • Parallel Interface (EP C270N only 4-3 • USB Interface 4-5 • Serial Interface (EP C270N only 4-6 • RS-232C Protocol (EP C270N only 4-7 • RS-232C Cable Connection (EP C270N only 4-10 ADVANCED OPERATION GUIDE 4-1

Operation Guide
Page 130
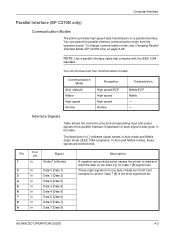
This chapter explains the following topics: • Parallel Interface (EP C270N only) • USB Interface • Serial Interface (EP C270N only) 4-2 ADVANCED OPERATION GUIDE Computer Interface General Information This chapter explains the signals used in the printer's parallel (EP C270N only), USB, and serial (option [EP C270N only]) interfaces. It also lists pin assignments, signal functions, timings, connector specifications, and voltage levels.
This chapter explains the following topics: • Parallel Interface (EP C270N only) • USB Interface • Serial Interface (EP C270N only) 4-2 ADVANCED OPERATION GUIDE Computer Interface General Information This chapter explains the signals used in the printer's parallel (EP C270N only), USB, and serial (option [EP C270N only]) interfaces. It also lists pin assignments, signal functions, timings, connector specifications, and voltage levels.
Operation Guide
Page 131
... 5 [Data 6] 8 In Data 6 [Data 7] 9 In Data 7 [Data 8] Description A negative-going-strobe pulse causes the printer to read and latch the data on the Data 0 [1] to printer. ADVANCED OPERATION GUIDE 4-3 Explanation of each signal is the most significant bit. Data 7 [8] is also given in Auto mode and... a parallel interface. These eight signals form one byte of the parallel interface. Computer Interface Parallel Interface (EP C270N only) Communication Modes The printer provides high-speed data transmission on page 2-29. You can choose from host computer to Data 7 [8]...
... 5 [Data 6] 8 In Data 6 [Data 7] 9 In Data 7 [Data 8] Description A negative-going-strobe pulse causes the printer to read and latch the data on the Data 0 [1] to printer. ADVANCED OPERATION GUIDE 4-3 Explanation of each signal is the most significant bit. Data 7 [8] is also given in Auto mode and... a parallel interface. These eight signals form one byte of the parallel interface. Computer Interface Parallel Interface (EP C270N only) Communication Modes The printer provides high-speed data transmission on page 2-29. You can choose from host computer to Data 7 [8]...
Operation Guide
Page 134
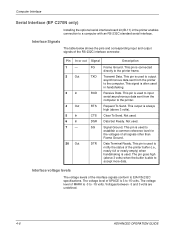
... of the interface signals conform to EIA RS-232C specifications. This pin is used to input serial asynchronous data sent from the printer to the printer. Request To Send. Data Set Ready. Signal Ground. Transmit Data. Receive Data. This output is always high (above 3 ...a computer with an RS-232C standard serial interface. Not used . The voltage level of all signals other than Frame Ground. Computer Interface Serial Interface (EP C270N only) Installing the optional serial interface board kit (IB-11) in handshaking. Pin In or out Signal Description 1- 2 Out 3 In 4 ...
... of the interface signals conform to EIA RS-232C specifications. This pin is used to input serial asynchronous data sent from the printer to the printer. Request To Send. Data Set Ready. Signal Ground. Transmit Data. Receive Data. This output is always high (above 3 ...a computer with an RS-232C standard serial interface. Not used . The voltage level of all signals other than Frame Ground. Computer Interface Serial Interface (EP C270N only) Installing the optional serial interface board kit (IB-11) in handshaking. Pin In or out Signal Description 1- 2 Out 3 In 4 ...

Operation Guide
Page 135
...factory setting is 8. Computer Interface RS-232C Protocol (EP C270N only) Parameters of the RS-232C Protocol A protocol is a set of rules followed by the following section outlines the parameters and their values you can be changed from the printer operator panel. To change the value for the ...serial interface parameters, see Changing Serial Interface Parameters (EP C270N only) on the operator panel: H1: Baud rate Parameter value 12 24 48...
...factory setting is 8. Computer Interface RS-232C Protocol (EP C270N only) Parameters of the RS-232C Protocol A protocol is a set of rules followed by the following section outlines the parameters and their values you can be changed from the printer operator panel. To change the value for the ...serial interface parameters, see Changing Serial Interface Parameters (EP C270N only) on the operator panel: H1: Baud rate Parameter value 12 24 48...
Operation Guide
Page 138
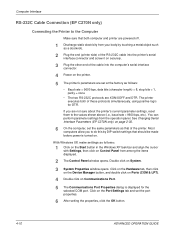
... displayed. 2 The Control Panel window opens. Computer Interface RS-232C Cable Connection (EP C270N only) Connecting the Printer to the Computer Make sure that of the printer. The printer executes both computer and printer are XON/XOFF and DTR. See Changing Serial Interface Parameters (EP C270N only) on page 2-30. 6 On the computer, set the same...
... displayed. 2 The Control Panel window opens. Computer Interface RS-232C Cable Connection (EP C270N only) Connecting the Printer to the Computer Make sure that of the printer. The printer executes both computer and printer are XON/XOFF and DTR. See Changing Serial Interface Parameters (EP C270N only) on page 2-30. 6 On the computer, set the same...
User Guide
Page 13
...undesired operation. Energy Saving Control Function This printer comes equipped with Canadian ICES-003. User's instruction that conforms to the applicable specifications. Kyocera Mita America Inc. Address: 225 Sand Road PO Box 40008 Fairfield, New Jersey 070040008, U.S.A. Disclaimer Kyocera Mita will not be liable to customers ... interference that may be caused directly or indirectly by equipment sold or furnished by the authorities concerned. Model name: Color Page Printer EP C170N/EP C220N/EP C270N Trade name: Kyocera Mita Responsible party: Kyocera Mita America, Inc.
...undesired operation. Energy Saving Control Function This printer comes equipped with Canadian ICES-003. User's instruction that conforms to the applicable specifications. Kyocera Mita America Inc. Address: 225 Sand Road PO Box 40008 Fairfield, New Jersey 070040008, U.S.A. Disclaimer Kyocera Mita will not be liable to customers ... interference that may be caused directly or indirectly by equipment sold or furnished by the authorities concerned. Model name: Color Page Printer EP C170N/EP C220N/EP C270N Trade name: Kyocera Mita Responsible party: Kyocera Mita America, Inc.
User Guide
Page 14
...Sleep Mode when approximately 5 minutes (EP C170N/EP C220N) or 15 minutes (EP C270N) have determined as a participating company in the International Energy Star Program that must pass before Sleep Mode is activated may be lengthened. Duplex Printing This printer includes duplex printing as a duplex ...of paper as a standard function. Your sales or service representative can provide information about recommended paper types. Recycled Paper This printer supports recycled paper which reduces the load on the environment. The amount of time of no activity with the standards laid...
...Sleep Mode when approximately 5 minutes (EP C170N/EP C220N) or 15 minutes (EP C270N) have determined as a participating company in the International Energy Star Program that must pass before Sleep Mode is activated may be lengthened. Duplex Printing This printer includes duplex printing as a duplex ...of paper as a standard function. Your sales or service representative can provide information about recommended paper types. Recycled Paper This printer supports recycled paper which reduces the load on the environment. The amount of time of no activity with the standards laid...
