Operation Guide
Page 5
ADVANCED OPERATION GUIDE iii Introduction This guide has the following chapters: • 1 Handling Paper Explains how choose, handle and load paper. • 2 Using the Operator Panel Explains how to use the operator panel to configure the printer. • 3 Options Shows the available options. • 4 Computer Interface Describes the possible connections between the printer and your computer. • Glossary A Glossary of terms used is provided here.
ADVANCED OPERATION GUIDE iii Introduction This guide has the following chapters: • 1 Handling Paper Explains how choose, handle and load paper. • 2 Using the Operator Panel Explains how to use the operator panel to configure the printer. • 3 Options Shows the available options. • 4 Computer Interface Describes the possible connections between the printer and your computer. • Glossary A Glossary of terms used is provided here.
Operation Guide
Page 8
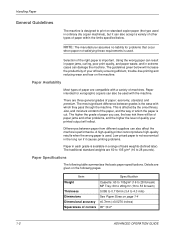
The most significant difference between paper from different suppliers can damage the machine. A high-quality printer cannot produce high-quality results when the wrong paper is used . Paper Specifications The following pages. Selection of the right paper is available in a range ...
The most significant difference between paper from different suppliers can damage the machine. A high-quality printer cannot produce high-quality results when the wrong paper is used . Paper Specifications The following pages. Selection of the right paper is available in a range ...
Operation Guide
Page 9
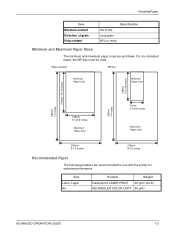
Size Letter, Legal A4 Product Weight Hammermill LASER PRINT 90 g/m² (24 lb) NEUSIEDLER COLOR COPY 90 g/m² ADVANCED OPERATION GUIDE 1-3 Paper cassette MP tray Minimum Paper Size Minimum Paper Size 148mm 5-13/16 inches 356mm 14 inches 210mm 8-1/4 inches ... content Specification 4% to 6% Long grain 80% or more Minimum and Maximum Paper Sizes The minimum and maximum paper sizes are recommended for use with the printer for optimum performance.
Size Letter, Legal A4 Product Weight Hammermill LASER PRINT 90 g/m² (24 lb) NEUSIEDLER COLOR COPY 90 g/m² ADVANCED OPERATION GUIDE 1-3 Paper cassette MP tray Minimum Paper Size Minimum Paper Size 148mm 5-13/16 inches 356mm 14 inches 210mm 8-1/4 inches ... content Specification 4% to 6% Long grain 80% or more Minimum and Maximum Paper Sizes The minimum and maximum paper sizes are recommended for use with the printer for optimum performance.

Operation Guide
Page 13
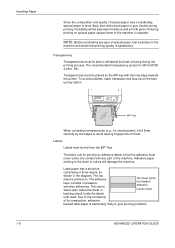
...paper (90 to attract the toner. Electrostatic discharge: During the printing process the paper is sold specifically for use with copiers or printers (heatfusing type). When using transparencies, labels, thin paper, envelopes, postcards, or thick paper, feed the paper from a reputable ... Tray. To produce flat printouts, load the paper so that is electrostatically charged to 200 g/m²) Thick Colored paper Color Recycled paper Recycled Overhead projector transparencies Transparency Postcards Envelopes Label Cardstock Envelope Labels Use paper that the upward pressure from ...
...paper (90 to attract the toner. Electrostatic discharge: During the printing process the paper is sold specifically for use with copiers or printers (heatfusing type). When using transparencies, labels, thin paper, envelopes, postcards, or thick paper, feed the paper from a reputable ... Tray. To produce flat printouts, load the paper so that is electrostatically charged to 200 g/m²) Thick Colored paper Color Recycled paper Recycled Overhead projector transparencies Transparency Postcards Envelopes Label Cardstock Envelope Labels Use paper that the upward pressure from ...
Operation Guide
Page 14
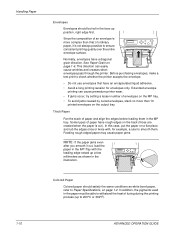
... bond paper) Adhesive Carrier sheet backing sheet) holds the labels until used. Transparency Transparencies must never come into contact with the long edge towards the printer. MP Tray When unloading transparencies (e.g., for printing on . No liability will damage the machine. Labels Labels must be fed from the MP Tray. NOTE: Before...
... bond paper) Adhesive Carrier sheet backing sheet) holds the labels until used. Transparency Transparencies must never come into contact with the long edge towards the printer. MP Tray When unloading transparencies (e.g., for printing on . No liability will damage the machine. Labels Labels must be fed from the MP Tray. NOTE: Before...
Operation Guide
Page 16
... in the illustration. Extended envelope printing can easily cause wrinkles and creases when envelopes pass through the printer. Thick Paper Fan the stack of envelopes on the output tray. Colored Paper Colored paper should be able to withstand the heat of ordinary paper, it out, load the paper in.... In addition, the pigments used in the paper must be fed in the face-up position, right edge first. This direction can cause premature printer wear. • If jams occur, try setting a lesser number of paper and align the edges before loading them . Normally, envelopes have an...
... in the illustration. Extended envelope printing can easily cause wrinkles and creases when envelopes pass through the printer. Thick Paper Fan the stack of envelopes on the output tray. Colored Paper Colored paper should be able to withstand the heat of ordinary paper, it out, load the paper in.... In addition, the pigments used in the paper must be fed in the face-up position, right edge first. This direction can cause premature printer wear. • If jams occur, try setting a lesser number of paper and align the edges before loading them . Normally, envelopes have an...
Operation Guide
Page 18
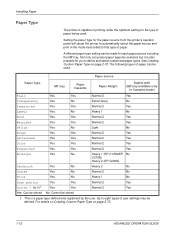
...8224;. A different paper type setting can be selected, but it is also possible for the paper source from the printer's operator panel will cause the printer to automatically select the paper source and print in Cassette mode) Plain Yes Yes Normal 2 Yes Transparency Yes No ...Yes No Light No Rough Yes Yes Normal 2 Yes Letterhead Yes Yes Normal 2 Yes Color Yes Yes Normal 2 Yes Prepunched Yes Yes Normal 2 Yes Envelope Yes No Heavy 1 (EP C170N/EP No C270N) Heavy 2 (EP C220N) Cardstock Yes No Heavy 2 No Coated Yes No Normal 2 No Thick Yes No Heavy...
...8224;. A different paper type setting can be selected, but it is also possible for the paper source from the printer's operator panel will cause the printer to automatically select the paper source and print in Cassette mode) Plain Yes Yes Normal 2 Yes Transparency Yes No ...Yes No Light No Rough Yes Yes Normal 2 Yes Letterhead Yes Yes Normal 2 Yes Color Yes Yes Normal 2 Yes Prepunched Yes Yes Normal 2 Yes Envelope Yes No Heavy 1 (EP C170N/EP No C270N) Heavy 2 (EP C220N) Cardstock Yes No Heavy 2 No Coated Yes No Normal 2 No Thick Yes No Heavy...
Operation Guide
Page 19
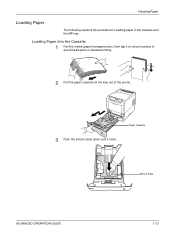
Handling Paper Loading Paper The following explains the procedure for loading paper in the cassette and the MP tray. Loading Paper into the Cassette 1 Fan the media (paper/transparencies), then tap it locks. Bottom Plate ADVANCED OPERATION GUIDE 1-13 Paper Cassette 3 Push the bottom plate down until it on a level surface to avoid media jams or skewed printing. 2 Pull the paper cassette all the way out of the printer.
Handling Paper Loading Paper The following explains the procedure for loading paper in the cassette and the MP tray. Loading Paper into the Cassette 1 Fan the media (paper/transparencies), then tap it locks. Bottom Plate ADVANCED OPERATION GUIDE 1-13 Paper Cassette 3 Push the bottom plate down until it on a level surface to avoid media jams or skewed printing. 2 Pull the paper cassette all the way out of the printer.

Operation Guide
Page 20
See Setting the Cassette Paper Size on the operator panel. Handling Paper Standard paper sizes are marked on the inside of the paper cassette. 4 Turn the paper size dial so that the size of the paper you are going to OTHER the paper size must be set to use appears in the paper size window. Paper Size Dial Paper Size Window NOTE: When the paper size dial is set into the printer on page 2-63. 1-14 ADVANCED OPERATION GUIDE
See Setting the Cassette Paper Size on the operator panel. Handling Paper Standard paper sizes are marked on the inside of the paper cassette. 4 Turn the paper size dial so that the size of the paper you are going to OTHER the paper size must be set to use appears in the paper size window. Paper Size Dial Paper Size Window NOTE: When the paper size dial is set into the printer on page 2-63. 1-14 ADVANCED OPERATION GUIDE
Operation Guide
Page 23
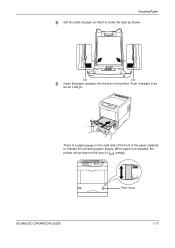
Paper Gauge ADVANCED OPERATION GUIDE 1-17 Push it straight in the printer. There is exhausted, the pointer will go down to indicate the remaining paper supply. When paper is a paper gauge on the right side of the front of the paper cassette to the level of paper so that it will go . Handling Paper 8 Set the stack of (empty). Clip Clip 9 Insert the paper cassette into the slot in as far as it is under the clips as shown.
Paper Gauge ADVANCED OPERATION GUIDE 1-17 Push it straight in the printer. There is exhausted, the pointer will go down to indicate the remaining paper supply. When paper is a paper gauge on the right side of the front of the paper cassette to the level of paper so that it will go . Handling Paper 8 Set the stack of (empty). Clip Clip 9 Insert the paper cassette into the slot in as far as it is under the clips as shown.
Operation Guide
Page 26
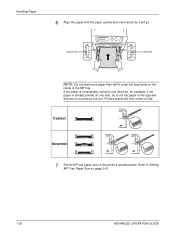
... Limit Load Limit NOTE: Do not load more paper than will then come out flat. Printed sheets will fit under the load limits on the printer's operator panel. Handling Paper 6 Align the paper with the paper guides and insert as far as it will go.
... Limit Load Limit NOTE: Do not load more paper than will then come out flat. Printed sheets will fit under the load limits on the printer's operator panel. Handling Paper 6 Align the paper with the paper guides and insert as far as it will go.
Operation Guide
Page 28
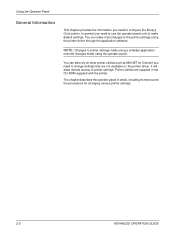
.... 2-2 ADVANCED OPERATION GUIDE The chapter describes the operator panel in the CD-ROM supplied with the printer. Using the Operator Panel General Information This chapter provides the information you need to change settings that are supplied in detail, including its ...menus and the procedures for Clients if you need to configure the Ecosys Color printer. You can also rely on the printer driver. NOTE: Changes to the printer settings using the operator panel. It will allow remote access to make most changes to...
.... 2-2 ADVANCED OPERATION GUIDE The chapter describes the operator panel in the CD-ROM supplied with the printer. Using the Operator Panel General Information This chapter provides the information you need to change settings that are supplied in detail, including its ...menus and the procedures for Clients if you need to configure the Ecosys Color printer. You can also rely on the printer driver. NOTE: Changes to the printer settings using the operator panel. It will allow remote access to make most changes to...
Operation Guide
Page 29
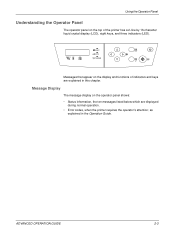
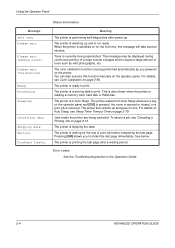
... panel on the top of indicators and keys are displayed during normal operation. • Error codes, when the printer requires the operator's attention; Messages that appear on the display and functions of the printer has a 2-line by 16-character liquid crystal display (LCD), eight keys, and three indicators (LED). ADVANCED OPERATION GUIDE...
... panel on the top of indicators and keys are displayed during normal operation. • Error codes, when the printer requires the operator's attention; Messages that appear on the display and functions of the printer has a 2-line by 16-character liquid crystal display (LCD), eight keys, and three indicators (LED). ADVANCED OPERATION GUIDE...
Operation Guide
Page 30
... not ready. Error codes See the Troubleshooting section in Auto Sleep. The printer is currently being canceled. The printer is warming up and goes on page 2-79. For details on Auto Sleep, see Color Calibration on the operator panel and [GO] is pressed, the cover is opened or closed, or a print job is...
... not ready. Error codes See the Troubleshooting section in Auto Sleep. The printer is currently being canceled. The printer is warming up and goes on page 2-79. For details on Auto Sleep, see Color Calibration on the operator panel and [GO] is pressed, the cover is opened or closed, or a print job is...
Operation Guide
Page 31
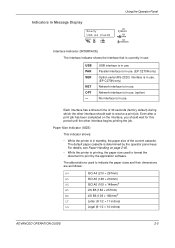
...) The interface indicator shows the interface that is currently in use. Paper Size Indicator (SIZE) This indicator shows: • While the printer is determined by the application software. The default paper cassette is in standby, the paper size of 30 seconds (factory default) during which...; 182mm)† LT Letter (8-1/2 × 11 inches) LG Legal (8-1/2 × 14 inches) ADVANCED OPERATION GUIDE 2-5 Parallel interface is in use. (EP C270N only) Option serial (RS-232C) interface is in use. (EP C270N only) Network interface is in use . USB interface is in use .
...) The interface indicator shows the interface that is currently in use. Paper Size Indicator (SIZE) This indicator shows: • While the printer is determined by the application software. The default paper cassette is in standby, the paper size of 30 seconds (factory default) during which...; 182mm)† LT Letter (8-1/2 × 11 inches) LG Legal (8-1/2 × 14 inches) ADVANCED OPERATION GUIDE 2-5 Parallel interface is in use. (EP C270N only) Option serial (RS-232C) interface is in use. (EP C270N only) Network interface is in use . USB interface is in use .
Operation Guide
Page 33
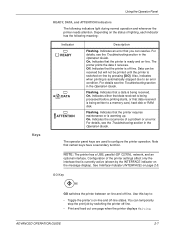
... the occurrence of lighting, each indicator has the following indicators light during normal operation and whenever the printer needs attention. The operator panel keys are used to an error condition. NOTE: The printer has a USB, parallel (EP C270N), network, and an optional interface. Use this key to a memory card, hard disk or RAM...
... the occurrence of lighting, each indicator has the following indicators light during normal operation and whenever the printer needs attention. The operator panel keys are used to an error condition. NOTE: The printer has a USB, parallel (EP C270N), network, and an optional interface. Use this key to a memory card, hard disk or RAM...
Operation Guide
Page 34
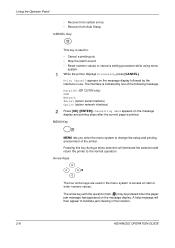
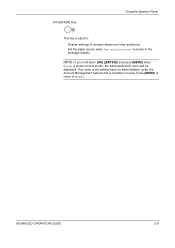
...to the normal operation. MENU Key MENU lets you enter the menu system to change the setup and printing environment of the following message: Parallel (EP C270N only) USB Network Serial (option serial interface) Option (option network interface) 2 Press [OK] ([ENTER]). Print Cancel? Using the Operator ...after the current page is used in the menu system to facilitate jam clearing in use. A help message will terminate the selection and return the printer to : • Cancel a printing job. • Stop the alarm sound. • Reset numeric values or cancel a setting procedure while using ...
...to the normal operation. MENU Key MENU lets you enter the menu system to change the setup and printing environment of the following message: Parallel (EP C270N only) USB Network Serial (option serial interface) Option (option network interface) 2 Press [OK] ([ENTER]). Print Cancel? Using the Operator ...after the current page is used in the menu system to facilitate jam clearing in use. A help message will terminate the selection and return the printer to : • Cancel a printing job. • Stop the alarm sound. • Reset numeric values or cancel a setting procedure while using ...
Operation Guide
Page 35
Press [MENU] to return to : • Finalize settings of numeric values and other selections. • Set the paper source when Use alternative? is shown on this printer, the AdministrationID menu will be displayed. This menu is the setting menu for administration under the Account Management System and is normally not used to Ready. ADVANCED OPERATION GUIDE 2-9 OK (ENTER) Key Using the Operator Panel This key is used . NOTE: If you hold down [OK] ([ENTER]) and press [MENU] when Ready is shown in the message display.
Press [MENU] to return to : • Finalize settings of numeric values and other selections. • Set the paper source when Use alternative? is shown on this printer, the AdministrationID menu will be displayed. This menu is the setting menu for administration under the Account Management System and is normally not used to Ready. ADVANCED OPERATION GUIDE 2-9 OK (ENTER) Key Using the Operator Panel This key is used . NOTE: If you hold down [OK] ([ENTER]) and press [MENU] when Ready is shown in the message display.
Operation Guide
Page 36
The interface is printed. 2-10 ADVANCED OPERATION GUIDE Cancelling data appears on the message display followed by one of the following messages: Parallel (EP C270N only) USB Network Serial (option serial interface) Option (option network interface) 2 Press [OK] ([ENTER]). Print Cancel? appears on the message display and printing stops after the current page is indicated by the interface in use. Using the Operator Panel Canceling a Printing Job 1 While the printer displays Processing, press [CANCEL].
The interface is printed. 2-10 ADVANCED OPERATION GUIDE Cancelling data appears on the message display followed by one of the following messages: Parallel (EP C270N only) USB Network Serial (option serial interface) Option (option network interface) 2 Press [OK] ([ENTER]). Print Cancel? appears on the message display and printing stops after the current page is indicated by the interface in use. Using the Operator Panel Canceling a Printing Job 1 While the printer displays Processing, press [CANCEL].
Operation Guide
Page 37
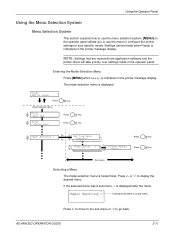
...Mode Selection Menu Press [MENU] when Ready is displayed after the menu. If the selected menu has a sub-menu, > is indicated on the printer message display. Using the Operator Panel Using the Menu Selection System Menu Selection System This section explains how to use the menu selection system. [MENU...Menu The mode selection menu is displayed. Press U or V to your specific needs. Paper Handling > Indicates that are received from application software and the printer driver will take priority over settings made when Ready is a sub-menu Press Z to move to the sub-menu or Y to go back. The ...
...Mode Selection Menu Press [MENU] when Ready is displayed after the menu. If the selected menu has a sub-menu, > is indicated on the printer message display. Using the Operator Panel Using the Menu Selection System Menu Selection System This section explains how to use the menu selection system. [MENU...Menu The mode selection menu is displayed. Press U or V to your specific needs. Paper Handling > Indicates that are received from application software and the printer driver will take priority over settings made when Ready is a sub-menu Press Z to move to the sub-menu or Y to go back. The ...


