
User Manual
Page 3
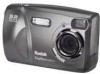
Camera Front 1 2 Product Overview 4 56 3 7a 7b ON OFF 1 Shutter button 2 Flash unit 3 On / Off switch 4 Self Timer light Camera Bottom 1 5 Viewfinder lens 6 Lens 7a USB connector 7b DC in connector 2 1 Camera Dock connector (door shown closed) 3 2 Tripod mount socket 3 Battery door i
Camera Front 1 2 Product Overview 4 56 3 7a 7b ON OFF 1 Shutter button 2 Flash unit 3 On / Off switch 4 Self Timer light Camera Bottom 1 5 Viewfinder lens 6 Lens 7a USB connector 7b DC in connector 2 1 Camera Dock connector (door shown closed) 3 2 Tripod mount socket 3 Battery door i
User Manual
Page 7
...the Print Quantity Default 42 Turning Off Quickview 43 Turning On Liveview 43 Setting Video Out 44 Formatting Memory or MMC/SD Card 45 Viewing Camera Information 46 6 Installing the Software 47 System Requirements 47 Install the Software 49 7 Connecting to the Computer 51 Important-Before You Connect 51...52 Printing Pictures from Your Computer 52 Printing from an SD/MMC Card 52 Print With or Without a Computer 52 8 Using the Optional Camera Dock II 53 Camera Dock Package Contents 53 Installing the Camera Insert 54 Connecting the Camera Dock 55 Installing the Battery Pack in the...
...the Print Quantity Default 42 Turning Off Quickview 43 Turning On Liveview 43 Setting Video Out 44 Formatting Memory or MMC/SD Card 45 Viewing Camera Information 46 6 Installing the Software 47 System Requirements 47 Install the Software 49 7 Connecting to the Computer 51 Important-Before You Connect 51...52 Printing Pictures from Your Computer 52 Printing from an SD/MMC Card 52 Print With or Without a Computer 52 8 Using the Optional Camera Dock II 53 Camera Dock Package Contents 53 Installing the Camera Insert 54 Connecting the Camera Dock 55 Installing the Battery Pack in the...
User Manual
Page 8
... Caution When Using a Tripod 59 Earlier Camera Dock Model 60 9 Troubleshooting 61 Troubleshooting-Camera 61 Troubleshooting-Camera Dock II 74 10 Getting Help 77 Helpful Web Links 77 Help in this User Guide 78 Software Help 78 Telephone Customer Support 78 11 Appendix 81 Camera Specifications 81 Original Factory Settings-Camera 83 Upgrading Your Software and Firmware...
... Caution When Using a Tripod 59 Earlier Camera Dock Model 60 9 Troubleshooting 61 Troubleshooting-Camera 61 Troubleshooting-Camera Dock II 74 10 Getting Help 77 Helpful Web Links 77 Help in this User Guide 78 Software Help 78 Telephone Customer Support 78 11 Appendix 81 Camera Specifications 81 Original Factory Settings-Camera 83 Upgrading Your Software and Firmware...
User Manual
Page 10
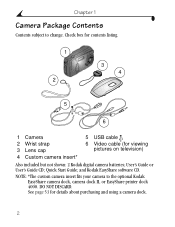
... Contents Contents subject to the optional Kodak EasyShare camera dock, camera dock II, or EasyShare printer dock 4000. and Kodak EasyShare software CD. See page 53 for viewing pictures on television) Also included but not shown: 2 Kodak digital camera batteries; User's Guide or User's Guide CD; Check box for contents listing. 1 2 3 4 5 6 1 Camera 2 Wrist strap 3 Lens cap 4 Custom camera insert* 5 USB cable 6 Video cable (for details...
... Contents Contents subject to the optional Kodak EasyShare camera dock, camera dock II, or EasyShare printer dock 4000. and Kodak EasyShare software CD. See page 53 for viewing pictures on television) Also included but not shown: 2 Kodak digital camera batteries; User's Guide or User's Guide CD; Check box for contents listing. 1 2 3 4 5 6 1 Camera 2 Wrist strap 3 Lens cap 4 Custom camera insert* 5 USB cable 6 Video cable (for details...
User Manual
Page 12
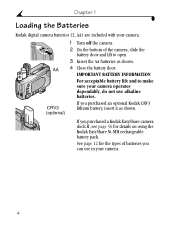
... purchased an optional Kodak CRV3 lithium battery, insert it as shown. 4 Close the battery door. If you purchased a Kodak EasyShare camera dock II, see page 56 for the types of the camera, slide the battery door and lift to make sure your camera operates dependably, do not use in your camera. Chapter 1 Loading the Batteries Kodak digital camera batteries (2, AA) are...
... purchased an optional Kodak CRV3 lithium battery, insert it as shown. 4 Close the battery door. If you purchased a Kodak EasyShare camera dock II, see page 56 for the types of the camera, slide the battery door and lift to make sure your camera operates dependably, do not use in your camera. Chapter 1 Loading the Batteries Kodak digital camera batteries (2, AA) are...
User Manual
Page 20
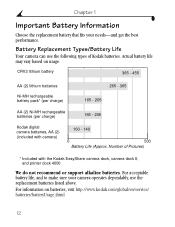
... (2) lithium batteries Ni-MH rechargeable battery pack* (per charge) 265 - 365 165 - 205 AA (2) Ni-MH rechargeable batteries (per charge) 165 - 205 Kodak digital camera batteries, AA (2) (included with the Kodak EasyShare camera dock, camera dock II, and printer dock 4000 We do not recommend or support alkaline batteries. Actual battery life may vary based on batteries, visit http://www...
... (2) lithium batteries Ni-MH rechargeable battery pack* (per charge) 265 - 365 165 - 205 AA (2) Ni-MH rechargeable batteries (per charge) 165 - 205 Kodak digital camera batteries, AA (2) (included with the Kodak EasyShare camera dock, camera dock II, and printer dock 4000 We do not recommend or support alkaline batteries. Actual battery life may vary based on batteries, visit http://www...
User Manual
Page 21
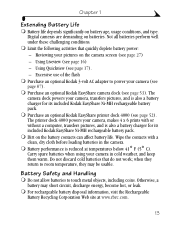
.... Using Liveview (see page 53). Purchase an optional Kodak EasyShare camera dock (see page 16) - Battery Safety and Handling ! Using Quickview (see page 52). Purchase an optional Kodak EasyShare printer dock 4000 (see page 17). - Battery performance is reduced at www.rbrc.com. 13 Excessive use of the flash ! Digital cameras are demanding on battery age, usage conditions, and...
.... Using Liveview (see page 53). Purchase an optional Kodak EasyShare camera dock (see page 16) - Battery Safety and Handling ! Using Quickview (see page 52). Purchase an optional Kodak EasyShare printer dock 4000 (see page 17). - Battery performance is reduced at www.rbrc.com. 13 Excessive use of the flash ! Digital cameras are demanding on battery age, usage conditions, and...

User Manual
Page 57
... d:\setup.exe (if d is the drive letter that contains the CD). CAUTION: Do not install the Kodak EasyShare software with the camera or camera dock connected to load incorrectly. On Mac OS 8.6 and 9.x-on the Kodak EasyShare software CD, see the Kodak EasyShare software Help. It may cause the software to the computer. Chapter 6 Install the Software For information...
... d:\setup.exe (if d is the drive letter that contains the CD). CAUTION: Do not install the Kodak EasyShare software with the camera or camera dock connected to load incorrectly. On Mac OS 8.6 and 9.x-on the Kodak EasyShare software CD, see the Kodak EasyShare software Help. It may cause the software to the computer. Chapter 6 Install the Software For information...
User Manual
Page 59
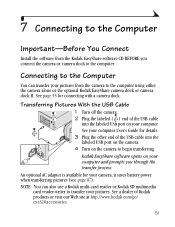
... BEFORE you through the transfer process. An optional AC adapter is available for connecting with a camera dock. Connecting to the Computer You can also use a Kodak multi-card reader or Kodak SD multimedia card reader-writer to the computer using either the camera alone or the optional Kodak EasyShare camera dock or camera dock II. See page 55 for your computer.
... BEFORE you through the transfer process. An optional AC adapter is available for connecting with a camera dock. Connecting to the Computer You can also use a Kodak multi-card reader or Kodak SD multimedia card reader-writer to the computer using either the camera alone or the optional Kodak EasyShare camera dock or camera dock II. See page 55 for your computer.

User Manual
Page 60
... details on transferring pictures, see the Kodak EasyShare software Help. Print With or Without a Computer Dock your computer and ordering prints online, see the Quick Start Guide or the Kodak EasyShare software Help. Purchase this and other accessories at a Kodak picture maker kiosk with an SD/MMC... when you insert your printer user guide for the availability to the Kodak EasyShare printer dock 4000 and print directly-without using a computer. See your card into a printer with a built-in SD/ MMC slot. Printing from your camera to print professionally from SD/MMC cards. !
... details on transferring pictures, see the Kodak EasyShare software Help. Print With or Without a Computer Dock your computer and ordering prints online, see the Quick Start Guide or the Kodak EasyShare software Help. Purchase this and other accessories at a Kodak picture maker kiosk with an SD/MMC... when you insert your printer user guide for the availability to the Kodak EasyShare printer dock 4000 and print directly-without using a computer. See your card into a printer with a built-in SD/ MMC slot. Printing from your camera to print professionally from SD/MMC cards. !

User Manual
Page 61
... Start Guide (not shown) Purchase an optional Kodak EasyShare camera dock II at a dealer of Kodak products or visit our Web site at http://www.kodak.com/go/ cx4310accessories. The camera dock is NOT compatible. 53 CAUTION: Do not use the digital camera 3-volt AC adapter with a Kodak EasyShare camera dock; 8 Using the Optional Camera Dock II The Kodak EasyShare camera dock II (camera dock) makes it is also a rapid battery charger...
... Start Guide (not shown) Purchase an optional Kodak EasyShare camera dock II at a dealer of Kodak products or visit our Web site at http://www.kodak.com/go/ cx4310accessories. The camera dock is NOT compatible. 53 CAUTION: Do not use the digital camera 3-volt AC adapter with a Kodak EasyShare camera dock; 8 Using the Optional Camera Dock II The Kodak EasyShare camera dock II (camera dock) makes it is also a rapid battery charger...
User Manual
Page 62
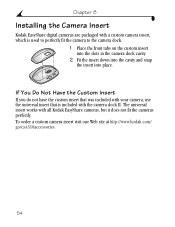
... perfectly fit the camera to the camera dock. 1 Place the front tabs on the custom insert into the slots in the camera dock cavity. 2 Fit the insert down into the cavity and snap the insert into place. Chapter 8 Installing the Camera Insert Kodak EasyShare digital cameras are packaged with the camera dock II. The universal insert works with all Kodak EasyShare cameras, but it does...
... perfectly fit the camera to the camera dock. 1 Place the front tabs on the custom insert into the slots in the camera dock cavity. 2 Fit the insert down into the cavity and snap the insert into place. Chapter 8 Installing the Camera Insert Kodak EasyShare digital cameras are packaged with the camera dock II. The universal insert works with all Kodak EasyShare cameras, but it does...

User Manual
Page 63
.... Your AC adapter may be different from DC IN 3V the one pictured or may cause damage to your camera, camera dock, or computer. 55 Chapter 8 Connecting the Camera Dock After the Kodak EasyShare software is NOT in the camera dock when you are connecting to power and the computer. 1 Plug the labeled ( ) end of the USB cable 1 into...
.... Your AC adapter may be different from DC IN 3V the one pictured or may cause damage to your camera, camera dock, or computer. 55 Chapter 8 Connecting the Camera Dock After the Kodak EasyShare software is NOT in the camera dock when you are connecting to power and the computer. 1 Plug the labeled ( ) end of the USB cable 1 into...

User Manual
Page 65
... The Power/Transfer light glows green when the camera is now powered by the camera dock instead of the camera batteries. NOTE: If the Kodak EasyShare Ni-MH rechargeable battery pack is in the camera dock. 1 Turn off the camera. 2 On the camera bottom, slide the connector cover open. Chapter 8 Docking the Camera When you are ready to transfer your pictures from...
... The Power/Transfer light glows green when the camera is now powered by the camera dock instead of the camera batteries. NOTE: If the Kodak EasyShare Ni-MH rechargeable battery pack is in the camera dock. 1 Turn off the camera. 2 On the camera bottom, slide the connector cover open. Chapter 8 Docking the Camera When you are ready to transfer your pictures from...

User Manual
Page 66
... If the camera is fully charged, leave the camera in the camera dock with the power on, charging resumes when the camera enters Auto Power-off the camera. 2 Make sure the battery pack is installed in the camera (see page 56). 3 Place the camera in the camera dock (see page 87). NOTE: The camera dock only charges the provided Kodak EasyShare Ni-MH rechargeable...
... If the camera is fully charged, leave the camera in the camera dock with the power on, charging resumes when the camera enters Auto Power-off the camera. 2 Make sure the battery pack is installed in the camera (see page 56). 3 Place the camera in the camera dock (see page 87). NOTE: The camera dock only charges the provided Kodak EasyShare Ni-MH rechargeable...
User Manual
Page 67
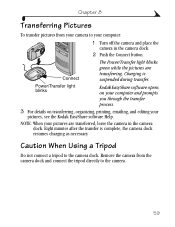
...tripod to the camera dock. Remove the camera from your camera to your computer: 1 Turn off the camera and place the camera in the camera dock. Chapter 8 Transferring Pictures To transfer pictures from the camera dock and connect the tripod directly to the camera. 59 Kodak EasyShare software opens ...printing, emailing, and editing your pictures are transferring. NOTE: When your pictures, see the Kodak EasyShare software Help. Charging is complete, the camera dock resumes charging as necessary. Eight minutes after the transfer is suspended during transfer. Connect Power/...
...tripod to the camera dock. Remove the camera from your camera to your computer: 1 Turn off the camera and place the camera in the camera dock. Chapter 8 Transferring Pictures To transfer pictures from the camera dock and connect the tripod directly to the camera. 59 Kodak EasyShare software opens ...printing, emailing, and editing your pictures are transferring. NOTE: When your pictures, see the Kodak EasyShare software Help. Charging is complete, the camera dock resumes charging as necessary. Eight minutes after the transfer is suspended during transfer. Connect Power/...
User Manual
Page 68
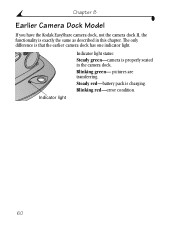
Blinking green- The only difference is charging. Steady red-battery pack is that the earlier camera dock has one indicator light. Chapter 8 Earlier Camera Dock Model If you have the Kodak EasyShare camera dock, not the camera dock II, the functionality is exactly the same as described in the camera dock. pictures are transferring. Indicator light Indicator light status: Steady green-camera is properly seated in this chapter. Blinking red-error condition. 60
Blinking green- The only difference is charging. Steady red-battery pack is that the earlier camera dock has one indicator light. Chapter 8 Earlier Camera Dock Model If you have the Kodak EasyShare camera dock, not the camera dock II, the functionality is exactly the same as described in the camera dock. pictures are transferring. Indicator light Indicator light status: Steady green-camera is properly seated in this chapter. Blinking red-error condition. 60

User Manual
Page 69
... For updates to room operating range. temperature. Additional technical information is not charged. Camera does not turn on (page 5). Replace or recharge the batteries (page 4, page 58). Battery is available in the ReadMe file located on in the On position. batteries (page 4). 9 Troubleshooting This chapter contains help for your Kodak EasyShare CX4310 digital camera or camera dock II.
... For updates to room operating range. temperature. Additional technical information is not charged. Camera does not turn on (page 5). Replace or recharge the batteries (page 4, page 58). Battery is available in the ReadMe file located on in the On position. batteries (page 4). 9 Troubleshooting This chapter contains help for your Kodak EasyShare CX4310 digital camera or camera dock II.

User Manual
Page 75
... Hardware Wizard cannot locate drivers. ! Re-install Kodak EasyShare software (page 49). ! computer. See the Kodak Web site devoted to correctly installed on computer. Install Kodak EasyShare software (page 49). Cannot transfer Software is not installed ! camera dock, from computer. Disconnect USB cable, or pictures to on camera dock, from computer. Chapter 9 Camera Communications Problem Cause Solution Cannot transfer Software...
... Hardware Wizard cannot locate drivers. ! Re-install Kodak EasyShare software (page 49). ! computer. See the Kodak Web site devoted to correctly installed on computer. Install Kodak EasyShare software (page 49). Cannot transfer Software is not installed ! camera dock, from computer. Disconnect USB cable, or pictures to on camera dock, from computer. Chapter 9 Camera Communications Problem Cause Solution Cannot transfer Software...

User Manual
Page 82
... or USB Check the connections (page 55). Connect button Press the Connect button. was Replace the camera on your computer. installed. cable is not Install the software (page 49). Chapter 9 Troubleshooting-Camera Dock II Camera Dock II Problems Camera Dock Problem Pictures are too Close all software applications many applications and try again. running on the removed...
... or USB Check the connections (page 55). Connect button Press the Connect button. was Replace the camera on your computer. installed. cable is not Install the software (page 49). Chapter 9 Troubleshooting-Camera Dock II Camera Dock II Problems Camera Dock Problem Pictures are too Close all software applications many applications and try again. running on the removed...


