
User Manual
Page 5
... and Off 5 Using the 4-Way Arrow/Zoom/OK Button 5 Selecting a Language 6 Setting the Clock 7 Checking Camera Status 8 Inserting an SD/MMC Card 9 Choosing Internal Memory or SD/MMC Card 10 Camera Modes 11 Important Battery Information 12 2 Taking Pictures-Capture Mode 15 Take a Picture Anytime 15 Taking a Picture 15 Liveview-Using the LCD to Frame...
... and Off 5 Using the 4-Way Arrow/Zoom/OK Button 5 Selecting a Language 6 Setting the Clock 7 Checking Camera Status 8 Inserting an SD/MMC Card 9 Choosing Internal Memory or SD/MMC Card 10 Camera Modes 11 Important Battery Information 12 2 Taking Pictures-Capture Mode 15 Take a Picture Anytime 15 Taking a Picture 15 Liveview-Using the LCD to Frame...
User Manual
Page 7
...Menu 42 Changing the Print Quantity Default 42 Turning Off Quickview 43 Turning On Liveview 43 Setting Video Out 44 Formatting Memory or MMC/SD Card 45 Viewing Camera Information 46 6 Installing the Software 47 System Requirements 47 Install the Software 49 7 Connecting to the Computer 51 ... Computer 52 Printing Pictures from Your Computer 52 Printing from an SD/MMC Card 52 Print With or Without a Computer 52 8 Using the Optional Camera Dock II 53 Camera Dock Package Contents 53 Installing the Camera Insert 54 Connecting the Camera Dock 55 Installing the Battery Pack in the...
...Menu 42 Changing the Print Quantity Default 42 Turning Off Quickview 43 Turning On Liveview 43 Setting Video Out 44 Formatting Memory or MMC/SD Card 45 Viewing Camera Information 46 6 Installing the Software 47 System Requirements 47 Install the Software 49 7 Connecting to the Computer 51 ... Computer 52 Printing Pictures from Your Computer 52 Printing from an SD/MMC Card 52 Print With or Without a Computer 52 8 Using the Optional Camera Dock II 53 Camera Dock Package Contents 53 Installing the Camera Insert 54 Connecting the Camera Dock 55 Installing the Battery Pack in the...
User Manual
Page 18
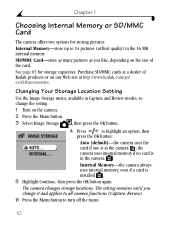
Internal Memory-the camera always uses internal memory, even if a card is in the camera ; the camera uses internal memory if no card is installed . 5 Highlight Continue, then press the OK button again. The camera changes storage locations. The setting remains until you like, depending on the size of Kodak products or on the camera. 2 Press the Menu button. 3 Select Image Storage...
Internal Memory-the camera always uses internal memory, even if a card is in the camera ; the camera uses internal memory if no card is installed . 5 Highlight Continue, then press the OK button again. The camera changes storage locations. The setting remains until you like, depending on the size of Kodak products or on the camera. 2 Press the Menu button. 3 Select Image Storage...

User Manual
Page 35
... Reviewing pictures on a card. The Review icon appears at the bottom of copies number Review Mode indicator Low battery Exhausted battery (blinking) 27 An optional AC adapter is displayed. The icons displayed with the pictures that are stored in internal memory or on the LCD quickly... reviewed is available (see page 87). To Enter Review Mode Review button 1 Press the Review button. Picture Information Icons 2 072 Internal memory Memory Card Email Favorite Print tag, # Protected Picture Picture Location of the LCD. 2 Press the Review button again to exit Review and return to...
... Reviewing pictures on a card. The Review icon appears at the bottom of copies number Review Mode indicator Low battery Exhausted battery (blinking) 27 An optional AC adapter is displayed. The icons displayed with the pictures that are stored in internal memory or on the LCD quickly... reviewed is available (see page 87). To Enter Review Mode Review button 1 Press the Review button. Picture Information Icons 2 072 Internal memory Memory Card Email Favorite Print tag, # Protected Picture Picture Location of the LCD. 2 Press the Review button again to exit Review and return to...

User Manual
Page 36
Review Menus Magnify (page 30) Copy (page 34) Protect (page 31) Multi-up (page 29) Image Storage (page 10) Picture Information (page 35) Slide Show (page 31) Setup (page 41) 28 Chapter 3 To Access the Review Menus Use the Review menus to work with the pictures that are stored in internal memory or on a card. 1 Press the Review button. 2 Press the Menu button. 3 Press the Menu button to turn off the menus.
Review Menus Magnify (page 30) Copy (page 34) Protect (page 31) Multi-up (page 29) Image Storage (page 10) Picture Information (page 35) Slide Show (page 31) Setup (page 41) 28 Chapter 3 To Access the Review Menus Use the Review menus to work with the pictures that are stored in internal memory or on a card. 1 Press the Review button. 2 Press the Menu button. 3 Press the Menu button to turn off the menus.

User Manual
Page 42
..., and Favorite tags are copied, delete them (see page 30). The camera's picture storage location is inserted in the camera. ! NOTE: Pictures are not copied. ALL-copies all pictures from internal memory to a card. A progress bar monitors the copy process. Chapter 3 Copying Pictures You ...can copy pictures from a card to internal memory, or from your selected storage location to ...
..., and Favorite tags are copied, delete them (see page 30). The camera's picture storage location is inserted in the camera. ! NOTE: Pictures are not copied. ALL-copies all pictures from internal memory to a card. A progress bar monitors the copy process. Chapter 3 Copying Pictures You ...can copy pictures from a card to internal memory, or from your selected storage location to ...

User Manual
Page 43
Chapter 3 Viewing Picture Information 1 Press the Review button, then press the Menu button. 2 Highlight the Picture Info menu , then press the OK button. The information about the displayed picture is view-only and includes: file name, location of the file if stored on a card (there are no directories in internal memory), date and time the picture was taken, and the quality setting. 3 Press to display the previous/next picture, with that picture's information. 4 To exit Picture Info, press the OK button. 35
Chapter 3 Viewing Picture Information 1 Press the Review button, then press the Menu button. 2 Highlight the Picture Info menu , then press the OK button. The information about the displayed picture is view-only and includes: file name, location of the file if stored on a card (there are no directories in internal memory), date and time the picture was taken, and the quality setting. 3 Press to display the previous/next picture, with that picture's information. 4 To exit Picture Info, press the OK button. 35

User Manual
Page 46
... 1 Locate a picture, then press the Share button. 2 Highlight Print the OK button. The Print icon appears with the picture. See Kodak EasyShare software Help for all pictures on the card or in internal memory, highlight Cancel Prints, then press the OK button. 6 Press the Share button to return to Capture mode. The default quantity...
... 1 Locate a picture, then press the Share button. 2 Highlight Print the OK button. The Print icon appears with the picture. See Kodak EasyShare software Help for all pictures on the card or in internal memory, highlight Cancel Prints, then press the OK button. 6 Press the Share button to return to Capture mode. The default quantity...

User Manual
Page 53
...CANCEL-exits without making a change modes. Chapter 5 Formatting Memory or MMC/SD Card CAUTION: Formatting deletes everything in memory or on the card, even protected pictures, and reformats the card for use in internal memory, even protected pictures and the address book. 5 Press ...the OK button. 6 Highlight Continue, then press the OK button. When the formatting is complete, the Setup menu is completed even if you turn off the camera...
...CANCEL-exits without making a change modes. Chapter 5 Formatting Memory or MMC/SD Card CAUTION: Formatting deletes everything in memory or on the card, even protected pictures, and reformats the card for use in internal memory, even protected pictures and the address book. 5 Press ...the OK button. 6 Highlight Continue, then press the OK button. When the formatting is complete, the Setup menu is completed even if you turn off the camera...

User Manual
Page 70
... stops processing a picture; Shutter button does Camera is not turned on the camera not work. (page 5). Turn on . If the power switch is full. In that case, turn off. The card or internal memory is on when you replace the batteries, the camera may not turn back on . Transfer pictures... to take another picture. Chapter 9 Camera Problem Cause Solution Camera does not turn the power switch off, then on . Alkaline ...
... stops processing a picture; Shutter button does Camera is not turned on the camera not work. (page 5). Turn on . If the power switch is full. In that case, turn off. The card or internal memory is on when you replace the batteries, the camera may not turn back on . Transfer pictures... to take another picture. Chapter 9 Camera Problem Cause Solution Camera does not turn the power switch off, then on . Alkaline ...

User Manual
Page 77
... corrupted. be read (Please format memory card or insert another digital camera. Read only memory card, change storage location to display There are copying to capture The card in the Turn off the camera and not copied camera. Memory card requires The card is corrupted Insert a new card or format formatting or formatted for the card (page 45). Chapter 9 Camera LCD Messages LCD Messages Message...
... corrupted. be read (Please format memory card or insert another digital camera. Read only memory card, change storage location to display There are copying to capture The card in the Turn off the camera and not copied camera. Memory card requires The card is corrupted Insert a new card or format formatting or formatted for the card (page 45). Chapter 9 Camera LCD Messages LCD Messages Message...

User Manual
Page 78
... light repeat the sequence above glows red and the until the message does not camera will be turned off for it back on. new card or change storage location to internal memory (page 10). Memory Card is full There is no more space Delete pictures from the on the... card in appear. appears automatically turned on LCD. five seconds. new card, or change storage location to internal memory (page 10). 70 the camera to operate. Reset switch on card Card is locked The card...
... light repeat the sequence above glows red and the until the message does not camera will be turned off for it back on. new card or change storage location to internal memory (page 10). Memory Card is full There is no more space Delete pictures from the on the... card in appear. appears automatically turned on LCD. five seconds. new card, or change storage location to internal memory (page 10). 70 the camera to operate. Reset switch on card Card is locked The card...

User Manual
Page 79
...address Camera (Connect with appear because there is book from your computer. Chapter 9 LCD Messages Message Cause Solution Internal Memory is full There is no address book. or change storage location to the computer (page 52), or delete the picture (page 30). See Kodak EasyShare ...address book) software Help. 71 Unrecognized File Format The camera cannot Transfer the unreadable read...
...address Camera (Connect with appear because there is book from your computer. Chapter 9 LCD Messages Message Cause Solution Internal Memory is full There is no address book. or change storage location to the computer (page 52), or delete the picture (page 30). See Kodak EasyShare ...address book) software Help. 71 Unrecognized File Format The camera cannot Transfer the unreadable read...

User Manual
Page 81
... the Shutter button auto focus are not and recompose the picture. Transfer pictures to internal memory (see page 10), or use a different card. Camera processing Wait. Your card is operating processed and saved normally. Flash is full. locked. 73 Chapter 9 Camera Ready Light Light Status Cause Solution Ready light glows steady red. Resume picture taking...
... the Shutter button auto focus are not and recompose the picture. Transfer pictures to internal memory (see page 10), or use a different card. Camera processing Wait. Your card is operating processed and saved normally. Flash is full. locked. 73 Chapter 9 Camera Ready Light Light Status Cause Solution Ready light glows steady red. Resume picture taking...

User Manual
Page 86
...your computer, be at your camera, camera/computer connections, camera dock, or SD/MMC cards. Telephone Customer Support If you have questions concerning the operation of the software or camera, you received Version of installation CD Camera serial number 78 Before You ...Call Before you call to speak to a customer support representative, please have the following information available: Operating system Processor speed (MHz Computer model Amount of memory (MB Exact error message you may have with the software included on the Kodak EasyShare...
...your computer, be at your camera, camera/computer connections, camera dock, or SD/MMC cards. Telephone Customer Support If you have questions concerning the operation of the software or camera, you received Version of installation CD Camera serial number 78 Before You ...Call Before you call to speak to a customer support representative, please have the following information available: Operating system Processor speed (MHz Computer model Amount of memory (MB Exact error message you may have with the software included on the Kodak EasyShare...

User Manual
Page 89
... memory MMC (MultiMedia) or SD card, optional Viewfinder Optical-Reverse Galilean ISO Sensitivity 100 Flash Range 1.6 to 9.8 ft (0.5 to 3 m) Tripod Socket .25 in. (6 mm) threaded Video Out Operating Temperature NTSC or PAL 32 to 104° F (0 to 40° C) 81 11 Appendix This appendix serves as a resource for technical information about your Kodak EasyShare CX4310 digital camera, Kodak EasyShare camera...
... memory MMC (MultiMedia) or SD card, optional Viewfinder Optical-Reverse Galilean ISO Sensitivity 100 Flash Range 1.6 to 9.8 ft (0.5 to 3 m) Tripod Socket .25 in. (6 mm) threaded Video Out Operating Temperature NTSC or PAL 32 to 104° F (0 to 40° C) 81 11 Appendix This appendix serves as a resource for technical information about your Kodak EasyShare CX4310 digital camera, Kodak EasyShare camera...

User Manual
Page 100
... compliance, 89 cap, lens, 3 capacity internal memory/cards, 85 capture mode accessing menus, 20 overview, 11 returning from other modes, 20 taking pictures, 15 card, memory, 9, 10, 85, 86 caring for your camera, 84 changing storage location, 10 charging battery pack, 58 charging lights, camera dock II, 58, 75 cleaning camera, lens, 84 clock, setting, 7 close-up...
... compliance, 89 cap, lens, 3 capacity internal memory/cards, 85 capture mode accessing menus, 20 overview, 11 returning from other modes, 20 taking pictures, 15 card, memory, 9, 10, 85, 86 caring for your camera, 84 changing storage location, 10 charging battery pack, 58 charging lights, camera dock II, 58, 75 cleaning camera, lens, 84 clock, setting, 7 close-up...

User Manual
Page 101
... pictures, 31 digital pictures, using, 52 digital zoom, 19 display problems, 63 displaying pictures, 27 distance limits, close -up , 21 dock printer, 52 dock insert custom, 2 universal, 54 dock, camera. See camera dock downloading pictures, 52, 59 software/firmware, 83 E EasyShare software, installing,... tagging for, 40 FCC compliance, 89 features, camera overview, i-ii file names, card, 86 fill flash, 18 firmware upgrading, 77, 83 version, 46 flash button, ii flash, setting, 18 focus distance, close -up , 21 folders, card, 85 formatting, memory/cards, 45 four-way arrow button, 5 G guidelines...
... pictures, 31 digital pictures, using, 52 digital zoom, 19 display problems, 63 displaying pictures, 27 distance limits, close -up , 21 dock printer, 52 dock insert custom, 2 universal, 54 dock, camera. See camera dock downloading pictures, 52, 59 software/firmware, 83 E EasyShare software, installing,... tagging for, 40 FCC compliance, 89 features, camera overview, i-ii file names, card, 86 fill flash, 18 firmware upgrading, 77, 83 version, 46 flash button, ii flash, setting, 18 focus distance, close -up , 21 folders, card, 85 formatting, memory/cards, 45 four-way arrow button, 5 G guidelines...

User Manual
Page 103
..., 49 loop, slide show, 32 M Macintosh installing software on, 49 system requirements, 47, 48 magnify picture, 30 maintenance, camera, 84 memory internal or card, 10 storage location setting, 10 memory card inserting, 9 storage capacities, 85 menu button, ii menus capture mode, 20 image storage, setting, 10 review mode, 28 setup mode, 41 share mode, 37...
..., 49 loop, slide show, 32 M Macintosh installing software on, 49 system requirements, 47, 48 magnify picture, 30 maintenance, camera, 84 memory internal or card, 10 storage location setting, 10 memory card inserting, 9 storage capacities, 85 menu button, ii menus capture mode, 20 image storage, setting, 10 review mode, 28 setup mode, 41 share mode, 37...

User Manual
Page 105
Index printing changing default quantity, 42 from a card, 52 optimizing printer, 77 pictures, 52 tagged pictures, 38 this user guide, 1 without a computer, 52 protect icon, 27 protecting pictures, 31 Q quality print with digital zoom, 19 settings, 24, 85 quickview deleting pictures, 17 reviewing last... picture, 17 turning off, 43 R readme file, 61 ready light status, 72 taking pictures, 15 red-eye, flash, 18 register your camera, web, 77 regulatory information, 89 removeable memory card, 9 requirements...
Index printing changing default quantity, 42 from a card, 52 optimizing printer, 77 pictures, 52 tagged pictures, 38 this user guide, 1 without a computer, 52 protect icon, 27 protecting pictures, 31 Q quality print with digital zoom, 19 settings, 24, 85 quickview deleting pictures, 17 reviewing last... picture, 17 turning off, 43 R readme file, 61 ready light status, 72 taking pictures, 15 red-eye, flash, 18 register your camera, web, 77 regulatory information, 89 removeable memory card, 9 requirements...


