User Manual
Page 7
5 Customizing Camera Settings-Setup Mode ........ 41 To Access Setup Mode/Menus 41 Returning to the Previous Menu 42 Changing the Print Quantity Default 42 Turning Off Quickview 43 Turning On Liveview 43 Setting Video Out 44 Formatting Memory or MMC/SD Card 45 Viewing Camera Information 46 6 Installing the Software 47 System Requirements 47 Install the Software 49 7 Connecting to the Computer 51 Important-Before You Connect 51 Connecting to the Computer 51 Transferring Pictures to Your Computer 52 Printing Pictures from...
5 Customizing Camera Settings-Setup Mode ........ 41 To Access Setup Mode/Menus 41 Returning to the Previous Menu 42 Changing the Print Quantity Default 42 Turning Off Quickview 43 Turning On Liveview 43 Setting Video Out 44 Formatting Memory or MMC/SD Card 45 Viewing Camera Information 46 6 Installing the Software 47 System Requirements 47 Install the Software 49 7 Connecting to the Computer 51 Important-Before You Connect 51 Connecting to the Computer 51 Transferring Pictures to Your Computer 52 Printing Pictures from...
User Manual
Page 8
... Battery Pack 58 Transferring Pictures 59 Caution When Using a Tripod 59 Earlier Camera Dock Model 60 9 Troubleshooting 61 Troubleshooting-Camera 61 Troubleshooting-Camera Dock II 74 10 Getting Help 77 Helpful Web Links 77 Help in this User Guide 78 Software Help 78 Telephone Customer Support 78 11 Appendix 81 Camera Specifications 81 Original Factory Settings-Camera 83 Upgrading Your Software and Firmware 83 Tips, Safety, Maintenance 84 Picture Storage Capacities 85 Locating Pictures on an MMC/SD Card 85 Card File...
... Battery Pack 58 Transferring Pictures 59 Caution When Using a Tripod 59 Earlier Camera Dock Model 60 9 Troubleshooting 61 Troubleshooting-Camera 61 Troubleshooting-Camera Dock II 74 10 Getting Help 77 Helpful Web Links 77 Help in this User Guide 78 Software Help 78 Telephone Customer Support 78 11 Appendix 81 Camera Specifications 81 Original Factory Settings-Camera 83 Upgrading Your Software and Firmware 83 Tips, Safety, Maintenance 84 Picture Storage Capacities 85 Locating Pictures on an MMC/SD Card 85 Card File...
User Manual
Page 10
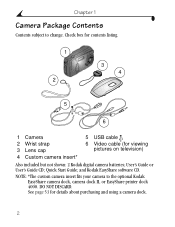
.... Quick Start Guide; See page 53 for viewing pictures on television) Also included but not shown: 2 Kodak digital camera batteries; NOTE: *The custom camera insert fits your camera to change. and Kodak EasyShare software CD. Chapter 1 Camera Package Contents Contents subject to the optional Kodak EasyShare camera dock, camera dock II, or EasyShare printer dock 4000. Check box for contents listing. 1 2 3 4 5 6 1 Camera 2 Wrist strap 3 Lens cap 4 Custom camera insert* 5 USB cable 6 Video cable (for details about purchasing and using a camera dock...
.... Quick Start Guide; See page 53 for viewing pictures on television) Also included but not shown: 2 Kodak digital camera batteries; NOTE: *The custom camera insert fits your camera to change. and Kodak EasyShare software CD. Chapter 1 Camera Package Contents Contents subject to the optional Kodak EasyShare camera dock, camera dock II, or EasyShare printer dock 4000. Check box for contents listing. 1 2 3 4 5 6 1 Camera 2 Wrist strap 3 Lens cap 4 Custom camera insert* 5 USB cable 6 Video cable (for details about purchasing and using a camera dock...
User Manual
Page 18
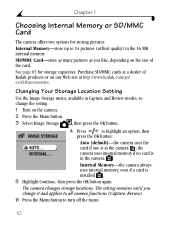
... button: Auto (default)-the camera uses the card if one is in the 16 MB internal memory. Changing Your Storage Location Setting Use the Image Storage menu, available in the camera . Internal Memory-the camera always uses internal memory, even if a card is in Capture and Review modes, to change it and applies to all camera functions (Capture, Review). 6 Press the Menu button to 14 pictures (at http://www.kodak.com/go/ cx4310accessories. SD/MMC Card-store as many pictures as you change the setting. 1 Turn...
... button: Auto (default)-the camera uses the card if one is in the 16 MB internal memory. Changing Your Storage Location Setting Use the Image Storage menu, available in the camera . Internal Memory-the camera always uses internal memory, even if a card is in Capture and Review modes, to change it and applies to all camera functions (Capture, Review). 6 Press the Menu button to 14 pictures (at http://www.kodak.com/go/ cx4310accessories. SD/MMC Card-store as many pictures as you change the setting. 1 Turn...
User Manual
Page 19
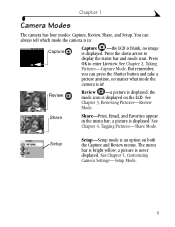
... 2, Taking Pictures-Capture Mode. See Chapter 3, Reviewing Pictures-Review Mode. Review Review -a picture is displayed. a picture is displayed; But remember, you can always tell which mode the camera is in: Capture Capture -the LCD is blank, no matter what mode the camera is displayed on both the Capture and Review menus. The menu bar is never displayed. You can press the Shutter button and take a picture anytime, no image is an option on the LCD. a picture is bright yellow; Setup Setup-Setup mode...
... 2, Taking Pictures-Capture Mode. See Chapter 3, Reviewing Pictures-Review Mode. Review Review -a picture is displayed. a picture is displayed; But remember, you can always tell which mode the camera is in: Capture Capture -the LCD is blank, no matter what mode the camera is displayed on both the Capture and Review menus. The menu bar is never displayed. You can press the Shutter button and take a picture anytime, no image is an option on the LCD. a picture is bright yellow; Setup Setup-Setup mode...
User Manual
Page 23
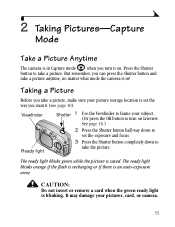
... take a picture, make sure your picture storage location is an auto-exposure error. CAUTION: Do not insert or remove a card when the green ready light is in Capture mode when you can press the Shutter button and take a picture. But remember, you turn on . See page 16.) 2 Press the Shutter button half-way down to set the way you take the picture. The ready light blinks green while the picture is in ! 2 Taking Pictures-Capture Mode Take a Picture Anytime The camera is saved...
... take a picture, make sure your picture storage location is an auto-exposure error. CAUTION: Do not insert or remove a card when the green ready light is in Capture mode when you can press the Shutter button and take a picture. But remember, you turn on . See page 16.) 2 Press the Shutter button half-way down to set the way you take the picture. The ready light blinks green while the picture is in ! 2 Taking Pictures-Capture Mode Take a Picture Anytime The camera is saved...

User Manual
Page 49
... button. 3 Press the Menu button to turn off the Setup menu and return to customize your camera settings. In Capture mode In Review mode But remember, you can access Setup mode two ways: in ! Setup Menus Return (page 42) Default Print Quantity (page 42) Quickview (page 43) Liveview (page 43) Video Out (page 44) Language (page 6) Format (page 45) About (page 46) Date/Time (page 7) 41 You can press the Shutter button and take a picture...
... button. 3 Press the Menu button to turn off the Setup menu and return to customize your camera settings. In Capture mode In Review mode But remember, you can access Setup mode two ways: in ! Setup Menus Return (page 42) Default Print Quantity (page 42) Quickview (page 43) Liveview (page 43) Video Out (page 44) Language (page 6) Format (page 45) About (page 46) Date/Time (page 7) 41 You can press the Shutter button and take a picture...

User Manual
Page 50
... menu screen from which you change it. 42 Changing the Print Quantity Default The Default Print Quantity setting determines the value that is one. 1 In Capture or Review mode, press the Menu button. 2 Highlight Setup , then press the OK button. 3 Highlight Default Print Quantity , then press the OK button. 4 Press to indicate the new default quantity, then press the OK button. 5 Press the Menu button to the menu screen from which you entered Setup: Capture or Review...
... menu screen from which you change it. 42 Changing the Print Quantity Default The Default Print Quantity setting determines the value that is one. 1 In Capture or Review mode, press the Menu button. 2 Highlight Setup , then press the OK button. 3 Highlight Default Print Quantity , then press the OK button. 4 Press to indicate the new default quantity, then press the OK button. 5 Press the Menu button to the menu screen from which you entered Setup: Capture or Review...

User Manual
Page 70
... you replace the batteries, the camera may not turn off , then on. BATTERIES. the blinking before attempting ready light is Wait until the light stops processing a picture; Turn on the camera not work. (page 5). Shutter button does Camera is full. The card or internal memory is not turned on. Transfer pictures to take another picture. Chapter 9 Camera Problem Cause Solution Camera does not turn back on. Alkaline batteries were DO NOT USE ALKALINE installed in the camera. In that case, turn the power switch off...
... you replace the batteries, the camera may not turn off , then on. BATTERIES. the blinking before attempting ready light is Wait until the light stops processing a picture; Turn on the camera not work. (page 5). Shutter button does Camera is full. The card or internal memory is not turned on. Transfer pictures to take another picture. Chapter 9 Camera Problem Cause Solution Camera does not turn back on. Alkaline batteries were DO NOT USE ALKALINE installed in the camera. In that case, turn the power switch off...

User Manual
Page 74
.... 66 Software is not Connect cable to disable this feature. USB cable is not installed. The Battery Monitor or Close that software before similar software runs starting the Kodak software. Battery is off guide to camera and securely connected. Chapter 9 Camera/Computer Communications Camera Communications Problem Cause Solution The computer cannot communicate with See the following file on the the configuration of the Kodak EasyShare software USB port on section of your laptop user's laptops can turn off...
.... 66 Software is not Connect cable to disable this feature. USB cable is not installed. The Battery Monitor or Close that software before similar software runs starting the Kodak software. Battery is off guide to camera and securely connected. Chapter 9 Camera/Computer Communications Camera Communications Problem Cause Solution The computer cannot communicate with See the following file on the the configuration of the Kodak EasyShare software USB port on section of your laptop user's laptops can turn off...

User Manual
Page 78
... Delete pictures from the on the card in Reset the switch as shown write-protect position. Date/Time entry screen This is too high for an extended period of the several minutes, then turn off .) camera is the first time you Reset the clock (page 7). or the batteries have been removed for it back on. Chapter 9 LCD Messages Message Cause Solution Memory card is protected Switch on card is in the card (page 30), insert a camera. new card...
... Delete pictures from the on the card in Reset the switch as shown write-protect position. Date/Time entry screen This is too high for an extended period of the several minutes, then turn off .) camera is the first time you Reset the clock (page 7). or the batteries have been removed for it back on. Chapter 9 LCD Messages Message Cause Solution Memory card is protected Switch on card is in the card (page 30), insert a camera. new card...

User Manual
Page 86
... User Guide See Chapter 9, Troubleshooting, for help with your computer, and have with the software included on the Kodak EasyShare software CD, see the Quick Start Guide or the Kodak EasyShare software Help. Telephone Customer Support If you have questions concerning the operation of the software or camera, you may have the following information available: Operating system Processor speed (MHz Computer model Amount of memory (MB Exact error message you received Version of installation CD Camera serial number...
... User Guide See Chapter 9, Troubleshooting, for help with your computer, and have with the software included on the Kodak EasyShare software CD, see the Quick Start Guide or the Kodak EasyShare software Help. Telephone Customer Support If you have questions concerning the operation of the software or camera, you may have the following information available: Operating system Processor speed (MHz Computer model Amount of memory (MB Exact error message you received Version of installation CD Camera serial number...

User Manual
Page 94
... picture number in a camera other than the Kodak EasyShare CX4310 digital camera, and that camera manufacturer adheres to this file structure standard, the \DCIM folder contains a folder named by that camera. 86 For example, if the last picture taken was DCP_0007.JPG and you delete it, the next picture you insert a different card into your camera, the next picture number is named DCP_0008.JPG. ! If you transfer pictures to the computer or delete pictures...
... picture number in a camera other than the Kodak EasyShare CX4310 digital camera, and that camera manufacturer adheres to this file structure standard, the \DCIM folder contains a folder named by that camera. 86 For example, if the last picture taken was DCP_0007.JPG and you delete it, the next picture you insert a different card into your camera, the next picture number is named DCP_0008.JPG. ! If you transfer pictures to the computer or delete pictures...

User Manual
Page 95
... Optional AC Adapter To save battery power, purchase a Kodak 3-volt AC adapter on our Web site at http://www.kodak.com/go/cx4310accessories. Use the 3-volt AC adapter when reviewing, copying, and transferring pictures. ! it is NOT compatible. 87 Liveview, 1 minute Review, any menu screen 8 minutes Press any button (Auto Power-off) Quickview on 5 seconds Slide show 1 minute after : LCD Off N/A LCD On; CAUTION: Do not use the 3-volt AC adapter with a Kodak EasyShare camera dock; Camera state...
... Optional AC Adapter To save battery power, purchase a Kodak 3-volt AC adapter on our Web site at http://www.kodak.com/go/cx4310accessories. Use the 3-volt AC adapter when reviewing, copying, and transferring pictures. ! it is NOT compatible. 87 Liveview, 1 minute Review, any menu screen 8 minutes Press any button (Auto Power-off) Quickview on 5 seconds Slide show 1 minute after : LCD Off N/A LCD On; CAUTION: Do not use the 3-volt AC adapter with a Kodak EasyShare camera dock; Camera state...

User Manual
Page 100
... connecting camera dock, 55 system requirements, 47 transferring pictures, 52, 59 connecting the camera first, important note, 51 to camera dock, 57 to computer, USB cable, 51 connecting the camera dock, 55 contents camera dock package, 53 camera package, 2 copying pictures memory to card, 34 to computer, 52, 59 CRV3 battery, installing, 4 custom insert, 54 customer support numbers, 78 customizing camera settings, 41 D date imprinting on pictures, 25 setting, 7 date stamp, 25 DCIM folder, card, 85 defaults changing print quantity, 42 original factory settings, 83 delete button, ii deleting...
... connecting camera dock, 55 system requirements, 47 transferring pictures, 52, 59 connecting the camera first, important note, 51 to camera dock, 57 to computer, USB cable, 51 connecting the camera dock, 55 contents camera dock package, 53 camera package, 2 copying pictures memory to card, 34 to computer, 52, 59 CRV3 battery, installing, 4 custom insert, 54 customer support numbers, 78 customizing camera settings, 41 D date imprinting on pictures, 25 setting, 7 date stamp, 25 DCIM folder, card, 85 defaults changing print quantity, 42 original factory settings, 83 delete button, ii deleting...

User Manual
Page 102
...54 installing batteries, 4 battery pack, 56 insert, camera dock, 54 MMC/SD card, 9 software, 49 Index internal memory change storage location, 10 format, 45 internet, helpful web links, 77 K Kodak digital camera batteries, 4 Kodak EasyShare software, 52 Kodak software getting help, 52, 78 installing, 49 transferring pictures, 52 Kodak web sites, 77 L language, setting, 6 large print, this user guide, 1 LCD (Liquid Crystal Display) display languages, 6 error messages, 69 picture location icon, 8 reviewing last picture, 17 status bar, 8 turning off quickview, 43 turning on liveview, 43 using as...
...54 installing batteries, 4 battery pack, 56 insert, camera dock, 54 MMC/SD card, 9 software, 49 Index internal memory change storage location, 10 format, 45 internet, helpful web links, 77 K Kodak digital camera batteries, 4 Kodak EasyShare software, 52 Kodak software getting help, 52, 78 installing, 49 transferring pictures, 52 Kodak web sites, 77 L language, setting, 6 large print, this user guide, 1 LCD (Liquid Crystal Display) display languages, 6 error messages, 69 picture location icon, 8 reviewing last picture, 17 status bar, 8 turning off quickview, 43 turning on liveview, 43 using as...

User Manual
Page 103
... magnify picture, 30 maintenance, camera, 84 memory internal or card, 10 storage location setting, 10 memory card inserting, 9 storage capacities, 85 menu button, ii menus capture mode, 20 image storage, setting, 10 review mode, 28 setup mode, 41 share mode, 37 tagging pictures, 37 taking pictures, 20 MISC folder, card, 85 MMC/SD card file name conventions, 86 file structure, 85 formatting, 45 inserting, 9 picture location, 10 printing from, 52 setting storage location, 10 storage capacities, 85 troubleshooting problems, 68 mode indicator icon, 27 modes camera, overview...
... magnify picture, 30 maintenance, camera, 84 memory internal or card, 10 storage location setting, 10 memory card inserting, 9 storage capacities, 85 menu button, ii menus capture mode, 20 image storage, setting, 10 review mode, 28 setup mode, 41 share mode, 37 tagging pictures, 37 taking pictures, 20 MISC folder, card, 85 MMC/SD card file name conventions, 86 file structure, 85 formatting, 45 inserting, 9 picture location, 10 printing from, 52 setting storage location, 10 storage capacities, 85 troubleshooting problems, 68 mode indicator icon, 27 modes camera, overview...

User Manual
Page 105
Index printing changing default quantity, 42 from a card, 52 optimizing printer, 77 pictures, 52 tagged pictures, 38 this user guide, 1 without a computer, 52 protect icon, 27 protecting pictures, 31 Q quality print with digital zoom, 19 settings, 24, 85 quickview deleting pictures, 17 reviewing last picture, 17 turning off, 43 R readme file, 61 ready light status, 72 taking pictures, 15 red-eye, flash, 18 register your camera, web, 77 regulatory information, 89 removeable memory card, 9 requirements Mac OS, 47, 48 Windows OS-based, 47 resolution, setting, 24 return...
Index printing changing default quantity, 42 from a card, 52 optimizing printer, 77 pictures, 52 tagged pictures, 38 this user guide, 1 without a computer, 52 protect icon, 27 protecting pictures, 31 Q quality print with digital zoom, 19 settings, 24, 85 quickview deleting pictures, 17 reviewing last picture, 17 turning off, 43 R readme file, 61 ready light status, 72 taking pictures, 15 red-eye, flash, 18 register your camera, web, 77 regulatory information, 89 removeable memory card, 9 requirements Mac OS, 47, 48 Windows OS-based, 47 resolution, setting, 24 return...

User Manual
Page 106
..., 7 date and time, 7 flash, 18 language, 6 NTSC/PAL, 44 picture quality, 24 picture storage location, 10 resolution, 24 self timer, 22 video out, 44 setup mode getting there, 41 overview, 11 returning to previous, 42 using, 41 share button, ii share mode email tagging, 39 getting there, 37 overview, 11 print tagging, 38 tagging favorites, 40 shutoff, auto, 87 shutter button location, ii problems, 62 self timer delay, 22 taking pictures, 15 sleep mode...
..., 7 date and time, 7 flash, 18 language, 6 NTSC/PAL, 44 picture quality, 24 picture storage location, 10 resolution, 24 self timer, 22 video out, 44 setup mode getting there, 41 overview, 11 returning to previous, 42 using, 41 share button, ii share mode email tagging, 39 getting there, 37 overview, 11 print tagging, 38 tagging favorites, 40 shutoff, auto, 87 shutter button location, ii problems, 62 self timer delay, 22 taking pictures, 15 sleep mode...

User Manual
Page 107
..., viewing pictures, 33 thumbnails, viewing on LCD, 29 time, setting, 7 timer, shutter delay, 22 tips battery guidelines, 13 maintenance, 84 readme file, 61 safety, 84 transfer light, camera dock, 75 transferring pictures to computer, 52, 59 trash can, deleting, 17, 30 tripod, connecting, i, 59 troubleshooting problems camera, 61-73 camera dock, 74-76 camera dock lights, 75-76 camera ready light, 72 communications, 66 error messages, 69 SD/MMC card, 68 turning camera on and off, 5 U universal insert, 54 upgrading software, firmware, 83...
..., viewing pictures, 33 thumbnails, viewing on LCD, 29 time, setting, 7 timer, shutter delay, 22 tips battery guidelines, 13 maintenance, 84 readme file, 61 safety, 84 transfer light, camera dock, 75 transferring pictures to computer, 52, 59 trash can, deleting, 17, 30 tripod, connecting, i, 59 troubleshooting problems camera, 61-73 camera dock, 74-76 camera dock lights, 75-76 camera ready light, 72 communications, 66 error messages, 69 SD/MMC card, 68 turning camera on and off, 5 U universal insert, 54 upgrading software, firmware, 83...


