
User Manual
Page 3
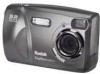
Camera Front 1 2 Product Overview 4 56 3 7a 7b ON OFF 1 Shutter button 2 Flash unit 3 On / Off switch 4 Self Timer light Camera Bottom 1 5 Viewfinder lens 6 Lens 7a USB connector 7b DC in connector 2 1 Camera Dock connector (door shown closed) 3 2 Tripod mount socket 3 Battery door i
Camera Front 1 2 Product Overview 4 56 3 7a 7b ON OFF 1 Shutter button 2 Flash unit 3 On / Off switch 4 Self Timer light Camera Bottom 1 5 Viewfinder lens 6 Lens 7a USB connector 7b DC in connector 2 1 Camera Dock connector (door shown closed) 3 2 Tripod mount socket 3 Battery door i
User Manual
Page 12
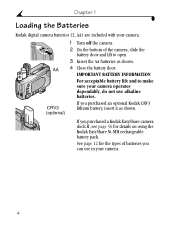
... purchased an optional Kodak CRV3 lithium battery, insert it as shown. 4 Close the battery door. See page 12 for details on using the Kodak EasyShare Ni-MH rechargeable battery pack. If you purchased a Kodak EasyShare camera dock II, see page 56 for the types of the camera, slide the battery door and lift to make sure your camera. 4 Chapter 1 Loading the Batteries Kodak digital camera batteries (2, AA) are included...
... purchased an optional Kodak CRV3 lithium battery, insert it as shown. 4 Close the battery door. See page 12 for details on using the Kodak EasyShare Ni-MH rechargeable battery pack. If you purchased a Kodak EasyShare camera dock II, see page 56 for the types of the camera, slide the battery door and lift to make sure your camera. 4 Chapter 1 Loading the Batteries Kodak digital camera batteries (2, AA) are included...
User Manual
Page 64
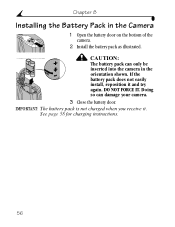
If the battery pack does not easily install, reposition it . Doing so can only be inserted into the camera in the Camera 1 Open the battery door on the bottom of the camera. 2 Install the battery pack as illustrated. Chapter 8 Installing the Battery Pack in the orientation shown. See page 58 for charging instructions. 56 DO NOT FORCE IT. IMPORTANT: The battery pack is not charged when you receive it and try again. CAUTION: The battery pack can damage your camera. 3 Close the battery door.
If the battery pack does not easily install, reposition it . Doing so can only be inserted into the camera in the Camera 1 Open the battery door on the bottom of the camera. 2 Install the battery pack as illustrated. Chapter 8 Installing the Battery Pack in the orientation shown. See page 58 for charging instructions. 56 DO NOT FORCE IT. IMPORTANT: The battery pack is not charged when you receive it and try again. CAUTION: The battery pack can damage your camera. 3 Close the battery door.


