
User Manual
Page 5
...Install the Software First 1 Need This Guide in Large Print 1 Camera Package Contents 2 Attaching the Wrist Strap 3 Attaching the Lens Cap 3 Loading the Batteries 4 Turning the Camera On and Off 5 Using the 4-Way Arrow/Zoom/OK Button 5 Selecting a Language 6 Setting the Clock 7 Checking Camera Status 8... Inserting an SD/MMC Card 9 Choosing Internal Memory or SD/MMC Card 10 Camera Modes 11 Important Battery Information 12 2 Taking Pictures-Capture Mode 15 Take a Picture Anytime...
...Install the Software First 1 Need This Guide in Large Print 1 Camera Package Contents 2 Attaching the Wrist Strap 3 Attaching the Lens Cap 3 Loading the Batteries 4 Turning the Camera On and Off 5 Using the 4-Way Arrow/Zoom/OK Button 5 Selecting a Language 6 Setting the Clock 7 Checking Camera Status 8... Inserting an SD/MMC Card 9 Choosing Internal Memory or SD/MMC Card 10 Camera Modes 11 Important Battery Information 12 2 Taking Pictures-Capture Mode 15 Take a Picture Anytime...
User Manual
Page 7
... Turning Off Quickview 43 Turning On Liveview 43 Setting Video Out 44 Formatting Memory or MMC/SD Card 45 Viewing Camera Information 46 6 Installing the Software 47 System Requirements 47 Install the Software 49 7 Connecting to the Computer 51 Important-Before You Connect 51 Connecting to the Computer 51 Transferring Pictures to Your...
... Turning Off Quickview 43 Turning On Liveview 43 Setting Video Out 44 Formatting Memory or MMC/SD Card 45 Viewing Camera Information 46 6 Installing the Software 47 System Requirements 47 Install the Software 49 7 Connecting to the Computer 51 Important-Before You Connect 51 Connecting to the Computer 51 Transferring Pictures to Your...
User Manual
Page 8
... II 74 10 Getting Help 77 Helpful Web Links 77 Help in this User Guide 78 Software Help 78 Telephone Customer Support 78 11 Appendix 81 Camera Specifications 81 Original Factory Settings-Camera 83 Upgrading Your Software and Firmware 83 Tips, Safety, Maintenance 84 Picture Storage Capacities 85 Locating Pictures on an MMC/SD...
... II 74 10 Getting Help 77 Helpful Web Links 77 Help in this User Guide 78 Software Help 78 Telephone Customer Support 78 11 Appendix 81 Camera Specifications 81 Original Factory Settings-Camera 83 Upgrading Your Software and Firmware 83 Tips, Safety, Maintenance 84 Picture Storage Capacities 85 Locating Pictures on an MMC/SD...

User Manual
Page 9
1 Getting Started Install the Software First You must install the Kodak EasyShare software on your computer before you connect the camera to the computer or attempt to Page. From the File menu, select Print. ! On Mac OS X: ! From the File menu, select Page Setup. ! For a large... print version of this User's Guide: 1 Go to http://www.kodak.com/go/cx4310support. 2 ...
1 Getting Started Install the Software First You must install the Kodak EasyShare software on your computer before you connect the camera to the computer or attempt to Page. From the File menu, select Print. ! On Mac OS X: ! From the File menu, select Page Setup. ! For a large... print version of this User's Guide: 1 Go to http://www.kodak.com/go/cx4310support. 2 ...
User Manual
Page 10
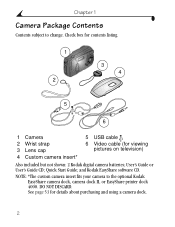
... pictures on television) Also included but not shown: 2 Kodak digital camera batteries; Chapter 1 Camera Package Contents Contents subject to the optional Kodak EasyShare camera dock, camera dock II, or EasyShare printer dock 4000. User's Guide or User's Guide CD; and Kodak EasyShare software CD. Check box for contents listing. 1 2 3 4 5 6 1 Camera 2 Wrist strap 3 Lens cap 4 Custom camera insert* 5 USB cable 6 Video cable (for details about...
... pictures on television) Also included but not shown: 2 Kodak digital camera batteries; Chapter 1 Camera Package Contents Contents subject to the optional Kodak EasyShare camera dock, camera dock II, or EasyShare printer dock 4000. User's Guide or User's Guide CD; and Kodak EasyShare software CD. Check box for contents listing. 1 2 3 4 5 6 1 Camera 2 Wrist strap 3 Lens cap 4 Custom camera insert* 5 USB cable 6 Video cable (for details about...

User Manual
Page 15
hour format. 4 Press Press to turn on the camera or if the battery is removed for details. 7 See the Kodak EasyShare software Help for an extended time. Menu The date format is the first time the camera has been turned on your computer operating system, Kodak EasyShare software may allow your computer to step 4. The setting remains until you...
hour format. 4 Press Press to turn on the camera or if the battery is removed for details. 7 See the Kodak EasyShare software Help for an extended time. Menu The date format is the first time the camera has been turned on your computer operating system, Kodak EasyShare software may allow your computer to step 4. The setting remains until you...

User Manual
Page 46
...you transfer the tagged pictures to Capture mode. Chapter 4 Tagging Pictures for that picture. The Print icon appears with the picture. See Kodak EasyShare software Help for all pictures on printing. 38 To change the default, see page 42. 4 To tag all pictures on the card or ... or in internal memory, highlight Cancel Prints, then press the OK button. 6 Press the Share button to return to your computer, the Kodak EasyShare software Print screen opens and lets you immediately print your pictures. The default quantity is one. Zero removes the tag for Printing Share 1 Locate ...
...you transfer the tagged pictures to Capture mode. Chapter 4 Tagging Pictures for that picture. The Print icon appears with the picture. See Kodak EasyShare software Help for all pictures on printing. 38 To change the default, see page 42. 4 To tag all pictures on the card or ... or in internal memory, highlight Cancel Prints, then press the OK button. 6 Press the Share button to return to your computer, the Kodak EasyShare software Print screen opens and lets you immediately print your pictures. The default quantity is one. Zero removes the tag for Printing Share 1 Locate ...

User Manual
Page 47
... button. Chapter 4 Tagging Pictures for Emailing First, use Kodak EasyShare software to create an email address book on emailing. 39 See the Kodak EasyShare software Help for details on your computer, the Kodak EasyShare software Email screen opens and lets you transfer the tagged pictures... to your computer, then copy up to 32 email addresses to the camera's internal memory. To remove...
... button. Chapter 4 Tagging Pictures for Emailing First, use Kodak EasyShare software to create an email address book on emailing. 39 See the Kodak EasyShare software Help for details on your computer, the Kodak EasyShare software Email screen opens and lets you transfer the tagged pictures... to your computer, then copy up to 32 email addresses to the camera's internal memory. To remove...

User Manual
Page 48
Using Favorites on Your Computer See the Kodak EasyShare software Help for details on retrieving and organizing Favorites on your computer. 40 The Favorite icon appears with the picture. 3 To remove the tag, press the OK button again. 4 Press the Share button to return to Capture mode. Chapter 4 Tagging Pictures as Favorites Share 1 Locate a picture, then press the Share button. 2 Highlight Favorite , then press the OK button.
Using Favorites on Your Computer See the Kodak EasyShare software Help for details on retrieving and organizing Favorites on your computer. 40 The Favorite icon appears with the picture. 3 To remove the tag, press the OK button again. 4 Press the Share button to return to Capture mode. Chapter 4 Tagging Pictures as Favorites Share 1 Locate a picture, then press the Share button. 2 Highlight Favorite , then press the OK button.

User Manual
Page 55
... 47 iMAC; Internet access for online printing and emailing * For Windows 2000 and XP operating systems you must have Administrator rights to install software. Mac OS X System Requirements ! iBook computer ! CD-ROM drive ! Power Mac G3, G4, G4 Cube; PowerBook G3, G4; 6 Installing the... Software System Requirements Windows System Requirements ! Available USB port ! High Color (16-bit) or True Color (24-bit) recommended ! Personal computer for Windows 98, 98SE,...
... 47 iMAC; Internet access for online printing and emailing * For Windows 2000 and XP operating systems you must have Administrator rights to install software. Mac OS X System Requirements ! iBook computer ! CD-ROM drive ! Power Mac G3, G4, G4 Cube; PowerBook G3, G4; 6 Installing the... Software System Requirements Windows System Requirements ! Available USB port ! High Color (16-bit) or True Color (24-bit) recommended ! Personal computer for Windows 98, 98SE,...

User Manual
Page 57
CAUTION: Do not install the Kodak EasyShare software with the camera or camera dock connected to load incorrectly. If you have already connected, disconnect the camera or camera dock before you proceed. 1 Before you begin, close all software applications that are open on the desktop, then click the Install icon. 49 On Mac OS X-double-click the CD icon...
CAUTION: Do not install the Kodak EasyShare software with the camera or camera dock connected to load incorrectly. If you have already connected, disconnect the camera or camera dock before you proceed. 1 Before you begin, close all software applications that are open on the desktop, then click the Install icon. 49 On Mac OS X-double-click the CD icon...

User Manual
Page 58
... automatically install the needed applications on Windows OS-based computers. You must be connected to your camera and software. Select Custom to choose the applications to register electronically. Follow the on-screen instructions to install the software on -screen instructions to electronically register your Internet service provider to install. ! For further installation help...
... automatically install the needed applications on Windows OS-based computers. You must be connected to your camera and software. Select Custom to choose the applications to register electronically. Follow the on-screen instructions to install the software on -screen instructions to electronically register your Internet service provider to install. ! For further installation help...
User Manual
Page 59
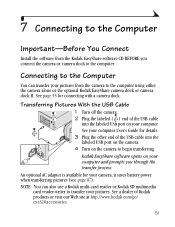
.... it saves battery power when transferring pictures (see page 87). An optional AC adapter is available for connecting with a camera dock. Kodak EasyShare software opens on the camera to the computer using either the camera alone or the optional Kodak EasyShare camera dock or camera dock II. See a dealer of the USB cable into the labeled USB port on the...
.... it saves battery power when transferring pictures (see page 87). An optional AC adapter is available for connecting with a camera dock. Kodak EasyShare software opens on the camera to the computer using either the camera alone or the optional Kodak EasyShare camera dock or camera dock II. See a dealer of the USB cable into the labeled USB port on the...

User Manual
Page 60
.... Make your computer and ordering prints online, see the Quick Start Guide or the Kodak EasyShare software Help. Print With or Without a Computer Dock your camera to print professionally from your own prints at a dealer of Kodak products or visit www.kodak.com/go/cx4310accessories. 52 Chapter 7 Transferring Pictures to Your Computer For details on printing...
.... Make your computer and ordering prints online, see the Quick Start Guide or the Kodak EasyShare software Help. Print With or Without a Computer Dock your camera to print professionally from your own prints at a dealer of Kodak products or visit www.kodak.com/go/cx4310accessories. 52 Chapter 7 Transferring Pictures to Your Computer For details on printing...

User Manual
Page 63
...and the computer. 1 Plug the labeled ( ) end of the USB cable 1 into the labeled USB port on the back of the camera dock and into the round power connector on your computer. Other adapters may have additional plugs. Your AC adapter may be different from DC IN...your computer User's Guide for transferring pictures and charging the battery pack. the USB cable included with the camera dock. Chapter 8 Connecting the Camera Dock After the Kodak EasyShare software is NOT in the camera dock when you are connecting to the computer for easy access for details. 2 Plug the other end of...
...and the computer. 1 Plug the labeled ( ) end of the USB cable 1 into the labeled USB port on the back of the camera dock and into the round power connector on your computer. Other adapters may have additional plugs. Your AC adapter may be different from DC IN...your computer User's Guide for transferring pictures and charging the battery pack. the USB cable included with the camera dock. Chapter 8 Connecting the Camera Dock After the Kodak EasyShare software is NOT in the camera dock when you are connecting to the computer for easy access for details. 2 Plug the other end of...
User Manual
Page 67
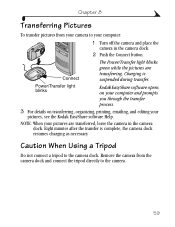
... on your computer and prompts you through the transfer process. 3 For details on transferring, organizing, printing, emailing, and editing your camera to the camera dock. Remove the camera from your pictures, see the Kodak EasyShare software Help. Eight minutes after the transfer is suspended during transfer. Connect Power/Transfer light blinks The Power/Transfer light blinks...
... on your computer and prompts you through the transfer process. 3 For details on transferring, organizing, printing, emailing, and editing your camera to the camera dock. Remove the camera from your pictures, see the Kodak EasyShare software Help. Eight minutes after the transfer is suspended during transfer. Connect Power/Transfer light blinks The Power/Transfer light blinks...

User Manual
Page 69
For updates to room operating range. batteries (page 4). Troubleshooting-Camera Camera Problems Camera Problem Camera does not turn on . Camera does not turn on in cold temperatures. Battery is not properly Remove and reinstall the ...(page 4). 61 Turn the camera off then back on the Kodak EasyShare software CD. 9 Troubleshooting This chapter contains help for your Kodak EasyShare CX4310 digital camera or camera dock II. The camera has been Remove the batteries and exposed to temperatures slowly return the camera close to the lower and batteries...
For updates to room operating range. batteries (page 4). Troubleshooting-Camera Camera Problems Camera Problem Camera does not turn on . Camera does not turn on in cold temperatures. Battery is not properly Remove and reinstall the ...(page 4). 61 Turn the camera off then back on the Kodak EasyShare software CD. 9 Troubleshooting This chapter contains help for your Kodak EasyShare CX4310 digital camera or camera dock II. The camera has been Remove the batteries and exposed to temperatures slowly return the camera close to the lower and batteries...

User Manual
Page 71
... on or did not Turn on the LCD storage location. between the camera and the subject: 9.8 ft (3 m). the lens when the objects away from the lens picture was blocking Keep hands, fingers, or other software. Flash is too dark. viewfinder. In Review mode, The pictures were... taken Transfer the pictures to have than the following distance an effect. function. compensation (page 23). 63 Chapter 9 Camera Problem Cause Solution Part of Use Fill flash ...
... on or did not Turn on the LCD storage location. between the camera and the subject: 9.8 ft (3 m). the lens when the objects away from the lens picture was blocking Keep hands, fingers, or other software. Flash is too dark. viewfinder. In Review mode, The pictures were... taken Transfer the pictures to have than the following distance an effect. function. compensation (page 23). 63 Chapter 9 Camera Problem Cause Solution Part of Use Fill flash ...

User Manual
Page 74
.... Some Advanced Power See the Power Management Management utilities on section of the Kodak EasyShare software USB port on your camera applications running on the camera (page 5). ports to disable this feature. constantly. 66 There is a problem with the camera. computer port (page 51). Install the software (page 49). Replace or recharge the batteries (page 4, page 58).
.... Some Advanced Power See the Power Management Management utilities on section of the Kodak EasyShare software USB port on your camera applications running on the camera (page 5). ports to disable this feature. constantly. 66 There is a problem with the camera. computer port (page 51). Install the software (page 49). Replace or recharge the batteries (page 4, page 58).

User Manual
Page 75
... locate drivers. ! Install Kodak EasyShare software (page 49). computer. ! Disconnect USB cable, or pictures to installing the Kodak EasyShare software on various operating systems (page 77). 67 Re-install Kodak EasyShare software (page 49). ! The Add computer. USCtonanirnttr→sotalllPStaehntteeinls→gosf→twAadrde/: Remove Programs ! See the Kodak Web site devoted to correctly installed on computer. camera dock, from computer...
... locate drivers. ! Install Kodak EasyShare software (page 49). computer. ! Disconnect USB cable, or pictures to installing the Kodak EasyShare software on various operating systems (page 77). 67 Re-install Kodak EasyShare software (page 49). ! The Add computer. USCtonanirnttr→sotalllPStaehntteeinls→gosf→twAadrde/: Remove Programs ! See the Kodak Web site devoted to correctly installed on computer. camera dock, from computer...


