
Instruction Manual
Page 2
...; Connect the equipment into an outlet on , or inside the product relating to provide reasonable protection against harmful interference in a particular installation. Informação sobre a eliminação de pilhas Este produto não deve ser eliminado como lixo doméstico ...que puedan dar el tratamiento adecuado a estos productos y a sus subproductos residuales correspondientes. In compliance with the limits for help. JVC KENWOOD Corporation 2967-3, ISHIKAWA-MACHI, HACHIOJI-SHI, TOKYO, JAPAN THIS PRODUCT COMPLIES WITH DHHS RULES 21CFR SUBCHAPTER J IN EFFECT AT...
...; Connect the equipment into an outlet on , or inside the product relating to provide reasonable protection against harmful interference in a particular installation. Informação sobre a eliminação de pilhas Este produto não deve ser eliminado como lixo doméstico ...que puedan dar el tratamiento adecuado a estos productos y a sus subproductos residuales correspondientes. In compliance with the limits for help. JVC KENWOOD Corporation 2967-3, ISHIKAWA-MACHI, HACHIOJI-SHI, TOKYO, JAPAN THIS PRODUCT COMPLIES WITH DHHS RULES 21CFR SUBCHAPTER J IN EFFECT AT...
Instruction Manual
Page 4
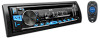
...discs: • Do not touch the recording surface of the faceplate) General: • Avoid using buttons on the faceplate of KD-AR865BTS / KD-R860BT. • [XX] indicates the selected items. • ( XX) indicates references are available on the stated page. 2 ... 7 AUX 8 Pandora® 9 iHeartRadio® 10 SiriusXM® Radio (for KD-R960BTS / KD-AR865BTS) 11 BLUETOOTH® 14 AUDIO SETTINGS 20 DISPLAY SETTINGS 22 MORE INFORMATION 24 TROUBLESHOOTING 26 SPECIFICATIONS 28 INSTALLATION / CONNECTION 30 How to read this unit, pull them out horizontally. • ...
...discs: • Do not touch the recording surface of the faceplate) General: • Avoid using buttons on the faceplate of KD-AR865BTS / KD-R860BT. • [XX] indicates the selected items. • ( XX) indicates references are available on the stated page. 2 ... 7 AUX 8 Pandora® 9 iHeartRadio® 10 SiriusXM® Radio (for KD-R960BTS / KD-AR865BTS) 11 BLUETOOTH® 14 AUDIO SETTINGS 20 DISPLAY SETTINGS 22 MORE INFORMATION 24 TROUBLESHOOTING 26 SPECIFICATIONS 28 INSTALLATION / CONNECTION 30 How to read this unit, pull them out horizontally. • ...
Instruction Manual
Page 7
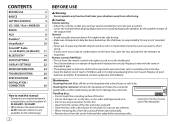
... Creator (JPC) / JVC Music Control (JMC) file ( 25) TRACK RPT/ FOLDER RPT/ RPT OFF : MP3/WMA/AAC/WAV file ONE RPT/ ALL RPT/ RPT OFF : iPod or ANDROID Press repeatedly. You can also install the latest version of the iPod/ iPhone)*1 ANDROID*2 Micro USB 2.0 cable...*1 (commercially available) To On the faceplate Reverse / Fast-forward*3 Press and hold . Press . Follow the instructions to install JVC MUSIC PLAY APP" is selected. ( 6) *4 For CD: Only for iPod/ ANDROID. *5 For iPod/ ANDROID: Applicable only when [HEAD MODE]/ [AUTO MODE] is...
... Creator (JPC) / JVC Music Control (JMC) file ( 25) TRACK RPT/ FOLDER RPT/ RPT OFF : MP3/WMA/AAC/WAV file ONE RPT/ ALL RPT/ RPT OFF : iPod or ANDROID Press repeatedly. You can also install the latest version of the iPod/ iPhone)*1 ANDROID*2 Micro USB 2.0 cable...*1 (commercially available) To On the faceplate Reverse / Fast-forward*3 Press and hold . Press . Follow the instructions to install JVC MUSIC PLAY APP" is selected. ( 6) *4 For CD: Only for iPod/ ANDROID. *5 For iPod/ ANDROID: Applicable only when [HEAD MODE]/ [AUTO MODE] is...

Instruction Manual
Page 11
.... The bookmark is created based on this unit. Press . To select a stored station, press number button 1, 4, 5 or 6. On the remote control Press . Pandora® Preparation: Install the latest version of the iPod/iPhone)*1 The source changes to PANDORA and broadcast starts. Thumbs up or Press . A new station is available on your...
.... The bookmark is created based on this unit. Press . To select a stored station, press number button 1, 4, 5 or 6. On the remote control Press . Pandora® Preparation: Install the latest version of the iPod/iPhone)*1 The source changes to PANDORA and broadcast starts. Thumbs up or Press . A new station is available on your...

Instruction Manual
Page 12
... selected, the current track is skipped. To cancel, press and hold . Press 1. iHeartRadio® Preparation: Install the latest version of the iPod/iPhone)*1 3 Press repeatedly to select IHEARTRADIO. USB input terminal (Accessory of iHeart Link for JVC application on your device (iPhone/ iPod touch), then create an account and log in alphabetical...
... selected, the current track is skipped. To cancel, press and hold . Press 1. iHeartRadio® Preparation: Install the latest version of the iPod/iPhone)*1 3 Press repeatedly to select IHEARTRADIO. USB input terminal (Accessory of iHeart Link for JVC application on your device (iPhone/ iPod touch), then create an account and log in alphabetical...
Instruction Manual
Page 16
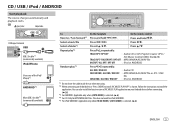
... desired PIN code before pairing. ( 18) • If only "PAIRING" appears, operate the Bluetooth device to confirm pairing. JVC MUSIC PLAY application is installed on the unit and Bluetooth device is established. • Up to five devices can be connected at any time. •... microphone Rear panel Microphone input jack* Microphone (supplied) Adjust the microphone angle Secure using cord clamps (not supplied) if necessary. * For KD-R960BTS / KD-AR865BTS, connect to the microphone input terminal. ( 31) 14 Pair a Bluetooth device When connecting a Bluetooth device to turn on the unit...
... desired PIN code before pairing. ( 18) • If only "PAIRING" appears, operate the Bluetooth device to confirm pairing. JVC MUSIC PLAY application is installed on the unit and Bluetooth device is established. • Up to five devices can be connected at any time. •... microphone Rear panel Microphone input jack* Microphone (supplied) Adjust the microphone angle Secure using cord clamps (not supplied) if necessary. * For KD-R960BTS / KD-AR865BTS, connect to the microphone input terminal. ( 31) 14 Pair a Bluetooth device When connecting a Bluetooth device to turn on the unit...
Instruction Manual
Page 28
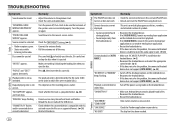
... the problem, the connected Android device is unable to route the audio signal to unit. ( 24) Cannot playback at [AUTO • Make sure JVC MUSIC PLAY APP is installed on the Android device. This unit can only display uppercase letters, numbers, and a limited number of the speaker wires are not displayed. "CHK...
... the problem, the connected Android device is unable to route the audio signal to unit. ( 24) Cannot playback at [AUTO • Make sure JVC MUSIC PLAY APP is installed on the Android device. This unit can only display uppercase letters, numbers, and a limited number of the speaker wires are not displayed. "CHK...

Instruction Manual
Page 29
...up/thumbs down has failed. Phone sound quality is locked. Remedy The selected channel is poor. Visit www.siriusxm.com for JVC application on your device. Your subscription is unsuccessful. "CREATE ERR" Custom station name creation is updated. "NO SKIPS" The... which Pandora is connected to subscribe. "CONNECT ERR" Communication is detected. "LICENSE ERR" You try to a place where you have installed the latest version of iHeartRADIO, custom stations become unavailable. or 1-877-438-9677 in Canada to the unit. Bluetooth® SiriusXM®...
...up/thumbs down has failed. Phone sound quality is locked. Remedy The selected channel is poor. Visit www.siriusxm.com for JVC application on your device. Your subscription is unsuccessful. "CREATE ERR" Custom station name creation is updated. "NO SKIPS" The... which Pandora is connected to subscribe. "CONNECT ERR" Communication is detected. "LICENSE ERR" You try to a place where you have installed the latest version of iHeartRADIO, custom stations become unavailable. or 1-877-438-9677 in Canada to the unit. Bluetooth® SiriusXM®...

Instruction Manual
Page 31
... W × 4 or 50 W × 2 + 50 W × 1 (Subwoofer = 4 Ω) 22 W × 4 4 Ω - 8 Ω KD-R960BTS / KD-R860BT: 2 500 mV/10 kΩ KD-AR865BTS: 4 800 mV/10 kΩ ≤ 600 Ω General Operating Voltage (10.5 V - 16 V allowable) Maximum Current Consumption Operating Temperature Range Installation Size (W × H × D) Weight 14.4 V 10 A 0°C to +40°C 182 mm ×...
... W × 4 or 50 W × 2 + 50 W × 1 (Subwoofer = 4 Ω) 22 W × 4 4 Ω - 8 Ω KD-R960BTS / KD-R860BT: 2 500 mV/10 kΩ KD-AR865BTS: 4 800 mV/10 kΩ ≤ 600 Ω General Operating Voltage (10.5 V - 16 V allowable) Maximum Current Consumption Operating Temperature Range Installation Size (W × H × D) Weight 14.4 V 10 A 0°C to +40°C 182 mm ×...

Instruction Manual
Page 32
...and off by the ignition key. • Keep all cables away from the ignition switch, then disconnect the terminal of speakers to your car When installing without the mounting sleeve Use only the specified screws. on the top side Orientate the trim plate as the heat sink and enclosure become hot... connect the wires of the car battery. 2 Connect the wires properly. Using wrong screws might damage the unit. Consult the car audio dealer. • Install this unit in -dash mounting) Hook on the car are working properly. • If the fuse blows, first make sure the wires are not touching...
...and off by the ignition key. • Keep all cables away from the ignition switch, then disconnect the terminal of speakers to your car When installing without the mounting sleeve Use only the specified screws. on the top side Orientate the trim plate as the heat sink and enclosure become hot... connect the wires of the car battery. 2 Connect the wires properly. Using wrong screws might damage the unit. Consult the car audio dealer. • Install this unit in -dash mounting) Hook on the car are working properly. • If the fuse blows, first make sure the wires are not touching...
Instruction Manual
Page 34
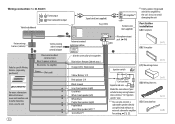
Wiring connection (for installation (A) Faceplate Factory wiring harness (vehicle) Vehicle-specific Wiring Harness (separately purchased) To the steering wheel remote control adapter Recommended connection Blue: To power antenna ...an external subwoofer amplifier. For setting, 21, 22. (D) Wiring harness (E) Extraction key Remote wire (not supplied) Part list for KD-R860BT) Front output Rear/subwoofer output Vehicle dashboard Signal cord (not supplied) Fuse (10 A) JVC Amplifier*1 *1 Firmly connect the ground wire of the amplifier to the car's chassis to avoid damaging the unit.
Wiring connection (for installation (A) Faceplate Factory wiring harness (vehicle) Vehicle-specific Wiring Harness (separately purchased) To the steering wheel remote control adapter Recommended connection Blue: To power antenna ...an external subwoofer amplifier. For setting, 21, 22. (D) Wiring harness (E) Extraction key Remote wire (not supplied) Part list for KD-R860BT) Front output Rear/subwoofer output Vehicle dashboard Signal cord (not supplied) Fuse (10 A) JVC Amplifier*1 *1 Firmly connect the ground wire of the amplifier to the car's chassis to avoid damaging the unit.


