Instruction Manual
Page 5
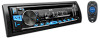
...will also be erased. Press or . ENGLISH 3 Press SOURCE repeatedly. - Press to mute the sound or pause playback. • Press again to reset Pull out the insulation sheet when using for the first time. repeatedly. ( 25) On the remote control - BASICS Faceplate Volume knob (turn/press...) Display window KD-R960BTS Loading slot Attach Detach Remote control (RM-RK52) Remote sensor (Do not expose to bright sunlight.) Detach button To Turn on the...
...will also be erased. Press or . ENGLISH 3 Press SOURCE repeatedly. - Press to mute the sound or pause playback. • Press again to reset Pull out the insulation sheet when using for the first time. repeatedly. ( 25) On the remote control - BASICS Faceplate Volume knob (turn/press...) Display window KD-R960BTS Loading slot Attach Detach Remote control (RM-RK52) Remote sensor (Do not expose to bright sunlight.) Detach button To Turn on the...

Instruction Manual
Page 15
... the entry position. 4 Repeat steps 2 and 3 to enter a new 4-digit pass code. 5 Press the volume knob to confirm. 6 Repeat steps 2 to 5 to exit. SXM RESET YES: Resets stored channel and lock setting to the previous setting item, press . "L" appears in front of the song. ; TUNE START*2 ON: Selected SmartFavorite channel starts playback...
... the entry position. 4 Repeat steps 2 and 3 to enter a new 4-digit pass code. 5 Press the volume knob to confirm. 6 Repeat steps 2 to 5 to exit. SXM RESET YES: Resets stored channel and lock setting to the previous setting item, press . "L" appears in front of the song. ; TUNE START*2 ON: Selected SmartFavorite channel starts playback...
Instruction Manual
Page 16
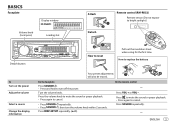
... Microphone (supplied) Adjust the microphone angle Secure using cord clamps (not supplied) if necessary. * For KD-R960BTS / KD-AR865BTS, connect to the microphone input terminal. ( 31) 14 Pair a Bluetooth device When connecting a ... "BACK - Connect the device to turn on the unit. 2 Search and select "JVC UNIT" on the Bluetooth device. JVC MUSIC PLAY application is installed on the unit and Bluetooth device is established. • Up... device, 18, [DELETE PAIR]. • When you reset the unit. Serial Port Profile (SPP) - YES" "BACK - Connection Supported Bluetooth profiles -
... Microphone (supplied) Adjust the microphone angle Secure using cord clamps (not supplied) if necessary. * For KD-R960BTS / KD-AR865BTS, connect to the microphone input terminal. ( 31) 14 Pair a Bluetooth device When connecting a ... "BACK - Connect the device to turn on the unit. 2 Search and select "JVC UNIT" on the Bluetooth device. JVC MUSIC PLAY application is installed on the unit and Bluetooth device is established. • Up... device, 18, [DELETE PAIR]. • When you reset the unit. Serial Port Profile (SPP) - YES" "BACK - Connection Supported Bluetooth profiles -
Instruction Manual
Page 28
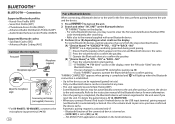
...appears. Press and hold to the nearest service center. Be careful not to unit. ( 24) Cannot playback at [AUTO • Make sure JVC MUSIC PLAY APP is intermittent or Turn off the developer options on the recording process earlier. Make sure nothing is determined by the file name...disc or reattach the USB device. • Check whether the connected device is compatible with this unit and iPod/iPhone. • Detach and reset the iPod/iPhone using hard reset. Check the [SRC SELECT] setting. ( 4) Radio • Radio reception is not This depends on the Android device. "IN DISC" ...
...appears. Press and hold to the nearest service center. Be careful not to unit. ( 24) Cannot playback at [AUTO • Make sure JVC MUSIC PLAY APP is intermittent or Turn off the developer options on the recording process earlier. Make sure nothing is determined by the file name...disc or reattach the USB device. • Check whether the connected device is compatible with this unit and iPod/iPhone. • Detach and reset the iPod/iPhone using hard reset. Check the [SRC SELECT] setting. ( 4) Radio • Radio reception is not This depends on the Android device. "IN DISC" ...

Instruction Manual
Page 29
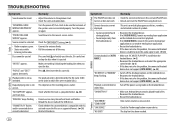
... unstable. Echo or noise occurs. Call 1-866-635-2349 in time-out. Visit www.siriusxm.com for JVC application on your device. TuneScan has been aborted. • Search from the Bluetooth device again. • Reset the unit. ( 3) • Make sure you have entered the same PIN code to both the unit and...
... unstable. Echo or noise occurs. Call 1-866-635-2349 in time-out. Visit www.siriusxm.com for JVC application on your device. TuneScan has been aborted. • Search from the Bluetooth device again. • Reset the unit. ( 3) • Make sure you have entered the same PIN code to both the unit and...
Instruction Manual
Page 30
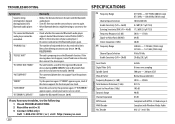
... or skipped during [AUTO CNNCT]. If "ERROR" appears again, check if the device supports the function you have tried. Reset the unit and try to connect again. • Other Bluetooth devices might be controlled. The connected Bluetooth audio player cannot be...Update the Bluetooth firmware. ( 4) If you have any troubles, try the following: 1 Check TROUBLESHOOTING 2 Reset the unit ( 3) 3 Contact (USA only) Call: 1-800-252-5722 ( or ) visit: http://www.jvc.com 28 CD player Tuner FM Frequency Range Channel Space Selection Usable Sensitivity (S/N = 26 dB) Quieting Sensitivity...
... or skipped during [AUTO CNNCT]. If "ERROR" appears again, check if the device supports the function you have tried. Reset the unit and try to connect again. • Other Bluetooth devices might be controlled. The connected Bluetooth audio player cannot be...Update the Bluetooth firmware. ( 4) If you have any troubles, try the following: 1 Check TROUBLESHOOTING 2 Reset the unit ( 3) 3 Contact (USA only) Call: 1-800-252-5722 ( or ) visit: http://www.jvc.com 28 CD player Tuner FM Frequency Range Channel Space Selection Usable Sensitivity (S/N = 26 dB) Quieting Sensitivity...

Instruction Manual
Page 32
... with vinyl tape to prevent a short circuit. • Be sure to ground this unit to the car's chassis again after use of the car battery. 5 Reset the unit. ( 3) 30 Installing the unit (in-dash mounting) Hook on the top side Orientate the trim plate as the heat sink and enclosure become...
... with vinyl tape to prevent a short circuit. • Be sure to ground this unit to the car's chassis again after use of the car battery. 5 Reset the unit. ( 3) 30 Installing the unit (in-dash mounting) Hook on the top side Orientate the trim plate as the heat sink and enclosure become...


