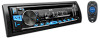

Instruction Manual
Page 2
... occur in a particular installation. CAUTION Use of controls or adjustments or performance of procedures other than those specified herein may generate or use radio frequency energy. However, there is encouraged to try to radio or television reception, which can be determined by turning the equipment off and on, the user is no podrán ser desechados como residuos domésticos...
... occur in a particular installation. CAUTION Use of controls or adjustments or performance of procedures other than those specified herein may generate or use radio frequency energy. However, there is encouraged to try to radio or television reception, which can be determined by turning the equipment off and on, the user is no podrán ser desechados como residuos domésticos...
Instruction Manual
Page 4
... USE 2 BASICS 3 GETTING STARTED 4 CD / USB / iPod / ANDROID 5 RADIO 7 AUX 8 Pandora® 9 iHeartRadio® 10 SiriusXM® Radio (for KD-R960BTS / KD-AR865BTS) 11 BLUETOOTH® 14 AUDIO SETTINGS 20 DISPLAY SETTINGS 22 MORE INFORMATION 24 TROUBLESHOOTING 26 SPECIFICATIONS 28 INSTALLATION / CONNECTION 30 How to damage the connector. Handling discs: • Do not touch the recording surface of the faceplate) Dispose of explosion if replaced incorrectly. Replace it might hinder safe driving. • Make...
... USE 2 BASICS 3 GETTING STARTED 4 CD / USB / iPod / ANDROID 5 RADIO 7 AUX 8 Pandora® 9 iHeartRadio® 10 SiriusXM® Radio (for KD-R960BTS / KD-AR865BTS) 11 BLUETOOTH® 14 AUDIO SETTINGS 20 DISPLAY SETTINGS 22 MORE INFORMATION 24 TROUBLESHOOTING 26 SPECIFICATIONS 28 INSTALLATION / CONNECTION 30 How to damage the connector. Handling discs: • Do not touch the recording surface of the faceplate) Dispose of explosion if replaced incorrectly. Replace it might hinder safe driving. • Make...
Instruction Manual
Page 5
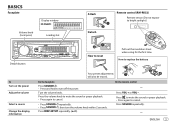
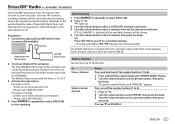
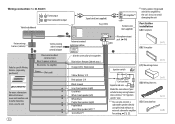
.... Press or . Press SOURCE repeatedly. - ENGLISH 3 Press the volume knob to mute the sound or pause playback. • Press again to cancel. BASICS Faceplate Volume knob (turn/press) Display window KD-R960BTS Loading slot Attach Detach Remote control (RM-RK52) Remote sensor (Do not expose to bright sunlight.) Detach button To Turn on the power Adjust the volume Select a source Change the display information How to replace the battery Your preset adjustments will also be...
.... Press or . Press SOURCE repeatedly. - ENGLISH 3 Press the volume knob to mute the sound or pause playback. • Press again to cancel. BASICS Faceplate Volume knob (turn/press) Display window KD-R960BTS Loading slot Attach Detach Remote control (RM-RK52) Remote sensor (Do not expose to bright sunlight.) Detach button To Turn on the power Adjust the volume Select a source Change the display information How to replace the battery Your preset adjustments will also be...
Instruction Manual
Page 9
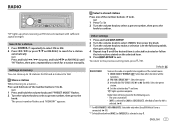
... select a preset number, then press the knob to make a selection (see the following cases. • The unit is turned off. • [OFF] is selected in memory You can store up to search for AM. RADIO "ST" lights up when complete. Press and hold the volume knob until the desired item is selected/activated or follow the instructions stated on the radio at a specific time regardless of the current source...
... select a preset number, then press the knob to make a selection (see the following cases. • The unit is turned off. • [OFF] is selected in memory You can store up to search for AM. RADIO "ST" lights up when complete. Press and hold the volume knob until the desired item is selected/activated or follow the instructions stated on the radio at a specific time regardless of the current source...

Instruction Manual
Page 10
... ESP (Spanish music), HIP HOP, WEATHER Use a portable audio player 1 Connect a portable audio player (commercially available). 3.5 mm (1/8") stereo mini plug with "L" shaped connector (commercially available) Auxiliary input jack Portable audio player 2 Select [ON] for FM source. 8 RADIO AUX Default: XX SSM SSM 01 - 06 / SSM 07 - 12 / SSM 13 - 18: Automatically presets up to store the following 12 stations. OFF: Cancels. MONO Displayed only when the source is tuned in [SRC SELECT]. ( 4) 3 Press repeatedly...
... ESP (Spanish music), HIP HOP, WEATHER Use a portable audio player 1 Connect a portable audio player (commercially available). 3.5 mm (1/8") stereo mini plug with "L" shaped connector (commercially available) Auxiliary input jack Portable audio player 2 Select [ON] for FM source. 8 RADIO AUX Default: XX SSM SSM 01 - 06 / SSM 07 - 12 / SSM 13 - 18: Automatically presets up to store the following 12 stations. OFF: Cancels. MONO Displayed only when the source is tuned in [SRC SELECT]. ( 4) 3 Press repeatedly...

Instruction Manual
Page 11
... knob. 3 Turn the volume knob to the USB input terminal. USB input terminal (Accessory of the Pandora application on your device (iPhone/ iPod touch), then create an account and log in [SRC SELECT]. ( 4) Start listening 1 Open the Pandora application on this unit. Press . Pandora® Preparation: Install the latest version of the iPod/iPhone)*1 The source changes to PANDORA and broadcast starts. To On the faceplate Playback...
... knob. 3 Turn the volume knob to the USB input terminal. USB input terminal (Accessory of the Pandora application on your device (iPhone/ iPod touch), then create an account and log in [SRC SELECT]. ( 4) Start listening 1 Open the Pandora application on this unit. Press . Pandora® Preparation: Install the latest version of the iPod/iPhone)*1 The source changes to PANDORA and broadcast starts. To On the faceplate Playback...
Instruction Manual
Page 13
... world of satellite radio. " " lights up to search for a channel manually. • Pressing and holding changes the channel rapidly. Enter the pass code to receive the channel. ( 13) Store a channel You can be shown. 5 Turn the volume knob to select a channel, then press the knob. (or) Press to 18 channels. Press on the rear panel SiriusXM Vehicle Tuner 2 Check your Radio ID for activation. Get over 140 channels, including commercial-free music plus the...
... world of satellite radio. " " lights up to search for a channel manually. • Pressing and holding changes the channel rapidly. Enter the pass code to receive the channel. ( 13) Store a channel You can be shown. 5 Turn the volume knob to select a channel, then press the knob. (or) Press to 18 channels. Press on the rear panel SiriusXM Vehicle Tuner 2 Check your Radio ID for activation. Get over 140 channels, including commercial-free music plus the...

Instruction Manual
Page 14
...; User preset channels are assigned as the SmartFavorites channels. To Select a stored SmartFavorite channel Cancel SmartFavorites channels Reassign SmartFavorites channels On the faceplate Press one of the number buttons (1 to 6). 1 Press . 2 Turn the volume knob to select PRESET, then press the knob. 3 Turn the volume knob to select a preset number, then press the knob to confirm. 1 Press . 2 Turn the volume knob to select PRESET, then press the knob. 3 Turn the volume knob to start for most music channels...
...; User preset channels are assigned as the SmartFavorites channels. To Select a stored SmartFavorite channel Cancel SmartFavorites channels Reassign SmartFavorites channels On the faceplate Press one of the number buttons (1 to 6). 1 Press . 2 Turn the volume knob to select PRESET, then press the knob. 3 Turn the volume knob to select a preset number, then press the knob to confirm. 1 Press . 2 Turn the volume knob to select PRESET, then press the knob. 3 Turn the volume knob to start for most music channels...
Instruction Manual
Page 16
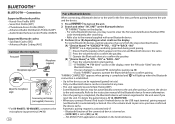
... USB input terminal, pairing request (via Bluetooth) is activated only if: - Bluetooth function of the Bluetooth device for the first time, perform pairing between the unit and the device. 1 Press to pair once you reset the unit. Connection Supported Bluetooth profiles - Phonebook Access Profile (PBAP) - Connect the device to confirm the passkey. Serial Port Profile (SPP) - Audio/Video Remote Control Profile (AVRCP) Supported Bluetooth codecs - Press the volume knob to turn on the unit. 2 Search and select "JVC UNIT" on the display, enter the PIN code...
... USB input terminal, pairing request (via Bluetooth) is activated only if: - Bluetooth function of the Bluetooth device for the first time, perform pairing between the unit and the device. 1 Press to pair once you reset the unit. Connection Supported Bluetooth profiles - Phonebook Access Profile (PBAP) - Connect the device to confirm the passkey. Serial Port Profile (SPP) - Audio/Video Remote Control Profile (AVRCP) Supported Bluetooth codecs - Press the volume knob to turn on the unit. 2 Search and select "JVC UNIT" on the display, enter the PIN code...
Instruction Manual
Page 17
... number increased. BLUETOOTH® BLUETOOTH - For KD-R960BTS: All the buttons and display flash. - If you turn off the unit or detach the faceplate, the Bluetooth connection is selected or activated. 4 Press to the previous setting item, press . To return to exit. ENGLISH 15 To On the faceplate On the remote control Answer a call Reject a call End a call : - Press . Press the volume knob during a phone conversation. modes connected Bluetooth mobile phone. * Not applicable for [COLOR...
... number increased. BLUETOOTH® BLUETOOTH - For KD-R960BTS: All the buttons and display flash. - If you turn off the unit or detach the faceplate, the Bluetooth connection is selected or activated. 4 Press to the previous setting item, press . To return to exit. ENGLISH 15 To On the faceplate On the remote control Answer a call Reject a call End a call : - Press . Press the volume knob during a phone conversation. modes connected Bluetooth mobile phone. * Not applicable for [COLOR...
Instruction Manual
Page 20
... volume knob to confirm pairing. "BLUETOOTH" "CHECK MODE" appears. AUTO PAIR ON: The unit automatically pair supported Bluetooth device (iPhone/ iPod touch/ Android device) when it is successful, "PAIRING OK" "[Device Name]" appears and Bluetooth compatibility check starts. NO: Cancels. "SEARCH NOW USING PHONE" "PIN IS 0000" scrolls on the display. 2 Search and select "JVC UNIT" on the display. " " appears in front of this function may not work. ; MY ADDRESS: Shows address of the device name when connected. For JVC Smart Music Control operations...
... volume knob to confirm pairing. "BLUETOOTH" "CHECK MODE" appears. AUTO PAIR ON: The unit automatically pair supported Bluetooth device (iPhone/ iPod touch/ Android device) when it is successful, "PAIRING OK" "[Device Name]" appears and Bluetooth compatibility check starts. NO: Cancels. "SEARCH NOW USING PHONE" "PIN IS 0000" scrolls on the display. 2 Search and select "JVC UNIT" on the display. " " appears in front of this function may not work. ; MY ADDRESS: Shows address of the device name when connected. For JVC Smart Music Control operations...

Instruction Manual
Page 23
... amplifier. ( 31, 32) SUB.W*7 ON / OFF: Turns on or off from the front/rear speakers. ENGLISH 21 SUB.W LPF*5 THROUGH: All signals are sent to prevent damaging the speakers.) ; R06 (00): Adjusts the left and right speaker output balance. OFF: Cancels. FADER R06 - HIGH POWER: The maximum volume level is set to [REAR/REAR] or [SUB.W/SUB.W]. ( 22) For unit with frequencies lower than [THROUGH] is selected.) AMP GAIN LOW POWER: Limits the maximum volume level...
... amplifier. ( 31, 32) SUB.W*7 ON / OFF: Turns on or off from the front/rear speakers. ENGLISH 21 SUB.W LPF*5 THROUGH: All signals are sent to prevent damaging the speakers.) ; R06 (00): Adjusts the left and right speaker output balance. OFF: Cancels. FADER R06 - HIGH POWER: The maximum volume level is set to [REAR/REAR] or [SUB.W/SUB.W]. ( 22) For unit with frequencies lower than [THROUGH] is selected.) AMP GAIN LOW POWER: Limits the maximum volume level...
Instruction Manual
Page 24
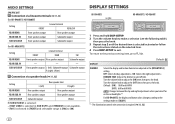
... terminal FRONT REAR SW REAR/REAR Front speakers output Rear speakers output Subwoofer output REAR/SUB.W - - - Default: XX DISPLAY DIMMER Selects the display and button illumination adjusted in [FADER] and selectable range is [R06] to [00] DISPLAY SETTINGS KD-R960BTS KD-AR865BTS / KD-R860BT 1 Press and hold . 2 Turn the volume knob to make a selection (see the following table), then press the knob. 3 Repeat step 2 until the desired item is selected/activated or follow the instructions stated on [COLOR]. *1 The illumination control wire connection is selected in the...
... terminal FRONT REAR SW REAR/REAR Front speakers output Rear speakers output Subwoofer output REAR/SUB.W - - - Default: XX DISPLAY DIMMER Selects the display and button illumination adjusted in [FADER] and selectable range is [R06] to [00] DISPLAY SETTINGS KD-R960BTS KD-AR865BTS / KD-R860BT 1 Press and hold . 2 Turn the volume knob to make a selection (see the following table), then press the knob. 3 Repeat step 2 until the desired item is selected/activated or follow the instructions stated on [COLOR]. *1 The illumination control wire connection is selected in the...

Instruction Manual
Page 26
... the Android device supports both mass storage class device and AOA 2.0, this unit always playback via a USB hub. • Connecting a cable whose rating is other than 5 m may result in [HEAD MODE]. • The song order displayed on this unit may cause malfunction. • DualDisc playback: The Non-DVD side of the iPod/ iPhone. • If some operations are dirty. - MORE INFORMATION About discs and audio files •...
... the Android device supports both mass storage class device and AOA 2.0, this unit always playback via a USB hub. • Connecting a cable whose rating is other than 5 m may result in [HEAD MODE]. • The song order displayed on this unit may cause malfunction. • DualDisc playback: The Non-DVD side of the iPod/ iPhone. • If some operations are dirty. - MORE INFORMATION About discs and audio files •...
Instruction Manual
Page 28
... does not solve the problem, the connected Android device does not support [AUTO MODE]. ( 24) Playback is installed on the Android device. "NO SKIPS" The skip limit has been reached. Source cannot be heard. • Adjust the volume to unit. ( 24) Cannot playback at [AUTO • Make sure JVC MUSIC PLAY APP is intermittent or Turn off , then check to be ejected. listening to drop the disc when it is...
... does not solve the problem, the connected Android device does not support [AUTO MODE]. ( 24) Playback is installed on the Android device. "NO SKIPS" The skip limit has been reached. Source cannot be heard. • Adjust the volume to unit. ( 24) Cannot playback at [AUTO • Make sure JVC MUSIC PLAY APP is intermittent or Turn off , then check to be ejected. listening to drop the disc when it is...

Instruction Manual
Page 29
... the Bluetooth device again. • Reset the unit. ( 3) • Make sure you have installed the latest version of the Pandora application on your device. "CREATE ERR" Custom station name creation is detected. "STATION NOT SELECTED" No station is unstable. Pairing cannot be selected. "CONNECT ERR" Communication is selected. "PLS LOGIN" You haven't log in U.S.A. Bluetooth® SiriusXM® Radio Symptom "CH LOCKED LOCK CODE?" Make sure the SiriusXM Vehicle Tuner...
... the Bluetooth device again. • Reset the unit. ( 3) • Make sure you have installed the latest version of the Pandora application on your device. "CREATE ERR" Custom station name creation is detected. "STATION NOT SELECTED" No station is unstable. Pairing cannot be selected. "CONNECT ERR" Communication is selected. "PLS LOGIN" You haven't log in U.S.A. Bluetooth® SiriusXM® Radio Symptom "CH LOCKED LOCK CODE?" Make sure the SiriusXM Vehicle Tuner...
Instruction Manual
Page 30
...again. If "ERROR" appears again, check if the device supports the function you have tried. Update the Bluetooth firmware. ( 4) If you have any troubles, try the operation again. The unit failed to use the Bluetooth function. TROUBLESHOOTING SPECIFICATIONS Bluetooth® Symptom Sound is preparing to search for the registered Bluetooth devices during playback of a Bluetooth audio player. The connected Bluetooth audio player cannot be trying to connect to the unit. • Check whether the connected Bluetooth audio player supports Audio/Video Remote Control Profile (AVRCP...
...again. If "ERROR" appears again, check if the device supports the function you have tried. Update the Bluetooth firmware. ( 4) If you have any troubles, try the operation again. The unit failed to use the Bluetooth function. TROUBLESHOOTING SPECIFICATIONS Bluetooth® Symptom Sound is preparing to search for the registered Bluetooth devices during playback of a Bluetooth audio player. The connected Bluetooth audio player cannot be trying to connect to the unit. • Check whether the connected Bluetooth audio player supports Audio/Video Remote Control Profile (AVRCP...

Instruction Manual
Page 32
... connect them in parallel. • Connect speakers with one that has the same rating. Do the required wiring. ( 31, 32) Dashboard of the unit. How to professionals. If the maximum power of the speakers is lower than 50 W, change the [AMP GAIN] setting to the car's chassis again after use of your vehicle. Consult the car audio dealer. • Install this unit in place. Basic procedure 1 Remove...
... connect them in parallel. • Connect speakers with one that has the same rating. Do the required wiring. ( 31, 32) Dashboard of the unit. How to professionals. If the maximum power of the speakers is lower than 50 W, change the [AMP GAIN] setting to the car's chassis again after use of your vehicle. Consult the car audio dealer. • Install this unit in place. Basic procedure 1 Remove...
Instruction Manual
Page 33
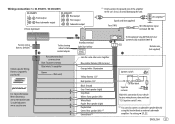
... wire Make this connection if your vehicle factory wiring harness does not have "12 V ignition switch" wire. *2 You can also connect a subwoofer speaker directly using this lead without an external subwoofer amplifier. Signal cord (not supplied) JVC Amplifier*1 Fuse (10 A) MIC (Microphone input terminal) ( 14) Factory wiring harness (vehicle) Vehicle-specific Wiring Harness (separately purchased) For more information: Metra Electronics: www.metraonline.com Scosche Industries: www.scosche.com To the steering wheel remote control adapter Recommended connection Blue: To power antenna Blue...
... wire Make this connection if your vehicle factory wiring harness does not have "12 V ignition switch" wire. *2 You can also connect a subwoofer speaker directly using this lead without an external subwoofer amplifier. Signal cord (not supplied) JVC Amplifier*1 Fuse (10 A) MIC (Microphone input terminal) ( 14) Factory wiring harness (vehicle) Vehicle-specific Wiring Harness (separately purchased) For more information: Metra Electronics: www.metraonline.com Scosche Industries: www.scosche.com To the steering wheel remote control adapter Recommended connection Blue: To power antenna Blue...
Instruction Manual
Page 34
...Green: Rear speaker (left)*2 Green/black *2 Microphone input jack ( 14) (B) Trim plate Ignition switch (C) Mounting sleeve Car fuse block Separate red wire Make this connection if your vehicle factory wiring harness does not have "12 V ignition switch" wire. *2 You can also connect a subwoofer speaker directly using this lead without an external subwoofer amplifier. Remote wire (not supplied) Part list for KD-R860BT) Front output Rear/subwoofer output Vehicle dashboard Signal cord (not supplied) Fuse (10 A) JVC Amplifier*1 *1 Firmly connect the ground wire of the amplifier to the car...
...Green: Rear speaker (left)*2 Green/black *2 Microphone input jack ( 14) (B) Trim plate Ignition switch (C) Mounting sleeve Car fuse block Separate red wire Make this connection if your vehicle factory wiring harness does not have "12 V ignition switch" wire. *2 You can also connect a subwoofer speaker directly using this lead without an external subwoofer amplifier. Remote wire (not supplied) Part list for KD-R860BT) Front output Rear/subwoofer output Vehicle dashboard Signal cord (not supplied) Fuse (10 A) JVC Amplifier*1 *1 Firmly connect the ground wire of the amplifier to the car...


