HP Printers - Supported Citrix Presentation Server environments
Page 22
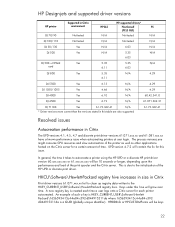
...GUID (globally unique identifier). HKCU\Software\Hewlett-Packard registry hive increases in size in Citrix The UPD versions 4.1, 4.5, 4.7 and discrete print driver versions 61.071.xxx.xx and 61.081.xxx.xx have a known performance issue when autocreating printers at user login. HP Designjets and supported driver versions HP printer... DJ 70/90 Supported in Citrix environment Not tested HPGL2 N/A HP-supported drivers* Host-based (PCL3 GUI) Not tested PS...
...GUID (globally unique identifier). HKCU\Software\Hewlett-Packard registry hive increases in size in Citrix The UPD versions 4.1, 4.5, 4.7 and discrete print driver versions 61.071.xxx.xx and 61.081.xxx.xx have a known performance issue when autocreating printers at user login. HP Designjets and supported driver versions HP printer... DJ 70/90 Supported in Citrix environment Not tested HPGL2 N/A HP-supported drivers* Host-based (PCL3 GUI) Not tested PS...
HP Designjet Printers & Mac OS X 10.6
Page 4
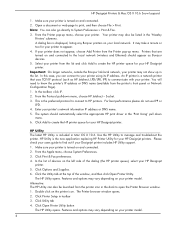
... tab at the top of the dialog (the HP printer queue), select your users guide to appear. 4. From the Printer pop-up in toolbar 3. Please check your HP Designjet printer. 5. In the list of devices on and connected. 2. Enter your HP Designjet printers. Make sure your printer is a network printer that are turned on your HP Designjet printer. Click Printer Setup in the list. In this case...
... tab at the top of the dialog (the HP printer queue), select your users guide to appear. 4. From the Printer pop-up in toolbar 3. Please check your HP Designjet printer. 5. In the list of devices on and connected. 2. Enter your HP Designjet printers. Make sure your printer is a network printer that are turned on your HP Designjet printer. Click Printer Setup in the list. In this case...
HP Designjet Printers & Mac OS X 10.6
Page 5
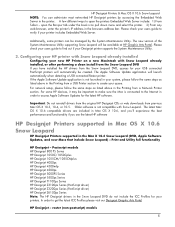
... the printer's IP address in the Snow Leopard DVD do not include the ICC Profiles for the latest HP software. Please check your users guide to get the latest ICC Profiles please visit our Designjet Graphic Arts Portal HP Designjet - Postscript models HP Designjet 800 PS Series HP Designjet 1050C/1050Cplus HP Designjet 1055CM/1055CMplus HP Designjet 4000ps HP Designjet 4500mfp HP Designjet 4500ps HP Designjet 5000PS Series HP Designjet 5500ps Series HP Designjet T1100ps Series HP Designjet...
... the printer's IP address in the Snow Leopard DVD do not include the ICC Profiles for the latest HP software. Please check your users guide to get the latest ICC Profiles please visit our Designjet Graphic Arts Portal HP Designjet - Postscript models HP Designjet 800 PS Series HP Designjet 1050C/1050Cplus HP Designjet 1055CM/1055CMplus HP Designjet 4000ps HP Designjet 4500mfp HP Designjet 4500ps HP Designjet 5000PS Series HP Designjet 5500ps Series HP Designjet T1100ps Series HP Designjet...

HP DesignJet 1000 Series Take-Up Reel UserÂ’s Guide - C6079-90001
Page 13
...is loaded, remove it . 4. Carefully lever apart the capping strip assembly cross-brace assembly. through the holes at the bottom. 13 HP DesignJet 1000 Series Take-Up Reel If you do not find any "TUR installed" option, you may need to Yes. Carefully lever the six... your printer's firmware (see Chapter 3 of paper is in use, remove it (see Upgrading your Printer, on page 4). 2. Remove the bin assembly with a flat-blade screwdriver. 7. Carefully lever the six retaining clips from the paper-bin support. Installing the Take-Up Reel 6. If a roll of the User's Guide). ...
...is loaded, remove it . 4. Carefully lever apart the capping strip assembly cross-brace assembly. through the holes at the bottom. 13 HP DesignJet 1000 Series Take-Up Reel If you do not find any "TUR installed" option, you may need to Yes. Carefully lever the six... your printer's firmware (see Chapter 3 of paper is in use, remove it (see Upgrading your Printer, on page 4). 2. Remove the bin assembly with a flat-blade screwdriver. 7. Carefully lever the six retaining clips from the paper-bin support. Installing the Take-Up Reel 6. If a roll of the User's Guide). ...
HP DesignJet 1000 Series Take-Up Reel UserÂ’s Guide - C6079-90001
Page 21
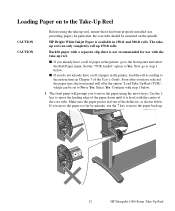
...have selected the paper type, the front panel will prompt you have a roll of paper in the printer, load the roll according to move the paper too far by mistake, use with the centre of ...back up reel, ensure that it is level with the take -up . 21 HP DesignJet 1000 Series Take-Up Reel HP Bright White Inkjet Paper is not recommended for use the ↑ key to the front panel and ...mounted on to Yes. If you already have a roll of paper in front of the User's Guide. Make sure the paper passes in the printer, go to step 1 below . 1 The front panel will offer the option "Load ...
...have selected the paper type, the front panel will prompt you have a roll of paper in the printer, load the roll according to move the paper too far by mistake, use with the centre of ...back up reel, ensure that it is level with the take -up . 21 HP DesignJet 1000 Series Take-Up Reel HP Bright White Inkjet Paper is not recommended for use the ↑ key to the front panel and ...mounted on to Yes. If you already have a roll of paper in front of the User's Guide. Make sure the paper passes in the printer, go to step 1 below . 1 The front panel will offer the option "Load ...

HP DesignJet 1000 Series Take-Up Reel UserÂ’s Guide - C6079-90001
Page 31
Remove the core from the printer, see the User's Guide. 31 HP DesignJet 1000 Series Take-Up Reel Take-up reel spindle. 7 Remove the take-up reel spindle. 42'' + + / =1=03=6655'07'/4'9m'/'1'1/m1523m770m2mmmm + 12'' / 305mm 8 Unlock and remove the left-hand paper guide from the take-up reel spindle Take-Up Core (with paper) Paper guide To remove roll paper from the spindle.
Remove the core from the printer, see the User's Guide. 31 HP DesignJet 1000 Series Take-Up Reel Take-up reel spindle. 7 Remove the take-up reel spindle. 42'' + + / =1=03=6655'07'/4'9m'/'1'1/m1523m770m2mmmm + 12'' / 305mm 8 Unlock and remove the left-hand paper guide from the take-up reel spindle Take-Up Core (with paper) Paper guide To remove roll paper from the spindle.

HP DesignJet 1000 Series Take-Up Reel UserÂ’s Guide - C6079-90001
Page 36
...°C HP DesignJet 1000 Series Take-Up Reel 36 There are three drying time settings, which are required to Best mode only. HP Paper Type HP Glossy Photo Matte Film Clear Film Width of Printing Area 12 inches or more 12 inches or more 12 inches or more detail in Chapter 2 of the User's Guide. The... table below shows paper that may need a longer time to dry, and so the printer will be damaged...
...°C HP DesignJet 1000 Series Take-Up Reel 36 There are three drying time settings, which are required to Best mode only. HP Paper Type HP Glossy Photo Matte Film Clear Film Width of Printing Area 12 inches or more 12 inches or more 12 inches or more detail in Chapter 2 of the User's Guide. The... table below shows paper that may need a longer time to dry, and so the printer will be damaged...
Service Manual
Page 4
... this Manual Purpose This Service Manual contains information necessary to test, calibrate and service: n HP DesignJet 1050C Printer (Model C6074A) n HP DesignJet 1055CM Printer (Model C6075A) For information about using these printers, refer to the corresponding User and Quick Reference Guides. Using this Service Manual are to be performed by HP Certified service personnel only. Readership The procedures described in Chapter 7.
... this Manual Purpose This Service Manual contains information necessary to test, calibrate and service: n HP DesignJet 1050C Printer (Model C6074A) n HP DesignJet 1055CM Printer (Model C6075A) For information about using these printers, refer to the corresponding User and Quick Reference Guides. Using this Service Manual are to be performed by HP Certified service personnel only. Readership The procedures described in Chapter 7.
Service Manual
Page 23
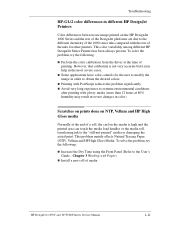
...hours at the time of media. HP DesignJets 1050C and 1055CM Printers Service Manual 1-11 n Some applications have color controls for other printers. This problem mainly affects Natural Tracing Paper (NTP), Vellum and HP High Gloss Media. Chapter 3 ...color). To solve the problem, try the following : n Increase the Dry Time using the Front Panel (Refer to obtain the desired colors. n Printing with Paper). n Avoid very long exposures to extreme environmental conditions after printing with the rest of the inks for the user to modify the image in order to the User's Guide...
...hours at the time of media. HP DesignJets 1050C and 1055CM Printers Service Manual 1-11 n Some applications have color controls for other printers. This problem mainly affects Natural Tracing Paper (NTP), Vellum and HP High Gloss Media. Chapter 3 ...color). To solve the problem, try the following : n Increase the Dry Time using the Front Panel (Refer to obtain the desired colors. n Printing with Paper). n Avoid very long exposures to extreme environmental conditions after printing with the rest of the inks for the user to modify the image in order to the User's Guide...
Service Manual
Page 24
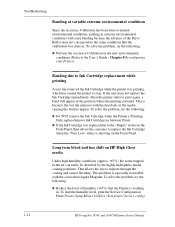
...8 Reconfiguring your Printer). Banding due to Ink Cartridge replacement while printing A user has removed the Ink Cartridge while the printer was done in. This is especially noticeable with the dried ink on HP High Gloss media... Panel. Long term bleed and hue shift on the media causing the band to the User's Guide - Troubleshooting Banding at variable extreme environmental conditions Since the Accuracy Calibration has been done at...wet ink interacts with the colors that the calibration was printing, which has caused the printer to migrate through the coating and causes bleeding.
...8 Reconfiguring your Printer). Banding due to Ink Cartridge replacement while printing A user has removed the Ink Cartridge while the printer was done in. This is especially noticeable with the dried ink on HP High Gloss media... Panel. Long term bleed and hue shift on the media causing the band to the User's Guide - Troubleshooting Banding at variable extreme environmental conditions Since the Accuracy Calibration has been done at...wet ink interacts with the colors that the calibration was printing, which has caused the printer to migrate through the coating and causes bleeding.

Service Manual
Page 26
...remember because if this will have irregular edges. n If the media you are using the Overdrive Cleaning Service Utility ⇒ Page 4-37. 1-14 HP DesignJets 1050C and 1055CM Printers Service Manual This is very slippery, hold the media with the right-hand edge against the blue perforated line on the roll. The right... or Incorrectly Positioned n The roll may be loaded at an angle. n Perform the manual alignment procedure (Refer to load it will help the printer to the User's Guide). n Check that the paper is not done, the media may be loaded the wrong way.
...remember because if this will have irregular edges. n If the media you are using the Overdrive Cleaning Service Utility ⇒ Page 4-37. 1-14 HP DesignJets 1050C and 1055CM Printers Service Manual This is very slippery, hold the media with the right-hand edge against the blue perforated line on the roll. The right... or Incorrectly Positioned n The roll may be loaded at an angle. n Perform the manual alignment procedure (Refer to load it will help the printer to the User's Guide). n Check that the paper is not done, the media may be loaded the wrong way.
Service Manual
Page 73
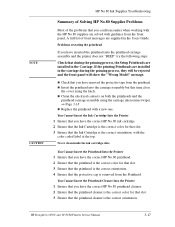
If the printing Printheads are installed in the carriage during the priming process, the Setup Printheads are installed in the Users Guide. Problems reseating the printhead If you have inserted the printhead into the carriage assembly but this time close the cover ...orientation, with guidance from the front panel. HP DesignJets 1050C and 1055CM Printers Service Manual 3-17 n Check that you have the correct HP No.80 printhead cleaner. 2 Ensure that the printhead cleaner is the correct color for that slot. 3 Ensure that you have the correct HP No.80 printhead. 2 Ensure that the ...
If the printing Printheads are installed in the carriage during the priming process, the Setup Printheads are installed in the Users Guide. Problems reseating the printhead If you have inserted the printhead into the carriage assembly but this time close the cover ...orientation, with guidance from the front panel. HP DesignJets 1050C and 1055CM Printers Service Manual 3-17 n Check that you have the correct HP No.80 printhead cleaner. 2 Ensure that the printhead cleaner is the correct color for that slot. 3 Ensure that you have the correct HP No.80 printhead. 2 Ensure that the ...
Service Manual
Page 169
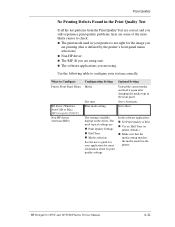
... settings are: n Print Quality Settings n Half Tone n Media selection See the user's guide for your printer is not right for more likely causes to Best n Use no Half Tone (or printer default.) n Make sure that the media setting matches the media loaded in the ...some of the more information about its print quality settings. HP DesignJets 1050C and 1055CM Printers Service Manual 6-21 Use the following table to Configure Printer Front-Panel Menu HP driver (Windows, AutoCAD or Mac) (HP DesignJet 2500CP) Non-HP drivers (Software RIPs) Configuration Setting Media Dry time Print mode...
... settings are: n Print Quality Settings n Half Tone n Media selection See the user's guide for your printer is not right for more likely causes to Best n Use no Half Tone (or printer default.) n Make sure that the media setting matches the media loaded in the ...some of the more information about its print quality settings. HP DesignJets 1050C and 1055CM Printers Service Manual 6-21 Use the following table to Configure Printer Front-Panel Menu HP driver (Windows, AutoCAD or Mac) (HP DesignJet 2500CP) Non-HP drivers (Software RIPs) Configuration Setting Media Dry time Print mode...

Service Manual
Page 212
... right hand side chassis. 6. WARNING NOTE NOTE Switch off the printer and remove the power cable. 1. Support the cover throughout the next step. 5. Removal and Installation Right Hand Cover Refer to the User Guide). Disconnect the aerosol fan cable from position P7 AEROSOL FAN on ...and the aerosol fan cable from the right hand trim (item 2). Disconnect the front panel cable from the service station cable. 8-4 HP DesignJets 1050C and 1055CM Printers Service Manual Remove two T-15 screws (item 1) from a hole in the right hand side chassis. "Electronics Module Left Rear ...
... right hand side chassis. 6. WARNING NOTE NOTE Switch off the printer and remove the power cable. 1. Support the cover throughout the next step. 5. Removal and Installation Right Hand Cover Refer to the User Guide). Disconnect the aerosol fan cable from position P7 AEROSOL FAN on ...and the aerosol fan cable from the right hand trim (item 2). Disconnect the front panel cable from the service station cable. 8-4 HP DesignJets 1050C and 1055CM Printers Service Manual Remove two T-15 screws (item 1) from a hole in the right hand side chassis. "Electronics Module Left Rear ...

Service Manual
Page 214
... Right Hand Cover (item 3) (Refer to the User Guide). The Front Panel Assembly and the Front-Panel Assembly Cable can be properly installed. Front Panel Assembly WARNING Removal 1. Remove the Printhead Cleaners (Refer to Figure 2). 3 1 2 Figure 2: Front Panel C607436 8-6 HP DesignJets 1050C and 1055CM Printers Service Manual Switch off the printer and remove the power cable. 1. "Right...
... Right Hand Cover (item 3) (Refer to the User Guide). The Front Panel Assembly and the Front-Panel Assembly Cable can be properly installed. Front Panel Assembly WARNING Removal 1. Remove the Printhead Cleaners (Refer to Figure 2). 3 1 2 Figure 2: Front Panel C607436 8-6 HP DesignJets 1050C and 1055CM Printers Service Manual Switch off the printer and remove the power cable. 1. "Right...
Service Manual
Page 216
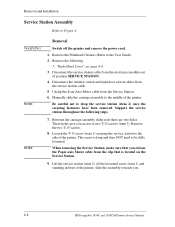
... front of position SERVICE STATION. 4. "Right Hand Cover" see page 8-4. 3. These holes give you . 8-8 HP DesignJets 1050C and 1055CM Printers Service Manual Disconnect the window switch and right door switch cables from the Service Station. 6. Be careful not to the User Guide). 2. Loosen the T-15 screw (item 1) securing the service station to be fully loosened. Disconnect...
... front of position SERVICE STATION. 4. "Right Hand Cover" see page 8-4. 3. These holes give you . 8-8 HP DesignJets 1050C and 1055CM Printers Service Manual Disconnect the window switch and right door switch cables from the Service Station. 6. Be careful not to the User Guide). 2. Loosen the T-15 screw (item 1) securing the service station to be fully loosened. Disconnect...

Service Manual
Page 218
...8-4. 2. Disconnect the Drop Detector cable from the Service Station. 1 2 3 Figure 5: Drop Detector Assembly C607436 8-10 HP DesignJets 1050C and 1055CM Printers Service Manual Remove the Drop Detector from the Service Station Cable. 4. Remove the following 1. Remove the screw (item 1)... Assembly (item 2) to Figure 5. WARNING Removal Switch off the printer and remove the power cord. 1. Removal and Installation Drop Detector Assembly Refer to the Service Station (item 3). 5. Remove the Printhead Cleaners (Refer to the User Guide). 2. "Right Hand Cover" see page 8-8. 3.
...8-4. 2. Disconnect the Drop Detector cable from the Service Station. 1 2 3 Figure 5: Drop Detector Assembly C607436 8-10 HP DesignJets 1050C and 1055CM Printers Service Manual Remove the Drop Detector from the Service Station Cable. 4. Remove the following 1. Remove the screw (item 1)... Assembly (item 2) to Figure 5. WARNING Removal Switch off the printer and remove the power cord. 1. Removal and Installation Drop Detector Assembly Refer to the Service Station (item 3). 5. Remove the Printhead Cleaners (Refer to the User Guide). 2. "Right Hand Cover" see page 8-8. 3.

Service Manual
Page 221
Open the door at the back of the printer. 1. Removal and Installation Left Hand Cover Refer to Figure 8 to Figure 8). 1 Figure 8: Left Hand Cover HP DesignJets 1050C and 1055CM Printers Service Manual 8-13 Working from the rear of the left hand cover by removing the two T-15 screws (item 1) (refer to Figure 15. Remove the Ink Cartridges (Refer to the User Guide). WARNING NOTE Removal 1. Switch off the printer and remove the power cord.
Open the door at the back of the printer. 1. Removal and Installation Left Hand Cover Refer to Figure 8 to Figure 8). 1 Figure 8: Left Hand Cover HP DesignJets 1050C and 1055CM Printers Service Manual 8-13 Working from the rear of the left hand cover by removing the two T-15 screws (item 1) (refer to Figure 15. Remove the Ink Cartridges (Refer to the User Guide). WARNING NOTE Removal 1. Switch off the printer and remove the power cord.
Service Manual
Page 227
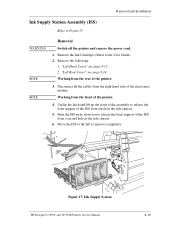
... to release the front support of the ISS from a hole in the side chassis. 6. Figure 17: Ink Supply System HP DesignJets 1050C and 1055CM Printers Service Manual 8-19 Move the ISS to the left to the User Guide). 2. Remove the following: 1. "Left Rear Cover" see page 8-13. 2. Remove the Ink Cartridges (Refer to remove completely. Removal...
... to release the front support of the ISS from a hole in the side chassis. 6. Figure 17: Ink Supply System HP DesignJets 1050C and 1055CM Printers Service Manual 8-19 Move the ISS to the left to the User Guide). 2. Remove the following: 1. "Left Rear Cover" see page 8-13. 2. Remove the Ink Cartridges (Refer to remove completely. Removal...
Service Manual
Page 228
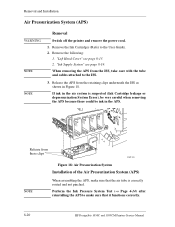
... tube and cables attached to the User Guide). 2. If ink in the air system is correctly routed and not pinched. Remove the following: 1. Perform the Ink Pressure System Test (⇒ Page 4-14) after reinstalling the APS to make sure that it functions correctly. 8-20 HP DesignJets 1050C and 1055CM Printers Service Manual Remove the Ink Cartridges...
... tube and cables attached to the User Guide). 2. If ink in the air system is correctly routed and not pinched. Remove the following: 1. Perform the Ink Pressure System Test (⇒ Page 4-14) after reinstalling the APS to make sure that it functions correctly. 8-20 HP DesignJets 1050C and 1055CM Printers Service Manual Remove the Ink Cartridges...


