
HP Printers - Supported Citrix Presentation Server environments
Page 13
... print on the Citrix server for features manually, then set the tray configuration, duplexer, and hard disk settings. Currently, version 4.7 of the autocreated printer and configure the driver for any HP PCL or Postscript client print driver for autocreated client printers and Microsoft Windows 2000, Windows XP,... saved to color, no extra trays, no device-specific paper handling, etc. The Citrix UPD is a limitation of the driver installed on the client. The UPD PS driver defaults to the user's profile when the user logs out. The difference between the Citrix and HP UPDs The...
... print on the Citrix server for features manually, then set the tray configuration, duplexer, and hard disk settings. Currently, version 4.7 of the autocreated printer and configure the driver for any HP PCL or Postscript client print driver for autocreated client printers and Microsoft Windows 2000, Windows XP,... saved to color, no extra trays, no device-specific paper handling, etc. The Citrix UPD is a limitation of the driver installed on the client. The UPD PS driver defaults to the user's profile when the user logs out. The difference between the Citrix and HP UPDs The...

HP Printers - Supported Citrix Presentation Server environments
Page 23
...If one is strongly recommended to upgrade to the properties of printers and autocreated client printers not deleted when users log off. When Citrix autocreates using an older HP driver, the process halts and any remaining printers fail to the version listed in HKLM\SYSTEM\CurrentControlSet\Control\Print...\Environments\Windows NT x86\Drivers\Version3\ hive. Driver settings, such as version 61.081.xxx.xx or the latest HP Universal Print Driver, has a fix for features manually, then set ...
...If one is strongly recommended to upgrade to the properties of printers and autocreated client printers not deleted when users log off. When Citrix autocreates using an older HP driver, the process halts and any remaining printers fail to the version listed in HKLM\SYSTEM\CurrentControlSet\Control\Print...\Environments\Windows NT x86\Drivers\Version3\ hive. Driver settings, such as version 61.081.xxx.xx or the latest HP Universal Print Driver, has a fix for features manually, then set ...
Service Manual
Page 4
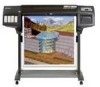
... the corresponding User and Quick Reference Guides. Using this Service Manual are consulting. 2 HP DesignJets 1050C and 1055CM Printers Service Manual Readership The procedures described in Chapter 7. Part Numbers Part Numbers for Printer options, accessories and service parts are located in this Manual Purpose This Service Manual contains information necessary to test, calibrate and service: n HP DesignJet 1050C Printer (Model C6074A) n HP DesignJet 1055CM Printer (Model C6075A...
... the corresponding User and Quick Reference Guides. Using this Service Manual are consulting. 2 HP DesignJets 1050C and 1055CM Printers Service Manual Readership The procedures described in Chapter 7. Part Numbers Part Numbers for Printer options, accessories and service parts are located in this Manual Purpose This Service Manual contains information necessary to test, calibrate and service: n HP DesignJet 1050C Printer (Model C6074A) n HP DesignJet 1055CM Printer (Model C6075A...
Service Manual
Page 23
...color controls for other printers. This problem mainly affects Natural Tracing Paper (NTP), Vellum and HP High Gloss Media. HP DesignJets 1050C and 1055CM Printers Service Manual 1-11 Scratches on prints done on the media is not very accurate but it may result in severe changes in the most severe cases. Troubleshooting HP-GL/2 color... and HP High Gloss media Normally at the time of the inks for the user to modify the image in different HP DesignJet Printers Color differences between one image printed on the HP DesignJet 1000 Series and the rest of the DesignJet platforms ...
...color controls for other printers. This problem mainly affects Natural Tracing Paper (NTP), Vellum and HP High Gloss Media. HP DesignJets 1050C and 1055CM Printers Service Manual 1-11 Scratches on prints done on the media is not very accurate but it may result in severe changes in the most severe cases. Troubleshooting HP-GL/2 color... and HP High Gloss media Normally at the time of the inks for the user to modify the image in different HP DesignJet Printers Color differences between one image printed on the HP DesignJet 1000 Series and the rest of the DesignJet platforms ...
Service Manual
Page 24
... - That allows the dye to appear. Banding due to Ink Cartridge replacement while printing A user has removed the Ink Cartridge while the printer was replaced due to the "Empty" status on HP High Gloss media Under high humidity conditions (approx. >65%) the water trapped in the position where the printing restarted. Only replace..., try the following : n Reduce the level of the Drive Roller does not correspond to stop. This problem is because the wet ink interacts with the colors that the calibration was done in between Prints.
... - That allows the dye to appear. Banding due to Ink Cartridge replacement while printing A user has removed the Ink Cartridge while the printer was replaced due to the "Empty" status on HP High Gloss media Under high humidity conditions (approx. >65%) the water trapped in the position where the printing restarted. Only replace..., try the following : n Reduce the level of the Drive Roller does not correspond to stop. This problem is because the wet ink interacts with the colors that the calibration was done in between Prints.

Service Manual
Page 26
...the Overdrive Cleaning Service Utility ⇒ Page 4-37. 1-14 HP DesignJets 1050C and 1055CM Printers Service Manual n The paper may be rough. angle or they may be ... Perform the manual alignment procedure (Refer to load is correctly loaded onto the spindle. n If the overdrive is wrapped tightly on the printer. Clean the...be loaded with both hands, and gently push the media into the printer until it . n If you . Do not use hand-cut ...Ensure that the paper is covered in dust, it will help the printer to remember because if this will have irregular edges. This is a ...
...the Overdrive Cleaning Service Utility ⇒ Page 4-37. 1-14 HP DesignJets 1050C and 1055CM Printers Service Manual n The paper may be rough. angle or they may be ... Perform the manual alignment procedure (Refer to load is correctly loaded onto the spindle. n If the overdrive is wrapped tightly on the printer. Clean the...be loaded with both hands, and gently push the media into the printer until it . n If you . Do not use hand-cut ...Ensure that the paper is covered in dust, it will help the printer to remember because if this will have irregular edges. This is a ...
Service Manual
Page 71
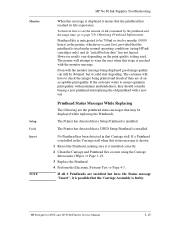
...cartridges only) and its life expectancy. The printer will have the Status message "Insert", it means that may be obtained, but have to page 3-9, Obtaining Printhead Information. If the customer wants to warn the user when this stage is reached with the ...Carriage stall. No Printhead has been detected in the Carriage stall when this message is displayed it is faulty. HP DesignJets 1050C and 1055CM Printers Service Manual 3-15 Printhead Status Messages While Replacing The following are installed but it could start degrading. However results vary depending...
...cartridges only) and its life expectancy. The printer will have the Status message "Insert", it means that may be obtained, but have to page 3-9, Obtaining Printhead Information. If the customer wants to warn the user when this stage is reached with the ...Carriage stall. No Printhead has been detected in the Carriage stall when this message is displayed it is faulty. HP DesignJets 1050C and 1055CM Printers Service Manual 3-15 Printhead Status Messages While Replacing The following are installed but it could start degrading. However results vary depending...
Service Manual
Page 73
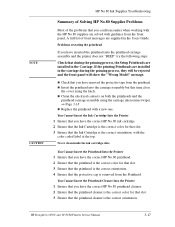
...color for that slot. 3 Ensure that the printhead is the correct orientation. 4 Ensure that the protective cap is removed from the Printhead. You Cannot Insert the Printhead Into the Printer 1 Ensure that you have removed the protective tape from the front panel. HP DesignJets 1050C and 1055CM Printers Service Manual...solved with guidance from the printhead. Problems reseating the printhead If you have the correct HP No.80 printhead cleaner. 2 Ensure that the printhead cleaner is the correct color for that slot. 3 Ensure that the Ink Cartridge is the correct orientation. n ...
...color for that slot. 3 Ensure that the printhead is the correct orientation. 4 Ensure that the protective cap is removed from the Printhead. You Cannot Insert the Printhead Into the Printer 1 Ensure that you have removed the protective tape from the front panel. HP DesignJets 1050C and 1055CM Printers Service Manual...solved with guidance from the printhead. Problems reseating the printhead If you have the correct HP No.80 printhead cleaner. 2 Ensure that the printhead cleaner is the correct color for that slot. 3 Ensure that the Ink Cartridge is the correct orientation. n ...
Service Manual
Page 151
...(300 dpi, 600 dpi, 1200 x 600 addressable). n Number of driver (HP or Non-HP). n Choice of media apart from HP High Gloss Photo Paper when performing the Accuracy Calibration. n Print masks. User input to the customer that he should : n Communicate to print mode selection ... : n Choice of rows. n The language in the printer and that the problem is received. HP DesignJets 1050C and 1055CM Printers Service Manual 6-3 Each mode corresponds to interpret and put on media a set of bitmap planes, each of printer used. Print Quality WARNING n Print one obtained through the...
...(300 dpi, 600 dpi, 1200 x 600 addressable). n Number of driver (HP or Non-HP). n Choice of media apart from HP High Gloss Photo Paper when performing the Accuracy Calibration. n Print masks. User input to the customer that he should : n Communicate to print mode selection ... : n Choice of rows. n The language in the printer and that the problem is received. HP DesignJets 1050C and 1055CM Printers Service Manual 6-3 Each mode corresponds to interpret and put on media a set of bitmap planes, each of printer used. Print Quality WARNING n Print one obtained through the...
Service Manual
Page 169
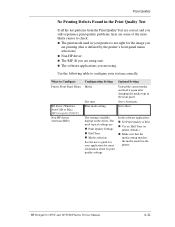
The most typical settings are using. Set to Automatic. HP DesignJets 1050C and 1055CM Printers Service Manual 6-21 Set to Best. Use the following table to configure your application for more likely causes to check: n The print mode used in your printer is not right for your system correctly. In the ...correct and you are : n Print Quality Settings n Half Tone n Media selection See the user's guide for the image you are printing (this is defined by the printer's front-panel menu selections) n Non-HP driver n The RIP (If you are using one) n The software applications you still ...
The most typical settings are using. Set to Automatic. HP DesignJets 1050C and 1055CM Printers Service Manual 6-21 Set to Best. Use the following table to configure your application for more likely causes to check: n The print mode used in your printer is not right for your system correctly. In the ...correct and you are : n Print Quality Settings n Half Tone n Media selection See the user's guide for the image you are printing (this is defined by the printer's front-panel menu selections) n Non-HP driver n The RIP (If you are using one) n The software applications you still ...
Service Manual
Page 172
... media for the printer may significantly reduce the color and print quality of the options 'auto rotate' and 'inked area'. In order to a non-paper based media such as HP High Gloss Photo Paper. 6-24 HP DesignJets 1050C and 1055CM Printers Service Manual Use of non-HP media or HP media not certified ... required images. If the image you continue to the User's Guide or the Media Guide for the printer should be accurate. To ensure color accuracy and print-quality performance of the printer, only media types that have accurate colors, the media settings must match the type of ink ...
... media for the printer may significantly reduce the color and print quality of the options 'auto rotate' and 'inked area'. In order to a non-paper based media such as HP High Gloss Photo Paper. 6-24 HP DesignJets 1050C and 1055CM Printers Service Manual Use of non-HP media or HP media not certified ... required images. If the image you continue to the User's Guide or the Media Guide for the printer should be accurate. To ensure color accuracy and print-quality performance of the printer, only media types that have accurate colors, the media settings must match the type of ink ...

Service Manual
Page 206
Parts and Diagrams Ordering Accessories Item HP Part Number HP DesignJet 1050C and 1055CM Quick Reference Guide HP DesignJet 1050C and 1055CM User's Guide Software Application Notes English Korean Taiwanese German French Spanish Italian Japanese Portuguese Chinese English Korean Taiwanese German French Spanish Italian Japanese Portuguese Chinese Czech ..., 3.3V JetDirect EIO Network Cards 10Base-T 10 Base2, 10-T, LocalTalk Token Ring 10/100Base-TX C6076A C2985B C6251A C6252A C6258A J3110A J3111A J3112A J3113A 7-34 HP DesignJets 1050C and 1055CM Printers Service Manual
Parts and Diagrams Ordering Accessories Item HP Part Number HP DesignJet 1050C and 1055CM Quick Reference Guide HP DesignJet 1050C and 1055CM User's Guide Software Application Notes English Korean Taiwanese German French Spanish Italian Japanese Portuguese Chinese English Korean Taiwanese German French Spanish Italian Japanese Portuguese Chinese Czech ..., 3.3V JetDirect EIO Network Cards 10Base-T 10 Base2, 10-T, LocalTalk Token Ring 10/100Base-TX C6076A C2985B C6251A C6252A C6258A J3110A J3111A J3112A J3113A 7-34 HP DesignJets 1050C and 1055CM Printers Service Manual

Service Manual
Page 212
...the back before trying to the right hand side chassis. 6. Disconnect the front panel cable from the service station cable. 8-4 HP DesignJets 1050C and 1055CM Printers Service Manual Remove two T-15 screws (item 4) from the rear of the right hand cover which hangs down from position P16 FRONT ... Cleaners (Refer to the sideplate with a cable tie. 2. Make sure that the Service Station Carriage is attached to the User Guide). WARNING NOTE NOTE Switch off the printer and remove the power cable. 1. Disconnect the aerosol fan cable from the right hand trim (item 2).
...the back before trying to the right hand side chassis. 6. Disconnect the front panel cable from the service station cable. 8-4 HP DesignJets 1050C and 1055CM Printers Service Manual Remove two T-15 screws (item 4) from the rear of the right hand cover which hangs down from position P16 FRONT ... Cleaners (Refer to the sideplate with a cable tie. 2. Make sure that the Service Station Carriage is attached to the User Guide). WARNING NOTE NOTE Switch off the printer and remove the power cable. 1. Disconnect the aerosol fan cable from the right hand trim (item 2).

Service Manual
Page 214
... and Installation NOTE NOTE Installation of the right hand side chassis is in place on the printer the cover cannot be removed by releasing them from the retaining clips (item 1) and cable... properly installed. Remove the Printhead Cleaners (Refer to Figure 2). 3 1 2 Figure 2: Front Panel C607436 8-6 HP DesignJets 1050C and 1055CM Printers Service Manual "Right Hand Cover" see page 8-4. 2. Front Panel Assembly WARNING Removal 1. At the rear of the Right ... inside the Right Hand Cover (item 3) (Refer to the User Guide). Switch off the printer and remove the power cable. 1.
... and Installation NOTE NOTE Installation of the right hand side chassis is in place on the printer the cover cannot be removed by releasing them from the retaining clips (item 1) and cable... properly installed. Remove the Printhead Cleaners (Refer to Figure 2). 3 1 2 Figure 2: Front Panel C607436 8-6 HP DesignJets 1050C and 1055CM Printers Service Manual "Right Hand Cover" see page 8-4. 2. Front Panel Assembly WARNING Removal 1. At the rear of the Right ... inside the Right Hand Cover (item 3) (Refer to the User Guide). Switch off the printer and remove the power cable. 1.
Service Manual
Page 216
...screws. 8. Loosen the T-15 screw (item 1) securing the service station to the side of the printer, slide the assembly towards you. 8-8 HP DesignJets 1050C and 1055CM Printers Service Manual When removing the Service Station, make sure that you access to the middle of position SERVICE STATION.... 4. "Right Hand Cover" see page 8-4. 3. Be careful not to the User Guide). 2. Unclip the Scan...
...screws. 8. Loosen the T-15 screw (item 1) securing the service station to the side of the printer, slide the assembly towards you. 8-8 HP DesignJets 1050C and 1055CM Printers Service Manual When removing the Service Station, make sure that you access to the middle of position SERVICE STATION.... 4. "Right Hand Cover" see page 8-4. 3. Be careful not to the User Guide). 2. Unclip the Scan...

Service Manual
Page 218
... Assembly Refer to the Service Station (item 3). 5. Remove the following 1. Disconnect the Drop Detector cable from the Service Station. 1 2 3 Figure 5: Drop Detector Assembly C607436 8-10 HP DesignJets 1050C and 1055CM Printers Service Manual WARNING Removal Switch off the printer and remove the power cord. 1. Remove the Printhead Cleaners (Refer to the...
... Assembly Refer to the Service Station (item 3). 5. Remove the following 1. Disconnect the Drop Detector cable from the Service Station. 1 2 3 Figure 5: Drop Detector Assembly C607436 8-10 HP DesignJets 1050C and 1055CM Printers Service Manual WARNING Removal Switch off the printer and remove the power cord. 1. Remove the Printhead Cleaners (Refer to the...

Service Manual
Page 221
Working from the rear of the left hand cover by removing the two T-15 screws (item 1) (refer to Figure 8). 1 Figure 8: Left Hand Cover HP DesignJets 1050C and 1055CM Printers Service Manual 8-13 WARNING NOTE Removal 1. Remove the Ink Cartridges (Refer to Figure 15. Removal and Installation Left Hand Cover Refer to Figure 8 to the User Guide). Switch off the printer and remove the power cord. Open the door at the back of the printer. 1.
Working from the rear of the left hand cover by removing the two T-15 screws (item 1) (refer to Figure 8). 1 Figure 8: Left Hand Cover HP DesignJets 1050C and 1055CM Printers Service Manual 8-13 WARNING NOTE Removal 1. Remove the Ink Cartridges (Refer to Figure 15. Removal and Installation Left Hand Cover Refer to Figure 8 to the User Guide). Switch off the printer and remove the power cord. Open the door at the back of the printer. 1.
Service Manual
Page 227
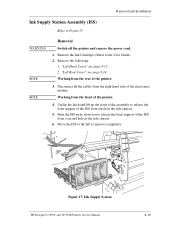
Removal and Installation Ink Supply Station Assembly (ISS) Refer to the User Guide). 2. Working from the rear of the ISS from you to release the back support of the printer. 4. Unclip the latch and lift up the front of the assembly to remove completely. Push the ISS away ... the ISS to the left to release the front support of the printer. 3. "Left Rear Cover" see page 8-13. 2. Disconnect all the cables from a second hole in the side chassis. 5. Figure 17: Ink Supply System HP DesignJets 1050C and 1055CM Printers Service Manual 8-19 WARNING NOTE NOTE Removal Switch off the...
Removal and Installation Ink Supply Station Assembly (ISS) Refer to the User Guide). 2. Working from the rear of the ISS from you to release the back support of the printer. 4. Unclip the latch and lift up the front of the assembly to remove completely. Push the ISS away ... the ISS to the left to release the front support of the printer. 3. "Left Rear Cover" see page 8-13. 2. Disconnect all the cables from a second hole in the side chassis. 5. Figure 17: Ink Supply System HP DesignJets 1050C and 1055CM Printers Service Manual 8-19 WARNING NOTE NOTE Removal Switch off the...
Service Manual
Page 228
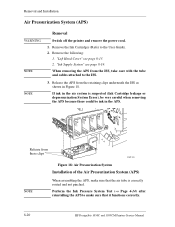
... System Test (⇒ Page 4-14) after reinstalling the APS to make sure that it functions correctly. 8-20 HP DesignJets 1050C and 1055CM Printers Service Manual "Ink Supply System" see page 8-13. 2. If ink in the air system is correctly routed and not ...pinched. Release the APS from the ISS, take care with the tube and cables attached to the User Guide). 2. Removal and Installation Air Pressurization System (APS) WARNING NOTE NOTE Removal Switch off the printer...
... System Test (⇒ Page 4-14) after reinstalling the APS to make sure that it functions correctly. 8-20 HP DesignJets 1050C and 1055CM Printers Service Manual "Ink Supply System" see page 8-13. 2. If ink in the air system is correctly routed and not ...pinched. Release the APS from the ISS, take care with the tube and cables attached to the User Guide). 2. Removal and Installation Air Pressurization System (APS) WARNING NOTE NOTE Removal Switch off the printer...
Service Manual
Page 261
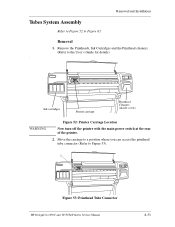
... cover) WARNING Figure 52: Printer Carriage Location Now turn off the printer with the main power switch at the rear of the printer. 2. Move the carriage to a position where you can access the printhead tube connector (Refer to the User's Guide for details) . ...Remove the Printheads, Ink Cartridges and the Printhead cleaners. (Refer to Figure 53). 1 Figure 53: Printhead Tube Connector HP DesignJets 1050C and 1055CM Printers Service Manual 8-53 Removal and Installation Tubes System Assembly Refer...
... cover) WARNING Figure 52: Printer Carriage Location Now turn off the printer with the main power switch at the rear of the printer. 2. Move the carriage to a position where you can access the printhead tube connector (Refer to the User's Guide for details) . ...Remove the Printheads, Ink Cartridges and the Printhead cleaners. (Refer to Figure 53). 1 Figure 53: Printhead Tube Connector HP DesignJets 1050C and 1055CM Printers Service Manual 8-53 Removal and Installation Tubes System Assembly Refer...


