Service Manual
Page 5
...Vacuum Fan 1-9 Vacuum suction much lower at high altitudes 1-9 Bin marks on prints done on HP High Gloss media 1-9 Printhead Crashes/Smears on High Density Prints Using Coated Media 1-10 Color changes when stacking prints done on HP High Gloss Media 1-10 HP-GL/2 color differences in different HP DesignJet Printers......" Table of Contents Table of the Print Quality LEDs on HP Coated media with light area fills 1-13 Solving Media-Handling Problems 1-14 How to Navigate through the Front-Panel Menu 1-15 Service Configuration Print 1-19 HP DesignJets 1050C and 1055CM Printers Service Manual 3
...Vacuum Fan 1-9 Vacuum suction much lower at high altitudes 1-9 Bin marks on prints done on HP High Gloss media 1-9 Printhead Crashes/Smears on High Density Prints Using Coated Media 1-10 Color changes when stacking prints done on HP High Gloss Media 1-10 HP-GL/2 color differences in different HP DesignJet Printers......" Table of Contents Table of the Print Quality LEDs on HP Coated media with light area fills 1-13 Solving Media-Handling Problems 1-14 How to Navigate through the Front-Panel Menu 1-15 Service Configuration Print 1-19 HP DesignJets 1050C and 1055CM Printers Service Manual 3

Service Manual
Page 9
Table of Contents Parts and Diagrams 7-1 Printer Support 7-2 Rear Covers 7-4 Electronics Module 7-6 Right Hand Cover 7-8 Left Hand Cover and Window 7-10 Right Hand Assemblies 7-12 ISS and APS Assembly 7-14 Clutch Assembly 7-... Vacuum Fan 8-11 Paper-axis Motor Assembly 8-12 Left Hand Cover 8-13 Left Hand Trim Assembly 8-18 Ink Supply Station Assembly (ISS) 8-19 Air Pressurization System (APS) 8-20 Clutch Assembly and left hand miscellaneous parts 8-21 Tail Deflectors and Rear Platen 8-23 Left and Right Rear Covers 8-24 HP DesignJets 1050C and 1055CM Printers Service...
Table of Contents Parts and Diagrams 7-1 Printer Support 7-2 Rear Covers 7-4 Electronics Module 7-6 Right Hand Cover 7-8 Left Hand Cover and Window 7-10 Right Hand Assemblies 7-12 ISS and APS Assembly 7-14 Clutch Assembly 7-... Vacuum Fan 8-11 Paper-axis Motor Assembly 8-12 Left Hand Cover 8-13 Left Hand Trim Assembly 8-18 Ink Supply Station Assembly (ISS) 8-19 Air Pressurization System (APS) 8-20 Clutch Assembly and left hand miscellaneous parts 8-21 Tail Deflectors and Rear Platen 8-23 Left and Right Rear Covers 8-24 HP DesignJets 1050C and 1055CM Printers Service...
Service Manual
Page 13
... Shutdowns 1-7 Problems with the Vacuum Fan 1-9 Vacuum suction much lower at high altitudes 1-9 Bin marks on prints done on HP High Gloss media 1-9 Printhead Crashes/Smears on High Density Prints Using Coated Media 1-10 Color changes when stacking prints done on HP High Gloss Media 1-10 HP-GL/2 color differences in different HP DesignJet Printers 1-11 Scratches on prints done...
... Shutdowns 1-7 Problems with the Vacuum Fan 1-9 Vacuum suction much lower at high altitudes 1-9 Bin marks on prints done on HP High Gloss media 1-9 Printhead Crashes/Smears on High Density Prints Using Coated Media 1-10 Color changes when stacking prints done on HP High Gloss Media 1-10 HP-GL/2 color differences in different HP DesignJet Printers 1-11 Scratches on prints done...
Service Manual
Page 19
... the cause of media jams and head crashes (especially head crashes because HP media is still stuck there. 2 Is the customer using HP Coated Media when problem occurred, please also refer to resolve the HP DesignJets 1050C and 1055CM Printers Service Manual 1-7 n If the client has had media jams, it...reported as head crashes. 1 Did the media jam occur when loading media? Refer to push out the media that the Vacuum Fan works correctly - If the media is not HP approved, advise the customer to get stuck in each path will get the message "Switch Power Off" followed by (1),...
... the cause of media jams and head crashes (especially head crashes because HP media is still stuck there. 2 Is the customer using HP Coated Media when problem occurred, please also refer to resolve the HP DesignJets 1050C and 1055CM Printers Service Manual 1-7 n If the client has had media jams, it...reported as head crashes. 1 Did the media jam occur when loading media? Refer to push out the media that the Vacuum Fan works correctly - If the media is not HP approved, advise the customer to get stuck in each path will get the message "Switch Power Off" followed by (1),...

Service Manual
Page 21
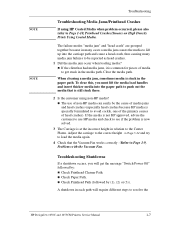
...Vacuum Fan, try the following: 1 With the Printer ON, open the Window of the Printer and place a sheet of HP High Gloss Photo Paper (must be D-Size), aligned with the Printer, to the bin. n Cut Sheet loading problems (high probability). To verify if there really is installed correctly. n Roll Media loading problems (low probability). HP DesignJets 1050C... and 1055CM Printers Service Manual 1-9 In this problem. n Check that the holes in the Center Platen ...
...Vacuum Fan, try the following: 1 With the Printer ON, open the Window of the Printer and place a sheet of HP High Gloss Photo Paper (must be D-Size), aligned with the Printer, to the bin. n Cut Sheet loading problems (high probability). To verify if there really is installed correctly. n Roll Media loading problems (low probability). HP DesignJets 1050C... and 1055CM Printers Service Manual 1-9 In this problem. n Check that the holes in the Center Platen ...

Service Manual
Page 25
... area fills are printed, causing unacceptable Image Quality defect. Cut Sheet rice paper loading failure Thin rice paper is very low (below 30%). PRINTER LIMITATION - Worm marks on the ink density). n Print the Service Configuration Print (⇒ Page 1-19) and check if the level of... Vacuum is causing the problem and NOT the Printer. This implies that the friction between the Center Platen and the rice paper becomes higher than between 10 and 60 minutes depending on HP Coated media with or without area fills. The media is too high. HP DesignJets 1050C and 1055CM Printers Service...
... area fills are printed, causing unacceptable Image Quality defect. Cut Sheet rice paper loading failure Thin rice paper is very low (below 30%). PRINTER LIMITATION - Worm marks on the ink density). n Print the Service Configuration Print (⇒ Page 1-19) and check if the level of... Vacuum is causing the problem and NOT the Printer. This implies that the friction between the Center Platen and the rice paper becomes higher than between 10 and 60 minutes depending on HP Coated media with or without area fills. The media is too high. HP DesignJets 1050C and 1055CM Printers Service...
Service Manual
Page 54
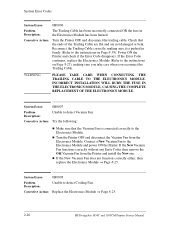
... Trailing Cable. System Error: 0B0007 Problem Description: Unable to the Electronics Module and power ON the Printer. Connect a New Vacuum Fan to detect Vacuum Fan. Corrective Action: Replace the Electronics Module ⇒ Page 8-25. 2-20 HP DesignJets 1050C and 1055CM Printers Service Manual System Error: 0B0008 Problem Description: Unable to the Electronics Module. Corrective Action: Try the...
... Trailing Cable. System Error: 0B0007 Problem Description: Unable to the Electronics Module and power ON the Printer. Connect a New Vacuum Fan to detect Vacuum Fan. Corrective Action: Replace the Electronics Module ⇒ Page 8-25. 2-20 HP DesignJets 1050C and 1055CM Printers Service Manual System Error: 0B0008 Problem Description: Unable to the Electronics Module. Corrective Action: Try the...
Service Manual
Page 184
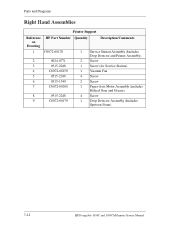
Parts and Diagrams Right Hand Assemblies Printer Support Reference on Drawing HP Part Number Quantity Description/Comments 1 C6072-60178 2 0624-0771 3 0515-2248 4 C6072-60159 5 0515-2248 6 0515-1349 7 C6072-60160 8 0515-2248 9 C6072-60179 1 Service Station Assembly (Includes Drop Detector and Primer Assembly) 2 Screw 1 Screw (for Service Station) 1 Vacuum Fan 4 Screw 2 Screw 1 Paper-Axis Motor Assembly (includes Helical Gear and Grease) 4 Screw 1 Drop Detector Assembly (Includes Spittoon Foam) 7-12 HP DesignJets 1050C and 1055CM Printers Service Manual
Parts and Diagrams Right Hand Assemblies Printer Support Reference on Drawing HP Part Number Quantity Description/Comments 1 C6072-60178 2 0624-0771 3 0515-2248 4 C6072-60159 5 0515-2248 6 0515-1349 7 C6072-60160 8 0515-2248 9 C6072-60179 1 Service Station Assembly (Includes Drop Detector and Primer Assembly) 2 Screw 1 Screw (for Service Station) 1 Vacuum Fan 4 Screw 2 Screw 1 Paper-Axis Motor Assembly (includes Helical Gear and Grease) 4 Screw 1 Drop Detector Assembly (Includes Spittoon Foam) 7-12 HP DesignJets 1050C and 1055CM Printers Service Manual
Service Manual
Page 209
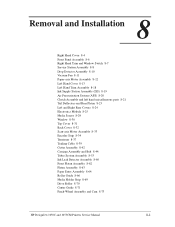
8 Removal and Installation 8 Right Hand Cover 8-4 Front Panel Assembly 8-6 Right Hand Trim and Window Switch 8-7 Service Station Assembly 8-8 Drop Detector Assembly 8-10 Vacuum Fan 8-11 Paper-axis Motor Assembly 8-12 Left Hand Cover 8-13 Left Hand Trim Assembly 8-18 Ink Supply Station Assembly (ISS) 8-19 Air Pressurization System (... Assembly 8-63 Paper Entry Assembly 8-64 Roller Guide 8-66 Media Holder Strip 8-69 Drive Roller 8-70 Center Guide 8-71 Pinch-Wheel Assembly and Cam 8-73 HP DesignJets 1050C and 1055CM Printers Service Manual 8-1
8 Removal and Installation 8 Right Hand Cover 8-4 Front Panel Assembly 8-6 Right Hand Trim and Window Switch 8-7 Service Station Assembly 8-8 Drop Detector Assembly 8-10 Vacuum Fan 8-11 Paper-axis Motor Assembly 8-12 Left Hand Cover 8-13 Left Hand Trim Assembly 8-18 Ink Supply Station Assembly (ISS) 8-19 Air Pressurization System (... Assembly 8-63 Paper Entry Assembly 8-64 Roller Guide 8-66 Media Holder Strip 8-69 Drive Roller 8-70 Center Guide 8-71 Pinch-Wheel Assembly and Cam 8-73 HP DesignJets 1050C and 1055CM Printers Service Manual 8-1

Service Manual
Page 219
Removal and Installation Vacuum Fan Refer to the right hand side chassis and remove the assembly. 1 1 Figure 6: Vacuum Fan 2 C607421 HP DesignJets 1050C and 1055CM Printers Service Manual 8-11 "Service Station Assembly" see page 8-4. 2. Remove the four T-15 screws (item 1) securing the vacuum fan assembly (item 2) to Figure 6. WARNING Removal Switch off the printer and remove the power cord. 1. Disconnect the vacuum fan cable from position P7 VACUUM FAN on the electronics module. 3. Remove the following: 1. "Right Hand Cover" see page 8-8. 2.
Removal and Installation Vacuum Fan Refer to the right hand side chassis and remove the assembly. 1 1 Figure 6: Vacuum Fan 2 C607421 HP DesignJets 1050C and 1055CM Printers Service Manual 8-11 "Service Station Assembly" see page 8-4. 2. Remove the four T-15 screws (item 1) securing the vacuum fan assembly (item 2) to Figure 6. WARNING Removal Switch off the printer and remove the power cord. 1. Disconnect the vacuum fan cable from position P7 VACUUM FAN on the electronics module. 3. Remove the following: 1. "Right Hand Cover" see page 8-8. 2.

Service Manual
Page 279
WARNING Removal Switch off the printer and remove the power cord. 1. "Right Hand Cover" see page 8-19. 5. "Ink Supply System Assembly" see page 8-4. 3. "Electronics module" see page 8-11. 2. "Vacuum Fan" see page 8-25. 4. "Clutch assembly" see page 8-8. 7. Remove the two T-15 screws from the left hand...: 1. Removal and Installation Center Guide Refer to Figure 78 to Figure 78). 1 Figure 78: Left Hand Center Guide Screws C607433 HP DesignJets 1050C and 1055CM Printers Service Manual 8-71 "Left Hand Cover" see page 8-13. 2. Lift up the paper entry assembly. 3.
WARNING Removal Switch off the printer and remove the power cord. 1. "Right Hand Cover" see page 8-19. 5. "Ink Supply System Assembly" see page 8-4. 3. "Electronics module" see page 8-11. 2. "Vacuum Fan" see page 8-25. 4. "Clutch assembly" see page 8-8. 7. Remove the two T-15 screws from the left hand...: 1. Removal and Installation Center Guide Refer to Figure 78 to Figure 78). 1 Figure 78: Left Hand Center Guide Screws C607433 HP DesignJets 1050C and 1055CM Printers Service Manual 8-71 "Left Hand Cover" see page 8-13. 2. Lift up the paper entry assembly. 3.

Service Manual
Page 317
... 3-2 obtaining information 3-9 Problems Color Accuracy 6-22 Color Alignment 6-8 Color Consistency 6-22 Color-to-Color Alignment 6-15 Cover Sensors 1-6 Horizontal Lines 6-17 Line Sensor 1-6 Long Term Color Bleeding 6-22 Media-handling 1-14 Printing lines 6-14 Stepped lines 6-13 Vacuum Fan 1-9 Vacuum suction 1-9 R Rear Covers 7-4 Rear Platen 8-23 Regulatory Notices 10-18 Release Info 4-32 HP DesignJets 1050C and 1055CM Printers Service Manual Index-3
... 3-2 obtaining information 3-9 Problems Color Accuracy 6-22 Color Alignment 6-8 Color Consistency 6-22 Color-to-Color Alignment 6-15 Cover Sensors 1-6 Horizontal Lines 6-17 Line Sensor 1-6 Long Term Color Bleeding 6-22 Media-handling 1-14 Printing lines 6-14 Stepped lines 6-13 Vacuum Fan 1-9 Vacuum suction 1-9 R Rear Covers 7-4 Rear Platen 8-23 Regulatory Notices 10-18 Release Info 4-32 HP DesignJets 1050C and 1055CM Printers Service Manual Index-3
Service Manual
Page 318
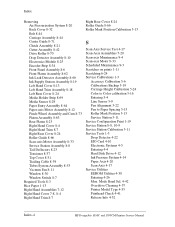
... Check 4-41 Release Info 4-32 Index-4 HP DesignJets 1050C and 1055CM Printers Service Manual Index Removing Air Pressurization System 8-... 8-8 Tail Deflectors 8-23 Tensioner 8-37 Top Cover 8-31 Trailing Cable 8-39 Tubes System Assembly 8-53 Vacuum Fan 8-11 Window 8-30 Window Switch 8-7 Required Tools 8-3 Rice Paper 1-13 Right Hand Assemblies 7-12...1-11 Scratching 6-24 Service Calibrations 1-3 Accuracy Calibration 5-6 Calibrations Backup 5-19 Carriage Height Calibration 5-24 Color to Color calibration 5-16 Entering 5-4 Line Sensor 5-9 Pen Alignment 5-22 Pen to Paper Spacing 5-15 Roller Mark...
... Check 4-41 Release Info 4-32 Index-4 HP DesignJets 1050C and 1055CM Printers Service Manual Index Removing Air Pressurization System 8-... 8-8 Tail Deflectors 8-23 Tensioner 8-37 Top Cover 8-31 Trailing Cable 8-39 Tubes System Assembly 8-53 Vacuum Fan 8-11 Window 8-30 Window Switch 8-7 Required Tools 8-3 Rice Paper 1-13 Right Hand Assemblies 7-12...1-11 Scratching 6-24 Service Calibrations 1-3 Accuracy Calibration 5-6 Calibrations Backup 5-19 Carriage Height Calibration 5-24 Color to Color calibration 5-16 Entering 5-4 Line Sensor 5-9 Pen Alignment 5-22 Pen to Paper Spacing 5-15 Roller Mark...
Service Manual
Page 319
... 8-23 Tensioner 8-37 Top Cover 8-31 Trailing Cable 8-39 Troubleshooting Shutdowns 1-7 System Error Codes 1-2 Tubes Guide Assemblies 7-32 Tubes Purge 4-28 Tubes System 8-53, 10-6 V Vacuum Fan 8-11 W Window 7-10, 8-30 Window Switch 8-7 Wiper 10-10 Worm marks 1-13 HP DesignJets 1050C and 1055CM Printers Service Manual Index-5
... 8-23 Tensioner 8-37 Top Cover 8-31 Trailing Cable 8-39 Troubleshooting Shutdowns 1-7 System Error Codes 1-2 Tubes Guide Assemblies 7-32 Tubes Purge 4-28 Tubes System 8-53, 10-6 V Vacuum Fan 8-11 W Window 7-10, 8-30 Window Switch 8-7 Wiper 10-10 Worm marks 1-13 HP DesignJets 1050C and 1055CM Printers Service Manual Index-5