
Owner's Manual
Page 1
.../1024/1042 GARAGE DOOR OPENERS Installer: Leave this manual with sectional doors. For use only with homeowner. Homelink® and Car2U® compatible For Answers and Assistance: 1.800.354.3643 or visit www.geniecompany.com SAVE THIS MANUAL FOR FUTURE REFERENCE Your Residential Opener... comes with a Rail Assembly which is a registered trademark of Lear Corporation. © The Genie Company 2010. Car2U® is a registered trademark of Johnson Controls Technology...
.../1024/1042 GARAGE DOOR OPENERS Installer: Leave this manual with sectional doors. For use only with homeowner. Homelink® and Car2U® compatible For Answers and Assistance: 1.800.354.3643 or visit www.geniecompany.com SAVE THIS MANUAL FOR FUTURE REFERENCE Your Residential Opener... comes with a Rail Assembly which is a registered trademark of Lear Corporation. © The Genie Company 2010. Car2U® is a registered trademark of Johnson Controls Technology...
Owner's Manual
Page 2
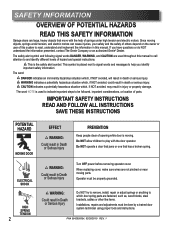
... SHOCK HIGH SPRING TENSION 2 WARNING: Could result in this manual to call attention to play with the help you have questions or do NOT understand the information presented, contact The Genie Company or an authorized Genie® Dealer. PN# 3642036534, 02/26/2010 REV. ...a broken spring. This symbol is used throughout this manual. The safety alert symbol and following signal words DANGER, WARNING, and CAUTION are fastened, such as, wood blocks, steel brackets, cables or other like items. Installations, repairs and adjustments must be followed, important considerations, ...
... SHOCK HIGH SPRING TENSION 2 WARNING: Could result in this manual to call attention to play with the help you have questions or do NOT understand the information presented, contact The Genie Company or an authorized Genie® Dealer. PN# 3642036534, 02/26/2010 REV. ...a broken spring. This symbol is used throughout this manual. The safety alert symbol and following signal words DANGER, WARNING, and CAUTION are fastened, such as, wood blocks, steel brackets, cables or other like items. Installations, repairs and adjustments must be followed, important considerations, ...
Owner's Manual
Page 3
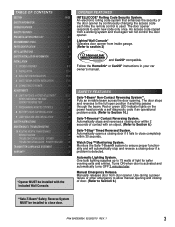
...Section 6.) **Safe-T-Beam® Safety Reverse System MUST be installed with an object. (Refer to section 3) and Car2U® compatible. Follow the Homelink® or Car2U® instructions in your car owner's manual. OPENER FEATURES INTELLICODE® Rolling Code Security System. Lighted Wall... only once. POWER HEAD LED . . . . . 28 TRANSMITTER COMPLIANCE STATEMENT 29 WARRANTY 30 *Opener MUST be installed to allow manual opening . Automatically opens a closing door within 30 seconds. TABLE OF CONTENTS SECTION PAGE SAFETY INFORMATION 2 OPENER FEATURES 3 SAFETY FEATURES 3...
...Section 6.) **Safe-T-Beam® Safety Reverse System MUST be installed with an object. (Refer to section 3) and Car2U® compatible. Follow the Homelink® or Car2U® instructions in your car owner's manual. OPENER FEATURES INTELLICODE® Rolling Code Security System. Lighted Wall... only once. POWER HEAD LED . . . . . 28 TRANSMITTER COMPLIANCE STATEMENT 29 WARRANTY 30 *Opener MUST be installed to allow manual opening . Automatically opens a closing door within 30 seconds. TABLE OF CONTENTS SECTION PAGE SAFETY INFORMATION 2 OPENER FEATURES 3 SAFETY FEATURES 3...

Owner's Manual
Page 13
Getting started. • Position assembled rail on the garage construction, extra framing material (not provided) which may be installed using a stud finder or similar device. Attach angle iron (not provided) to joists or trusses through finish material using (provided) lag... level or power head slightly below level. • Securely tighten power head mounting bolts and nuts. • Carefully raise and lower door manually. NOTE: Refer to your local building codes for appropriate framing materials and construction techniques. • Attach mounting straps (not provided) to ceiling...
Getting started. • Position assembled rail on the garage construction, extra framing material (not provided) which may be installed using a stud finder or similar device. Attach angle iron (not provided) to joists or trusses through finish material using (provided) lag... level or power head slightly below level. • Securely tighten power head mounting bolts and nuts. • Carefully raise and lower door manually. NOTE: Refer to your local building codes for appropriate framing materials and construction techniques. • Attach mounting straps (not provided) to ceiling...
Owner's Manual
Page 16
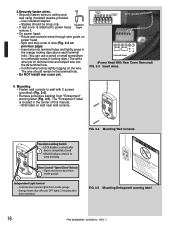
... after 1 door is completely closed - Insulated • If rear cover is located in the terminal hole. • Do NOT install rear cover yet. Locking Clips Terminal Holes 6 54 321 wire guide 6 54 3 21 +- UNLOCK allows controls to power head,...closes door from 2 inside garage - Split and strip ends of this manual. - LOCK disables controls after door activation FIG. 3-5 DCheailAeNNItdfhmleewpcTovveeaeaeerrsIIPRrnyffMgsrrtlesodasoboefdpocllueeeeeeononnrektrnrttto1ecwoeifi/parccoaryseyi-...
... after 1 door is completely closed - Insulated • If rear cover is located in the terminal hole. • Do NOT install rear cover yet. Locking Clips Terminal Holes 6 54 321 wire guide 6 54 3 21 +- UNLOCK allows controls to power head,...closes door from 2 inside garage - Split and strip ends of this manual. - LOCK disables controls after door activation FIG. 3-5 DCheailAeNNItdfhmleewpcTovveeaeaeerrsIIPRrnyffMgsrrtlesodasoboefdpocllueeeeeeononnrektrnrttto1ecwoeifi/parccoaryseyi-...
Owner's Manual
Page 21
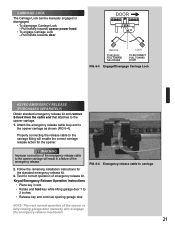
...opening garage door. Keyed Emergency Release Operation Instructions • Place key in a failure of the opener or fully closing garage door manually will enable the correct carriage release action for the opener. NOTE: The next normal operation of the emergency release. 2. Pull handle... towards opener power head. • To engage Carriage Lock - Follow the remaining installation instructions for correct operation of the emergency release cable to the carriage fitting will re-engage the emergency release mechanism. 21 CARRIAGE LOCK...
...opening garage door. Keyed Emergency Release Operation Instructions • Place key in a failure of the opener or fully closing garage door manually will enable the correct carriage release action for the opener. NOTE: The next normal operation of the emergency release. 2. Pull handle... towards opener power head. • To engage Carriage Lock - Follow the remaining installation instructions for correct operation of the emergency release cable to the carriage fitting will re-engage the emergency release mechanism. 21 CARRIAGE LOCK...

Owner's Manual
Page 23
... to Part 15 of opening while door is connected. • Consult your car owner's manual. This equipment generates, uses and can radiate radio frequency energy and, if not installed and used in accordance with opener, including wall button, remote control, or Wireless Keypad. ...opener could begin to radio communications. NOTE: This opener can you program 1 button to provide reasonable protection against harmful interference in a particular installation. Program each button. - Door will stop . • Press button again. - Clear memory. • Press and hold learn ...
... to Part 15 of opening while door is connected. • Consult your car owner's manual. This equipment generates, uses and can radiate radio frequency energy and, if not installed and used in accordance with opener, including wall button, remote control, or Wireless Keypad. ...opener could begin to radio communications. NOTE: This opener can you program 1 button to provide reasonable protection against harmful interference in a particular installation. Program each button. - Door will stop . • Press button again. - Clear memory. • Press and hold learn ...


