
Owner's Manual
Page 1
... for up to close door. Homelink® and Car2U® compatible For Answers and Assistance: 1.800.354.3643 or visit www.geniecompany.com SAVE THIS MANUAL FOR FUTURE REFERENCE Your Residential Opener comes with sectional doors. Homelink® is a registered trademark of Johnson Controls Technology Company. Car2U® is a registered trademark...
... for up to close door. Homelink® and Car2U® compatible For Answers and Assistance: 1.800.354.3643 or visit www.geniecompany.com SAVE THIS MANUAL FOR FUTURE REFERENCE Your Residential Opener comes with sectional doors. Homelink® is a registered trademark of Johnson Controls Technology Company. Car2U® is a registered trademark...
Owner's Manual
Page 2
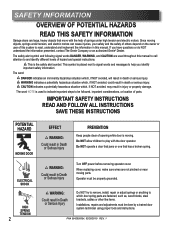
...which , if NOT avoided, could result in injury or property damage. ELECTRICAL SHOCK HIGH SPRING TENSION 2 WARNING: Could result in this manual to call attention to read, understand and implement the information in Death or Serious Injury Turn OFF power before removing operator cover. WARNING ... Genie® Dealer. This is moving. PN# 3642036534, 02/26/2010 REV. 1 The safety alert symbol and following signal words DANGER, WARNING, and CAUTION are not pinched or near moving objects, springs under high tension and electric motors. This symbol is used throughout this manual....
...which , if NOT avoided, could result in injury or property damage. ELECTRICAL SHOCK HIGH SPRING TENSION 2 WARNING: Could result in this manual to call attention to read, understand and implement the information in Death or Serious Injury Turn OFF power before removing operator cover. WARNING ... Genie® Dealer. This is moving. PN# 3642036534, 02/26/2010 REV. 1 The safety alert symbol and following signal words DANGER, WARNING, and CAUTION are not pinched or near moving objects, springs under high tension and electric motors. This symbol is used throughout this manual....
Owner's Manual
Page 3
... Safe-T-Reverse® Contact Reversing System. Monitors the Safe-T-Beam® system to ensure proper functionality and will not control the door opener. Manual Emergency Release. POWER HEAD LED . . . . . 28 TRANSMITTER COMPLIANCE STATEMENT 29 WARRANTY 30 *Opener MUST be installed to section 3) ... (Refer to close completely within 2 seconds of the door opener by continuously changing the access code each new code only once. Manually releases door from door opener. Use during a power failure or other emergency to Section 6.) Safe-T-Stop® Timed Reversed System...
... Safe-T-Reverse® Contact Reversing System. Monitors the Safe-T-Beam® system to ensure proper functionality and will not control the door opener. Manual Emergency Release. POWER HEAD LED . . . . . 28 TRANSMITTER COMPLIANCE STATEMENT 29 WARRANTY 30 *Opener MUST be installed to section 3) ... (Refer to close completely within 2 seconds of the door opener by continuously changing the access code each new code only once. Manually releases door from door opener. Use during a power failure or other emergency to Section 6.) Safe-T-Stop® Timed Reversed System...

Owner's Manual
Page 6
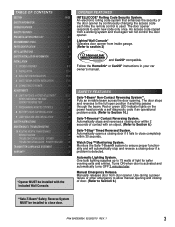
nch ob ect (o 2x4 aid a ) on oo I doo a ls to eve se on con act ad ust opene I opene s ill a ls to you owne s manual ace - Safety Brochures ARRANGING BOX CONTENTS FOR ASSEMBLY ORGANISATION DU CONTENU DE LA BOÎTE POUR LE MONTAGE DISPOS CIÓN DEL CONTEN DO ... r de a ch îne D spo ga os r e e en l n a y es re a c m s de p ás co f era de a c dena Fo low nst uct ons n he nsta la ion Manual for a sembly teps Proc der se on pour es ét pes de montage à su v e Box Contents Sheet Adjustable wrench Wire strippers 1/4", 7/16", 3/8" and 1/2" Sockets...
nch ob ect (o 2x4 aid a ) on oo I doo a ls to eve se on con act ad ust opene I opene s ill a ls to you owne s manual ace - Safety Brochures ARRANGING BOX CONTENTS FOR ASSEMBLY ORGANISATION DU CONTENU DE LA BOÎTE POUR LE MONTAGE DISPOS CIÓN DEL CONTEN DO ... r de a ch îne D spo ga os r e e en l n a y es re a c m s de p ás co f era de a c dena Fo low nst uct ons n he nsta la ion Manual for a sembly teps Proc der se on pour es ét pes de montage à su v e Box Contents Sheet Adjustable wrench Wire strippers 1/4", 7/16", 3/8" and 1/2" Sockets...

Owner's Manual
Page 13
... or trusses. b) Be level or power head slightly below level. • Securely tighten power head mounting bolts and nuts. • Carefully raise and lower door manually. Getting started. • Position assembled rail on step-ladder to header bracket. CLEVIS PIN COTTER PIN NOTE: For nuts, bolts, and lag screws locate Bag...
... or trusses. b) Be level or power head slightly below level. • Securely tighten power head mounting bolts and nuts. • Carefully raise and lower door manually. Getting started. • Position assembled rail on step-ladder to header bracket. CLEVIS PIN COTTER PIN NOTE: For nuts, bolts, and lag screws locate Bag...
Owner's Manual
Page 16
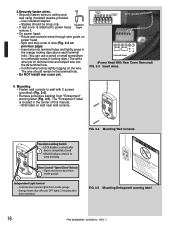
... after 1 door is attached to wall with 2 screws (provided) (Fig. 3-4). • Remove protective backing from "Entrapment" warning label (Fig. 3-5). Split and strip ends of this manual. - Insert wire into the #2 terminal hole. - FIG. 3-4 Mounting Wall Console. or. ©1999 Mounting Entrapment warning label. 16 PN# 3642036534, 02/26/2010 REV. 1 Use...
... after 1 door is attached to wall with 2 screws (provided) (Fig. 3-4). • Remove protective backing from "Entrapment" warning label (Fig. 3-5). Split and strip ends of this manual. - Insert wire into the #2 terminal hole. - FIG. 3-4 Mounting Wall Console. or. ©1999 Mounting Entrapment warning label. 16 PN# 3642036534, 02/26/2010 REV. 1 Use...

Owner's Manual
Page 20
... Move in the UP direction. 3. LED Indicator Light Open Open Set Limit Travel Limit Button Up Force OPEN Control Adjustment To Garage Door SET LEARN MANUAL LIMIT FORCE SET Learn Code CODE Button Close Travel Limit Close CLOSE Down Force Set Limit Control Button Adjustment FIG. 6-1 Limit controls. You can also...
... Move in the UP direction. 3. LED Indicator Light Open Open Set Limit Travel Limit Button Up Force OPEN Control Adjustment To Garage Door SET LEARN MANUAL LIMIT FORCE SET Learn Code CODE Button Close Travel Limit Close CLOSE Down Force Set Limit Control Button Adjustment FIG. 6-1 Limit controls. You can also...
Owner's Manual
Page 21
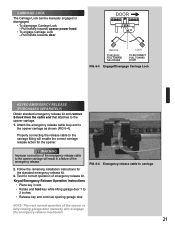
... loop end to the opener carriage. 1. Properly connecting the release cable to carriage. Test for correct operation of the opener or fully closing garage door manually will re-engage the emergency release mechanism. 21 Keyed Emergency Release Operation Instructions • Place key in a failure of the emergency release cable to the... 1 to 2 inches. • Release key and continue opening garage door. Follow the remaining installation instructions for the opener. CARRIAGE LOCK The Carriage Lock can be manually engaged or disengaged. • To disengage Carriage Lock -
... loop end to the opener carriage. 1. Properly connecting the release cable to carriage. Test for correct operation of the opener or fully closing garage door manually will re-engage the emergency release mechanism. 21 Keyed Emergency Release Operation Instructions • Place key in a failure of the emergency release cable to the... 1 to 2 inches. • Release key and continue opening garage door. Follow the remaining installation instructions for the opener. CARRIAGE LOCK The Carriage Lock can be manually engaged or disengaged. • To disengage Carriage Lock -

Owner's Manual
Page 23
...8226; Connect the opener into an outlet on power head) for use with 1 door. To Garage Door SET LOST OR STOLEN REMOTE LEARN MANUAL LIMIT FORCE 1. SET Learn Code CODE Button Close Travel Limit Close CLOSE Down Force Set Limit Control Button Adjustment FIG. 7-1 Learn code ...pulling the Emergency Release. However, there is no longer recognize any other which the receiver is connected. • Consult your car owner's manual. LED Indicator Light Open Open Set Limit Travel Limit Button Up Force OPEN Control Adjustment NOTE: The door will stop automatically at a rate...
...8226; Connect the opener into an outlet on power head) for use with 1 door. To Garage Door SET LOST OR STOLEN REMOTE LEARN MANUAL LIMIT FORCE 1. SET Learn Code CODE Button Close Travel Limit Close CLOSE Down Force Set Limit Control Button Adjustment FIG. 7-1 Learn code ...pulling the Emergency Release. However, there is no longer recognize any other which the receiver is connected. • Consult your car owner's manual. LED Indicator Light Open Open Set Limit Travel Limit Button Up Force OPEN Control Adjustment NOTE: The door will stop automatically at a rate...
Owner's Manual
Page 25
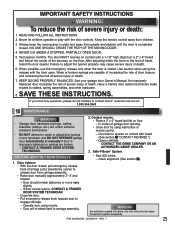
...8226; Garage door hardware (springs, cables, brackets, pulleys, etc.) are under extreme pressure and tension. • DO NOT attempt to contact Genie® customer service at the center of severe injury or death. 7. NO ONE SHOULD CROSS THE PATH OF THE MOVING DOOR. 4. Weak or... Door balance. • With the door closed . Door should remain stationary or move very slightly. - See your garage door Owner's Manual. CONTACT A TRAINED DOOR SYSTEM TECHNICIAN. 2. Opener still fails CONTACT THE GENIE COMPANY OR AN AUTHORIZED GENIE® DEALER. 3. READ AND FOLLOW ALL INSTRUCTIONS. 2.
...8226; Garage door hardware (springs, cables, brackets, pulleys, etc.) are under extreme pressure and tension. • DO NOT attempt to contact Genie® customer service at the center of severe injury or death. 7. NO ONE SHOULD CROSS THE PATH OF THE MOVING DOOR. 4. Weak or... Door balance. • With the door closed . Door should remain stationary or move very slightly. - See your garage door Owner's Manual. CONTACT A TRAINED DOOR SYSTEM TECHNICIAN. 2. Opener still fails CONTACT THE GENIE COMPANY OR AN AUTHORIZED GENIE® DEALER. 3. READ AND FOLLOW ALL INSTRUCTIONS. 2.

