Genie ProMax Stealth Support and Manuals
Get Help and Manuals for this Genie item

View All Support Options Below
Free Genie ProMax Stealth manuals!
Problems with Genie ProMax Stealth?
Ask a Question
Free Genie ProMax Stealth manuals!
Problems with Genie ProMax Stealth?
Ask a Question
Most Recent Genie ProMax Stealth Questions

What Is The New Model Replacement For A Pmx1200. How Much Hp
(Posted by Realestateroger 3 years ago)

Remote Replacement
I need to replace a lost remote but I don't know what remote is compatible with my Genie pro. I have...
I need to replace a lost remote but I don't know what remote is compatible with my Genie pro. I have...
(Posted by andrea85thomas 6 years ago)

Forhandler I Danmark Genie Pro Stealth
forhandler i danmarkgenie pro stealth
forhandler i danmarkgenie pro stealth
(Posted by len28923 8 years ago)

Promax Stealth Anx700
we have a Promax Stealth garage door opener model ANX700. We are trying to figure out how to program...
we have a Promax Stealth garage door opener model ANX700. We are trying to figure out how to program...
(Posted by sandrachurch 9 years ago)
Popular Genie ProMax Stealth Manual Pages
Owner's Manual - Page 1

...AND LENS INSTALLATION 26
MAINTENANCE 27
TROUBLESHOOTING GUIDE 28
WIRING DIAGRAM 29
ACCESSORIES 30
WARRANTY 32
Self-diagnostic Electronic Sensory Protection System (SAFE-T-BEAM SYSTEM) MUST Be Installed To Close Door! 3507535556
GPS-IC Series PMX-IC B Series
Automatic
Chain Drive/Belt Drive Garage Door Operator
System
Complete with and SERIES II Electronics
Remote Control
Operator...
Owner's Manual - Page 2
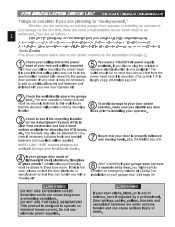
... are replacing an existing garage door operator or installing an operator in the illustrations on page 3.)
1 5 Check your ceiling where the power head of your garage for the first time, there are as follows:
The Genie Company recommends that they can furnish you with your garage door made of light-weight steel, aluminum, fiberglass or glass panels? Additional support...
Owner's Manual - Page 4
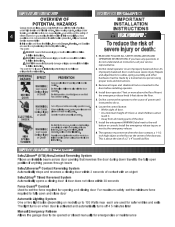
... x 4" board laid flat. READ AND FOLLOW ALL SAFETY, INSTALLATION AND OPERATION INSTRUCTIONS. ELESCHTORCIKCAL SWCeoraAironRDuCNseaIaINnuthjGsuer:y
Turn off 4 5 minutes later Manual Emergency Release Allows the garage door to be made by model)
Safe-T-Beam® (STB) Non-Contact Reversing System Places an invisible beam across door opening that reverses the door during down travel to the fully...
Owner's Manual - Page 6
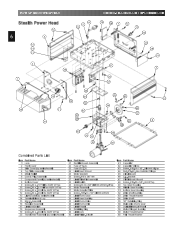
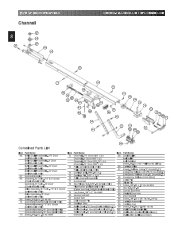
... Drive Worm Gear 57 Optical Interrupt Wheel 58 Motor Flanged Bushing 59 Motor Thrust Washer 60 Poly Thrust Washer Assembly 16 Receiver Assembly 17 Limit Set Switch 18 Sequencer Assembly 19 Screw, #6 x .38 Slt Hx Hd/W Sf Tap 20 Transformer Assembly (by series/model) 14 Terminal Block & Lug 15 M.O.V. PARTS IDENTIFICATION
Stealth Power Head
12
6
3
15 14 12
2 20
1
6 5 4
FOR...
Owner's Manual - Page 7
... 59 60 59
61 59 58
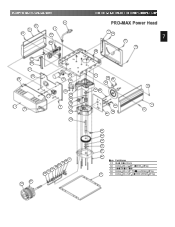
FOR HELP-1.800.354.3643 OR GENIECOMPANY.COM
PRO-MAX Power Head
7 12
7
12
11 48
4 39 40
37 52 64
65 28 63
12
3 12
55 56 53
52
51
62
Item Part Name
61 Main Drive Worm
62 Screw, #8 x 3-1/8" Slot HH, Sf Tap
63 Limit...
Owner's Manual - Page 8
... Parts List
Item Part Name
Item Part Name
Item Part Name
66 Belt & Bullet Assembly - 7'6" Door (Belt Models Only) Belt & Bullet Assembly - 8' Door (Belt Models Only) Belt & Bullet Assembly - 10' Door (Belt Models Only) Belt & Bullet Assembly - 12' Door (Belt Models Only)
67 Sprocket Bushing 68 Sprocket, 10 Tooth - 7'6" & 8' Doors
(Chain Models Only) Sprocket, 12 Tooth - 10' Door (Chain Models...
Owner's Manual - Page 14
...,rrmiwaoiltsdhnifaiecneaydtieqodun.esPsmtlieoaanysse
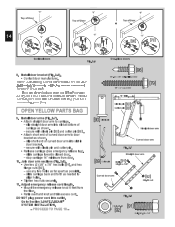
OPEN YELLOW PARTS BAG
[96]
1/4"-20 x 3/4" Self-Drilling Screw 1/4" x 2" Lag Screw
[79]
14" MIN. slide stop
carriage carriage
towards closed door. 14" minimum from
• Retie overhand knot and trim excess cord. PROCEED TO PAGE 18 -
[90]Clevis pin
Straight door arm
Curved door arm
[89]Cotter pin
Fig. 2-7
Straight door arm
B3...
Owner's Manual - Page 17
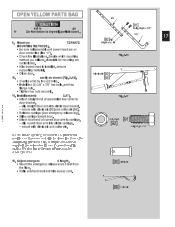
...). OPEN YELLOW PARTS BAG Str
CAUTION
ket m
ge
[91]
Bolt, 3/8-16 x 7/8"
fr Do Not fasten to
door bracket.
- Mount po
TERNATE
[92]
3/8-16 nut
17
MOUNTING METHODS).
• Be sure rail assembly and power head are
not included.
• After power head is installed, remove
supporting material.
• Close door.
10.
slip curved door arm into slot in carriage...
Owner's Manual - Page 19
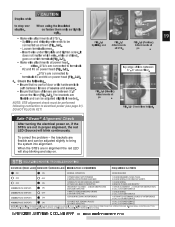
... (REPEAT)
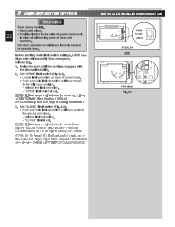
ON
1.SOURCE NOT SENDING PULSES 2.SOURCE DEFECTIVE
1.CALL CUSTOMER SERVICE 2.CALL CUSTOMER SERVICE
NDOOTWEN: IUFNOTPILERDAOTOINRGISPCRLOOBSLEEDM.
FIG. 3-8 (Stealth)
Apttoachments
at STB's.
3
19
-
HOLD WALL CONTROL BUTTON
CUSTOMER SERVICE: 1.800.354.3643 or www.geniecompany.com To correct the problem - and #3 on
STB's power
ahreeacdo(nFniegc.t3e-d8)t.o
terminals...
Owner's Manual - Page 20

...
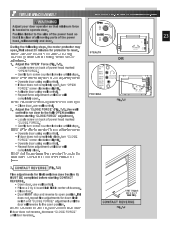
NOTE: Additional wall controls are available from moving parts of door.
- UNLOCK allows controls to permanently mount Label. • Make sure everyone reads and follows WARNINGS.
Shows system is in UNLOCK position - from
3 inside garage
4
-
MORE
OPEN MENT
W1 2
Y3 G4
PUSH TO SET L MITS
Rpoewaer rviheewadof
Power head
terminals 1 2 3 4
White Striped
1
2
Power...
Owner's Manual - Page 22
...
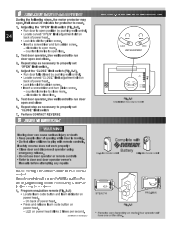
SER E CON ROL
CLOSE MORE
OPEN MORE
CLOSE
OPEN
EIMIT ADJUSTMENT S Patent No 5 243 784 5 221 869
NEC CLASS 2
PUSH BUT ON
1
COM
2
SAF TY BEAM
3
DO N T USH
LMTS U LE S D OR I TT C E
LIM T SET
OPEN FOR E
CLO E FOR E RAD O SIG AL LEA N CODE
4 5 6
MORE FORCE
PRO MAX Fig. 6-1
SE NLESS DOOR IS ATTACHED
LIMIT SET
OPEN FORCE
LOSE E
5 6
MORE FORC...
Owner's Manual - Page 23
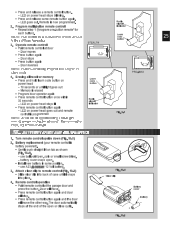
....thSemmalilneirmthuemnfuomrcbeerretqhueirsemdatlolemr tahkee the
3. If door does not reverse, decrease "CLOSE FORCE"
until it stops. FOR HELP-1.800.354.3643 OR GENIECOMPANY.COM
STEALTH
OP N CL SE
OR
LIMIT SET
OPEN FORCE
CLOSE FORCE RADIO SIGNAL LEARN CODE
PRO MAX
MORE FORCE
Fig. 7-1
1
2 NEC
CLASS 2
3
4
MO E
MORE
C OSE
OPEN
L MIT ADJUSTMENT
PUSH TO SET LIM TS
NOTE USE O LY...
Owner's Manual - Page 24
... as necessary to door and door operator owner's
Manuals before attempting any repairs
NcoOnTtrEo:l.Factory sets different codes for protector to play
while door is moving. Your operator will not work properly:
• eCmloesregednocoyr raenledadsies.connect operator using
• •
Do not use door operator or remote controls Refer to properly set
"OPEN" limit switch...
Owner's Manual - Page 25
... CLIP INSTALLATION
1. Battery replacement (your remote control is now programmed.
2.
LED on
tab
as
shown
- LED on power head stops blinking.
• Press and release same remote button again. - battery cover snaps open or
LIMIT ADJUSTMENT
D
U S P t t N 5 43 7 4 5 2 1 869
PRO-MAX
4. use ball point pen, coin or small screwdriver.
- Operate remote control
STEALTH...
Owner's Manual - Page 32

... Number Operator Model Remote Control Model Dealer Name Dealer Address City State Zip
CORRESPONDENCE WITH FACTORY MUST INCLUDE DATE / MFG.
Motor 5 years and all our responsibilities regarding your Genie product.There are Stapteroavnindcep.rovince rights: This warranty gives you specific legal rights, and you
is your Genie product, and it sets forth all other parts 5 years...
Genie ProMax Stealth Reviews
We have not received any reviews for Genie yet.