
Genie ProMax Stealth Support Question
Genie ProMax Stealth Support Question
Find answers below for this question about Genie ProMax Stealth.Need a Genie ProMax Stealth manual? We have 1 online manual for this item!
Question posted by Realestateroger on January 23rd, 2021
What Is The New Model Replacement For A Pmx1200. How Much Hp
The person who posted this question about this Genie product did not include a detailed explanation. Please use the "Request More Information" button to the right if more details would help you to answer this question.
Current Answers
Related Genie ProMax Stealth Manual Pages
Owner's Manual - Page 1
...REFERENCE
Customer Service
CALL: 1-800-354-3643 VISIT: WWW.GENIECOMPANY.com
AUTOMATIC GARAGE DOOR OPERATOR SYSTEMS
HANG MANUAL NEAR YOUR WALL CONTROL
TABLE OF CONTENTS
SECTION
PAGE...
WARRANTY 32
3507535556
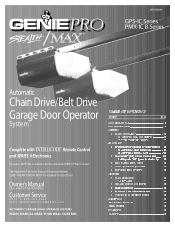
GPS-IC Series PMX-IC B Series
Automatic
Chain Drive/Belt Drive Garage Door Operator
System
Complete with and SERIES II Electronics
Remote Control
Operator MUST be installed with ...
Owner's Manual - Page 2
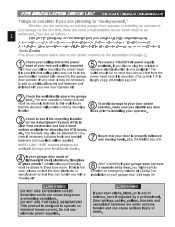
...WARNING BELOW
4 Is your garage door made of your new unit will be mounting the power head standard electrical outlet is the case please contact the door distributor or manufacturer so that... to this is one available? Whether you are replacing an existing garage door operator or installing an operator in
door operator In any door
location
locks prior to installing your operator.
3 Check...
Owner's Manual - Page 4
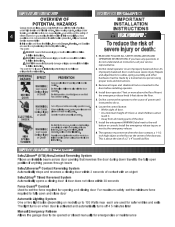
... can result from failure to be made by model)
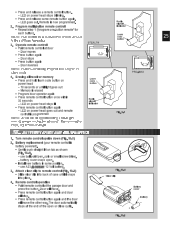
Safe-T-Beam® (STB) Non-Contact Reversing System Places an invisible beam across door opening while door is about the size of a 2" x 4" board laid flat. ELESCHTORCIKCAL SWCeoraAironRDuCNseaIaINnuthjGsuer:y
Turn off 4 5 minutes later Manual Emergency Release Allows the garage door to follow instructions. Install the entrapment WARNING...
Owner's Manual - Page 5

... Pin
N/A
N/A
N/A
N/A
N/A
N/A PARTS IDENTIFICATION
FOR HELP-1.800.354.3643 OR GENIECOMPANY.COM
106
105
125
5
124
104 101 100
126
(varryebmyomteosde)l
103
NOTE: Accessories vary by model.
Owner's Manual - Page 8
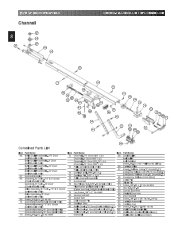
... Door (Belt Models Only) Belt & Bullet Assembly - 8' Door (Belt Models Only) Belt & Bullet Assembly - 10' Door (Belt Models Only) Belt & Bullet Assembly - 12' Door (Belt Models Only)
67 Sprocket Bushing 68 Sprocket, 10 Tooth - 7'6" & 8' Doors
(Chain Models Only) Sprocket, 12 Tooth - 10' Door (Chain Models Only) Drive Sprocket, 18 Tooth - 7'6" & 8' Doors (Belt Models Only) Drive Sprocket - 10' Door...
Owner's Manual - Page 10

... on the rail
FOR HELP-1.800.354.3643 OR GENIECOMPANY.COM
Toward Door
Toward Power Head
Carriage
ERTamegleeragseency ERCmoelreedragseency ERKmenloeebragseency
Fig. 1-1
[69]Hex Head...head to powerhead . • Align mounting holes in this
1.
1...OPERATOR ASSEMBLY
OPEN BLUE PARTS BAG Screws fobraga.ttPalcehaisnegsliegthatscidoevefroraruesienclalutedre. d in front and rear of cord. ...
Owner's Manual - Page 11
...must be made by a trained service person using proper tools and instructions.
3. Use adjusting bolt to the door before installing operator.
4. Mount the emergency release knob 6 feet above the floor. Do Not install operator ... the control button: • Within sight of door. • At a minimum height of 5 feet, so small children cannot reach it
Fig. 1-4
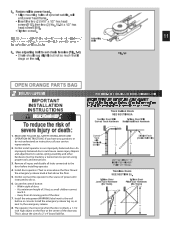
OPEN ORANGE PARTS BAG
2...
Owner's Manual - Page 13
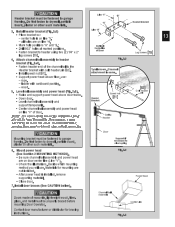
... garage fbroaamrdin,gp.laDsoteNrootrfaosthteenr stoucdhrymwaatlel,rpiaalsrt.icle
Line "V"
"B"
"A"
Header Bracket
3. Channel attachment is on door...power head is installed, remove supporting material. • Close door. 7. wood.
[82]
5. center hole is same.
• Support power head above door tracks.
• Open door. • Level channel/rail assembly and
HBreaacdkeert
Sp[e8e1d...
Owner's Manual - Page 14
... short end of curved door arm into outlet. dsloiporsbhroarctkeent.d of curved door arm to carriage.
-
NlfiogOrhTwt-Ewo:oeSdigedhlfot-dodrroisloliornngolnysl.cyr,ewwhsilearleaginstecnredweds faorreumseeawnitth bccooennrBcteaeqecructnaiyiruneosgdueryadodnouodoroarrdddomdeoiastrin.iogunnfaaslcvmtuaarrtyee,rrmiwaoiltsdhnifaiecneaydtieqodun.esPsmtlieoaanysse
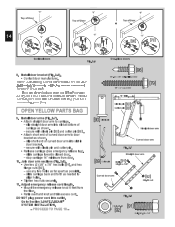
OPEN YELLOW PARTS BAG
[96...
Owner's Manual - Page 15
... rise (Fig. 2-10). • Open door to highest point of travel. • Measure distance from top of door to determine header bracket position. • Draw horizontal line "H" across line "H" at marked positions. • F1/a4s"texn2h"elaagdesrcrberwacsk[e7t9t]o. CAUTION
Hfprlaeamasdtieenrrgo.brDraooctkhNeeotrtmsfauuscsthtenbmetaoftaedsrritayelwnsea. Mark center. &#...
Owner's Manual - Page 17
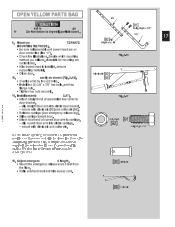
Install assemb
2-17).
slip straight door arm into slot in door bracket.
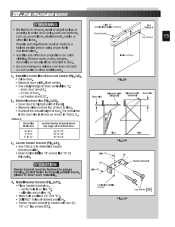
- OPEN YELLOW PARTS BAG Str
CAUTION
ket m
ge
[91]
Bolt, 3/8-16 x 7/8"
fr Do Not fasten to carriage.
- Mount po
TERNATE
[92]
3/8-16 nut
17
MOUNTING METHODS).
&#...
Owner's Manual - Page 18
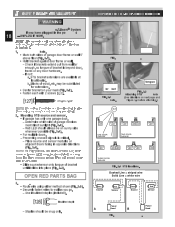
...,wSmaTyoBre
• Sunlitdileitscoluicrkcse/isnetonspolarcoent(oFitgo.n3g-u3e).of bracket
OPEN RED PARTS BAG
3.
• •
RS- Staples...GREEN LED
GREEN LED
RED RED LED LED
GREEN LED
ONE DOOR GARAGE
TWO DOOR GARAGE
GREEN LED
RED RED LED LED
GREEN GREEN LED LED
RED LED
THREE DOOR GARAGE
FIG. 3-4 STB locations. SAFE-T-BEAM® INSTALLATION
WARNING
18...
Owner's Manual - Page 20

...
- Fig. 4-3
OR
#6 x 1-1/4" ws
Fig. 4-2
Lighted Button
- Goes out when Security Lock
Switch is in LOCK position
Door Control Button - Connect white wire to terminal "1" MoOn Epower head and "B" on wall control.
Open and closes door from inside garage
Connect striped wires to terminal "1" Lon power head and "W" on wall control.
- LOCK disables controls after...
Owner's Manual - Page 21
... permanent wiring to green wire location
(GROUND). For Stealth-connect permanent wiring to internal terminal block. •....nM. ake sure
For ProMax-connect permanent wiring. •... damage to the door operator
MUST BE TURNED OFF when power head cover is removed.
Replace power head bottom cover.
• Replace and tighten four ...
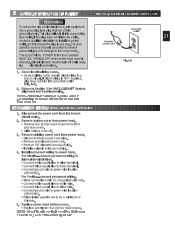
Owner's Manual - Page 22
...
CLO E
O EN
L MIT ADJUSTMENT
PUSH TO SET LIM TS
PUSH TO SET
LIMITSC
STEALTH
ORSE ONLY
IE II CO
NOTE U E ONLY W TH
SER E CON ROL
CLOSE MORE
OPEN MORE
CLOSE
OPEN
EIMIT ADJUSTMENT S Patent No 5 243 784 5 221 869
NEC CLASS 2
PUSH BUT... limit set . Set door operator so minimum force is needed to the fully open position. - MAIN LIMIT SWITCH SETTINGS
WARNING
Door opens rapidly.
22
•...
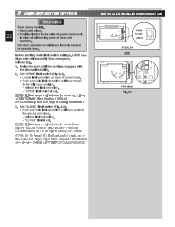
Owner's Manual - Page 23
... Set minimum force required to make door close .
so that minimum force Pthheoaastditi,itoriansilclaaledsadsreeromftboallytlhmaenosdvididneogooprf.athrtespoofwtheer pheoawderso During the following steps, the motor protector may open position.
If does not, repeat fine adjustments for down limit
it sMtOoRps. FOR HELP-1.800.354.3643 OR GENIECOMPANY.COM
STEALTH
OP N CL SE
OR
LIMIT SET...
Owner's Manual - Page 24
...
door open position by pushing wall control.
• Locate curved "CLOSE" limit adjustment slot on model. Test door operator. clockwise to play
while door is moving. Use wall control to open and close less.
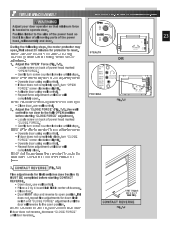
5. Perform CONTACT REVERSE
... with
Battery
One-Button Remote Control*
Multi-Button Remote Control*
NC C A S2
M RE
M RE
LS
N
L M T A J S ME T
P SH OS T L IS
STEALTH...
Owner's Manual - Page 25
... seconds - BATTERY / VISOR CLIP INSTALLATION
1. Battery replacement (your remote control is now programmed.
2. use A23,
12 Volt battery.
3.
ulti-button remote control 3. Door reverses
CLO E
PEN
MORE
ORE
MT
E R
O
M RE
R
RC
D A
CLOS
PEN
N
NclOosTeE:cyDcoloe.r automatically stops at the end of open .
• Install new battery in same position.
- Erasing all receiver...
Owner's Manual - Page 28
... wiring. SOLUTIONS Check lock switch on wall control. Door starts for short and proper wiring.
Odopeesrantoort mruonvse,.but stops before it 's completely open . Wall control button sticking. Check for power head. Check OPEN limit switch for no reason. Replace battery. Check OPEN limit switch setting (See section 8).
fIfreoqnueernecmy ootfencoonn-wtroolrkwinogrkusnaitn...
Owner's Manual - Page 32

... OF INSTALLATION FOR YOUR OWN RECORDS, SO THAT IT WILL BE AVAILABLE IF YOU EVER NEED TO CALL US
Date Purchased Serial Number Operator Model Remote Control Model Dealer Name Dealer Address City State Zip
CORRESPONDENCE WITH FACTORY MUST INCLUDE DATE / MFG. Motor Lifetime* and all other rights which vary from personal...
Similar Questions

What Remote Do I Use For Powerlift Garage Door Opener Model Wr77 Serial No.08258
(Posted by tmski87 3 years ago)

Remote Replacement
I need to replace a lost remote but I don't know what remote is compatible with my Genie pro. I have...
I need to replace a lost remote but I don't know what remote is compatible with my Genie pro. I have...
(Posted by andrea85thomas 6 years ago)

Garage Door Opener Not Working
Green light and red light are on the safety"eye" When pushing wall, remote or key pad the screw driv...
Green light and red light are on the safety"eye" When pushing wall, remote or key pad the screw driv...
(Posted by scanty5 9 years ago)

Promax Stealth Anx700
we have a Promax Stealth garage door opener model ANX700. We are trying to figure out how to program...
we have a Promax Stealth garage door opener model ANX700. We are trying to figure out how to program...
(Posted by sandrachurch 9 years ago)
Pro Max Stealth 1200 Garage Door Will Not Close
Before it would be able to close with 1 touch of the button. Now you have to keep the button pushed ...
Before it would be able to close with 1 touch of the button. Now you have to keep the button pushed ...
(Posted by firelos 11 years ago)