
Genie ProMax Stealth Support Question
Genie ProMax Stealth Support Question
Find answers below for this question about Genie ProMax Stealth.Need a Genie ProMax Stealth manual? We have 1 online manual for this item!
Question posted by andrea85thomas on July 31st, 2017
Remote Replacement
I need to replace a lost remote but I don't know what remote is compatible with my Genie pro. I have a GPS-IC Series PMX-IC Seriers. (3507535556)
Current Answers


Related Genie ProMax Stealth Manual Pages
Owner's Manual - Page 1
...
10 BATTERY & VISOR CLIP INSTALLATION 25
11 LIGHT BULB AND LENS INSTALLATION 26
MAINTENANCE 27
TROUBLESHOOTING GUIDE 28
WIRING DIAGRAM 29
ACCESSORIES 30
WARRANTY 32
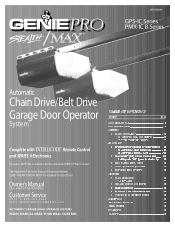
3507535556
GPS-IC Series PMX-IC B Series
Automatic
Chain Drive/Belt Drive Garage Door Operator
System
Complete with and SERIES II Electronics
Remote Control
Operator MUST be installed with the included...
Owner's Manual - Page 2
... the
exact position needed with respect to the garage power head once it is mounted (The cord is 4 ft in
your garage for attaching the STB brackets. They are available through your local Genie Dealer.
7 Insure that they can furnish you with your new door operator kit)
Check the wall directly above the garage
2 door. PRE-INSTALLATION...
Owner's Manual - Page 4
... beam across door opening and closing door For maximum safety set the minimum force required to fully open and close door Automatic Lighting...door contacts a 1-1/2 inch high object on when door is about the size of power until
instructed to follow instructions. ELESCHTORCIKCAL SWCeoraAironRDuCNseaIaINnuthjGsuer:y
Turn off 4 5 minutes later Manual Emergency Release Allows the garage door...
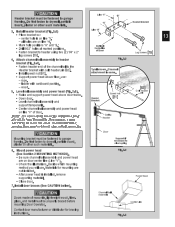
Owner's Manual - Page 10

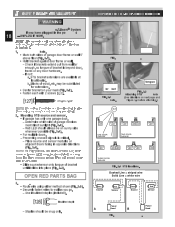
...tie securely. drags on clean, flat surface. 4. 1...OPERATOR ASSEMBLY
OPEN BLUE PARTS BAG Screws fobraga.ttPalcehaisnegsliegthatscidoevefroraruesienclalutedre. Place power head and rail on the... rail
FOR HELP-1.800.354.3643 OR GENIECOMPANY.COM
Toward Door
Toward Power Head
Carriage
ERTamegleeragseency ERCmoelreedragseency ERKmenloeebragseency
Fig. 1-1
[69]Hex Head ...
Owner's Manual - Page 11
... floor. Locate the control button: • Within sight of door. • At a minimum height of 5 feet, so small children cannot reach it
Fig. 1-4
OPEN ORANGE PARTS BAG
2... The operator must be made by a trained... your service representative.
2. Do Not install operator on the floor at the center of the door.
7. Install the emergency release tag on, or next to the wall button or console. ...
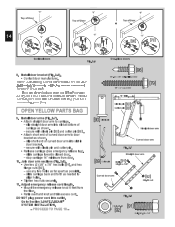
Owner's Manual - Page 13
...you will use :
- center hole is same.
• Support power head above door tracks.
• Open door. • Level channel/rail assembly and
HBreaacdkeert
Sp[e8e1d n]ut
Cold phineader
support... door. 7. wood.
[82]
5. CAshsaenmnebll/yRail
Center Line
Fig. 2-5 ladder with cardboard packing. - CAUTION
Header bracket must be fastened to garage fbroaamrdin,gp....
Owner's Manual - Page 14
.... ase tag).
- -
"V"
Top of Door orte
"V"
Top of Door de la ort
"V"
Top of curved door arm to carriage.
- NlfiogOrhTwt-Ewo:oeSdigedhlfot-dodrroisloliornngolnysl.cyr,ewwhsilearleaginstecnredweds faorreumseeawnitth bccooennrBcteaeqecructnaiyiruneosgdueryadodnouodoroarrdddomdeoiastrin.iogunnfaaslcvmtuaarrtyee,rrmiwaoiltsdhnifaiecneaydtieqodun.esPsmtlieoaanysse
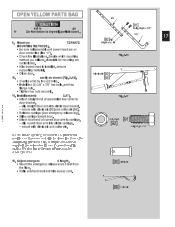
OPEN YELLOW PARTS BAG
[96...
Owner's Manual - Page 15
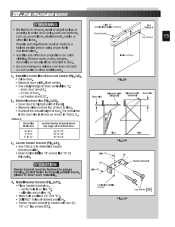
Mark center. • Use straight edge to floor. • Subtract the actual height of door to draw vertical line "V." - Determine door rise (Fig. 2-10). • Open door to highest point of travel. • Measure distance from top of door. The remainder is on line "H." • Mark hole positions ("A" and "B"). • Drill 5/32" holes at this point...
Owner's Manual - Page 17
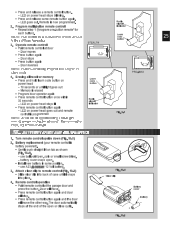
... cotter pin [89].
• Release carriage (See emergency release tag).
• Slide carriage toward door. • Attach short end of assembled door arms to
door bracket.
- Fig. 2-17
• Attach straight end of curved door arm to drywall, particle board,
Cur
9. OPEN YELLOW PARTS BAG Str
CAUTION
ket m
ge
[91]
Bolt, 3/8-16 x 7/8"
fr Do Not...
Owner's Manual - Page 18
....)
RED LED
GREEN LED
GREEN LED
RED RED LED LED
GREEN LED
ONE DOOR GARAGE
TWO DOOR GARAGE
GREEN LED
RED RED LED LED
GREEN GREEN LED LED
RED LED
THREE DOOR GARAGE
FIG. 3-4 STB locations. the
2.
Dashed Line = striped wire Solid Line...,wSmaTyoBre
• Sunlitdileitscoluicrkcse/isnetonspolarcoent(oFitgo.n3g-u3e).of bracket
OPEN RED PARTS BAG
3.
• •
RS-
Owner's Manual - Page 19
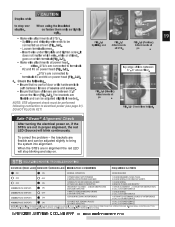
...LED will blink continuously.
FIG. 3-8 (Stealth)
Apttoachments
at .
- FIG. 3-6
FIG. 3-7
Splitting and AttaatcShmTBe.nts
FIG. 3-8 (ProMax)
Apttoachments
at . Check the following ...
to bring the system into alignment.
are between lenses of door or its hardware is in proper alignment, the red LED ...needed. BEAM OBSTRUCTED 3.SENSOR DEFECTIVE
1.CHECK ALIGNMENT 2.
Owner's Manual - Page 20

... UNLOCK position - Away from
3 inside garage
4
- Connect striped wires to terminal "2" on power head and "B" on wall control.
-
om po
ol.
• Place the wall control:
- Vacation Locking Switch
1
- Shows system is completely closed
- Open and closes door from moving parts of door.
-
4... Dr .
1.
In sight of door and
door hardware.
• Use staples to...
Owner's Manual - Page 21
... INSTRUCTIONS FOR ELECTRICIAN
1. For ProMax-connect permanent wiring. •...door
pOowpeerractoorrd
operator must remain off . 3. The ELECTRICAL POWER to green wire location
(GROUND). Fig. 5-1
ing electrical connections.
1. Replace power head bottom cover.
• Replace...
To reduce the risk of
6 inches. 5. For Stealth-connect permanent wiring to internal terminal block. • ...
Owner's Manual - Page 22
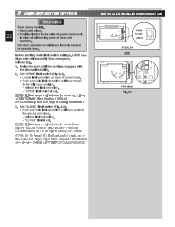
...
PRO MAX Fig. 6-1
SE NLESS DOOR IS ATTACHED
LIMIT SET
OPEN FORCE
LOSE E
5 6
MORE FORC
Set "OPEN" limit switch (Fig 6-1).
• Locate limit set switch on back of power head. • Push and hold limit set switch until door moves
to operate door. NOTE: Do Not push the limit set switch. -
MAIN LIMIT SWITCH SETTINGS
WARNING
Door opens...
Owner's Manual - Page 23
... close, turn screw counterclockwMisOeR until door reverses.
If does not, repeat fine adjustments for protector to open . FORCE ADJUSTMENT
WARNING
Aisdnjuesetdyeodutrodoopoerraotpeedraotoorr. stop and reverse to reset. FOR HELP-1.800.354.3643 OR GENIECOMPANY.COM
STEALTH
OP N CL SE
OR
LIMIT SET
OPEN FORCE
CLOSE FORCE RADIO SIGNAL LEARN CODE
PRO MAX
MORE FORCE
Fig. 7-1
1
2 NEC...
Owner's Manual - Page 24
.... 8-1).
• Run door to open more .
- with
Battery
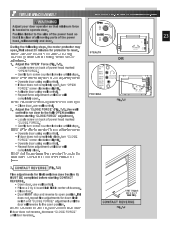
One-Button Remote Control*
Multi-Button Remote Control*
NC C A S2
M RE
M RE
LS
N
L M T A J S ME T
P SH OS T L IS
STEALTH
OTE: E E C TO
LO E ORE
OP N MO E
CL S
PEN
LI IT ADJUST ENT
52374 5 21 6
NC C ASS 2
UH UT
1
OM
2
AE EM
3
4
5
6
I IT ET
PN
O CE
L
E
O NL
E RN E
PRO-MAX
Fig...
Owner's Manual - Page 25
... 10-2 Battery replacement (your remote control is now programmed.
2. battery cover snaps open or
LIMIT ADJUSTMENT
D
U S P t t N 5 43 7 4 5 2 1 869
PRO-MAX
4. Door will move.
• Press remote control button again and door
will stop.
• Press remote control button again and the door
will move the other way. The door automatically
stops at door
- Remote is
battery powered...
Owner's Manual - Page 27

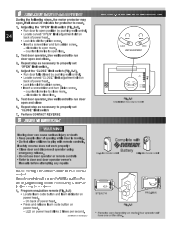
...door by using wall button or remote control. • IsfedeoSorecfatiiolsnto7-rCeOveNrsTeAConT cRoEnVtaEcRt wSEith. NatTicAaCllTy oAr • OUsiledsoiolircoronlelelrusb, rbiceaanritnogrs,ligahntdohili.nges monthly. the board, • ITfHoEpeDraOtoOrRstSillEfaRiVlsI,CreEpDlaBcYe oApPerRaOtoFrEoSr SHIAOVNEAL. DOOR....prethneoRpeermatoeteorCpolnatyrowl iathwathye Door 3 fcATrloHlowmsEaeyMpdse....
Owner's Manual - Page 28
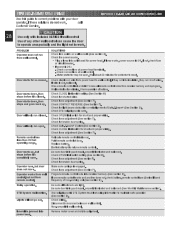
...(See section 3). Check force adjustment (See Section 7). Replace battery.
Be sure door is OK.
SOLUTIONS Check lock switch on wall control....open .
Be sure door is OK:
- Make sure carriage is engaged.
Door starts up . Relocate remote control inside car. Check force adjustment (See section7).
check
battery,
remote
control
type
(Series
II
)
and
Be sure all remote...
Owner's Manual - Page 29
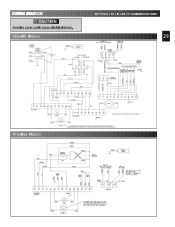
WIRING DIAGRAM CAUTION
Opening cover could cause electrical shock.
(Stealth Motor)
FOR HELP-1.800.354.3643 OR GENIECOMPANY.COM
29
(ProMax Motor)
Similar Questions

What Remote Do I Use For Powerlift Garage Door Opener Model Wr77 Serial No.08258
(Posted by tmski87 3 years ago)

Garage Door Opener Not Working
Green light and red light are on the safety"eye" When pushing wall, remote or key pad the screw driv...
Green light and red light are on the safety"eye" When pushing wall, remote or key pad the screw driv...
(Posted by scanty5 9 years ago)


Promax Stealth Anx700
we have a Promax Stealth garage door opener model ANX700. We are trying to figure out how to program...
we have a Promax Stealth garage door opener model ANX700. We are trying to figure out how to program...
(Posted by sandrachurch 9 years ago)
Pro Max Stealth 1200 Garage Door Will Not Close
Before it would be able to close with 1 touch of the button. Now you have to keep the button pushed ...
Before it would be able to close with 1 touch of the button. Now you have to keep the button pushed ...
(Posted by firelos 11 years ago)